Information injection-pump assembly
BOSCH
9 400 611 809
9400611809
ZEXEL
108822-3284
1088223284

Rating:
Service parts 108822-3284 INJECTION-PUMP ASSEMBLY:
1.
_
5.
AUTOM. ADVANCE MECHANIS
7.
COUPLING PLATE
11.
Nozzle and Holder
23600-3342A
12.
Open Pre:MPa(Kqf/cm2)
14.7{150}/21.6{220}
14.
NOZZLE
Include in #1:
108822-3284
as INJECTION-PUMP ASSEMBLY
Cross reference number
BOSCH
9 400 611 809
9400611809
ZEXEL
108822-3284
1088223284
Zexel num
Bosch num
Firm num
Name
Calibration Data:
Adjustment conditions
Test oil
1404 Test oil ISO4113 or {SAEJ967d}
1404 Test oil ISO4113 or {SAEJ967d}
Test oil temperature
degC
40
40
45
Nozzle and nozzle holder
105780-8250
Bosch type code
1 688 901 101
Nozzle
105780-0120
Bosch type code
1 688 901 990
Nozzle holder
105780-2190
Opening pressure
MPa
20.7
Opening pressure
kgf/cm2
211
Injection pipe
Outer diameter - inner diameter - length (mm) mm 8-3-600
Outer diameter - inner diameter - length (mm) mm 8-3-600
Overflow valve
134424-4120
Overflow valve opening pressure
kPa
255
221
289
Overflow valve opening pressure
kgf/cm2
2.6
2.25
2.95
Tester oil delivery pressure
kPa
255
255
255
Tester oil delivery pressure
kgf/cm2
2.6
2.6
2.6
RED4 control unit part number
407915-0
590
RED4 rack sensor specifications
mm
19
PS/ACT control unit part no.
407980-2
24*
Digi switch no.
41
Direction of rotation (viewed from drive side)
Right R
Right R
Injection timing adjustment
Direction of rotation (viewed from drive side)
Right R
Right R
Injection order
1-8-6-2-
7-5-4-3
Pre-stroke
mm
6.4
6.37
6.43
Beginning of injection position
Drive side NO.1
Drive side NO.1
Difference between angles 1
Cal 1-8 deg. 45 44.75 45.25
Cal 1-8 deg. 45 44.75 45.25
Difference between angles 2
Cal 1-6 deg. 90 89.75 90.25
Cal 1-6 deg. 90 89.75 90.25
Difference between angles 3
Cyl.1-2 deg. 135 134.75 135.25
Cyl.1-2 deg. 135 134.75 135.25
Difference between angles 4
Cal 1-7 deg. 180 179.75 180.25
Cal 1-7 deg. 180 179.75 180.25
Difference between angles 5
Cal 1-5 deg. 225 224.75 225.25
Cal 1-5 deg. 225 224.75 225.25
Difference between angles 6
Cal 1-4 deg. 270 269.75 270.25
Cal 1-4 deg. 270 269.75 270.25
Difference between angles 7
Cal 1-3 deg. 315 314.75 315.25
Cal 1-3 deg. 315 314.75 315.25
Injection quantity adjustment
Rack position
(12.1)
PWM
%
56.2
Pump speed
r/min
700
700
700
Average injection quantity
mm3/st.
134
132
136
Max. variation between cylinders
%
0
-3
3
Basic
*
PS407980-224*
V
2.2+-0.0
1
PS407980-224*
mm
4+-0.05
Injection quantity adjustment_02
Rack position
(6.6)
PWM
%
25.3+-2.
8
Pump speed
r/min
380
380
380
Average injection quantity
mm3/st.
16
15
17
Max. variation between cylinders
%
0
-10
10
PS407980-224*
V
V1+0.05+
-0.01
PS407980-224*
mm
6.3+-0.0
3
Remarks
Refer to items regarding the pre-stroke actuator
Refer to items regarding the pre-stroke actuator
0000001201
Pre-stroke
mm
6.4
6.37
6.43
Remarks
When the timing sleeve is pushed up
When the timing sleeve is pushed up
_02
Connector angle
deg.
11.5
11
12
Remarks
When the eccentric pin is tightened
When the eccentric pin is tightened
_03
Supply voltage
V
24
23.5
24.5
Ambient temperature
degC
23
18
28
Pre-stroke
mm
2.4
2.35
2.45
Output voltage
V
2.95
2.94
2.96
Adjustment
*
_04
Supply voltage
V
24
23.5
24.5
Ambient temperature
degC
23
18
28
Pre-stroke
mm
6.4
6.37
6.43
Output voltage
V
1.2
1
1.4
Confirmation
*
Remarks
Output voltage V1
Output voltage V1
_05
Supply voltage
V
24
23.5
24.5
Ambient temperature
degC
23
18
28
Output voltage
V
3.05
3.05
Confirmation of operating range
*
Test data Ex:
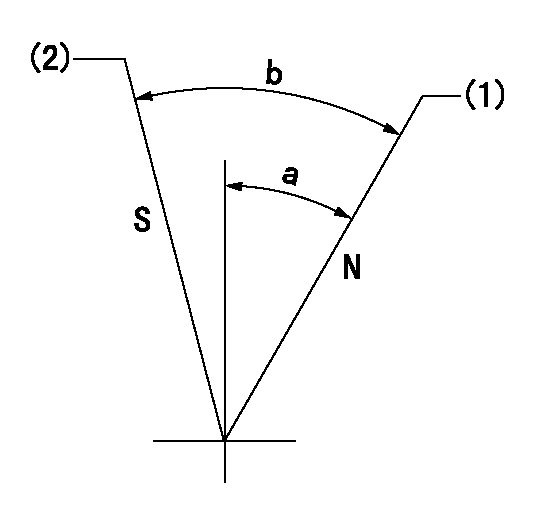
Speed control lever angle

N:Pump normal
S:Stop the pump.
(1)Rack position = aa
(2)Rack position bb
----------
aa=20mm bb=1mm
----------
a=27deg+-5deg b=37deg+-5deg
----------
aa=20mm bb=1mm
----------
a=27deg+-5deg b=37deg+-5deg
0000000901

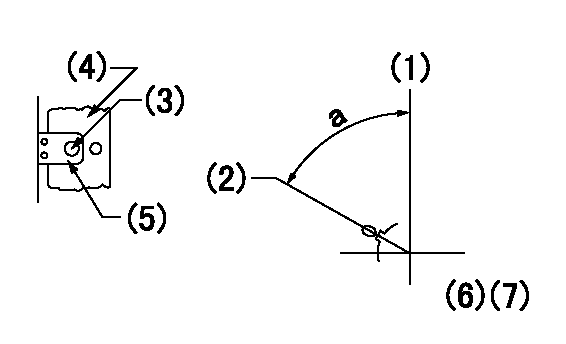
(1)Pump vertical direction
(2)Coupling's key groove position at No 1 cylinder's beginning of injection
(3)At the No 1 cylinder's beginning of injection position, stamp an aligning mark on the damper to align with the pointer's groove.
(4)Damper
(5)Pointer
(6)B.T.D.C.:-
(7)Pre-stroke: aa
----------
aa=6.4+-0.03mm
----------
a=(80deg)
----------
aa=6.4+-0.03mm
----------
a=(80deg)
0000001501

A:Sealing position
B:Pre-stroke actuator
1. When installing the pre-stroke actuator on the pump, first tighten the installation bolts loosely, then move the actuator fully counterclockwise (viewed from the drive side).
Temporary tightening torque: 1 - 1.5 N.m (0.1 - 0.15 kgf.m)
2. Move the actuator in the clockwise direction when viewed from the drive side, and adjust so that it becomes the adjustment point of the adjustment value. Then tighten it.
Tightening torque: 7^9 N.m (0.7^0.9 kgf.m)
3. After prestroke actuator installation adjustment, simultaneously stamp both the actuator side and housing side.
----------
----------
----------
----------
0000001701

(PWM) Pulse width modulation (%)
(R) Rack position (mm)
Rack sensor output characteristics
1. Rack limit adjustment
(1)Measure the rack position R2 for PWM a2%.
(2)Confirm that it is within the range R2 = 15+-1 mm.
(3)Measure the rack position R1 at PWM a %.
(4)Confirm that it is within the range R2 - R1 = 10+-0.1 mm.
2. Check the limp home operation.
(1)Move the switch box's limp home switch to the limp home side.
(2)Confirm rack position L1 (mm ) and L2 (mm) for PWM in the above table.
3. Check the pull down operation.
(1)Confirm that the rack position is 19 mm at PWM B%.
(2)In the conditions described in the above table, move the switch box's pull down switch to the pull down side and confirm that the rack position momentarily becomes 1 mm or less.
----------
a1=16.25 % a2=72.5 % L1=1-- mm L2=19++mm A=5 % B=95 %
----------
----------
a1=16.25 % a2=72.5 % L1=1-- mm L2=19++mm A=5 % B=95 %
----------
Information:
Illustration 70 g03402776
Install 8T-5389 Elbow (12) using 238-5081 O-Ring Seal (11) and 228-7092 O-Ring Seal (13)
Illustration 71 g03701313
Install 6V-8636 Connector (17) using 214-7568 O-Ring Seal (16) and 228-7089 O-Ring Seal (18). Install 128-6841 Elbow (15) using 238-5082 O-Ring Seal (19) and 228-7092 O-Ring Seal (14).
Illustration 72 g03701321
Reconnect 209-5526 Hose As (20) to the fuel transfer pump
Illustration 73 g03701349
Install 387-7154 Tube As (21) and 387-7159 Tube As (22).
Illustration 74 g03701355
Install 416-9706 Fuel Tube (24) using 338-8439 Clip (23).
Install the remaining components that were removed during the HEUI pump replacement procedure.Installation Procedure for 511, 521, 522, 532, 541 and 552 Track Feller Bunchers
Table 10
Required parts for 532, 541, 541B , 551, 552, and 552B Track Feller Bunchers
Part Number Description Quantity
384-0607 Unit Injector Hydraulic Pump Gp 1
227-5904 O-Ring Seal 1
6V-7981 Bolt 2
6V-5839 Washer 2
387-7153 Tube As 1
387-7151 Tube As 1
6V-8629 Elbow 1
238-5081 O-Ring Seal 1
228-7092 O-Ring Seal 2
128-6841 Elbow 1
238-5082 O-Ring Seal 1
6V-8636 Connector 2
228-7089 O-Ring Seal 2
214-7568 O-Ring Seal 3
360-3679 Connector Plug 1
6V-3305 O-Ring Adapter 1
214-7567 O-Ring Seal 2
Illustration 75 g03402944
Install 6V-3305 O-Ring Adapter (2) using 214-7567 O-Ring Seal (1). Also install new 214-7567 O-Ring Seal (1) to injection actuation pressure sensor.
Illustration 76 g03402955
Install 384-0607 Unit Injector Hydraulic Pump Gp (4) using 227-5904 O-Ring Seal (3). If necessary, in order to aid in installation, rotate the pump to an 8 o'clock position when looking at the engine from the rear.
Illustration 77 g03402984
Install new 6V-7981 Bolts (5) and 6V-5839 Washers (6). Torque to 55 10 N m (41 7 lb ft)
Illustration 78 g03701359
Install the 6V-8636 Connector (12) using 214-7568 O-Ring Seal (11) and 228-7089 O-Ring Seal (13). Install 360-3679 Connector Plug (10) using 214-7568 O-Ring Seal (11). Install 6V-8629 Elbow (8) using 238-5081 O-Ring Seal (7) and 228-7092 O-Ring Seal (9).
Illustration 79 g03701379
Install 128-6841 Elbow (15) using 238-5082 O-Ring Seal (19) and 228-7092 O-Ring Seal (14). Install 6V-8636 Connector (17) using 214-7568 O-Ring Seal (16) and 228-7089 O-Ring Seal (18).
Illustration 80 g03701406
Install 387-7151 Tube As (21) and 387-7153 Tube As (20).
Install the remaining components that were removed during the HEUI pump replacement procedure.