Information injection-pump assembly
BOSCH
9 400 612 188
9400612188
ZEXEL
108821-0202
1088210202
NISSAN-DIESEL
16801ND000
16801nd000

Rating:
Service parts 108821-0202 INJECTION-PUMP ASSEMBLY:
1.
_
7.
COUPLING PLATE
9.
_
11.
Nozzle and Holder
16600-97175
12.
Open Pre:MPa(Kqf/cm2)
15.7{160}/18.6{190}
Include in #1:
108821-0202
as INJECTION-PUMP ASSEMBLY
Cross reference number
BOSCH
9 400 612 188
9400612188
ZEXEL
108821-0202
1088210202
NISSAN-DIESEL
16801ND000
16801nd000
Zexel num
Bosch num
Firm num
Name
108821-0202
9 400 612 188
16801ND000 NISSAN-DIESEL
INJECTION-PUMP ASSEMBLY
RG8 K 14CQ INJECTION PUMP ASSY TICS HD-TI8F TICS
RG8 K 14CQ INJECTION PUMP ASSY TICS HD-TI8F TICS
Calibration Data:
Adjustment conditions
Test oil
1404 Test oil ISO4113 or {SAEJ967d}
1404 Test oil ISO4113 or {SAEJ967d}
Test oil temperature
degC
40
40
45
Nozzle and nozzle holder
105780-8250
Bosch type code
1 688 901 101
Nozzle
105780-0120
Bosch type code
1 688 901 990
Nozzle holder
105780-2190
Opening pressure
MPa
20.7
Opening pressure
kgf/cm2
211
Injection pipe
Outer diameter - inner diameter - length (mm) mm 8-3-600
Outer diameter - inner diameter - length (mm) mm 8-3-600
Overflow valve
134424-4120
Overflow valve opening pressure
kPa
255
221
289
Overflow valve opening pressure
kgf/cm2
2.6
2.25
2.95
Tester oil delivery pressure
kPa
255
255
255
Tester oil delivery pressure
kgf/cm2
2.6
2.6
2.6
RED4 control unit part number
407915-0
590
RED4 rack sensor specifications
mm
19
PS/ACT control unit part no.
407980-2
24*
Digi switch no.
41
Direction of rotation (viewed from drive side)
Right R
Right R
Injection timing adjustment
Direction of rotation (viewed from drive side)
Right R
Right R
Injection order
8-7-5-4-
3-6-2-1
Pre-stroke
mm
6.4
6.37
6.43
Beginning of injection position
Governor side NO.1
Governor side NO.1
Difference between angles 1
Cal 8-7 deg. 45 44.75 45.25
Cal 8-7 deg. 45 44.75 45.25
Difference between angles 2
Cal 8-5 deg. 90 89.75 90.25
Cal 8-5 deg. 90 89.75 90.25
Difference between angles 3
Cal 8-4 deg. 135 134.75 135.25
Cal 8-4 deg. 135 134.75 135.25
Difference between angles 4
Cal 8-3 deg. 180 179.75 180.25
Cal 8-3 deg. 180 179.75 180.25
Difference between angles 5
Cal 8-6 deg. 225 224.75 225.25
Cal 8-6 deg. 225 224.75 225.25
Difference between angles 6
Cal 8-2 deg. 270 269.75 270.25
Cal 8-2 deg. 270 269.75 270.25
Difference between angles 7
Cal 8-1 deg. 315 314.75 315.25
Cal 8-1 deg. 315 314.75 315.25
Injection quantity adjustment
Rack position
(11.9)
PWM
%
55.2
Pump speed
r/min
600
600
600
Average injection quantity
mm3/st.
126
124
128
Max. variation between cylinders
%
0
-4
4
Basic
*
PS407980-224*
V
2.2+-0.0
1
PS407980-224*
mm
4+-0.05
Injection quantity adjustment_02
Rack position
(7.7)
PWM
%
31.5+-2.
8
Pump speed
r/min
275
275
275
Average injection quantity
mm3/st.
19
17
21
Max. variation between cylinders
%
0
-10
10
PS407980-224*
V
V1+0.05+
-0.01
PS407980-224*
mm
6.3+-0.0
3
Remarks
Refer to items regarding the pre-stroke actuator
Refer to items regarding the pre-stroke actuator
Governor adjustment
Pump speed
r/min
750--
Advance angle
deg.
0
0
0
Remarks
Start
Start
Governor adjustment_02
Pump speed
r/min
700
Advance angle
deg.
0.5
Governor adjustment_03
Pump speed
r/min
980
Advance angle
deg.
3
2.5
3.5
Remarks
Finish
Finish
0000001201
Pre-stroke
mm
6.4
6.37
6.43
Remarks
When the timing sleeve is pushed up
When the timing sleeve is pushed up
_02
Connector angle
deg.
11.5
11
12
Remarks
When the eccentric pin is tightened
When the eccentric pin is tightened
_03
Supply voltage
V
24
23.5
24.5
Ambient temperature
degC
23
18
28
Pre-stroke
mm
2.4
2.35
2.45
Output voltage
V
2.95
2.94
2.96
Adjustment
*
_04
Supply voltage
V
24
23.5
24.5
Ambient temperature
degC
23
18
28
Pre-stroke
mm
6.4
6.37
6.43
Output voltage
V
1.2
1
1.4
Confirmation
*
Remarks
Output voltage V1
Output voltage V1
_05
Supply voltage
V
24
23.5
24.5
Ambient temperature
degC
23
18
28
Output voltage
V
3.05
3.05
Confirmation of operating range
*
Test data Ex:
Speed control lever angle

N:Pump normal
S:Stop the pump.
(1)Rack position = aa
(2)Rack position bb
----------
aa=20mm bb=1mm
----------
a=27deg+-5deg b=37deg+-5deg
----------
aa=20mm bb=1mm
----------
a=27deg+-5deg b=37deg+-5deg
0000000901

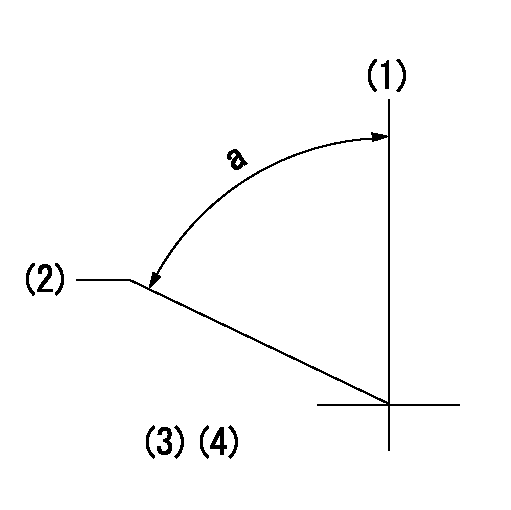
(1)Pump vertical direction
(2)Position of the coupling's key groove at the beginning of injection of the No. 8 cylinder.
(3)Pre-stroke: aa
(4)-
----------
aa=6.4+-0.03mm
----------
a=(80deg)
----------
aa=6.4+-0.03mm
----------
a=(80deg)
0000001501

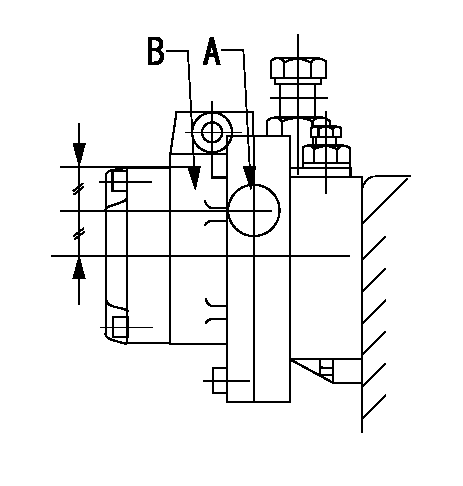
A:Sealing position
B:Pre-stroke actuator
1. When installing the pre-stroke actuator on the pump, first tighten the installation bolts loosely, then move the actuator fully counterclockwise (viewed from the drive side).
Temporary tightening torque: 1 - 1.5 N.m (0.1 - 0.15 kgf.m)
2. Move the actuator in the clockwise direction when viewed from the drive side, and adjust so that it becomes the adjustment point of the adjustment value. Then tighten it.
Tightening torque: 7^9 N.m (0.7^0.9 kgf.m)
3. After prestroke actuator installation adjustment, simultaneously stamp both the actuator side and housing side.
----------
----------
----------
----------
0000001701

(PWM) Pulse width modulation (%)
(R) Rack position (mm)
Rack sensor output characteristics
1. Rack limit adjustment
(1)Measure the rack position R2 for PWM a2%.
(2)Confirm that it is within the range R2 = 15+-1 mm.
(3)Measure the rack position R1 at PWM a %.
(4)Confirm that it is within the range R2 - R1 = 10+-0.1 mm.
2. Check the limp home operation.
(1)Move the switch box's limp home switch to the limp home side.
(2)Confirm rack position L1 (mm ) and L2 (mm) for PWM in the above table.
3. Check the pull down operation.
(1)Confirm that the rack position is 19 mm at PWM B%.
(2)In the conditions described in the above table, move the switch box's pull down switch to the pull down side and confirm that the rack position momentarily becomes 1 mm or less.
----------
a1=16.25 % a2=72.5 % L1=1-- mm L2=19++mm A=5 % B=95 %
----------
----------
a1=16.25 % a2=72.5 % L1=1-- mm L2=19++mm A=5 % B=95 %
----------
Information:
FEED ENGAGED
21. Slot. 22. Pin. 23. Knob. To set the feed mechanism into feed on later units, turn lever (A) up (the direction of arrow).
LATER FEED MECHANISM
A. Lever.Place adapter (24) into boring bar and tightening setscrew (25).
ADAPTER INSTALLED
24. 1P2364 Adapter. 25. Setscrew.Apply layout bluing to the bearing cap and bearing bore. Oil the centering rings. Do not use lubricant on the cutter. Use a one-half inch electric drill with universal joint (26) to feed tool through the bore. Service main bearings with .010 in. (0.25 mm) oversize outside diameter are available to permit the bore to be bored oversize. Bore the bore to 3.7175 .0005 in. (94.425 0.013 mm).
BORING BEARING BORE
26. 1P2363 Universal. If you use the later feed mechanism, the tool can be driven from either the boring bar or the feed mechanism.
DRIVING THROUGH FEED MECHANISM (Typical Example)
26. 1P2363 Universal.The bluing applied to the bearing bore indicates the condition of the bore at the corret bore size. If bluing shows an out of round condition, check the largest diameter (indicated by remaining bluing) in relation to the smallest diameter (indicated by lack of bluing). The difference of the two must not exceed .0010 in. (0.025 mm).If bluing indicates a step in the joint face, measure the diameter at the step in relation to the smallest diameter. A step of .0005 in. (0.013 mm) on one or both sides is permissible. A maximum of .0010 in. (0.025 mm) over the nominal finish bore diameter is permissible if within the described limits.To check the bore diameter, set the 1P3535 Dial Bore Gauge to 3.7175 in. (94.425 mm).
CHECKING BORE (Typical Example)Line Boring Main Bearing Bores
Line bore all main bearing bores if bearing caps or saddles are distorted.Clean bearing caps and saddles. Remove all nicks from pan rail. Plug oil holes in block with grease to prevent chips from entering oil passages.Place 1P2344 Centering Rings (1), with oiler (2) up, at each end of block. If an end bore is distorted, use the next good bore. There must be two good bores for locating centering rings.
CENTERING RINGS IN BLOCK
1. 1P2344 Centering Rings. 2. Oiler.Place original bearing caps (4) over the centering rings (1). Tighten bolts (3) hand tight.
CENTERING RINGS INSTALLED
1. 1P2344 Centering Rings. 3. Bolts (four). 4. Bearing caps.
BORING BAR INSTALLED
1. 1P2344 Centering Rings. 3. Bolts (four). 5. 1P2352 Boring Bar.Oil boring bar (5) and insert it through centering rings (1). Tighten bolts (3) to a minimum of 20 lb. ft. (25 N m) and a maximum of 50 lb. ft. (70 N m) while spinning bearing bar (5) to check for binding. Centering rings (1) must be seated in boring saddles after tightening.Slide boring bar (5) out of one end of block and install bearing assemblies (6) on boring bar (5). Slide boring bar (5) back through centering ring. Adjust bearing by tightening bolt (7) until bar begins to bind, then back off until boring bar (5) spins easily.
INSTALLING BEARING ASSEMBLIES
5. 1P2352 Boring Bar. 6. 1P2373 Bearing assembly
Have questions with 108821-0202?
Group cross 108821-0202 ZEXEL
Nissan-Diesel
108821-0202
9 400 612 188
16801ND000
INJECTION-PUMP ASSEMBLY
RG8
RG8