Information injection-pump assembly
ZEXEL
108622-3230
1086223230
HINO
220801610A
220801610a
Rating:
Cross reference number
ZEXEL
108622-3230
1086223230
HINO
220801610A
220801610a
Zexel num
Bosch num
Firm num
Name
Calibration Data:
Adjustment conditions
Test oil
1404 Test oil ISO4113 or {SAEJ967d}
1404 Test oil ISO4113 or {SAEJ967d}
Test oil temperature
degC
40
40
45
Nozzle and nozzle holder
105780-8140
Bosch type code
EF8511/9A
Nozzle
105780-0000
Bosch type code
DN12SD12T
Nozzle holder
105780-2080
Bosch type code
EF8511/9
Opening pressure
MPa
17.2
Opening pressure
kgf/cm2
175
Injection pipe
Outer diameter - inner diameter - length (mm) mm 8-3-600
Outer diameter - inner diameter - length (mm) mm 8-3-600
Overflow valve
134424-1520
Overflow valve opening pressure
kPa
162
147
177
Overflow valve opening pressure
kgf/cm2
1.65
1.5
1.8
Tester oil delivery pressure
kPa
157
157
157
Tester oil delivery pressure
kgf/cm2
1.6
1.6
1.6
PS/ACT control unit part no.
407980-2
24*
Digi switch no.
21
Direction of rotation (viewed from drive side)
Right R
Right R
Injection timing adjustment
Direction of rotation (viewed from drive side)
Right R
Right R
Injection order
1-4-2-6-
3-5
Pre-stroke
mm
6.4
6.37
6.43
Beginning of injection position
Drive side NO.1
Drive side NO.1
Difference between angles 1
Cal 1-4 deg. 60 59.75 60.25
Cal 1-4 deg. 60 59.75 60.25
Difference between angles 2
Cyl.1-2 deg. 120 119.75 120.25
Cyl.1-2 deg. 120 119.75 120.25
Difference between angles 3
Cal 1-6 deg. 180 179.75 180.25
Cal 1-6 deg. 180 179.75 180.25
Difference between angles 4
Cal 1-3 deg. 240 239.75 240.25
Cal 1-3 deg. 240 239.75 240.25
Difference between angles 5
Cal 1-5 deg. 300 299.75 300.25
Cal 1-5 deg. 300 299.75 300.25
Injection quantity adjustment
Adjusting point
A
Rack position
9.7
Pump speed
r/min
800
800
800
Average injection quantity
mm3/st.
161
159
163
Max. variation between cylinders
%
0
-2
2
Basic
*
Fixing the lever
*
Boost pressure
kPa
43.3
43.3
Boost pressure
mmHg
325
325
PS407980-224*
V
V1+0.05+
-0.01
PS407980-224*
mm
6.3+-0.0
3
Remarks
Refer to items regarding the pre-stroke actuator
Refer to items regarding the pre-stroke actuator
Injection quantity adjustment_02
Adjusting point
B
Rack position
9.5
Pump speed
r/min
500
500
500
Average injection quantity
mm3/st.
167
164
170
Fixing the lever
*
Boost pressure
kPa
43.3
43.3
Boost pressure
mmHg
325
325
PS407980-224*
V
V1+0.05+
-0.01
PS407980-224*
mm
6.3+-0.0
3
Injection quantity adjustment_03
Adjusting point
D
Rack position
10
Pump speed
r/min
1075
1075
1075
Average injection quantity
mm3/st.
165
162
168
Fixing the lever
*
Boost pressure
kPa
43.3
43.3
Boost pressure
mmHg
325
325
PS407980-224*
V
V1+0.05+
-0.01
PS407980-224*
mm
6.3+-0.0
3
Injection quantity adjustment_04
Adjusting point
E
Rack position
9.1
Pump speed
r/min
1200
1200
1200
Average injection quantity
mm3/st.
145.5
142.5
148.5
Fixing the lever
*
Boost pressure
kPa
43.3
43.3
Boost pressure
mmHg
325
325
PS407980-224*
V
V1+0.05+
-0.01
PS407980-224*
mm
6.3+-0.0
3
Injection quantity adjustment_05
Adjusting point
G
Rack position
4+-0.5
Pump speed
r/min
250
250
250
Average injection quantity
mm3/st.
11.5
8.5
14.5
Max. variation between cylinders
%
0
-15
15
Fixing the rack
*
Boost pressure
kPa
0
0
0
Boost pressure
mmHg
0
0
0
PS407980-224*
V
V1+0.05+
-0.01
PS407980-224*
mm
6.3+-0.0
3
Injection quantity adjustment_06
Adjusting point
H
Rack position
7.6
Pump speed
r/min
400
400
400
Average injection quantity
mm3/st.
122.5
119.5
125.5
Fixing the lever
*
Boost pressure
kPa
0
0
0
Boost pressure
mmHg
0
0
0
PS407980-224*
V
V1+0.05+
-0.01
PS407980-224*
mm
6.3+-0.0
3
Injection quantity adjustment_07
Adjusting point
I
Rack position
-
Pump speed
r/min
100
100
100
Average injection quantity
mm3/st.
120
120
140
Fixing the lever
*
Boost pressure
kPa
0
0
0
Boost pressure
mmHg
0
0
0
PS407980-224*
V
V1+0.05+
-0.01
PS407980-224*
mm
6.3+-0.0
3
Boost compensator adjustment
Pump speed
r/min
500
500
500
Rack position
7.6
Boost pressure
kPa
9.3
7.3
9.3
Boost pressure
mmHg
70
55
70
Boost compensator adjustment_02
Pump speed
r/min
500
500
500
Rack position
9.5
Boost pressure
kPa
30
30
30
Boost pressure
mmHg
225
225
225
0000001601
Pre-stroke
mm
6.4
6.37
6.43
Remarks
When the timing sleeve is pushed up
When the timing sleeve is pushed up
_02
Connector angle
deg.
5
4.5
5.5
Remarks
When the eccentric pin is tightened
When the eccentric pin is tightened
_03
Supply voltage
V
24
23.5
24.5
Ambient temperature
degC
23
18
28
Pre-stroke
mm
4
3.95
4.05
Output voltage
V
2.6
2.6
2.61
Adjustment
*
_04
Supply voltage
V
24
23.5
24.5
Ambient temperature
degC
23
18
28
Pre-stroke
mm
6.4
6.35
6.45
Output voltage
V
1.2
1
1.4
Confirmation
*
Remarks
Output voltage V1
Output voltage V1
_05
Supply voltage
V
24
23.5
24.5
Ambient temperature
degC
23
18
28
Pre-stroke
mm
3.4
Output voltage
V
3
2.98
3
Confirmation
*
_06
Supply voltage
V
24
23.5
24.5
Ambient temperature
degC
23
18
28
Output voltage
V
3.05
3.05
Confirmation of operating range
*
Test data Ex:
Governor adjustment
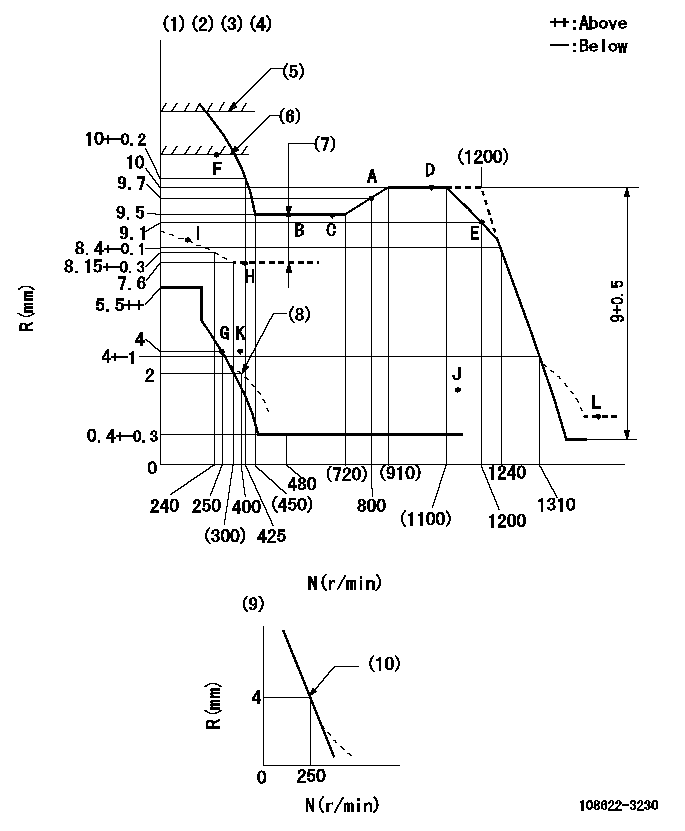
N:Pump speed
R:Rack position (mm)
(1)Lever ratio: RT
(2)Target shim dimension: TH
(3)Tolerance for racks not indicated: +-0.05
(4)Set idle at point K (N = N1, R = R1) and confirm that the injection quantity does not exceed Q1 at point J (N = N2).
(5)Stop lever setting: R2
(6)RACK LIMIT: RAL
(7)Boost compensator stroke: BCL
(8)Damper spring setting
(9)Variable speed specification: idling adjustment
(10)Main spring setting
----------
RT=1 TH=2.3mm N1=350r/min R1=4mm N2=1075r/min Q1=3 mm3/st R2=12.9+0.2mm RAL=10.3+-0.1mm BCL=1.9+-0.1mm
----------
----------
RT=1 TH=2.3mm N1=350r/min R1=4mm N2=1075r/min Q1=3 mm3/st R2=12.9+0.2mm RAL=10.3+-0.1mm BCL=1.9+-0.1mm
----------
Speed control lever angle
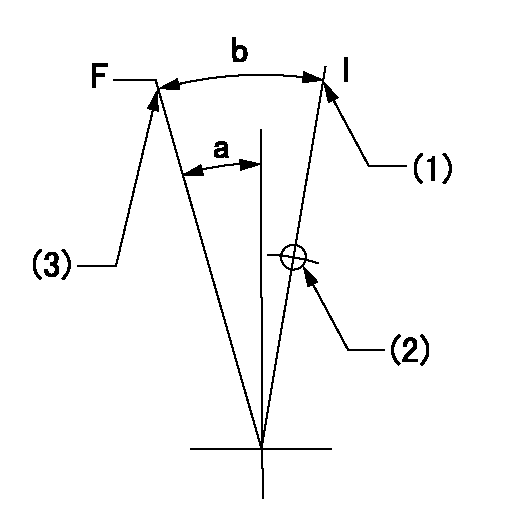
F:Full speed
I:Idle
(1)Stopper bolt setting
(2)Use the hole at R = aa
(3)Stopper bolt setting
----------
aa=130mm
----------
a=7.5deg+-5deg b=(15deg)+-5deg
----------
aa=130mm
----------
a=7.5deg+-5deg b=(15deg)+-5deg
0000000901
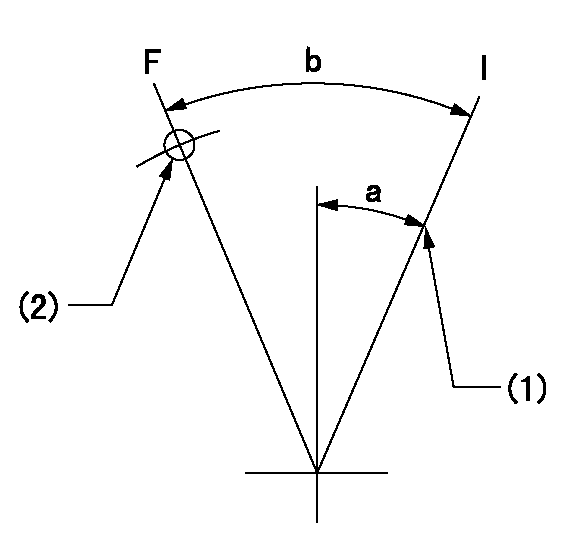
F:Full load
I:Idle
(1)Stopper bolt setting
(2)Use the hole at R = aa
----------
aa=56mm
----------
a=25deg+-5deg b=33deg+-3deg
----------
aa=56mm
----------
a=25deg+-5deg b=33deg+-3deg
Stop lever angle
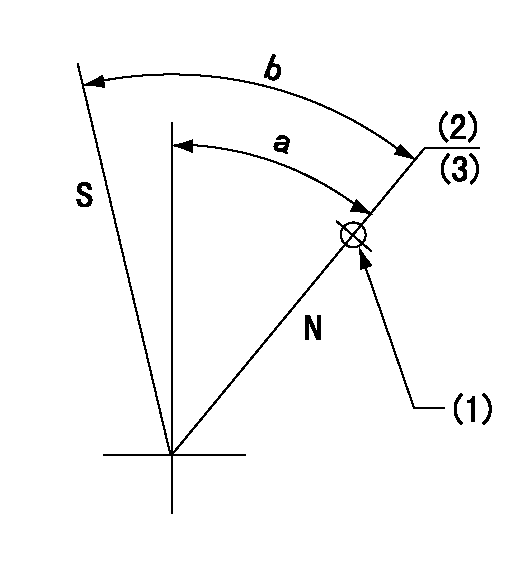
N:Pump normal
S:Stop the pump.
(1)Use the hole at R = aa
(2)Set stopper screw so that rack position = bb (after setting apply red paint).
(3)Set before governor adjustment.
----------
aa=33mm bb=12.9+0.2mm
----------
a=30deg+-5deg b=43deg+-5deg
----------
aa=33mm bb=12.9+0.2mm
----------
a=30deg+-5deg b=43deg+-5deg
0000001201
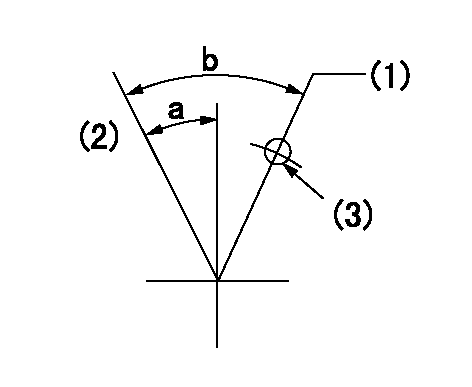
(1)Variable speed specification
(2)Minimum - maximum speed specification
(3)Use the hole at R = aa
----------
aa=150mm
----------
a=(17deg)+-5deg b=(33deg)
----------
aa=150mm
----------
a=(17deg)+-5deg b=(33deg)
0000001301
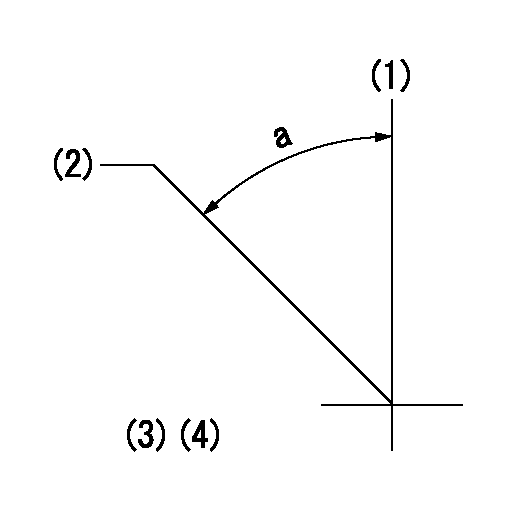
(1)Pump vertical direction
(2)Coupling's key groove position at No 1 cylinder's beginning of injection
(3)Pre-stroke: aa
(4)-
----------
aa=6.4+-0.03mm
----------
a=(40deg)
----------
aa=6.4+-0.03mm
----------
a=(40deg)
0000001901

(A): Pre-stroke actuator
(B): Stamp housings A and B at the same time.
(C): Stamping range
1. When installing the pre-stroke actuator on the pump, first tighten the installation bolts loosely, then move the actuator fully clockwise (viewed from the drive side).
Temporary tightening torque: 1 - 1.5 N.m (0.1 - 0.15 kgf.m)
2. Move the actuator in the counterclockwise direction when viewed from the drive side, and adjust so that it becomes the adjustment point of the adjustment value. Then tighten it.
Tightening torque: 7^9 N.m (0.7^0.9 kgf.m)
3. After prestroke actuator installation adjustment, simultaneously stamp both the actuator side and housing side.
----------
----------
----------
----------
0000002201 RACK SENSOR
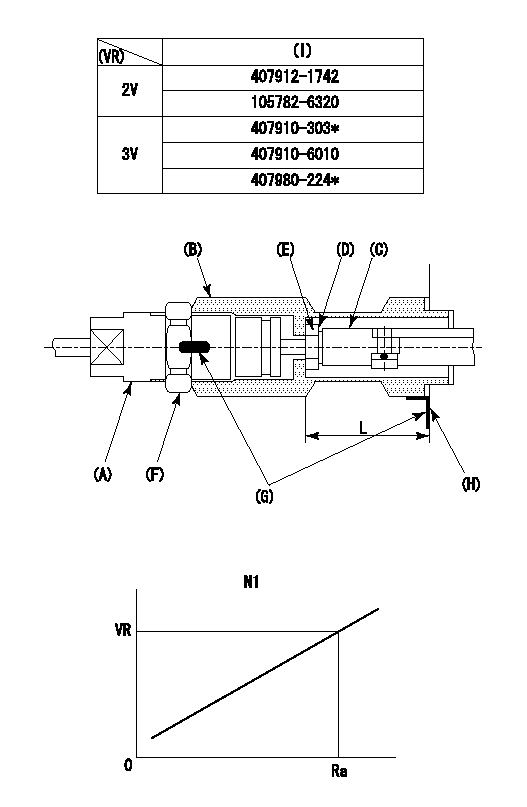
(VR) measurement voltage
(I) Part number of the control unit
(G) Apply red paint.
(H): End surface of the pump
Adjustment of the rack sensor (-0720)
1. Rack limit adjustment
(1)After mounting the joint (B), select the shim (D) so that the rack position is in the rack limit position.
(2)Install the rod (E) to the block (C).
(3)At the rack limit, set the distance between the pump end face and the rod (E) to L1.
2. Rack sensor
(1)Screw in the bobbin (A) until it contacts the joint (B).
(2)Fix the speed control lever at the full side and set the pump speed at N1.
(3)Adjust the depth that the bobbin (A) is screwed in so that the control unit's rack sensor output voltage is VR+-0.01 (V), then tighten the nut (F). (If equipped with a boost compensator, perform with boost pressure applied.)
(4)Apply red paint to both the joint (B) and the nut (F) join, and the joint (B) and the pump join. Output voltage VR +-0.01(V), speed N1, rack position Ra, rack sensor supply voltage 5+-0.01 (V)
----------
L=33.5+-0.1mm N1=1075r/min Ra=10mm
----------
----------
L=33.5+-0.1mm N1=1075r/min Ra=10mm
----------
0000002301 GOVERNOR TORQUE CONTROL

Dr:Torque control stroke
(A): Without torque control spring capsule
1. Adjustment procedures
(1)Procedure is the same as that for the RFD (former type), except that the positive torque control stroke must be determined at the full lever setting.
2. Procedures for adjustment
(1)Remove the torque control spring capsule.
(2)Operate the pump at approximately N1. (End of idling spring operation < N1.)
(3)Tilt the lever to the full side.
(4)Set so that R = RF.
(5)Increase the speed by pushing in the screw (attached to the bracket on the rear of the tension lever) through the adjusting window.
(6)Adjust so that the torque control stroke Dr1 can be obtained.
(7)Align N2 and N3 with the torque control spring capsule.
3. Final confirmation
(1)After final confirmation, temporarily set the load lever to N = N1, R = idling position.
(2)From this condition, increase speed to N = N4.
(3)Confirm that positive torque control stroke is Dr2.
----------
N1=500r/min N2=(720)r/min N3=(910)r/min N4=1075r/min RF=9.5mm Dr1=0.5mm Dr2=0+0.3mm
----------
----------
N1=500r/min N2=(720)r/min N3=(910)r/min N4=1075r/min RF=9.5mm Dr1=0.5mm Dr2=0+0.3mm
----------
0000002401 LEVER

2-stage changeover lever adjustment
(A) Speed lever
(B) Load lever
(C) 2-stage changeover lever
(D) Link
(E) Bolt
(G) Variable speed specifications
(H) Minimum maximum speed specifications
F:Full speed
I:Idle
1. Minimum-maximum speed specification adjustment (when running)
(1)After completing governor adjustment, hold the 2-stage changeover lever (C) so that the speed lever (A) contacts the full speed stopper.
(2)In this condition, the load lever is held in the idle position.
(3)Adjust bolt (E) so that the clearance between the pin underneath lever (C) and the end of the long groove in link (D) is L.
(4)Lock using the nut.
2. Variable speed specification adjustment (at operation)
(1)Hold the 2-stage changeover lever (C) so that the load lever (B) contacts the full load stopper. (When the load lever is equipped with a cancel mechanism, move it so that it contacts the stopper without canceling.)
(2)In this condition, confirm that the speed lever (A) moves from idle to full speed.
----------
L=1~2mm
----------
----------
L=1~2mm
----------
Information:
4. Install a new seal washer (6).Use 6V-4979 Carbon Stop Seal Tool (4) to install new carbon dam (5) on nozzle (2).7000 Series Nozzles
The part number for compression seal (3) is not the same for all nozzles. If the correct seal is not installed, the result will be high emissions. This is NOT acceptable.
Troubleshooting (Pencil-Type Fuel Nozzles Only)
A. To troubleshoot these nozzles, refer to the Troubleshooting Guide For Pencil-Type Fuel Nozzles located in this manual.B. Refer to Special Instruction SEHS8627 "Use of 8S-2245 Nozzle Cleaning Tool Group" for the correct procedure (according to the part number of the nozzle) in order to clean these nozzles. C. If VO is LESS than the specified value for a specific part number, DO NOT use the nozzle.Troubleshooting Guide For Pencil-Type Fuel Nozzles
Troubleshooting Guide For Caterpillar 7000 Series Direct Injection Fuel Nozzles
Engine Nozzle Test Record Form (Sample Copy)
Repair/Calibration Information For 5P-4150 Tester Group
For the repair and/or calibration of the 5P-4150 Tester Group, contact the manufacturer: U.S. Mail:OTC Division
SPX Corporation
655 Eisenhower Drive
Owatonna, Minnesota 55060, U.S.A.
Telephone:(507) 455-7000(800) 533-6127 Fax:(800) 955-8329Test Equipment Calibration
Caterpillar fuel nozzle and unit injector testers feature premium quality, liquid filled gauges for high accuracy and durability.Pressure gauges, in this application must be of high quality in order to provide accurate and consistent test results.To maintain this high degree of accuracy, gauge calibration should be checked at a MINIMUM of once a year. Additional information can be found in NEHS0631 "General Maintenance And Troubleshooting For Fuel Injection Equipment Test Stands (FIETS) And 5P-4150 Nozzle Tester". However, calibration should be checked at any time when the test results have become INCONSISTENT or if the gauge needle does NOT return to the 0 (zero) range when the test pressure is relieved.Calibration
Two methods are available for gauge calibration:* Method 1: Calibration by gauge manufacturer.* Method 2: 5P-8558 Pressure Gauge Calibrating Group. Additional information can be found in NEHS0631 "General Maintenance And Troubleshooting For Fuel Injection Equipment Test Stands (FIETS) And 5P-4150 Nozzle Tester".Calibration By Gauge Manufacturer (Method 1)
Certified calibration services are offered by Carrier - Oehler Company, a Caterpillar certified supplier of premium quality gauges.The Carrier - Oehler Company can promptly check and recalibrate gauges at a low cost.The Carrier - Oehler Company will also repair and recalibrate damaged gauges at a fraction of the cost of a new gauge.When sending gauges to Carrier - Oehler Company, include the following information:* Person or department that gauges and/or correspondence is to be directed to.* List the quantity and a brief description of the gauge(s) problem or the service requested.* Dealer name and address.* Telephone number.* Fax number. The Carrier - Oehler Company will advise you if repair costs exceed 50 percent of a new gauge. Questions on costs, service, and repair time should be directed to the Caterpillar Repair Desk:(800) 321-3241 Shipping:Carrier - Oehler Company
16965 Vincennes Avenue
South Holland, Illinois 60473
U.S. Mail:Carrier - Oehler Company
Post Office Box 40
16965 Vincennes Avenue
South Holland, Illinois 60473
Telephone:(708) 339-8200 Fax:(708) 339-98305P-8558 Pressure Gauge Calibrating Group (Method 2)
(1) 5P-0946 Box Assembly.(2) 1P-2375 Quick