Information injection-pump assembly
ZEXEL
108622-1130
1086221130
ISUZU
1156032930
1156032930

Rating:
Service parts 108622-1130 INJECTION-PUMP ASSEMBLY:
1.
_
5.
AUTOM. ADVANCE MECHANIS
7.
COUPLING PLATE
11.
Nozzle and Holder
1-15300-376-1
12.
Open Pre:MPa(Kqf/cm2)
22.1{225}
15.
NOZZLE SET
Include in #1:
108622-1130
as INJECTION-PUMP ASSEMBLY
Cross reference number
ZEXEL
108622-1130
1086221130
ISUZU
1156032930
1156032930
Zexel num
Bosch num
Firm num
Name
Calibration Data:
Adjustment conditions
Test oil
1404 Test oil ISO4113 or {SAEJ967d}
1404 Test oil ISO4113 or {SAEJ967d}
Test oil temperature
degC
40
40
45
Nozzle and nozzle holder
105780-8250
Bosch type code
1 688 901 101
Nozzle
105780-0120
Bosch type code
1 688 901 990
Nozzle holder
105780-2190
Opening pressure
MPa
20.7
Opening pressure
kgf/cm2
211
Injection pipe
Outer diameter - inner diameter - length (mm) mm 8-3-600
Outer diameter - inner diameter - length (mm) mm 8-3-600
Overflow valve
131424-7120
Overflow valve opening pressure
kPa
255
221
289
Overflow valve opening pressure
kgf/cm2
2.6
2.25
2.95
Tester oil delivery pressure
kPa
255
255
255
Tester oil delivery pressure
kgf/cm2
2.6
2.6
2.6
RED3 control unit part number
407910-3
960
RED3 rack sensor specifications
mm
19
PS/ACT control unit part no.
407980-2
24*
Digi switch no.
33
Direction of rotation (viewed from drive side)
Right R
Right R
Injection timing adjustment
Direction of rotation (viewed from drive side)
Right R
Right R
Injection order
1-5-3-6-
2-4
Pre-stroke
mm
8
7.97
8.03
Beginning of injection position
Drive side NO.1
Drive side NO.1
Difference between angles 1
Cal 1-5 deg. 60 59.75 60.25
Cal 1-5 deg. 60 59.75 60.25
Difference between angles 2
Cal 1-3 deg. 120 119.75 120.25
Cal 1-3 deg. 120 119.75 120.25
Difference between angles 3
Cal 1-6 deg. 180 179.75 180.25
Cal 1-6 deg. 180 179.75 180.25
Difference between angles 4
Cyl.1-2 deg. 240 239.75 240.25
Cyl.1-2 deg. 240 239.75 240.25
Difference between angles 5
Cal 1-4 deg. 300 299.75 300.25
Cal 1-4 deg. 300 299.75 300.25
Injection quantity adjustment
Rack position
(13.8)
Vist
V
1.78
1.78
1.78
Pump speed
r/min
700
700
700
Average injection quantity
mm3/st.
200
198
202
Max. variation between cylinders
%
0
-3
3
Basic
*
PS407980-224*
V
2.2+-0.0
1
PS407980-224*
mm
5.6+-0.0
5
Injection quantity adjustment_02
Rack position
(7)
Vist
V
2.8
2.7
2.9
Pump speed
r/min
280
280
280
Average injection quantity
mm3/st.
14.3
11.1
17.5
Max. variation between cylinders
%
0
-13
13
PS407980-224*
V
V1+0.05+
-0.01
PS407980-224*
mm
7.9+-0.0
3
Remarks
Refer to items regarding the pre-stroke actuator
Refer to items regarding the pre-stroke actuator
0000001201
Pre-stroke
mm
8
7.97
8.03
Remarks
When the timing sleeve is pushed up
When the timing sleeve is pushed up
_02
Connector angle
deg.
11.5
11
12
Remarks
When the eccentric pin is tightened
When the eccentric pin is tightened
_03
Supply voltage
V
24
23.5
24.5
Ambient temperature
degC
23
18
28
Pre-stroke
mm
4
3.95
4.05
Output voltage
V
2.95
2.94
2.96
Adjustment
*
_04
Supply voltage
V
24
23.5
24.5
Ambient temperature
degC
23
18
28
Pre-stroke
mm
8
7.97
8.03
Output voltage
V
1.2
1
1.4
Confirmation
*
Remarks
Output voltage V1
Output voltage V1
_05
Supply voltage
V
24
23.5
24.5
Ambient temperature
degC
23
18
28
Output voltage
V
3.05
3.05
Confirmation of operating range
*
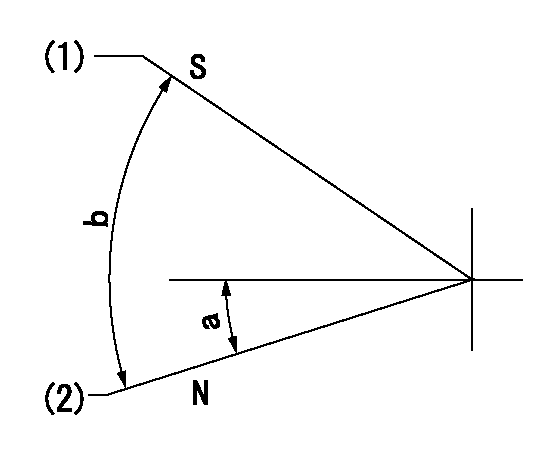
Test data Ex:
Speed control lever angle

N:Pump normal
S:Stop the pump.
(1)Rack position = aa
(2)Rack position bb
----------
aa=1mm bb=20mm
----------
a=17deg+-5deg b=37deg+-5deg
----------
aa=1mm bb=20mm
----------
a=17deg+-5deg b=37deg+-5deg
0000000901

(1)Pump vertical direction
(2)Position of damper's threaded hole at No 1 cylinder's beginning of injection
(3)B.T.D.C.: aa
(4)Pre-stroke: bb
----------
aa=0deg bb=8+-0.03mm
----------
a=(100deg)
----------
aa=0deg bb=8+-0.03mm
----------
a=(100deg)
0000001501

A:Sealing position
B:Pre-stroke actuator
1. When installing the pre-stroke actuator on the pump, first tighten the installation bolts loosely, then move the actuator fully counterclockwise (viewed from the drive side).
Temporary tightening torque: 1 - 1.5 N.m (0.1 - 0.15 kgf.m)
2. Move the actuator in the clockwise direction when viewed from the drive side, and adjust so that it becomes the adjustment point of the adjustment value. Then tighten it.
Tightening torque: 7^9 N.m (0.7^0.9 kgf.m)
3. After prestroke actuator installation adjustment, simultaneously stamp both the actuator side and housing side.
----------
----------
----------
----------
0000001701

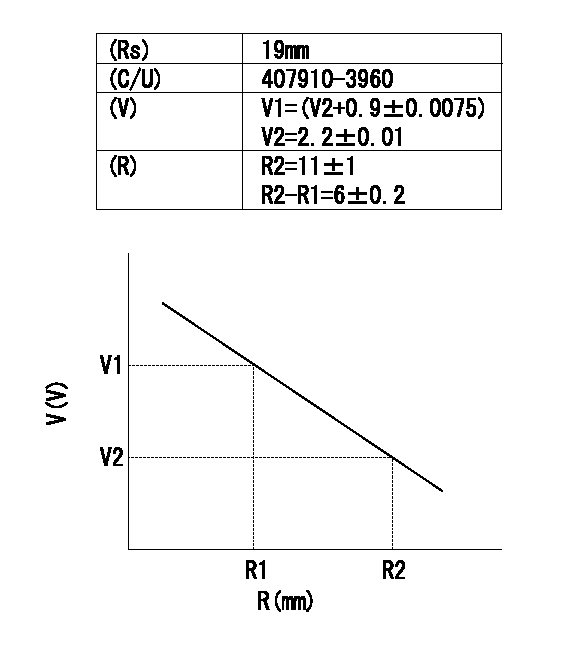
(Rs) rack sensor specifications
(C/U) control unit part number
(V) Rack sensor output voltage
(R) Rack position (mm)
1. Confirming governor output characteristics (rack 19 mm, span 6 mm)
(1)When the output voltages of the rack sensor are V1 and V2, check that the rack positions R1 and R2 in the table above are satisfied.
----------
----------
----------
----------
Information:
8-4711. Remove needle bearing circlips.Fig. 8-47
8-4812. Press needle bearing out of cover.Fig. 8-48
8-4913. Press shaft with ball bearing out of fan shroud hub and press bearing from shaft.Fig. 8-49
8-5014. Prise out shaft seal.Fig. 8-50
8-5115. Remove needle bearing circlips.Fig. 8-51
8-5216. Press needle bearing out of hub.Fig. 8-52Reassembling Fan
8-53Shown in Fig. 8-53 is the complete cover.8. Shaft seal9. Circlip10. Needle bearing11. Shaft20. Circlip21. Ball bearing23. Cover
8-5417. Install inner circlip in cover.Fig. 8-54
8-5518. Press in needle bearing.Fig. 8-55
8-5619. Install outer circlip.Fig. 8-56
8-5720. Press ball bearing into cover, applying pressure to outer ring.Fig. 8-57
8-5821. Install circlip for ball bearing.Fig. 8-58
8-5922. Press shaft seal in flush, using tool No. 160260.Fig. 8-59
8-6023. Carefully guide shaft through shaft seal and press into ball bearing, while supporting cover on inner ring of ball bearing.Fig. 8-60
8-61Shown in Fig. 8-61 is the complete fan shroud hub.8. Shaft seal9. Circlip10. Needle bearing11. Shaft15. Fan shroud with guide vane blading16. Sleeve17. Angular-contact ball bearing18. Circlip
8-6224. Install inner circlip in fan shroud hub.Fig. 8-62
8-6325. Press in needle bearing.Fig. 8-63
8-6426. Install outer circlip.Fig. 8-64
8-6527. Install sleeve in fan shroud.Fig. 8-65
8-6628. Press angular-contact ball bearing into fan shroud hub, applying pressure to outer ring.Fig. 8-66
8-6729. Install circlip.Fig. 8-67
8-6830. Press shaft seal in flush, using tool No. 160260.Fig. 8-68
8-6931. Carefully guide shaft through shaft seal and press into angular-contact ball bearing, while supporting fan shroud hub on inner ring of bearing.Fig. 8-69
8-7032. Install complete coupling.Fig. 8-70
8-7133. Fit new O-seal on shaft (arrow).Fig. 8-71
8-7234. Place V-belt pulley in position. Fit new sealing nut. Oil thread beforehaFig. 8-72 Hold wrench against bolt flat.
8-7335. Preload nut with 50 Nm and tighten through 90°.Fig. 8-73
8-7436. Place new O-seal on cover and coat with grease.Fig. 8-74
8-7537. For easier guidance of the cover during installation insert three stud bolts beforehand. Install cover so that the oil deflector (arrow) is at the bottom of the cooling blower, at oil drain.Fig. 8-75
8-7638. Install cheese-head screws with new joint washers and tighten. (8.5+3 Nm)Fig. 8-76
8-7739. Fit O-seal.Fig. 8-77
8-7840. Install rotor.Fig. 8-7841. Screw new sealing nut in place, oiling thread well beforehand.
8-79 Hold wrench against bolt flat.Fig. 8-79
8-8042. Preload nut with 50 Nm and tighten through 90°.Fig. 8-80Dismantling And Installing The Hydraulic Oil Pump
Dismantling
1. Disconnect oil lines at the hydraulic pump.
8-812. Screw off cover. Screw nut off hydraulic pump shaft.Fig. 8-81
8-82
8-833. For earlier gear design, use puller No. 144700, Fig. 8-82, for new gear design, use puller No. 144750 to withdraw gear from shaft.Fig. 8-83
8-84 Fig. 8-84 shows the new gear design with inner groove (arrow).4. Release hydraulic pump and remove.Installing:
5. Mount hydraulic pump complete with new gasket.
8-856. Tighten nut to prescribed torque (see Specification Data).Fig. 8-85
8-867. Place new O-seal in position and mount cover.Fig. 8-86Remove And Refit Horizontal Coolant Oil Nozzle
8-891. Install drilling bush and operate 6.7 mm dia. drill.Fig. 8-89
8-902. Drilling depth: max approx. 12 mm.Fig. 8-90
8-913. Tap with M8 and remove nozzle by puller bush and screw.Fig. 8-91
8-924. Refit oil nozzle, using tool No. 151100. When installing nozzle in tool, check that parallel pin points towards cylinder head. Furthermore, check that