Information injection-pump assembly
ZEXEL
107692-5280
1076925280
Rating:
Cross reference number
ZEXEL
107692-5280
1076925280
Zexel num
Bosch num
Firm num
Name
107692-5280
INJECTION-PUMP ASSEMBLY
Calibration Data:
Adjustment conditions
Test oil
1404 Test oil ISO4113 or {SAEJ967d}
1404 Test oil ISO4113 or {SAEJ967d}
Test oil temperature
degC
40
40
45
Nozzle and nozzle holder
105780-8250
Bosch type code
1 688 901 101
Nozzle
105780-0120
Bosch type code
1 688 901 990
Nozzle holder
105780-2190
Opening pressure
MPa
20.7
Opening pressure
kgf/cm2
211
Injection pipe
Outer diameter - inner diameter - length (mm) mm 8-3-600
Outer diameter - inner diameter - length (mm) mm 8-3-600
Overflow valve
131425-0520
Overflow valve opening pressure
kPa
255
221
289
Overflow valve opening pressure
kgf/cm2
2.6
2.25
2.95
Tester oil delivery pressure
kPa
255
255
255
Tester oil delivery pressure
kgf/cm2
2.6
2.6
2.6
PS/ACT control unit part no.
407910-3
03*
Selector switch no.
01
PS/ACT control unit part no.
407980-2
24*
Digi switch no.
15
Direction of rotation (viewed from drive side)
Right R
Right R
Injection timing adjustment
Direction of rotation (viewed from drive side)
Right R
Right R
Injection order
1-4-2-6-
3-5
Pre-stroke
mm
5.1
5.07
5.13
Beginning of injection position
Drive side NO.1
Drive side NO.1
Difference between angles 1
Cal 1-4 deg. 60 59.75 60.25
Cal 1-4 deg. 60 59.75 60.25
Difference between angles 2
Cyl.1-2 deg. 120 119.75 120.25
Cyl.1-2 deg. 120 119.75 120.25
Difference between angles 3
Cal 1-6 deg. 180 179.75 180.25
Cal 1-6 deg. 180 179.75 180.25
Difference between angles 4
Cal 1-3 deg. 240 239.75 240.25
Cal 1-3 deg. 240 239.75 240.25
Difference between angles 5
Cal 1-5 deg. 300 299.75 300.25
Cal 1-5 deg. 300 299.75 300.25
Injection quantity adjustment
Adjusting point
-
Rack position
14.5
Pump speed
r/min
1300
1300
1300
Average injection quantity
mm3/st.
110.5
108.5
112.5
Max. variation between cylinders
%
0
-4
4
Basic
*
Fixing the rack
*
PS407980-224*
V
2.25+-0.
01
PS407980-224*
mm
3.1+-0.0
5
PS407910-303*
V
2.25+-0.
01
PS407910-303*
mm
3.1+-0.0
5
Standard for adjustment of the maximum variation between cylinders
*
Injection quantity adjustment_02
Adjusting point
Z
Rack position
8.6+-0.5
Pump speed
r/min
530
530
530
Average injection quantity
mm3/st.
30
28.2
31.8
Max. variation between cylinders
%
0
-10
10
Fixing the rack
*
PS407980-224*
V
V1+0.05+
-0.01
PS407980-224*
mm
5+-0.03
PS407910-303*
V
V1+0.05+
-0.01
PS407910-303*
mm
5+-0.03
Standard for adjustment of the maximum variation between cylinders
*
Remarks
Refer to items regarding the pre-stroke actuator
Refer to items regarding the pre-stroke actuator
Injection quantity adjustment_03
Adjusting point
A
Rack position
R1(14.5)
Pump speed
r/min
1300
1300
1300
Average injection quantity
mm3/st.
110.5
109.5
111.5
Basic
*
Fixing the lever
*
Boost pressure
kPa
24
24
Boost pressure
mmHg
180
180
PS407980-224*
V
2.25+-0.
01
PS407980-224*
mm
3.1+-0.0
5
PS407910-303*
V
2.25+-0.
01
PS407910-303*
mm
3.1+-0.0
5
Injection quantity adjustment_04
Adjusting point
B
Rack position
R1-2.25
Pump speed
r/min
800
800
800
Average injection quantity
mm3/st.
96.5
92.5
100.5
Fixing the lever
*
Boost pressure
kPa
24
24
Boost pressure
mmHg
180
180
PS407980-224*
V
2.25+-0.
01
PS407980-224*
mm
3.1+-0.0
5
PS407910-303*
V
2.25+-0.
01
PS407910-303*
mm
3.1+-0.0
5
Injection quantity adjustment_05
Adjusting point
C
Rack position
(R2-0.35
)+-0.2
Pump speed
r/min
350
350
350
Average injection quantity
mm3/st.
45
43
47
Fixing the lever
*
Boost pressure
kPa
0
0
0
Boost pressure
mmHg
0
0
0
PS407980-224*
V
2.25+-0.
01
PS407980-224*
mm
3.1+-0.0
5
PS407910-303*
V
2.25+-0.
01
PS407910-303*
mm
3.1+-0.0
5
Boost compensator adjustment
Pump speed
r/min
350
350
350
Rack position
(R2-0.35
)
Boost pressure
kPa
6.7
5.4
8
Boost pressure
mmHg
50
40
60
Boost compensator adjustment_02
Pump speed
r/min
350
350
350
Rack position
R2(R1-4.
35)
Boost pressure
kPa
10.7
10.7
10.7
Boost pressure
mmHg
80
80
80
0000001601
CU407980-224*
*
Actuator retarding type
*
Supply voltage
V
12
11.5
12.5
Ambient temperature
degC
23
18
28
Pre-stroke
mm
2
1.95
2.05
Output voltage
V
2.83
2.82
2.84
Adjustment
*
_02
CU407980-224*
*
Supply voltage
V
12
11.5
12.5
Ambient temperature
degC
23
18
28
Pre-stroke
mm
5.1
5.07
5.13
Output voltage
V
1.2
1
1.4
Confirmation
*
Remarks
Output voltage V1
Output voltage V1
_03
CU407980-224*
*
Supply voltage
V
12
11.5
12.5
Ambient temperature
degC
23
18
28
Output voltage
V
3.05
3.05
Confirmation of operating range
*
_04
CU407910-303*
*
Actuator retarding type
*
Supply voltage
V
12
11.5
12.5
Ambient temperature
degC
23
18
28
Pre-stroke
mm
2
1.95
2.05
Output voltage
V
2.83
2.82
2.84
Adjustment
*
_05
CU407910-303*
*
Supply voltage
V
12
11.5
12.5
Ambient temperature
degC
23
18
28
Pre-stroke
mm
5.1
5.07
5.13
Output voltage
V
1.2
1
1.4
Confirmation
*
Remarks
Output voltage V1
Output voltage V1
_06
CU407910-303*
*
Supply voltage
V
12
11.5
12.5
Ambient temperature
degC
23
18
28
Output voltage
V
3.05
3.05
Confirmation of operating range
*
Test data Ex:
Governor adjustment
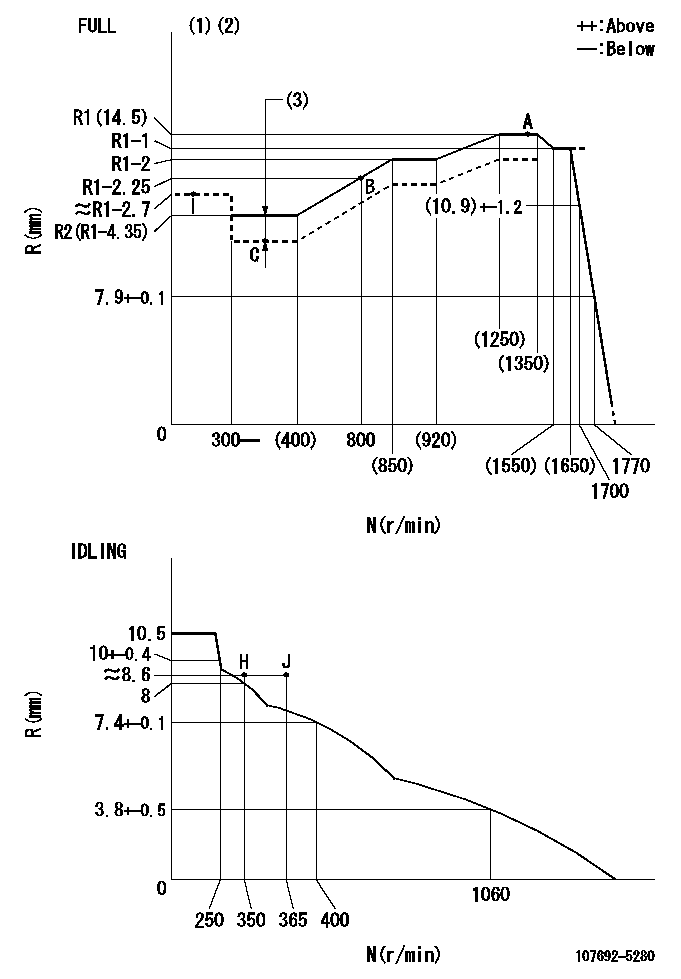
N:Pump speed
R:Rack position (mm)
(1)Torque cam stamping: T1
(2)Tolerance for racks not indicated: +-0.05mm.
(3)Boost compensator stroke: BCL
----------
T1=AG30 BCL=(0.35)mm
----------
----------
T1=AG30 BCL=(0.35)mm
----------
Speed control lever angle

F:Full speed
I:Idle
(1)Use the hole at R = aa
(2)Stopper bolt set position 'H'
----------
aa=93.5mm
----------
a=15deg+-5deg b=(35deg)+-3deg
----------
aa=93.5mm
----------
a=15deg+-5deg b=(35deg)+-3deg
Stop lever angle
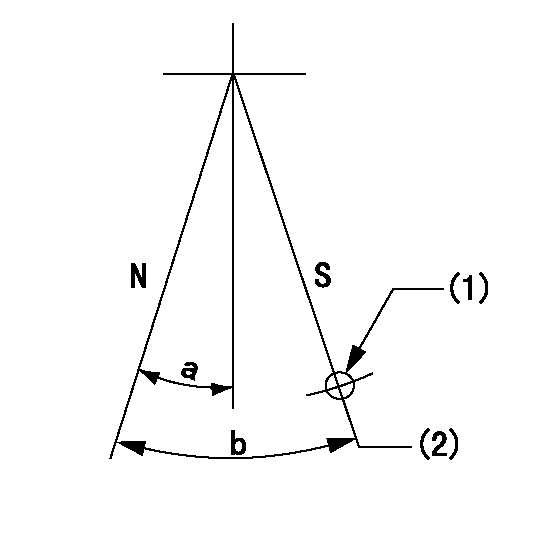
N:Pump normal
S:Stop the pump.
(1)Use the pin at R = aa
(2)Set the stopper bolt at rack position = bb (speed = cc).
----------
aa=37mm bb=1.5+-0.3mm cc=0r/min
----------
a=20deg+-5deg b=45deg+-5deg
----------
aa=37mm bb=1.5+-0.3mm cc=0r/min
----------
a=20deg+-5deg b=45deg+-5deg
0000001301
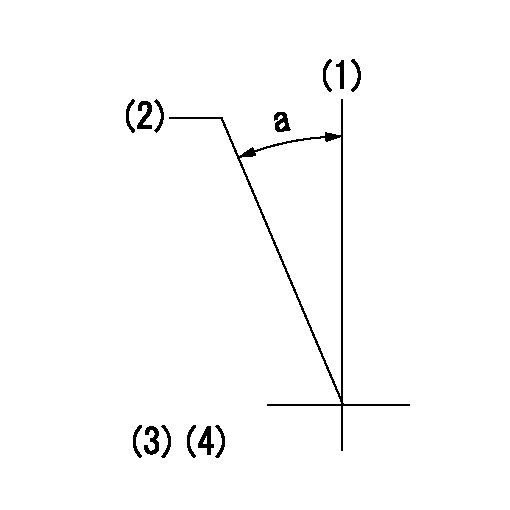
(1)Pump vertical direction
(2)Coupling's key groove position at No 1 cylinder's beginning of injection
(3)Pre-stroke: aa
(4)-
----------
aa=5.1+-0.03mm
----------
a=(20deg)
----------
aa=5.1+-0.03mm
----------
a=(20deg)
0000001401
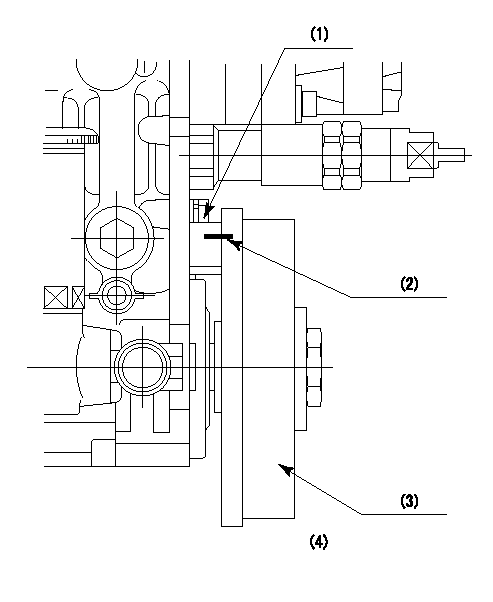
(1)Pointer
(2)Injection timing aligning mark
(3)Fly weight
(4)The actual shape and direction may be different from this illustration.
Operation sequence
1. Turn the prestroke actuator OFF.
2. Turn the camshaft as far as the No.1 cylinder's beginning of injection position.
3. Check that the pointer alignment mark of the injection pump and the alignment mark of the flywheel are matching.
4. If they are not matching, erase the alignment mark on the flywheel side, and stamp an alignment mark on the flywheel position that matches with the pointer side alignment mark.
5. Check again that the coupling's key groove position is in the No.1 cylinder's beginning of injection position.
----------
----------
----------
----------
0000001701
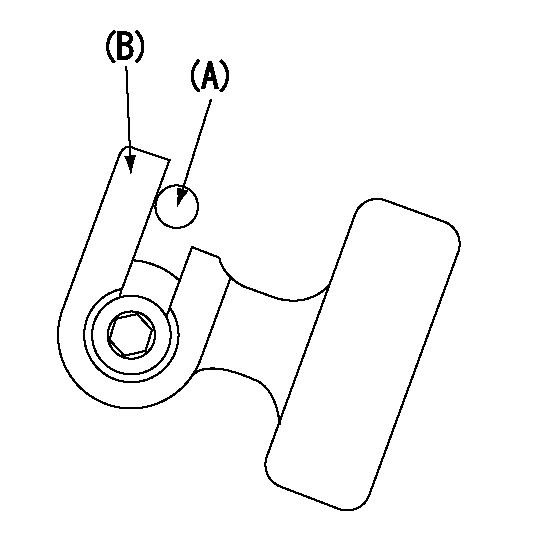
A : Stopper pin
B: Connector
----------
----------
----------
----------
0000001801
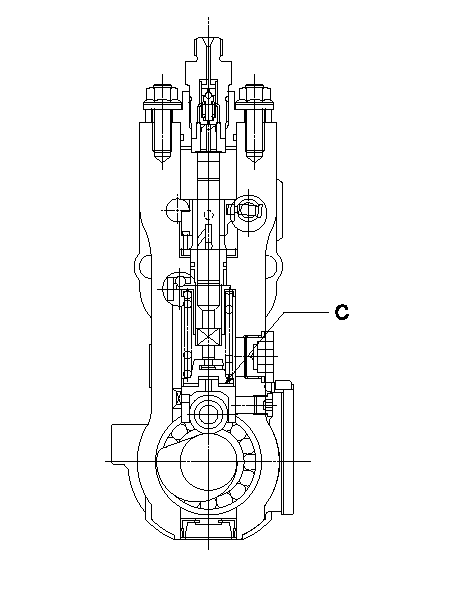
C:Shim
----------
----------
----------
----------
0000001901

A:Sealing position
B:Pre-stroke actuator
1. When installing the pre-stroke actuator on the pump, first tighten the installation bolts loosely, then move the actuator fully counterclockwise (viewed from the drive side).
Temporary tightening torque: 1 - 1.5 N.m (0.1 - 0.15 kgf.m)
2. Move the actuator in the clockwise direction when viewed from the drive side, and adjust so that it becomes the adjustment point of the adjustment value. Then tighten it.
Tightening torque: 7^9 N.m (0.7^0.9 kgf.m)
3. After prestroke actuator installation adjustment, simultaneously stamp both the actuator side and housing side.
----------
----------
----------
----------
0000002201 RACK SENSOR
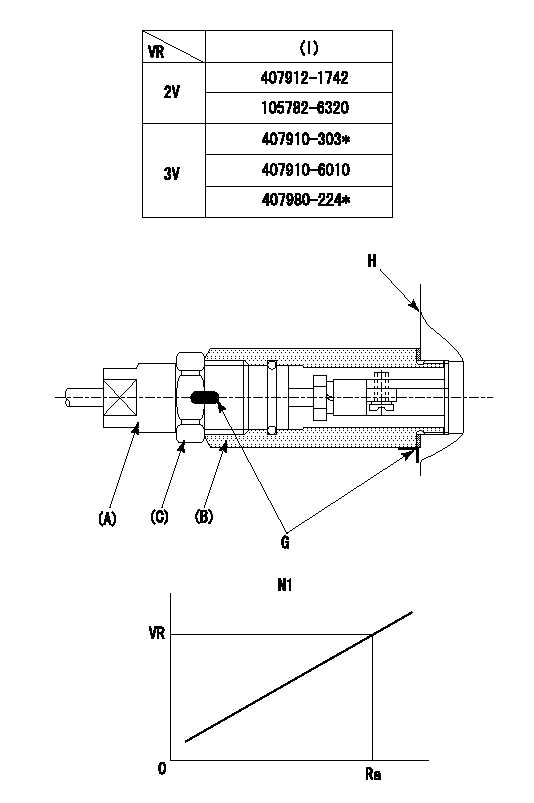
(VR) measurement voltage
(I) Part number of the control unit
(G) Apply red paint.
(H): End surface of the pump
1. Rack sensor adjustment (-0620)
(1)Fix the speed control lever at the full position
(2)Set the speed to N1 r/min.
(If the boost compensator is provided, apply boost pressure.)
(3)Adjust the bobbin (A) so that the rack sensor's output voltage is VR+-0.01.
(4)At that time, rack position must be Ra.
(5)Apply G at two places.
Connecting part between the joint (B) and the nut (F)
Connecting part between the joint (B) and the end surface of the pump (H)
----------
N1=1300r/min Ra=R1(14.5)mm
----------
----------
N1=1300r/min Ra=R1(14.5)mm
----------
Information:
Inspect/Replace Hoses and Clamps
Hose replacement prior to failure is a good preventive maintenance practice. Replacing a hose before it fails reduces the chances for unscheduled downtime. By replacing a hose that is cracked, soft or leaking, major repairs will be avoided that could result in a severe engine overheating problem.* Inspect all hoses for leaks due to cracking, softness and loose clamps.* Replace hoses that are cracked or soft and tighten loose clamps.Before Replacing Hoses
1. Loosen the cooling system filler cap slowly to relieve any pressure and remove the cap. 2. Drain the coolant from the cooling system to a level below the hose being replaced. Remove the hose clamps, disconnect the old hose and replace with a new hose. Install hose clamps. See the Torque for Standard Hose Clamps chart in the Torque Specifications section of this publication for the appropriate torque. After Replacing Hoses
Refer to the Cooling System Specifications section in this publication for information about cooling system requirements.3. Add proper coolant mixture to the cooling system. Fill system to the proper level. Install the filler cap. Start the engine and inspect for cooling system leaks. 4. Check coolant temperature reading frequently for proper operating temperature. Engine Air Cleaners
Never service the air cleaner with the engine running since this will allow dirt to enter the engine. Check the inlet piping for leaks. Make all repairs to inlet piping immediately, as dirt and debris could enter the engine causing damage to the turbocharger and engine components.Clean or replace elements using these recommendations and/or your weather and operating conditions, or when required by the restriction indicator.
Replace
Refer to SEBF8062, Guideline for Reusable Parts-Cleaning and Inspection of Air Filters. Regular service intervals, along with close visual inspection of the air cleaners are necessary for proper cleaning of the engine inlet air. The interval will vary with the weather and operating conditions. It will be necessary to service the air cleaners more frequently in salty, dry weather conditions or where airborne dust and debris is present. In damp weather conditions the service interval may be extended, however the elements should be replaced EVERY YEAR.Visual inspection of the gaskets and seals is important to keep dust from bypassing the cleaner elements. If the gaskets and seals or the element pleats are damaged, replace them. Extra filter elements should be kept on hand for replacement or for use while elements are being cleaned. Refer to topic Air Cleaner Indicator in the Daily maintenance for cleaning instructions. SR4 Generator
Before working inside the generator, make sure that the starting motor can not be activated by any automatic or manual signal.When servicing or repairing electric power generation equipment make sure the unit is off-line (disconnected from utility and/or other generators power service), and either locked out or tagged DO NOT OPERATE1. Remove all fuses.Make sure the generator engine is stopped.Make sure all batteries are disconnected.Make sure all capacitors are discharged.Failure to do so could result in personal injury or death.Make sure residual voltage
Have questions with 107692-5280?
Group cross 107692-5280 ZEXEL
Nissan-Diesel
Nissan-Diesel
Nissan-Diesel
Nissan-Diesel
Nissan-Diesel
Nissan-Diesel
Nissan-Diesel
Nissan-Diesel
107692-5280
INJECTION-PUMP ASSEMBLY