Information injection-pump assembly
ZEXEL
107692-1290
1076921290
ISUZU
8943915310
8943915310
Rating:
Service parts 107692-1290 INJECTION-PUMP ASSEMBLY:
1.
_
5.
AUTOM. ADVANCE MECHANIS
9.
_
11.
Nozzle and Holder
8-94394-606-5
12.
Open Pre:MPa(Kqf/cm2)
21.6{220}
15.
NOZZLE SET
Include in #1:
107692-1290
as INJECTION-PUMP ASSEMBLY
Cross reference number
ZEXEL
107692-1290
1076921290
ISUZU
8943915310
8943915310
Zexel num
Bosch num
Firm num
Name
Calibration Data:
Adjustment conditions
Test oil
1404 Test oil ISO4113 or {SAEJ967d}
1404 Test oil ISO4113 or {SAEJ967d}
Test oil temperature
degC
40
40
45
Nozzle and nozzle holder
105780-8250
Bosch type code
1 688 901 101
Nozzle
105780-0120
Bosch type code
1 688 901 990
Nozzle holder
105780-2190
Opening pressure
MPa
20.7
Opening pressure
kgf/cm2
211
Injection pipe
Outer diameter - inner diameter - length (mm) mm 8-3-600
Outer diameter - inner diameter - length (mm) mm 8-3-600
Overflow valve
131425-0520
Overflow valve opening pressure
kPa
255
221
289
Overflow valve opening pressure
kgf/cm2
2.6
2.25
2.95
Tester oil delivery pressure
kPa
255
255
255
Tester oil delivery pressure
kgf/cm2
2.6
2.6
2.6
PS/ACT control unit part no.
407980-2
24*
Digi switch no.
17
Direction of rotation (viewed from drive side)
Left L
Left L
Injection timing adjustment
Direction of rotation (viewed from drive side)
Left L
Left L
Injection order
1-5-3-6-
2-4
Pre-stroke
mm
5.1
5.07
5.13
Beginning of injection position
Governor side NO.1
Governor side NO.1
Difference between angles 1
Cal 1-5 deg. 60 59.75 60.25
Cal 1-5 deg. 60 59.75 60.25
Difference between angles 2
Cal 1-3 deg. 120 119.75 120.25
Cal 1-3 deg. 120 119.75 120.25
Difference between angles 3
Cal 1-6 deg. 180 179.75 180.25
Cal 1-6 deg. 180 179.75 180.25
Difference between angles 4
Cyl.1-2 deg. 240 239.75 240.25
Cyl.1-2 deg. 240 239.75 240.25
Difference between angles 5
Cal 1-4 deg. 300 299.75 300.25
Cal 1-4 deg. 300 299.75 300.25
Injection quantity adjustment
Adjusting point
-
Rack position
13.1
Pump speed
r/min
750
750
750
Average injection quantity
mm3/st.
102
100.4
103.6
Max. variation between cylinders
%
0
-2.5
2.5
Basic
*
Fixing the rack
*
PS407980-224*
V
2.25+-0.
01
PS407980-224*
mm
3.1+-0.0
5
Standard for adjustment of the maximum variation between cylinders
*
Injection quantity adjustment_02
Adjusting point
Z
Rack position
9.1+-0.5
Pump speed
r/min
420
420
420
Average injection quantity
mm3/st.
18.5
16.7
20.3
Max. variation between cylinders
%
0
-14
14
Fixing the rack
*
PS407980-224*
V
V1+0.05+
-0.01
PS407980-224*
mm
5+-0.03
Standard for adjustment of the maximum variation between cylinders
*
Remarks
Refer to items regarding the pre-stroke actuator
Refer to items regarding the pre-stroke actuator
Injection quantity adjustment_03
Adjusting point
A
Rack position
R1(13.1)
Pump speed
r/min
750
750
750
Average injection quantity
mm3/st.
102
101
103
Basic
*
Fixing the lever
*
Boost pressure
kPa
60
60
Boost pressure
mmHg
450
450
PS407980-224*
V
2.25+-0.
01
PS407980-224*
mm
3.1+-0.0
5
Boost compensator adjustment
Pump speed
r/min
300
300
300
Rack position
R2-1.9
Boost pressure
kPa
17.3
16
18.6
Boost pressure
mmHg
130
120
140
Boost compensator adjustment_02
Pump speed
r/min
300
300
300
Rack position
R2(R1-0.
35)
Boost pressure
kPa
46.7
46.7
46.7
Boost pressure
mmHg
350
350
350
0000001601
CU407980-224*
*
Actuator retarding type
*
Supply voltage
V
24
23.5
24.5
Ambient temperature
degC
23
18
28
Pre-stroke
mm
2
1.95
2.05
Output voltage
V
2.83
2.82
2.84
Adjustment
*
_02
CU407980-224*
*
Supply voltage
V
24
23.5
24.5
Ambient temperature
degC
23
18
28
Pre-stroke
mm
5.1
5.07
5.13
Output voltage
V
1.2
1
1.4
Confirmation
*
Remarks
Output voltage V1
Output voltage V1
_03
CU407980-224*
*
Supply voltage
V
24
23.5
24.5
Ambient temperature
degC
23
18
28
Output voltage
V
3.05
3.05
Confirmation of operating range
*
Test data Ex:
Governor adjustment
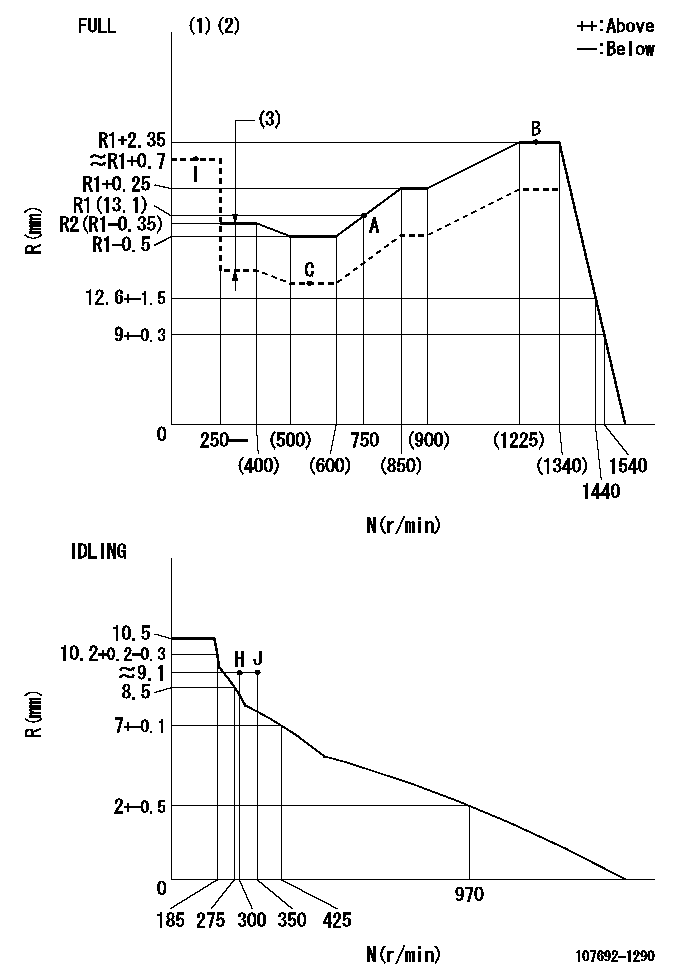
N:Pump speed
R:Rack position (mm)
(1)Torque cam stamping: T1
(2)Tolerance for racks not indicated: +-0.05mm.
(3)Boost compensator stroke: BCL
----------
T1=AB48 BCL=1.9+-0.1mm
----------
----------
T1=AB48 BCL=1.9+-0.1mm
----------
Speed control lever angle
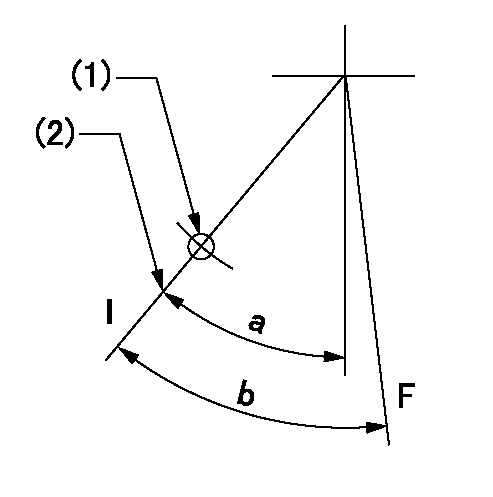
F:Full speed
I:Idle
(1)Use the hole at R = aa
(2)Stopper bolt set position 'H'
----------
aa=35mm
----------
a=31.5deg+-5deg b=34deg+-3deg
----------
aa=35mm
----------
a=31.5deg+-5deg b=34deg+-3deg
Stop lever angle
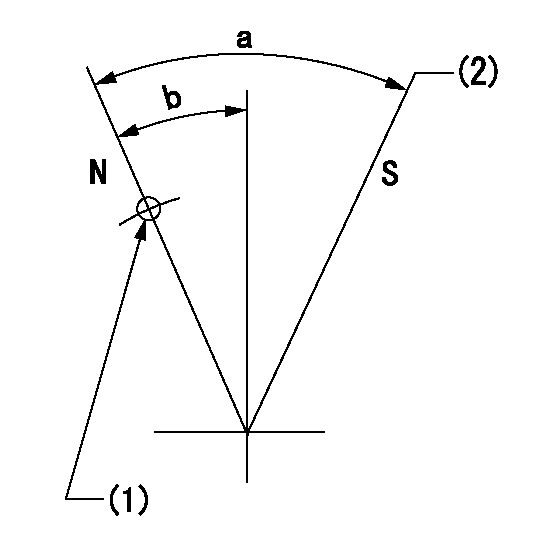
N:Pump normal
S:Stop the pump.
(1)Use the pin at R = aa
(2)Set the stopper bolt at speed = bb and rack position = cc (non-injection rack position). Confirm non-injection.
----------
aa=40mm bb=0r/min cc=1.5+-0.3mm
----------
a=44deg+-5deg b=12deg+-5deg
----------
aa=40mm bb=0r/min cc=1.5+-0.3mm
----------
a=44deg+-5deg b=12deg+-5deg
0000001301

(1)Pump vertical direction
(2)Position of flywheel's threaded hole at No 1 cylinder's beginning of injection
(3)B.T.D.C.: aa
(4)Pre-stroke: bb
----------
aa=4deg bb=5.1+-0.03mm
----------
a=(50deg)
----------
aa=4deg bb=5.1+-0.03mm
----------
a=(50deg)
0000001401
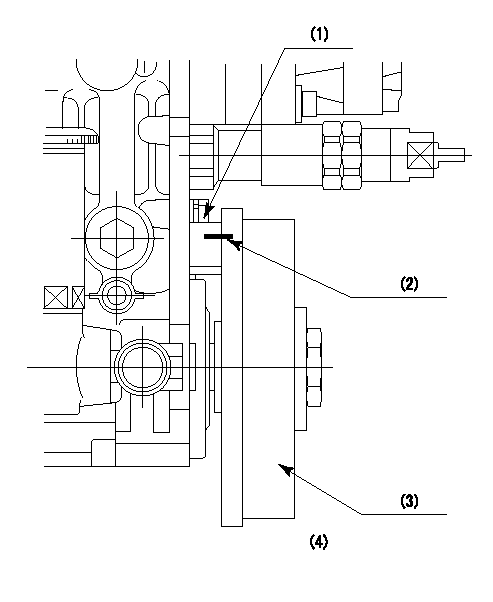
(1)Pointer
(2)Injection timing aligning mark
(3)Fly weight
(4)The actual shape and direction may be different from this illustration.
Operation sequence
1. Turn the prestroke actuator OFF.
2. Turn the camshaft as far as the No.1 cylinder's beginning of injection position.
3. Check that the pointer alignment mark of the injection pump and the alignment mark of the flywheel are matching.
4. If they are not matching, erase the alignment mark on the flywheel side, and stamp an alignment mark on the flywheel position that matches with the pointer side alignment mark.
5. Check again that the coupling's key groove position is in the No.1 cylinder's beginning of injection position.
----------
----------
----------
----------
0000001701
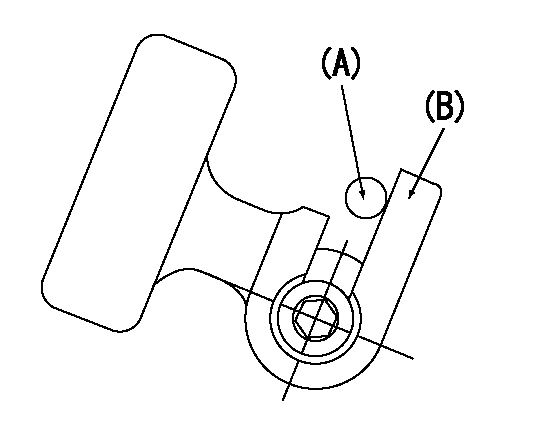
A : Stopper pin
B: Connector
----------
----------
----------
----------
0000001801
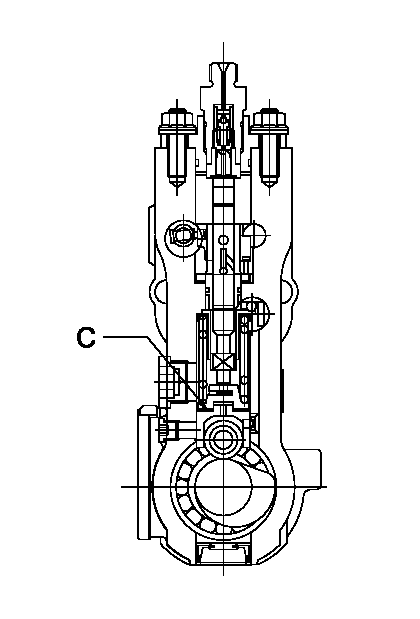
C:Shim
----------
----------
----------
----------
0000001901
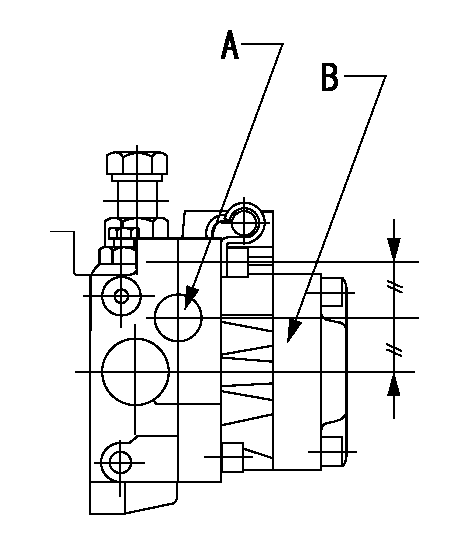
A:Sealing position
B:Pre-stroke actuator
1. When installing the pre-stroke actuator on the pump, first tighten the installation bolts loosely, then move the actuator fully clockwise (viewed from the drive side).
Temporary tightening torque: 1 - 1.5 N.m (0.1 - 0.15 kgf.m)
2. Move the actuator in the counterclockwise direction when viewed from the drive side, and adjust so that it becomes the adjustment point of the adjustment value. Then tighten it.
Tightening torque: 7^9 N.m (0.7^0.9 kgf.m)
3. After prestroke actuator installation adjustment, simultaneously stamp both the actuator side and housing side.
----------
----------
----------
----------
0000002201 RACK SENSOR
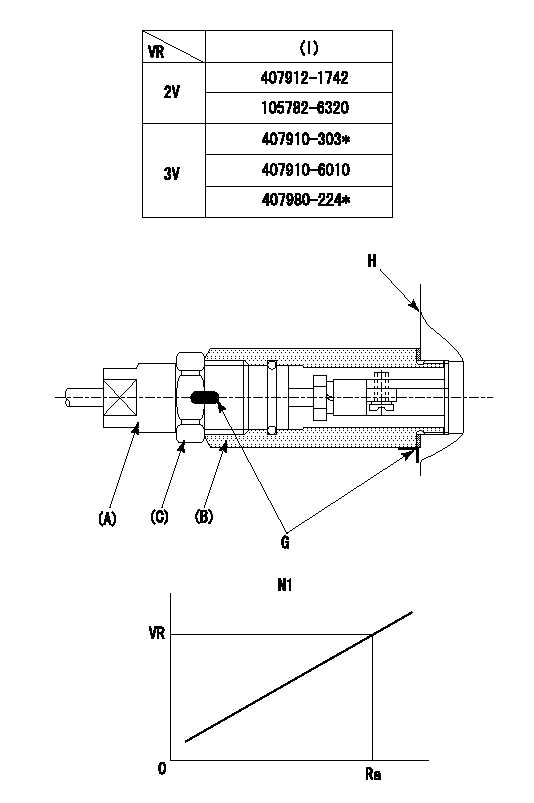
(VR) measurement voltage
(I) Part number of the control unit
(G) Apply red paint.
(H): End surface of the pump
1. Rack sensor adjustment (-0620)
(1)Fix the speed control lever at the full position
(2)Set the speed to N1 r/min.
(If the boost compensator is provided, apply boost pressure.)
(3)Adjust the bobbin (A) so that the rack sensor's output voltage is VR+-0.01.
(4)At that time, rack position must be Ra.
(5)Apply G at two places.
Connecting part between the joint (B) and the nut (F)
Connecting part between the joint (B) and the end surface of the pump (H)
----------
N1=1250r/min Ra=R1(13.1)+2.35mm
----------
----------
N1=1250r/min Ra=R1(13.1)+2.35mm
----------
Information:
Caterpillar's Scheduled Oil Sampling (S O S) Program is a series of diagnostic tests designed to identify and measure contamination and condition of oil in an engine's crankcase. S O S is also used to determine oil performance and component wear rates and is the best indicator for determining what is happening inside your engine.Caterpillar recommends using Scheduled Oil Sampling (S O S), at regularly scheduled intervals, to compliment a good preventive maintenance program.The Caterpillar Scheduled Oil Sampling Program (S O S), was developed to help Caterpillar users realize the highest possible value from their equipment by minimizing repair costs and maximizing availability. The S O S program is a series of diagnostic tests which analyze used lubricating oils from the oil wetted compartments of the equipment. By analyzing the used oils, problems may be identified early, before extensive component failure occurs. This reduces repair cost and down-time.The S O S program is coupled with a wide range of repair options so that when a problem is identified, an appropriate matched repair plan is available. This offers the user a more complete service to minimize repair costs and schedule down-time. S O S can also measure the effectiveness of the user's maintenance program.S O S Analysis
S O S is composed of three basic tests:* Wear Analysis* Chemical and Physical Tests* Oil Condition Analysis Wear Analysis is performed with an atomic absorption spectrophotometer to monitor component wear rates by identifying and measuring concentrations, in parts per million, of wear elements present in the used oil.Based on known normal concentration data, maximum limits of wear elements are established. Impending failures can be identified when test results deviate from concentration levels established as acceptable, based on normal wear.Through monitoring the used oil, normal component wear trends are determined. Many failures can be identified when wear trends and/or contaminants significantly exceed past trends.Detectable failures are those caused by component wear and gradual contamination from dirt, fuel, water or antifreeze. Wear analysis is not able to predict failures due to component fatigue, sudden loss of lubrication, or sudden ingestion of a large amount of dirt or contaminants since failures of this nature occur too rapidly. Chemical and Physical Tests detect the presence of water, fuel and/or glycol (antifreeze) in the oil and determine whether or not their concentrations exceed established maximum limits. Oil Condition Analysis is evaluated with Infrared Analysis and determines the degree of deterioration of the used oil by measuring the amount of contaminants such as sulfur products, oxidation, nitration products and soot present in the used oil.It also monitors additive depletion and detects ethylene glycol and butyl cellosolve contamination and can assist in customizing (reducing, maintaining or extending) oil change intervals for particular conditions and applications.Oil Condition Analysis can help regulate (reduce, maintain or extend), oil change intervals for a specific engine in a given application and MUST always be used with Wear Element Analysis and Chemical and Physical Tests to assure accurate diagnosis. Infrared Analysis must be used to
S O S is composed of three basic tests:* Wear Analysis* Chemical and Physical Tests* Oil Condition Analysis Wear Analysis is performed with an atomic absorption spectrophotometer to monitor component wear rates by identifying and measuring concentrations, in parts per million, of wear elements present in the used oil.Based on known normal concentration data, maximum limits of wear elements are established. Impending failures can be identified when test results deviate from concentration levels established as acceptable, based on normal wear.Through monitoring the used oil, normal component wear trends are determined. Many failures can be identified when wear trends and/or contaminants significantly exceed past trends.Detectable failures are those caused by component wear and gradual contamination from dirt, fuel, water or antifreeze. Wear analysis is not able to predict failures due to component fatigue, sudden loss of lubrication, or sudden ingestion of a large amount of dirt or contaminants since failures of this nature occur too rapidly. Chemical and Physical Tests detect the presence of water, fuel and/or glycol (antifreeze) in the oil and determine whether or not their concentrations exceed established maximum limits. Oil Condition Analysis is evaluated with Infrared Analysis and determines the degree of deterioration of the used oil by measuring the amount of contaminants such as sulfur products, oxidation, nitration products and soot present in the used oil.It also monitors additive depletion and detects ethylene glycol and butyl cellosolve contamination and can assist in customizing (reducing, maintaining or extending) oil change intervals for particular conditions and applications.Oil Condition Analysis can help regulate (reduce, maintain or extend), oil change intervals for a specific engine in a given application and MUST always be used with Wear Element Analysis and Chemical and Physical Tests to assure accurate diagnosis. Infrared Analysis must be used to