Information injection-pump assembly
ZEXEL
107692-1153
1076921153
ISUZU
8943954942
8943954942

Rating:
Cross reference number
ZEXEL
107692-1153
1076921153
ISUZU
8943954942
8943954942
Zexel num
Bosch num
Firm num
Name
Calibration Data:
Adjustment conditions
Test oil
1404 Test oil ISO4113 or {SAEJ967d}
1404 Test oil ISO4113 or {SAEJ967d}
Test oil temperature
degC
40
40
45
Nozzle and nozzle holder
105780-8250
Bosch type code
1 688 901 101
Nozzle
105780-0120
Bosch type code
1 688 901 990
Nozzle holder
105780-2190
Opening pressure
MPa
20.7
Opening pressure
kgf/cm2
211
Injection pipe
Outer diameter - inner diameter - length (mm) mm 8-3-600
Outer diameter - inner diameter - length (mm) mm 8-3-600
Overflow valve
131425-0520
Overflow valve opening pressure
kPa
255
221
289
Overflow valve opening pressure
kgf/cm2
2.6
2.25
2.95
Tester oil delivery pressure
kPa
255
255
255
Tester oil delivery pressure
kgf/cm2
2.6
2.6
2.6
PS/ACT control unit part no.
407910-3
03*
Selector switch no.
00
PS/ACT control unit part no.
407980-2
24*
Digi switch no.
11
Direction of rotation (viewed from drive side)
Left L
Left L
Injection timing adjustment
Direction of rotation (viewed from drive side)
Left L
Left L
Injection order
1-5-3-6-
2-4
Pre-stroke
mm
1.9
1.87
1.93
Beginning of injection position
Governor side NO.1
Governor side NO.1
Difference between angles 1
Cal 1-5 deg. 60 59.75 60.25
Cal 1-5 deg. 60 59.75 60.25
Difference between angles 2
Cal 1-3 deg. 120 119.75 120.25
Cal 1-3 deg. 120 119.75 120.25
Difference between angles 3
Cal 1-6 deg. 180 179.75 180.25
Cal 1-6 deg. 180 179.75 180.25
Difference between angles 4
Cyl.1-2 deg. 240 239.75 240.25
Cyl.1-2 deg. 240 239.75 240.25
Difference between angles 5
Cal 1-4 deg. 300 299.75 300.25
Cal 1-4 deg. 300 299.75 300.25
Injection quantity adjustment
Adjusting point
-
Rack position
14.3
Pump speed
r/min
750
750
750
Average injection quantity
mm3/st.
120.5
118.9
122.1
Max. variation between cylinders
%
0
-2.5
2.5
Basic
*
Fixing the rack
*
PS407980-224*
V
1.88+-0.
01
PS407980-224*
mm
3.2+-0.0
5
PS407910-303*
V
1.88+-0.
01
PS407910-303*
mm
3.2+-0.0
5
Standard for adjustment of the maximum variation between cylinders
*
Injection quantity adjustment_02
Adjusting point
Z
Rack position
9+-0.5
Pump speed
r/min
420
420
420
Average injection quantity
mm3/st.
19
17.7
20.3
Max. variation between cylinders
%
0
-14
14
Fixing the rack
*
PS407980-224*
V
V1-0.05+
-0.01
PS407980-224*
mm
4.9+-0.0
3
PS407910-303*
V
V1-0.05+
-0.01
PS407910-303*
mm
4.9+-0.0
3
Standard for adjustment of the maximum variation between cylinders
*
Remarks
Refer to items regarding the pre-stroke actuator
Refer to items regarding the pre-stroke actuator
Injection quantity adjustment_03
Adjusting point
A
Rack position
R1(14.3)
Pump speed
r/min
750
750
750
Average injection quantity
mm3/st.
120.5
119.5
121.5
Basic
*
Fixing the lever
*
Boost pressure
kPa
61.3
61.3
Boost pressure
mmHg
460
460
PS407980-224*
V
1.88+-0.
01
PS407980-224*
mm
3.2+-0.0
5
PS407910-303*
V
1.88+-0.
01
PS407910-303*
mm
3.2+-0.0
5
Boost compensator adjustment
Pump speed
r/min
300
300
300
Rack position
R2-2.7
Boost pressure
kPa
17.3
16
18.6
Boost pressure
mmHg
130
120
140
Boost compensator adjustment_02
Pump speed
r/min
300
300
300
Rack position
R2(R1-0.
55)
Boost pressure
kPa
48
48
48
Boost pressure
mmHg
360
360
360
0000001601
CU407980-224*
*
Actuator advancing type
*
Supply voltage
V
12
11.5
12.5
Ambient temperature
degC
23
18
28
Pre-stroke
mm
5
4.95
5.05
Output voltage
V
2.83
2.82
2.84
Adjustment
*
Remarks
Output voltage V1
Output voltage V1
_02
CU407980-224*
*
Supply voltage
V
12
11.5
12.5
Ambient temperature
degC
23
18
28
Pre-stroke
mm
1.9
1.87
1.93
Output voltage
V
1.2
1
1.4
Confirmation
*
_03
CU407980-224*
*
Supply voltage
V
12
11.5
12.5
Ambient temperature
degC
23
18
28
Output voltage
V
3.05
3.05
Confirmation of operating range
*
_04
CU407910-303*
*
Actuator advancing type
*
Supply voltage
V
12
11.5
12.5
Ambient temperature
degC
23
18
28
Pre-stroke
mm
5
4.95
5.05
Output voltage
V
2.83
2.82
2.84
Adjustment
*
Remarks
Output voltage V1
Output voltage V1
_05
CU407910-303*
*
Supply voltage
V
12
11.5
12.5
Ambient temperature
degC
23
18
28
Pre-stroke
mm
1.9
1.87
1.93
Output voltage
V
1.2
1
1.4
Confirmation
*
_06
CU407910-303*
*
Supply voltage
V
12
11.5
12.5
Ambient temperature
degC
23
18
28
Output voltage
V
3.05
3.05
Confirmation of operating range
*
Test data Ex:
Governor adjustment
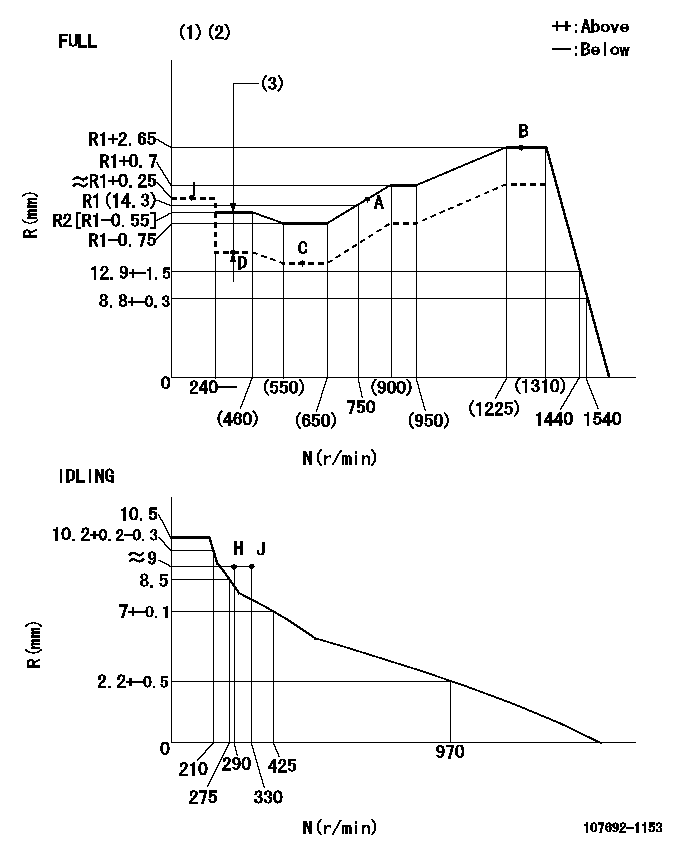
N:Pump speed
R:Rack position (mm)
(1)Torque cam stamping: T1
(2)Tolerance for racks not indicated: +-0.05mm.
(3)Boost compensator stroke: BCL
----------
T1=AB47 BCL=2.7+-0.1mm
----------
----------
T1=AB47 BCL=2.7+-0.1mm
----------
Speed control lever angle
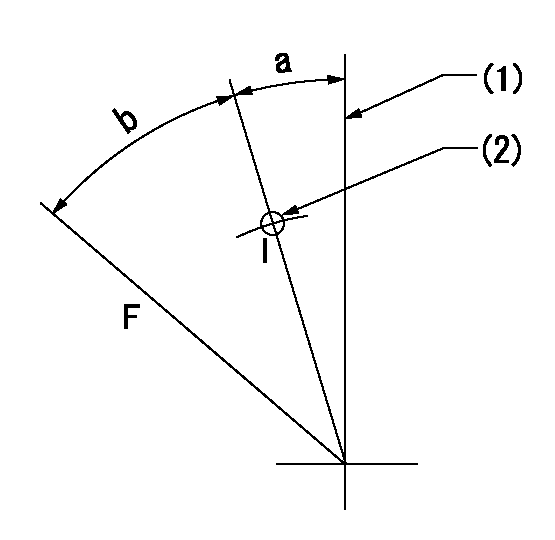
F:Full speed
I:Idle
(1)Stopper bolt setting
(2)Use the pin at R = aa
----------
aa=35mm
----------
a=2deg+-5deg b=33.5deg+-3deg
----------
aa=35mm
----------
a=2deg+-5deg b=33.5deg+-3deg
Stop lever angle
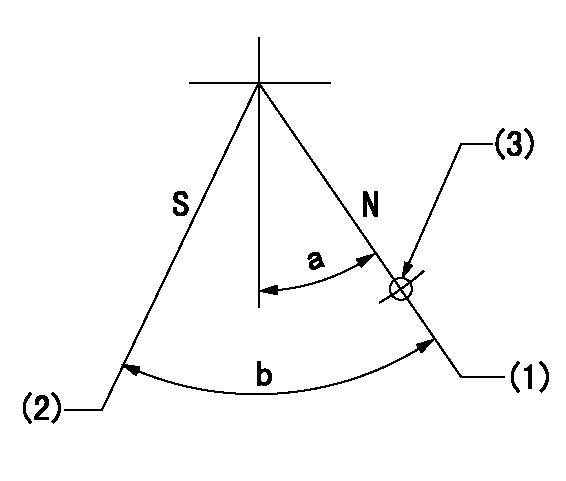
N:Pump normal
S:Stop the pump.
(1)-
(2)Set the stopper bolt at speed = aa and rack position = bb and confirm non-injection.
(3)Use the pin above R = cc
----------
aa=0r/min bb=1.5+-0.3mm cc=40mm
----------
a=12deg+-5deg b=44deg+-5deg
----------
aa=0r/min bb=1.5+-0.3mm cc=40mm
----------
a=12deg+-5deg b=44deg+-5deg
0000001301

(1)Pump vertical direction
(2)Position of flywheel's threaded hole at No 1 cylinder's beginning of injection
(3)B.T.D.C.: aa
(4)Pre-stroke: bb
----------
aa=19deg bb=1.9+-0.03mm
----------
a=(60deg)
----------
aa=19deg bb=1.9+-0.03mm
----------
a=(60deg)
0000001401
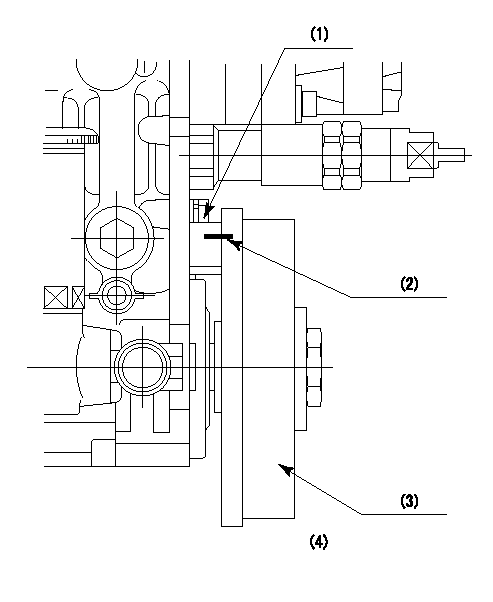
(1)Pointer
(2)Injection timing aligning mark
(3)Fly weight
(4)The actual shape and direction may be different from this illustration.
Operation sequence
1. Turn the prestroke actuator OFF.
2. Turn the camshaft as far as the No.1 cylinder's beginning of injection position.
3. Check that the pointer alignment mark of the injection pump and the alignment mark of the flywheel are matching.
4. If they are not matching, erase the alignment mark on the flywheel side, and stamp an alignment mark on the flywheel position that matches with the pointer side alignment mark.
5. Check again that the coupling's key groove position is in the No.1 cylinder's beginning of injection position.
----------
----------
----------
----------
0000001701
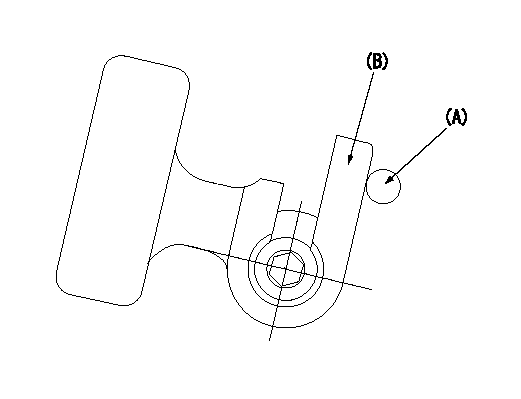
A : Stopper pin
B: Connector
----------
----------
----------
----------
0000001801
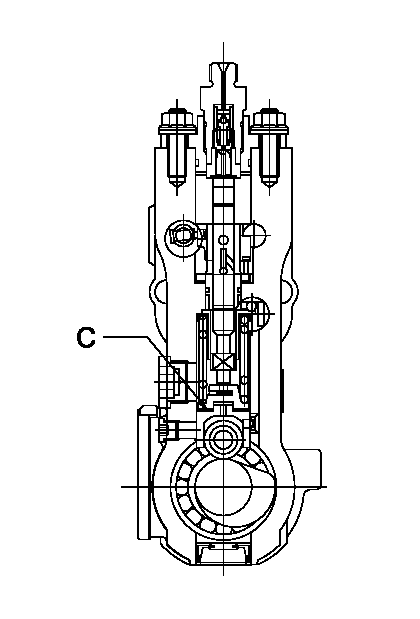
C:Shim
----------
----------
----------
----------
0000001901
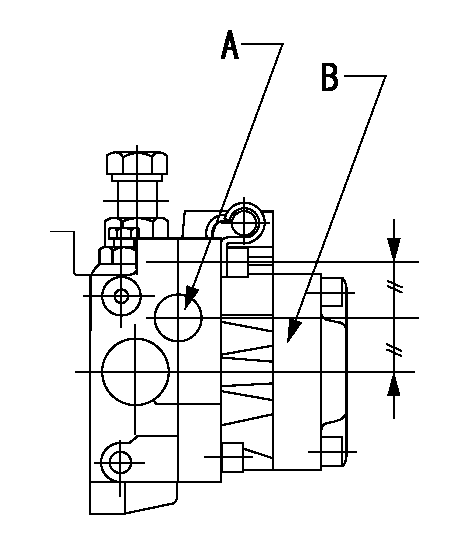
A:Sealing position
B:Pre-stroke actuator
1. When installing the pre-stroke actuator on the pump, first tighten the installation bolts loosely, then move the actuator fully clockwise (viewed from the drive side).
Temporary tightening torque: 1 - 1.5 N.m (0.1 - 0.15 kgf.m)
2. Move the actuator in the counterclockwise direction when viewed from the drive side, and adjust so that it becomes the adjustment point of the adjustment value. Then tighten it.
Tightening torque: 7^9 N.m (0.7^0.9 kgf.m)
3. After prestroke actuator installation adjustment, simultaneously stamp both the actuator side and housing side.
----------
----------
----------
----------
0000002201 RACK SENSOR
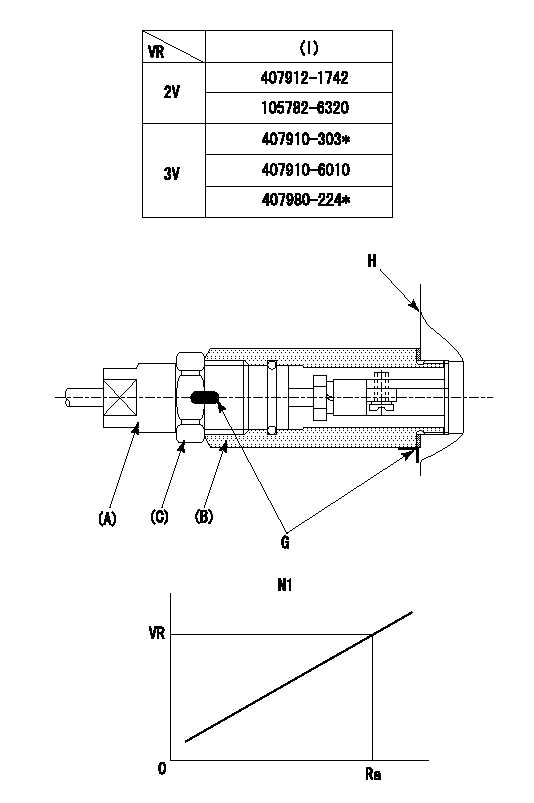
(VR) measurement voltage
(I) Part number of the control unit
(G) Apply red paint.
(H): End surface of the pump
1. Rack sensor adjustment (-0620)
(1)Fix the speed control lever at the full position
(2)Set the speed to N1 r/min.
(If the boost compensator is provided, apply boost pressure.)
(3)Adjust the bobbin (A) so that the rack sensor's output voltage is VR+-0.01.
(4)At that time, rack position must be Ra.
(5)Apply G at two places.
Connecting part between the joint (B) and the nut (F)
Connecting part between the joint (B) and the end surface of the pump (H)
----------
N1=1250r/min Ra=R1(14.3)+2.65mm
----------
----------
N1=1250r/min Ra=R1(14.3)+2.65mm
----------
0000002301 ACS
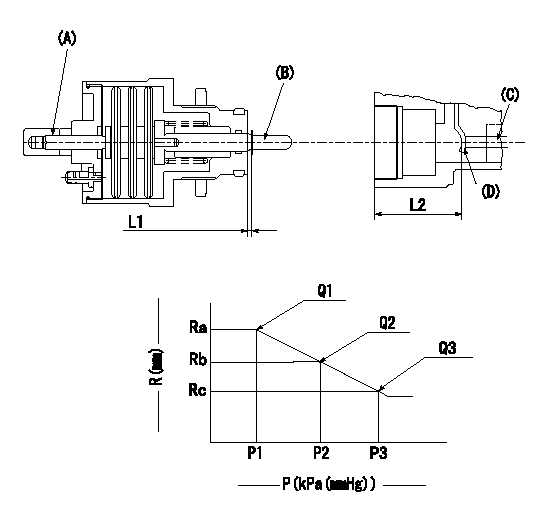
(A) Set screw
(B) Push rod 1
(C) Push rod 2
(D) Lever
1. Aneroid compensator unit adjustment
(1)Screw in (A) to obtain L1.
(2)Select C so that dimension L2 can be obtained.
2. Adjustment when mounting the governor.
(1)Set the speed of the pump to N1 r/min and fix the control lever at the full set position.
(2)Set to full boost.
(3)Screw in the aneroid compensator body to obtain the performance shown in the graph above.
(4)As there is hysterisis, measure when the absolute pressure drops.
(5)Hysterisis must not exceed rack position = h1.
----------
N1=1250r/min L1=1.5+-0.5mm L2=37.5+-0.5mm h1=0.15mm
----------
Ra=R3(R1+2.65)mm Rb=R3-0.15mm Rc=R3-0.5mm P1=(89.9)+-2.7kPa((674)+-20mmHg) P2=84.7+-2.7kPa(635+-20mmHg) P3=70.1+-0.7kPa(526+-5mmHg) Q1=(131.5)cm3/1000st Q2=(130)cm3/1000st Q3=(125.5)+-2cm3/1000st
----------
N1=1250r/min L1=1.5+-0.5mm L2=37.5+-0.5mm h1=0.15mm
----------
Ra=R3(R1+2.65)mm Rb=R3-0.15mm Rc=R3-0.5mm P1=(89.9)+-2.7kPa((674)+-20mmHg) P2=84.7+-2.7kPa(635+-20mmHg) P3=70.1+-0.7kPa(526+-5mmHg) Q1=(131.5)cm3/1000st Q2=(130)cm3/1000st Q3=(125.5)+-2cm3/1000st
Information:
Cooling
Never add coolant to an overheated engine; allow the engine to cool first.Check specific gravity of antifreeze solution frequently in cold weather to assure adequate protection.Coolant should be drained and replaced "Every 2000 Service Meter Units." With additions of Caterpillar Cooling System Inhibitor or the use of Coolant Conditioner Elements as recommended, the drain period can be extended to "Every 4000 Service Meter Units."All water is corrosive at engine operating temperature. The cooling system should be protected with inhibitor at all times regardless of concentration of antifreeze. This can be done by maintaining a 3% concentration of liquid Caterpillar Cooling System Inhibitor or by using Coolant Conditioner Elements.Never use both the liquid cooling system inhibitor and coolant elements at the same time.Do not use Caterpillar Cooling System Inhibitor or Coolant Conditioner Elements with Dowtherm 209 Full-Fill Coolant.
Whenever draining and refilling cooling system, always recheck the coolant level when the engine reaches normal operating temperature.Filling at over 5 U.S. gallons (19 liters) per minute can cause air pockets in the cooling system.Premix antifreeze solution to provide protection to the lowest expected ambient temperature. Pure undiluted antifreeze will freeze at -10°F (-23°C).Operate with a thermostat in the cooling system all year-round. Cooling system problems can arise without a thermostat.Electrical
When using jumper cables to start the engine, be sure to connect in parallel: POSITIVE (+) to POSITIVE (+) and NEGATIVE (-) to NEGATIVE (-).
Scheduled Oil Sampling
Use Scheduled Oil Sampling to monitor the engine's condition and maintenance requirements.Each oil sample should be taken when the oil is hot, and well mixed, to insure a sample which is representative of the oil in the compartment.Consult your Caterpillar dealer for complete information, and assistance in establishing a Scheduled Oil Sampling program for your equipment.Fuel
Fill fuel tank at the end of each day of operation to drive out moisture laden air and to prevent condensation. Do not fill the tank to the brim. The fuel expands when it gets warm and may overflow.
Water and sediment should be drained from the fuel tank at the start of each shift or after the fuel tank has been filled and allowed to stand for 5 to 10 minutes.Drain fuel tank of moisture and sediment as required by prevailing conditions.After changing fuel filters, always bleed fuel system to remove air bubbles from system.Air Intake
Service air cleaners when RED band in indicator locks in visible position.