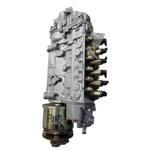
Information injection-pump assembly
BOSCH
9 400 612 510
9400612510
ZEXEL
107691-3263
1076913263
HINO
220401242B
220401242b
Rating:
Compare Prices: .
As an associate, we earn commssions on qualifying purchases through the links below
Fuel Injection Pump 107691-3263 105411-2760 Compatible For HinoH17D-T J08C FT-1 F-2 H06CT P09B-TI P11C-TC Diesel Pump
VSQQGPSV Through high-precision pressure, fuel can be fully atomized, promoting complete combustion and improving fuel economy. || High precision manufacturing processes ensure the accuracy of fuel metering and injection. || Excellent design minimizes noise and vibration during operation, providing you with a quieter and more comfortable driving experience. || A good fuel injection pump is crucial for engine power, fuel efficiency, and fuel economy. || Fuel Injection Pump 107691-3263 105411-2760 Compatible For HinoH17D-T J08C FT-1 F-2 H06CT P09B-TI P11C-TC Diesel Pump
VSQQGPSV Through high-precision pressure, fuel can be fully atomized, promoting complete combustion and improving fuel economy. || High precision manufacturing processes ensure the accuracy of fuel metering and injection. || Excellent design minimizes noise and vibration during operation, providing you with a quieter and more comfortable driving experience. || A good fuel injection pump is crucial for engine power, fuel efficiency, and fuel economy. || Fuel Injection Pump 107691-3263 105411-2760 Compatible For HinoH17D-T J08C FT-1 F-2 H06CT P09B-TI P11C-TC Diesel Pump
You can express buy:
USD 1479.11
25-06-2025
25-06-2025
Original ! Zexel TICS Fuel Injection Pump 107691-3263 105411-2760 for HinoH17D-T J08C FT-1 F-2 H06CT P09B-TI P11C-TC Diesel pump
Service parts 107691-3263 INJECTION-PUMP ASSEMBLY:
1.
_
7.
COUPLING PLATE
9.
_
11.
Nozzle and Holder
23600-3222B
12.
Open Pre:MPa(Kqf/cm2)
17.7{180}/21.6{220}
14.
NOZZLE
Include in #1:
107691-3263
as INJECTION-PUMP ASSEMBLY
Cross reference number
BOSCH
9 400 612 510
9400612510
ZEXEL
107691-3263
1076913263
HINO
220401242B
220401242b
Zexel num
Bosch num
Firm num
Name
107691-3263
9 400 612 510
220401242B HINO
INJECTION-PUMP ASSEMBLY
J08C-TT K 14CG INJECTION PUMP ASSY TICS MD-TI6 TICS
J08C-TT K 14CG INJECTION PUMP ASSY TICS MD-TI6 TICS
107691-3263
9 400 612 510
S220401242 HINO
INJECTION-PUMP ASSEMBLY
J08C-TT A K 14CG INJECTION PUMP ASSY TICS MD-TI6 TICS
J08C-TT A K 14CG INJECTION PUMP ASSY TICS MD-TI6 TICS
Calibration Data:
Adjustment conditions
Test oil
1404 Test oil ISO4113 or {SAEJ967d}
1404 Test oil ISO4113 or {SAEJ967d}
Test oil temperature
degC
40
40
45
Nozzle and nozzle holder
105780-8250
Bosch type code
1 688 901 101
Nozzle
105780-0120
Bosch type code
1 688 901 990
Nozzle holder
105780-2190
Opening pressure
MPa
20.7
Opening pressure
kgf/cm2
211
Injection pipe
Outer diameter - inner diameter - length (mm) mm 8-3-600
Outer diameter - inner diameter - length (mm) mm 8-3-600
Overflow valve
131425-0920
Overflow valve opening pressure
kPa
255
221
289
Overflow valve opening pressure
kgf/cm2
2.6
2.25
2.95
Tester oil delivery pressure
kPa
255
255
255
Tester oil delivery pressure
kgf/cm2
2.6
2.6
2.6
PS/ACT control unit part no.
407980-2
24*
Digi switch no.
17
Direction of rotation (viewed from drive side)
Left L
Left L
Injection timing adjustment
Direction of rotation (viewed from drive side)
Left L
Left L
Injection order
1-4-2-6-
3-5
Pre-stroke
mm
5.1
5.07
5.13
Beginning of injection position
Governor side NO.1
Governor side NO.1
Difference between angles 1
Cal 1-4 deg. 60 59.75 60.25
Cal 1-4 deg. 60 59.75 60.25
Difference between angles 2
Cyl.1-2 deg. 120 119.75 120.25
Cyl.1-2 deg. 120 119.75 120.25
Difference between angles 3
Cal 1-6 deg. 180 179.75 180.25
Cal 1-6 deg. 180 179.75 180.25
Difference between angles 4
Cal 1-3 deg. 240 239.75 240.25
Cal 1-3 deg. 240 239.75 240.25
Difference between angles 5
Cal 1-5 deg. 300 299.75 300.25
Cal 1-5 deg. 300 299.75 300.25
Injection quantity adjustment
Adjusting point
-
Rack position
12.7
Pump speed
r/min
750
750
750
Average injection quantity
mm3/st.
123
120
126
Max. variation between cylinders
%
0
-3.5
3.5
Basic
*
Fixing the rack
*
PS407980-224*
V
2.25+-0.
01
PS407980-224*
mm
3.1+-0.0
5
Standard for adjustment of the maximum variation between cylinders
*
Injection quantity adjustment_02
Adjusting point
Z
Rack position
8+-0.5
Pump speed
r/min
440
440
440
Each cylinder's injection qty
mm3/st.
13.5
12.5
14.5
Fixing the rack
*
PS407980-224*
V
V1+0.05+
-0.01
PS407980-224*
mm
5+-0.03
Standard for adjustment of the maximum variation between cylinders
*
Remarks
Refer to items regarding the pre-stroke actuator
Refer to items regarding the pre-stroke actuator
Injection quantity adjustment_03
Adjusting point
A
Rack position
R1(12.7)
Pump speed
r/min
750
750
750
Average injection quantity
mm3/st.
123
121
125
Basic
*
Fixing the lever
*
Boost pressure
kPa
72
72
Boost pressure
mmHg
540
540
PS407980-224*
V
2.25+-0.
01
PS407980-224*
mm
3.1+-0.0
5
Injection quantity adjustment_04
Adjusting point
B
Rack position
R1+2.15
Pump speed
r/min
1250
1250
1250
Average injection quantity
mm3/st.
135.5
129.5
141.5
Fixing the lever
*
Boost pressure
kPa
72
72
Boost pressure
mmHg
540
540
PS407980-224*
V
2.25+-0.
01
PS407980-224*
mm
3.1+-0.0
5
Injection quantity adjustment_05
Adjusting point
C
Rack position
(R2-0.9)
Pump speed
r/min
300
300
300
Average injection quantity
mm3/st.
91
88
94
Fixing the lever
*
Boost pressure
kPa
0
0
0
Boost pressure
mmHg
0
0
0
PS407980-224*
V
2.25+-0.
01
PS407980-224*
mm
3.1+-0.0
5
Boost compensator adjustment
Pump speed
r/min
300
300
300
Rack position
(R2-0.9)
Boost pressure
kPa
24.7
23.4
26
Boost pressure
mmHg
185
175
195
Boost compensator adjustment_02
Pump speed
r/min
300
300
300
Rack position
R2(R1-1)
Boost pressure
kPa
58.7
58.7
58.7
Boost pressure
mmHg
440
440
440
Timer adjustment
Pump speed
r/min
0
Advance angle
deg.
0
0
0
Timer adjustment_02
Pump speed
r/min
-
Advance angle
deg.
0
0
0
Remarks
Measure speed (beginning of operation).
Measure speed (beginning of operation).
Timer adjustment_03
Pump speed
r/min
-
Advance angle
deg.
-1.5
-1.8
-1.2
Remarks
Measure the actual speed, stop
Measure the actual speed, stop
0000001601
CU407980-224*
*
Actuator retarding type
*
Supply voltage
V
24
23.5
24.5
Ambient temperature
degC
23
18
28
Pre-stroke
mm
2
1.95
2.05
Output voltage
V
2.83
2.82
2.84
Adjustment
*
_02
CU407980-224*
*
Supply voltage
V
24
23.5
24.5
Ambient temperature
degC
23
18
28
Pre-stroke
mm
5.1
5.07
5.13
Output voltage
V
1.2
1
1.4
Confirmation
*
Remarks
Output voltage V1
Output voltage V1
_03
CU407980-224*
*
Supply voltage
V
24
23.5
24.5
Ambient temperature
degC
23
18
28
Output voltage
V
3.05
3.05
Confirmation of operating range
*
Test data Ex:
Governor adjustment
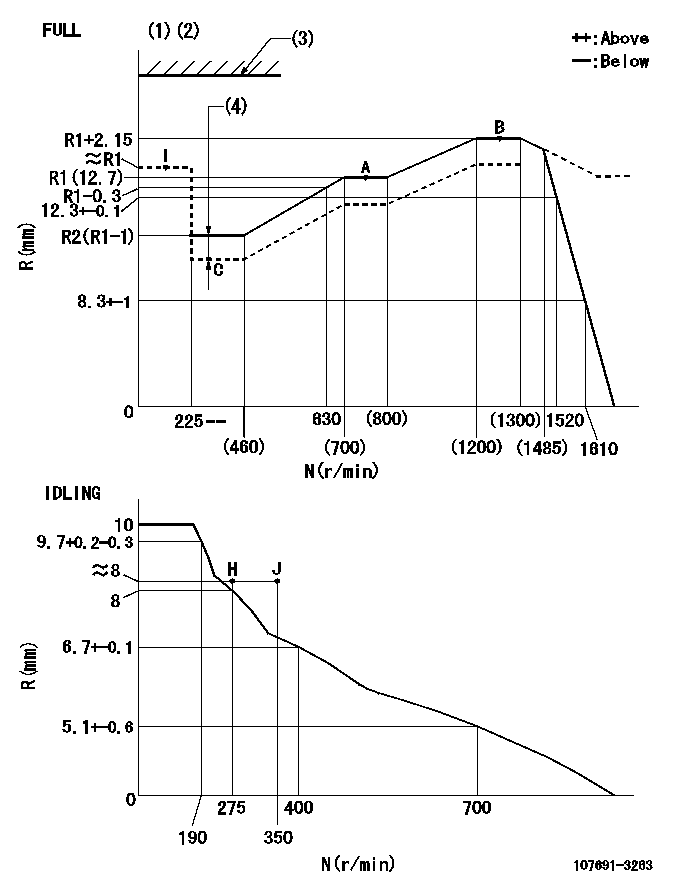
N:Pump speed
R:Rack position (mm)
(1)Torque cam stamping: T1
(2)Tolerance for racks not indicated: +-0.05mm.
(3)Stop lever's normal position setting: RA
(4)Boost compensator stroke: BCL
----------
T1=AF50 RA=(18)mm BCL=(0.9)+-0.1mm
----------
----------
T1=AF50 RA=(18)mm BCL=(0.9)+-0.1mm
----------
Speed control lever angle
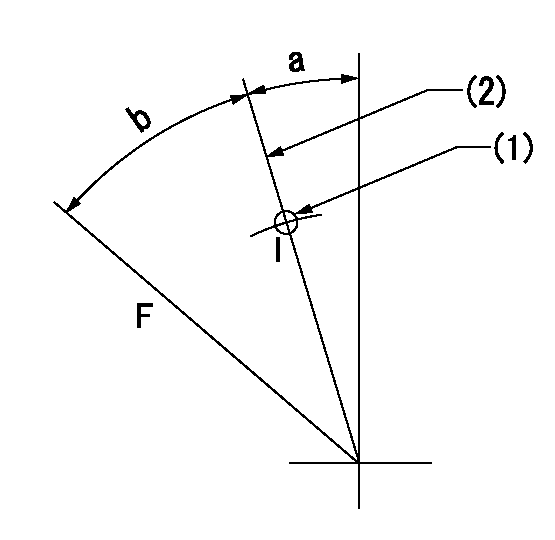
F:Full speed
I:Idle
(1)Use the hole at R = aa
(2)Stopper bolt set position 'H'
----------
aa=50mm
----------
a=8deg+-5deg b=36.5deg+-3deg
----------
aa=50mm
----------
a=8deg+-5deg b=36.5deg+-3deg
Stop lever angle
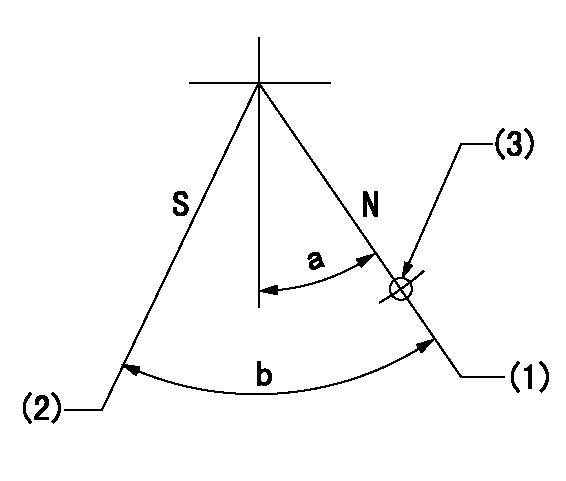
N:Pump normal
S:Stop the pump.
(1)Rack position = aa, stopper bolt setting
(2)Speed = bb, rack position = cc
(3)Use the hole above R = dd
----------
aa=(18)mm bb=0r/min cc=1.5+-0.1mm dd=40mm
----------
a=15deg+-5deg b=35deg+-5deg
----------
aa=(18)mm bb=0r/min cc=1.5+-0.1mm dd=40mm
----------
a=15deg+-5deg b=35deg+-5deg
0000001301

(1)Pump vertical direction
(2)Coupling's key groove position at No 1 cylinder's beginning of injection
(3)Pre-stroke: aa
(4)-
----------
aa=5.1+-0.03mm
----------
a=(80deg)
----------
aa=5.1+-0.03mm
----------
a=(80deg)
0000001401
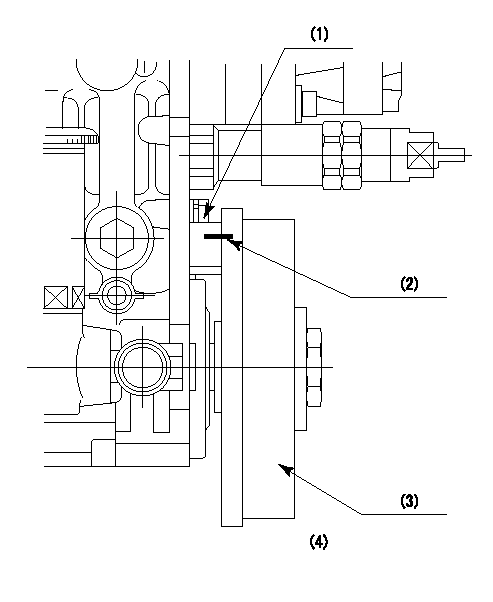
(1)Pointer
(2)Injection timing aligning mark
(3)Fly weight
(4)The actual shape and direction may be different from this illustration.
Operation sequence
1. Turn the prestroke actuator OFF.
2. Turn the camshaft as far as the No.1 cylinder's beginning of injection position.
3. Check that the pointer alignment mark of the injection pump and the alignment mark of the flywheel are matching.
4. If they are not matching, erase the alignment mark on the flywheel side, and stamp an alignment mark on the flywheel position that matches with the pointer side alignment mark.
5. Check again that the coupling's key groove position is in the No.1 cylinder's beginning of injection position.
----------
----------
----------
----------
0000001701
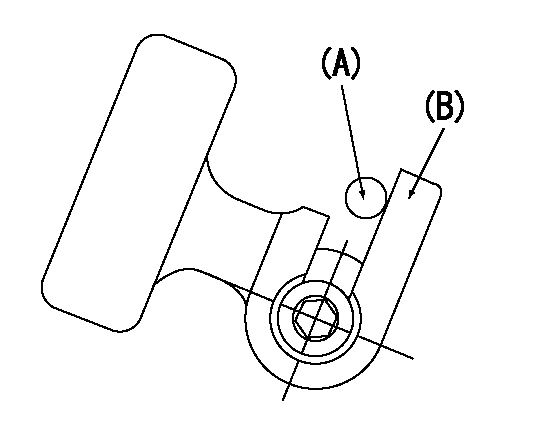
A : Stopper pin
B: Connector
----------
----------
----------
----------
0000001801
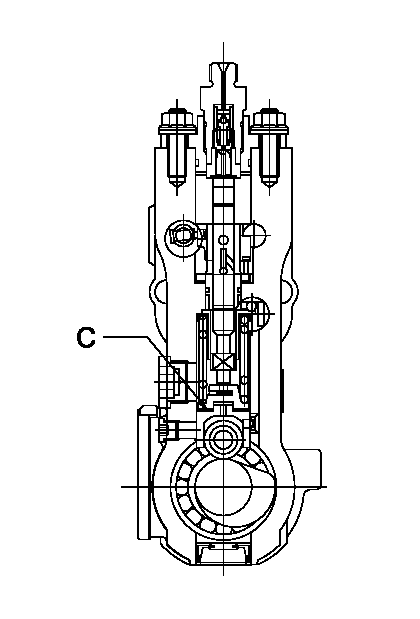
C:Shim
----------
----------
----------
----------
0000001901
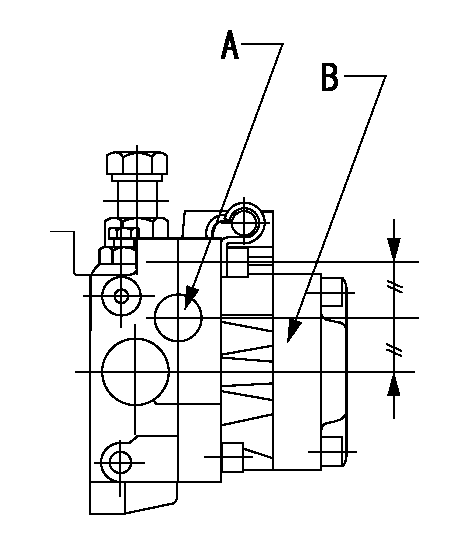
A:Sealing position
B:Pre-stroke actuator
1. When installing the pre-stroke actuator on the pump, first tighten the installation bolts loosely, then move the actuator fully clockwise (viewed from the drive side).
Temporary tightening torque: 1 - 1.5 N.m (0.1 - 0.15 kgf.m)
2. Move the actuator in the counterclockwise direction when viewed from the drive side, and adjust so that it becomes the adjustment point of the adjustment value. Then tighten it.
Tightening torque: 7^9 N.m (0.7^0.9 kgf.m)
3. After prestroke actuator installation adjustment, simultaneously stamp both the actuator side and housing side.
----------
----------
----------
----------
0000002201 RACK SENSOR
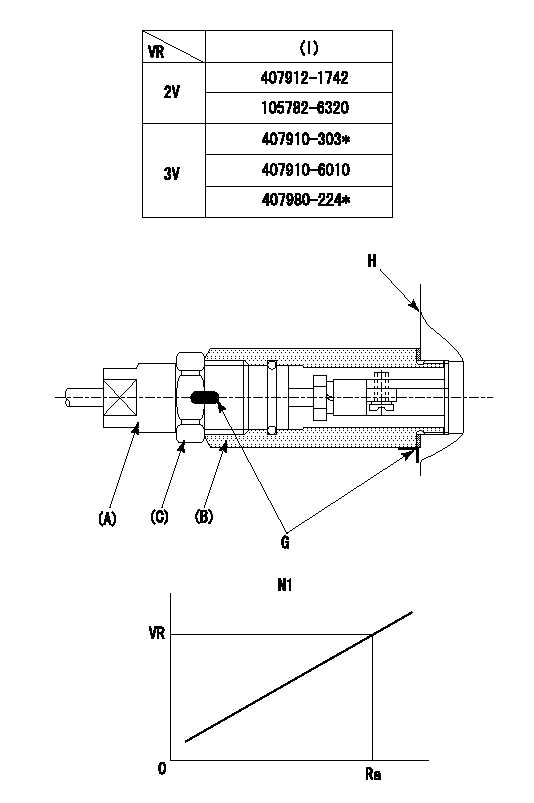
(VR) measurement voltage
(I) Part number of the control unit
(G) Apply red paint.
(H): End surface of the pump
1. Rack sensor adjustment (-0620)
(1)Fix the speed control lever at the full position
(2)Set the speed to N1 r/min.
(If the boost compensator is provided, apply boost pressure.)
(3)Adjust the bobbin (A) so that the rack sensor's output voltage is VR+-0.01.
(4)At that time, rack position must be Ra.
(5)Apply G at two places.
Connecting part between the joint (B) and the nut (F)
Connecting part between the joint (B) and the end surface of the pump (H)
----------
N1=1250r/min Ra=R1(12.7)+2.15mm
----------
----------
N1=1250r/min Ra=R1(12.7)+2.15mm
----------
Information:
Battery
9S1990 BATTERY CHARGER TESTER.The storage battery circuit represents a continuous, although variable, electrical load to the charging unit. If the circuit, positive or negative is opened or broken while the charging unit is charging, the loss of the battery load will result in the charging voltage rising to unsafe levels.High voltage will damage the charging unit and regulator and may damage other electrical components or instruments.NEVER DISCONNECT ANY CHARGING UNIT CIRCUIT OR BATTERY CIRCUIT CABLE FROM BATTERY WHEN THE CHARGING UNIT IS PRODUCING A CHARGE.A load test should be made on a battery that discharges very rapidly when in use. To do this apply a resistance of three times the ampere/hour rating of the battery across the battery main terminals. Allow the resistance to discharge the battery for 15 seconds and immediately test the battery voltage. A 12 volt battery in good condition will test 9 volts.The instructions included with the 9S1990 Battery Charger Tester completely covers the battery testing subject.Starting System
Use a D.C. voltmeter to locate starting system components which do not function.Turn the disconnect switch ON. Attach one voltmeter lead to the starter solenoid terminal connected to both a cable and a small wire. Ground the other voltmeter lead. No voltmeter reading indicates a defective disconnect switch. A voltmeter reading of battery voltage indicates further testing is necessary.Turn the HEAT-START switch to the START position. Starting motor solenoid operation is audible as the starter motor pinion engages with the ring gear on the engine flywheel. The solenoid operation should also close the electric circuit to the motor. Attach one voltmeter lead to the solenoid terminal that is connected to the motor. Ground the other lead. Turn the HEAT-START switch to START and observe the voltmeter. A battery voltage reading indicates the malfunction is in the motor. It must be removed for further testing. No voltmeter reading indicates that the solenoid contacts do not close and the solenoid must be repaired or the starter pinion clearance should be adjusted.A starting motor solenoid that will not operate may not be receiving battery current. Attach one lead of the voltmeter to the solenoid battery cable connection. Ground the other lead. No voltmeter reading indicates a defective disconnect switch. A voltmeter reading indicates further testing is necessary.Continue the test by attaching one voltmeter lead to the starting motor solenoid small wire terminal and the other lead to ground. Observe the voltmeter and turn the HEAT-START switch to START. A voltmeter reading indicates that the malfunction is in the solenoid. No voltmeter reading indicates that either the circuit breaker is defective or the HEAT-START switch does not close when turned to the START position.Attach one lead of the voltmeter to the HEAT-START switch battery wire terminal and ground the other lead. A voltmeter reading indicates a defective switch. No voltmeter reading indicates the circuit breaker points are open. If the circuit breaker reset button will not close the points the circuit breaker is defective.A starting motor that operates too slow can
Have questions with 107691-3263?
Group cross 107691-3263 ZEXEL
Hino
107691-3263
9 400 612 510
220401242B
INJECTION-PUMP ASSEMBLY
J08C-TT
J08C-TT
107691-3263
9 400 612 510
S220401242
INJECTION-PUMP ASSEMBLY
J08C-TT
J08C-TT

