Information injection-pump assembly
BOSCH
9 400 611 636
9400611636
ZEXEL
107691-2910
1076912910
Rating:
Service parts 107691-2910 INJECTION-PUMP ASSEMBLY:
1.
_
7.
COUPLING PLATE
9.
_
11.
Nozzle and Holder
ME132604
12.
Open Pre:MPa(Kqf/cm2)
15.7{160}/21.6{220}
14.
NOZZLE
Include in #1:
107691-2910
as INJECTION-PUMP ASSEMBLY
Cross reference number
BOSCH
9 400 611 636
9400611636
ZEXEL
107691-2910
1076912910
Zexel num
Bosch num
Firm num
Name
Calibration Data:
Adjustment conditions
Test oil
1404 Test oil ISO4113 or {SAEJ967d}
1404 Test oil ISO4113 or {SAEJ967d}
Test oil temperature
degC
40
40
45
Nozzle and nozzle holder
105780-8250
Bosch type code
1 688 901 101
Nozzle
105780-0120
Bosch type code
1 688 901 990
Nozzle holder
105780-2190
Opening pressure
MPa
20.7
Opening pressure
kgf/cm2
211
Injection pipe
Outer diameter - inner diameter - length (mm) mm 8-3-600
Outer diameter - inner diameter - length (mm) mm 8-3-600
Overflow valve
131424-8420
Overflow valve opening pressure
kPa
255
221
289
Overflow valve opening pressure
kgf/cm2
2.6
2.25
2.95
Tester oil delivery pressure
kPa
255
255
255
Tester oil delivery pressure
kgf/cm2
2.6
2.6
2.6
RED4 control unit part number
407915-0
590
RED4 rack sensor specifications
mm
19
PS/ACT control unit part no.
407980-2
24*
Digi switch no.
17
Direction of rotation (viewed from drive side)
Left L
Left L
Injection timing adjustment
Direction of rotation (viewed from drive side)
Left L
Left L
Injection order
1-5-3-6-
2-4
Pre-stroke
mm
5.1
5.07
5.13
Beginning of injection position
Governor side NO.1
Governor side NO.1
Difference between angles 1
Cal 1-5 deg. 60 59.75 60.25
Cal 1-5 deg. 60 59.75 60.25
Difference between angles 2
Cal 1-3 deg. 120 119.75 120.25
Cal 1-3 deg. 120 119.75 120.25
Difference between angles 3
Cal 1-6 deg. 180 179.75 180.25
Cal 1-6 deg. 180 179.75 180.25
Difference between angles 4
Cyl.1-2 deg. 240 239.75 240.25
Cyl.1-2 deg. 240 239.75 240.25
Difference between angles 5
Cal 1-4 deg. 300 299.75 300.25
Cal 1-4 deg. 300 299.75 300.25
Injection quantity adjustment
Rack position
(13.3)
PWM
%
62.7
Pump speed
r/min
850
850
850
Average injection quantity
mm3/st.
120.5
119.5
121.5
Max. variation between cylinders
%
0
-3
3
Basic
*
PS407980-224*
V
2.25+-0.
01
PS407980-224*
mm
3.1+-0.0
5
Injection quantity adjustment_02
Rack position
(7.3)
PWM
%
29.5+-2.
8
Pump speed
r/min
380
380
380
Average injection quantity
mm3/st.
10
8.2
11.8
Max. variation between cylinders
%
0
-15
15
PS407980-224*
V
V1+0.05+
-0.01
PS407980-224*
mm
5+-0.03
Remarks
Refer to items regarding the pre-stroke actuator
Refer to items regarding the pre-stroke actuator
Governor adjustment
Pump speed
r/min
950--
Advance angle
deg.
0
0
0
Remarks
Start
Start
Governor adjustment_02
Pump speed
r/min
900
Advance angle
deg.
0.5
Governor adjustment_03
Pump speed
r/min
(1075)
Advance angle
deg.
1
0.5
1.5
Governor adjustment_04
Pump speed
r/min
1200
Advance angle
deg.
1
0.5
1.5
Governor adjustment_05
Pump speed
r/min
1400
Advance angle
deg.
4
3.5
4.5
Remarks
Finish
Finish
0000001201
CU407980-224*
*
Actuator retarding type
*
Supply voltage
V
24
23.5
24.5
Ambient temperature
degC
23
18
28
Pre-stroke
mm
2
1.95
2.05
Output voltage
V
2.83
2.82
2.84
Adjustment
*
_02
CU407980-224*
*
Supply voltage
V
24
23.5
24.5
Ambient temperature
degC
23
18
28
Pre-stroke
mm
5.1
5.07
5.13
Output voltage
V
1.2
1
1.4
Confirmation
*
Remarks
Output voltage V1
Output voltage V1
_03
CU407980-224*
*
Supply voltage
V
24
23.5
24.5
Ambient temperature
degC
23
18
28
Output voltage
V
3.05
3.05
Confirmation of operating range
*
Test data Ex:
Speed control lever angle

N:Pump normal
S:Stop the pump.
(1)Rack position = aa
(2)Rack position bb
----------
aa=20mm bb=1mm
----------
a=37deg+-5deg b=22deg+-5deg
----------
aa=20mm bb=1mm
----------
a=37deg+-5deg b=22deg+-5deg
0000000901

(1)Pump vertical direction
(2)Coupling's key groove position at No 1 cylinder's beginning of injection
(3)B.T.D.C.: aa
(4)Pre-stroke: bb
----------
aa=3deg bb=5.1+-0.03mm
----------
a=(2deg)
----------
aa=3deg bb=5.1+-0.03mm
----------
a=(2deg)
Stop lever angle
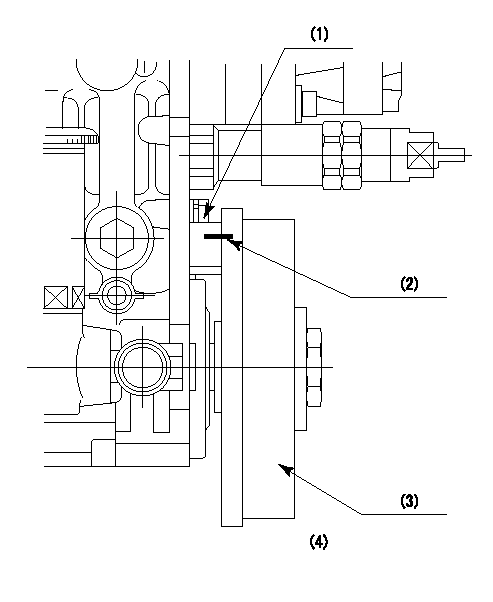
(1)Pointer
(2)Injection timing aligning mark
(3)Fly weight
(4)The actual shape and direction may be different from this illustration.
Operation sequence
1. Turn the prestroke actuator OFF.
2. Turn the camshaft as far as the No.1 cylinder's beginning of injection position.
3. Check that the pointer alignment mark of the injection pump and the alignment mark of the flywheel are matching.
4. If they are not matching, erase the alignment mark on the flywheel side, and stamp an alignment mark on the flywheel position that matches with the pointer side alignment mark.
5. Check again that the coupling's key groove position is in the No.1 cylinder's beginning of injection position.
----------
----------
----------
----------
0000001301
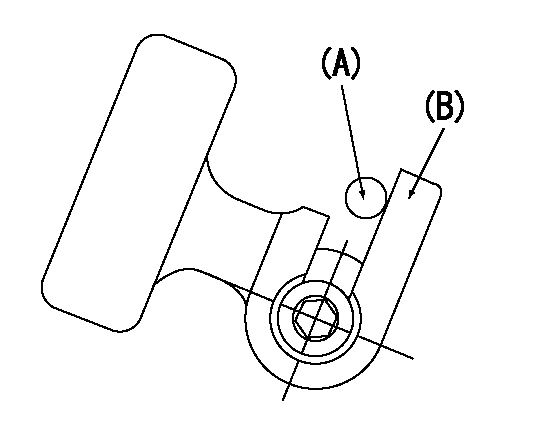
A : Stopper pin
B: Connector
----------
----------
----------
----------
0000001401
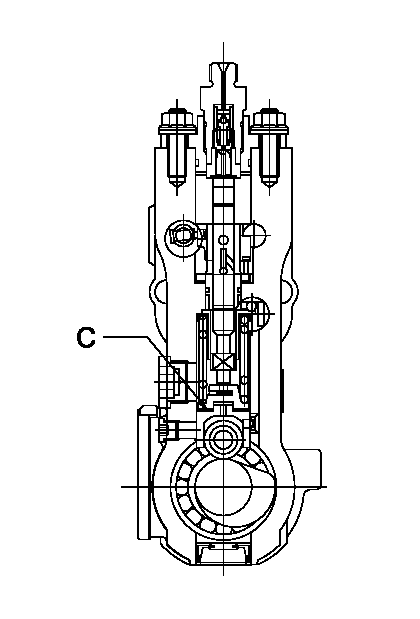
C:Shim
----------
----------
----------
----------
0000001501
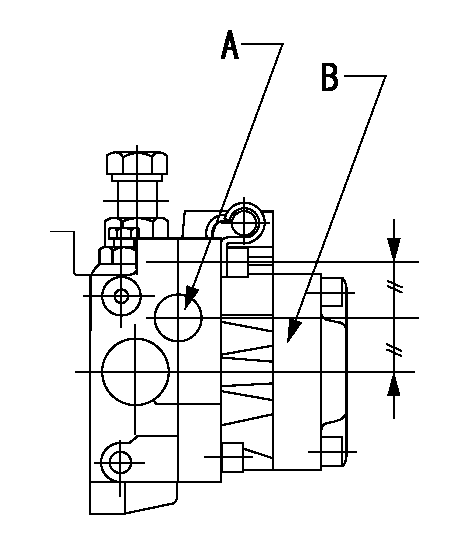
A:Sealing position
B:Pre-stroke actuator
1. When installing the pre-stroke actuator on the pump, first tighten the installation bolts loosely, then move the actuator fully clockwise (viewed from the drive side).
Temporary tightening torque: 1 - 1.5 N.m (0.1 - 0.15 kgf.m)
2. Move the actuator in the counterclockwise direction when viewed from the drive side, and adjust so that it becomes the adjustment point of the adjustment value. Then tighten it.
Tightening torque: 7^9 N.m (0.7^0.9 kgf.m)
3. After prestroke actuator installation adjustment, simultaneously stamp both the actuator side and housing side.
----------
----------
----------
----------
0000001701

(PWM) Pulse width modulation (%)
(R) Rack position (mm)
Rack sensor output characteristics
1. Rack limit adjustment
(1)Measure the rack position R2 for PWM a2%.
(2)Confirm that it is within the range R2 = 15+-1 mm.
(3)Measure the rack position R1 at PWM a %.
(4)Confirm that it is within the range R2 - R1 = 10+-0.1 mm.
2. Check the limp home operation.
(1)Move the switch box's limp home switch to the limp home side.
(2)Confirm rack position L1 (mm ) and L2 (mm) for PWM in the above table.
3. Check the pull down operation.
(1)Confirm that the rack position is 19 mm at PWM B%.
(2)In the conditions described in the above table, move the switch box's pull down switch to the pull down side and confirm that the rack position momentarily becomes 1 mm or less.
----------
a1=16.25% a2=72.5% L1=1--mm L2=19++mm A=5 % B=95%
----------
----------
a1=16.25% a2=72.5% L1=1--mm L2=19++mm A=5 % B=95%
----------
Information:
BRAKESAVER CONTROL VALVE IN FLOW CONTROL POSITION
1. Passage to oil filter. 2. Oil cooler. 3. Air line. 4. Oil inlet passage. 5. Valve spool. 6. Control valve body. 7. Differential pressure valve. 8. Poppet valve. 9. BrakeSaver. 10. BrakeSaver inlet pressure. 11. BrakeSaver outlet pressure.BrakeSaver Operator Controls
Two types of controls are available for the BrakeSaver: a manual control and an automatic control. Supply air goes into the circuit through pressure reducing valve (17). The pressure reducing valve keeps a maximum pressure in the control circuit of 40 psi (280 kPa).This pressure air is available at manual control lever (2) in the operator's compartment and at the solenoid valve (8). When ignition switch (5) is turned ON, the electrical circuit to manual-automatic switch (3) has current available. [Switch (3) is shown in the MANUAL position.] In the MANUAL position, switch (3) opens the circuit. The automatic section of switch (3) is in the OFF position and the BrakeSaver can only be operated manually. Maximum supply air pressure from the air compressor (not shown) is 125 psi (860 kPa).
BRAKESAVER CONTROL CIRCUIT SCHEMATIC
1. Pressure reducing valve. 2. Manual control lever. 3. Manual-automatic selector switch. 4. Control valve. 5. Ignition switch. 6. Double check valve. 7. Accelerator switch. 8. Solenoid valve. 9. Clutch switch.Manual Control
When the BrakeSaver manual-automatic selector switch (3) is in the MANUAL position, the BrakeSaver can only be turned on by the operator by moving manual control lever (2). With control lever (2) in the BrakeSaver ON position, air goes through manual control lever (2) and double check valve (6) to control valve (4). A valve spool moves and the BrakeSaver gets oil. It holds this oil until manual control lever (2) is moved to the BrakeSaver OFF position. Air can go from control valve (4) to the atmosphere through manual control lever (2).The farther control lever (2) is moved toward the ON position, the higher the pressure of the air sent to the control valve. An increase in air pressure in the control valve causes an increase in the oil pressure in the BrakeSaver. An increase in the oil pressure in the BrakeSaver causes an increase in the braking force in the BrakeSaver. The operator can give modulation to the braking force in the BrakeSaver through the movement of control lever (2).An air pressure gauge gives the operator a relative indication of the air pressure being sent to the control valve. Through the use of the indication on the air pressure gauge in relation to engine rpm, the operator can get approximately the same braking effect from the BrakeSaver time after time. This lets the operator more easily control the desired wheel speed of the vehicle.An oil temperature gauge gives the operator an indication of the ability of the engine cooling system to control the heat in the BrakeSaver during its operation. If the gauge reads too HOT, move control lever (2) to the OFF position and use the service brakes to control the wheel speed of the