Information injection-pump assembly
BOSCH
9 400 611 093
9400611093
ZEXEL
107691-2341
1076912341
MITSUBISHI
ME075792
me075792

Rating:
Service parts 107691-2341 INJECTION-PUMP ASSEMBLY:
1.
_
7.
COUPLING PLATE
9.
_
11.
Nozzle and Holder
ME075583
12.
Open Pre:MPa(Kqf/cm2)
15.7{160}/21.6{220}
14.
NOZZLE
Include in #1:
107691-2341
as INJECTION-PUMP ASSEMBLY
Cross reference number
BOSCH
9 400 611 093
9400611093
ZEXEL
107691-2341
1076912341
MITSUBISHI
ME075792
me075792
Zexel num
Bosch num
Firm num
Name
9 400 611 093
ME075792 MITSUBISHI
INJECTION-PUMP ASSEMBLY
6D17-1 K 14CG INJECTION PUMP ASSY TICS MD-TI6 TICS
6D17-1 K 14CG INJECTION PUMP ASSY TICS MD-TI6 TICS
Calibration Data:
Adjustment conditions
Test oil
1404 Test oil ISO4113 or {SAEJ967d}
1404 Test oil ISO4113 or {SAEJ967d}
Test oil temperature
degC
40
40
45
Nozzle and nozzle holder
105780-8250
Bosch type code
1 688 901 101
Nozzle
105780-0120
Bosch type code
1 688 901 990
Nozzle holder
105780-2190
Opening pressure
MPa
20.7
Opening pressure
kgf/cm2
211
Injection pipe
Outer diameter - inner diameter - length (mm) mm 8-3-600
Outer diameter - inner diameter - length (mm) mm 8-3-600
Overflow valve
131424-8420
Overflow valve opening pressure
kPa
255
221
289
Overflow valve opening pressure
kgf/cm2
2.6
2.25
2.95
Tester oil delivery pressure
kPa
255
255
255
Tester oil delivery pressure
kgf/cm2
2.6
2.6
2.6
PS/ACT control unit part no.
407980-2
24*
Digi switch no.
17
Direction of rotation (viewed from drive side)
Left L
Left L
Injection timing adjustment
Direction of rotation (viewed from drive side)
Left L
Left L
Injection order
1-5-3-6-
2-4
Pre-stroke
mm
5.6
5.57
5.63
Beginning of injection position
Governor side NO.1
Governor side NO.1
Difference between angles 1
Cal 1-5 deg. 60 59.75 60.25
Cal 1-5 deg. 60 59.75 60.25
Difference between angles 2
Cal 1-3 deg. 120 119.75 120.25
Cal 1-3 deg. 120 119.75 120.25
Difference between angles 3
Cal 1-6 deg. 180 179.75 180.25
Cal 1-6 deg. 180 179.75 180.25
Difference between angles 4
Cyl.1-2 deg. 240 239.75 240.25
Cyl.1-2 deg. 240 239.75 240.25
Difference between angles 5
Cal 1-4 deg. 300 299.75 300.25
Cal 1-4 deg. 300 299.75 300.25
Injection quantity adjustment
Adjusting point
-
Rack position
12.5
Pump speed
r/min
850
850
850
Average injection quantity
mm3/st.
105
103
107
Max. variation between cylinders
%
0
-3
3
Basic
*
Fixing the rack
*
PS407980-224*
V
2.25+-0.
01
PS407980-224*
mm
3.6+-0.0
5
Standard for adjustment of the maximum variation between cylinders
*
Injection quantity adjustment_02
Adjusting point
Z
Rack position
8+-0.5
Pump speed
r/min
465
465
465
Average injection quantity
mm3/st.
14
12.2
15.8
Max. variation between cylinders
%
0
-15
15
Fixing the rack
*
PS407980-224*
V
V1+0.05+
-0.01
PS407980-224*
mm
5.5+-0.0
3
Standard for adjustment of the maximum variation between cylinders
*
Remarks
Refer to items regarding the pre-stroke actuator
Refer to items regarding the pre-stroke actuator
Injection quantity adjustment_03
Adjusting point
A
Rack position
R1(12.5)
Pump speed
r/min
850
850
850
Average injection quantity
mm3/st.
105
104
106
Basic
*
Fixing the lever
*
PS407980-224*
V
2.25+-0.
01
PS407980-224*
mm
3.6+-0.0
5
Injection quantity adjustment_04
Adjusting point
B
Rack position
R1+1.45
Pump speed
r/min
1450
1450
1450
Average injection quantity
mm3/st.
102.5
98.5
106.5
Fixing the lever
*
PS407980-224*
V
2.25+-0.
01
PS407980-224*
mm
3.6+-0.0
5
Injection quantity adjustment_05
Adjusting point
C
Rack position
R1-1.4
Pump speed
r/min
500
500
500
Average injection quantity
mm3/st.
90.5
86.5
94.5
Fixing the lever
*
PS407980-224*
V
2.25+-0.
01
PS407980-224*
mm
3.6+-0.0
5
Timer adjustment
Pump speed
r/min
1250--
Advance angle
deg.
0
0
0
Remarks
Start
Start
Timer adjustment_02
Pump speed
r/min
1200
Advance angle
deg.
0.5
Timer adjustment_03
Pump speed
r/min
1470
Advance angle
deg.
3
2.5
3.5
Remarks
Finish
Finish
0000001601
CU407980-224*
*
Actuator retarding type
*
Supply voltage
V
24
23.5
24.5
Ambient temperature
degC
23
18
28
Pre-stroke
mm
2.5
2.45
2.55
Output voltage
V
2.83
2.82
2.84
Adjustment
*
_02
CU407980-224*
*
Supply voltage
V
24
23.5
24.5
Ambient temperature
degC
23
18
28
Pre-stroke
mm
5.6
5.57
5.63
Output voltage
V
1.2
1
1.4
Confirmation
*
Remarks
Output voltage V1
Output voltage V1
_03
CU407980-224*
*
Supply voltage
V
24
23.5
24.5
Ambient temperature
degC
23
18
28
Output voltage
V
3.05
3.05
Confirmation of operating range
*
Test data Ex:
Governor adjustment
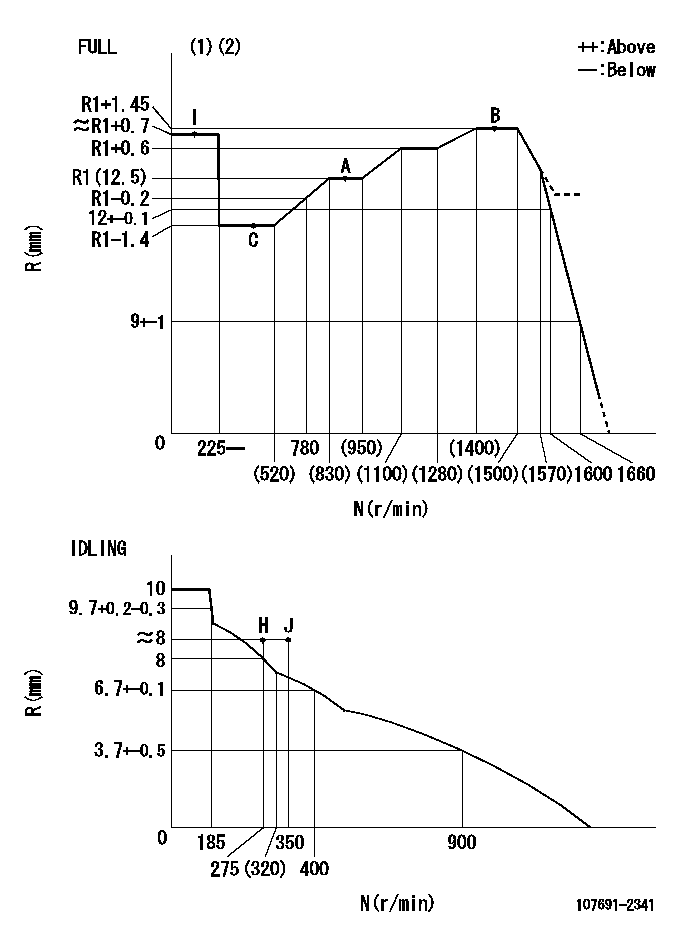
N:Pump speed
R:Rack position (mm)
(1)Torque cam stamping: T1
(2)Tolerance for racks not indicated: +-0.05mm.
----------
T1=AD54
----------
----------
T1=AD54
----------
Speed control lever angle
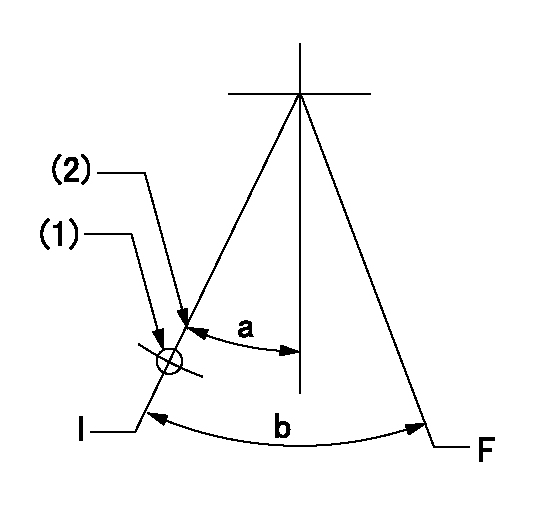
F:Full speed
I:Idle
(1)Use the hole at R = aa
(2)Stopper bolt setting
----------
aa=38mm
----------
a=32deg+-5deg b=39.5deg+-3deg
----------
aa=38mm
----------
a=32deg+-5deg b=39.5deg+-3deg
Stop lever angle
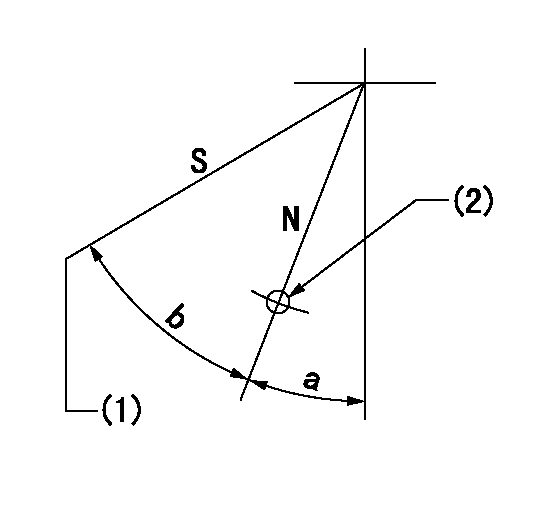
N:Pump normal
S:Stop the pump.
(1)Set the stopper bolt at rack position = aa, speed = bb (confirm non-injection).
(2)Use the hole above R = cc
----------
aa=1+-0.3mm bb=0r/min cc=30mm
----------
a=22deg+-5deg b=45deg+-5deg
----------
aa=1+-0.3mm bb=0r/min cc=30mm
----------
a=22deg+-5deg b=45deg+-5deg
0000001301

(1)Pump vertical direction
(2)Coupling's key groove position at No 1 cylinder's beginning of injection
(3)B.T.D.C.: aa
(4)Pre-stroke: bb
----------
aa=5deg bb=5.6+-0.03mm
----------
a=(1deg)
----------
aa=5deg bb=5.6+-0.03mm
----------
a=(1deg)
0000001401
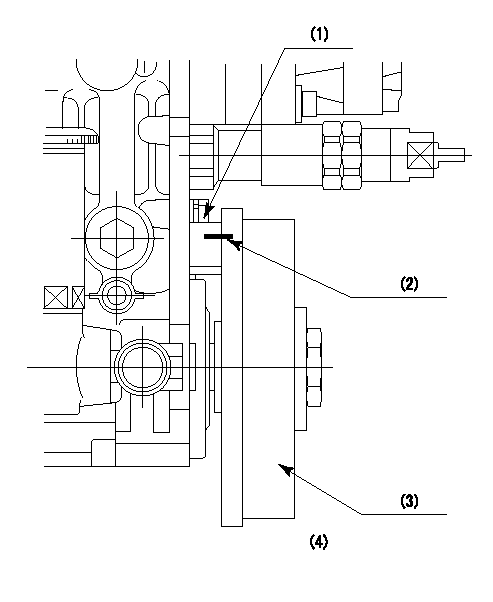
(1)Pointer
(2)Injection timing aligning mark
(3)Fly weight
(4)The actual shape and direction may be different from this illustration.
Operation sequence
1. Turn the prestroke actuator OFF.
2. Turn the camshaft as far as the No.1 cylinder's beginning of injection position.
3. Check that the pointer alignment mark of the injection pump and the alignment mark of the flywheel are matching.
4. If they are not matching, erase the alignment mark on the flywheel side, and stamp an alignment mark on the flywheel position that matches with the pointer side alignment mark.
5. Check again that the coupling's key groove position is in the No.1 cylinder's beginning of injection position.
----------
----------
----------
----------
0000001701
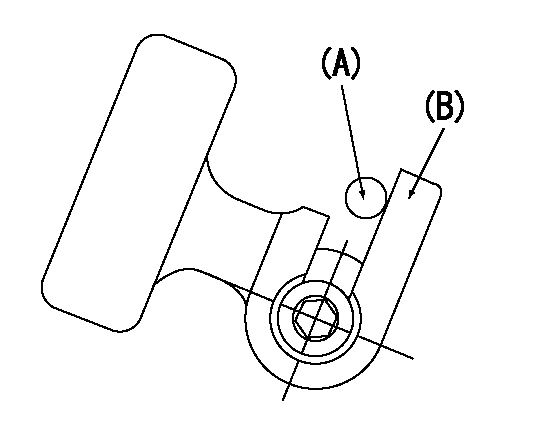
A : Stopper pin
B: Connector
----------
----------
----------
----------
0000001801
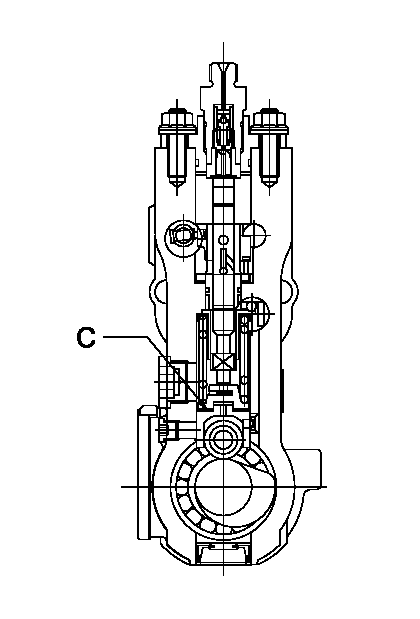
C:Shim
----------
----------
----------
----------
0000001901
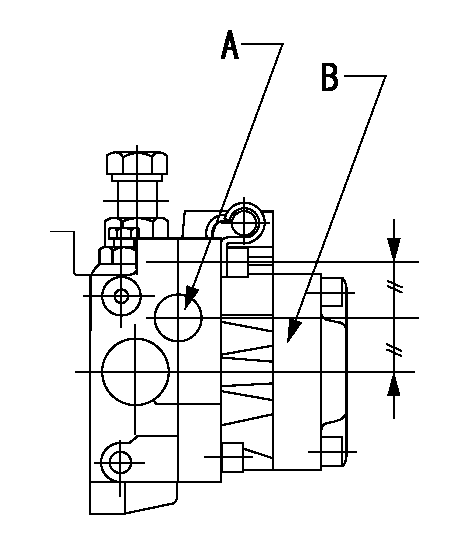
A:Sealing position
B:Pre-stroke actuator
1. When installing the pre-stroke actuator on the pump, first tighten the installation bolts loosely, then move the actuator fully clockwise (viewed from the drive side).
Temporary tightening torque: 1 - 1.5 N.m (0.1 - 0.15 kgf.m)
2. Move the actuator in the counterclockwise direction when viewed from the drive side, and adjust so that it becomes the adjustment point of the adjustment value. Then tighten it.
Tightening torque: 7^9 N.m (0.7^0.9 kgf.m)
3. After prestroke actuator installation adjustment, simultaneously stamp both the actuator side and housing side.
----------
----------
----------
----------
0000002201 SPEED SENSOR
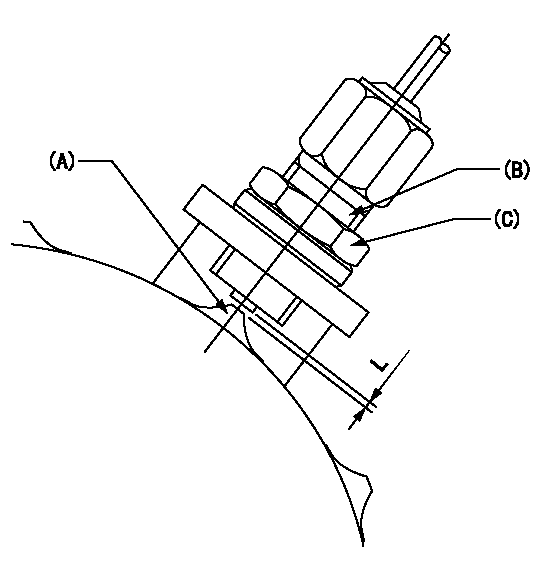
(A) Flyweight projection
(B) Pickup sensor
(c) Lock nut
Speed sensor installation
(1)Install the speed sensor so that the clearance between the sensor and the flyweight projection is L.
(This gap is the gap when the pickup sensor is returned 1 turn from where it contacts the flyweight tooth.)
----------
L=0.8~1mm
----------
----------
L=0.8~1mm
----------
0000002301 MICRO SWITCH
Adjustment of the micro-switch
Adjust the bolt to obtain the following lever position when the micro-switch is ON.
(1)Speed N1
(2)Rack position Ra
----------
N1=275r/min Ra=8+-0.1mm
----------
----------
N1=275r/min Ra=8+-0.1mm
----------
0000002401 RACK SENSOR
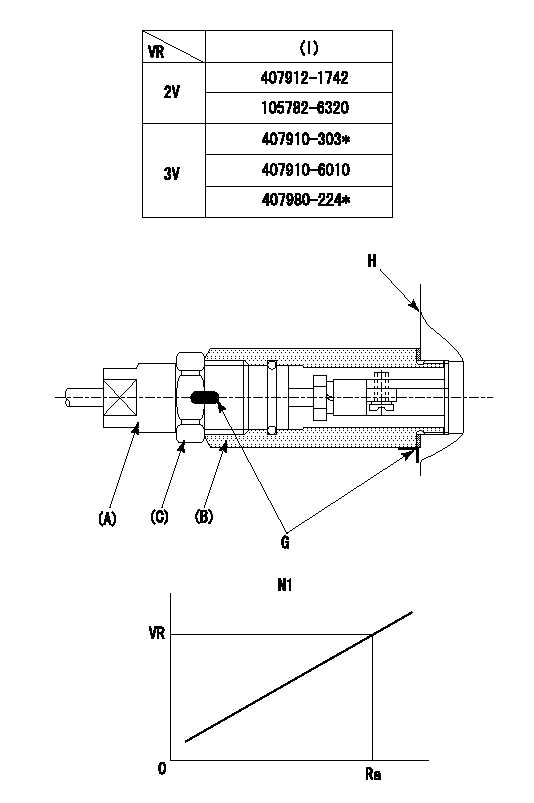
(VR) measurement voltage
(I) Part number of the control unit
(G) Apply red paint.
(H): End surface of the pump
1. Rack sensor adjustment (-0620)
(1)Fix the speed control lever at the full position
(2)Set the speed to N1 r/min.
(If the boost compensator is provided, apply boost pressure.)
(3)Adjust the bobbin (A) so that the rack sensor's output voltage is VR+-0.01.
(4)At that time, rack position must be Ra.
(5)Apply G at two places.
Connecting part between the joint (B) and the nut (F)
Connecting part between the joint (B) and the end surface of the pump (H)
----------
N1=1450r/min Ra=R1(12.5)+1.45mm
----------
----------
N1=1450r/min Ra=R1(12.5)+1.45mm
----------
Information:
Illustration 74 g02026337 Appendix D
Cleaned Filter Specification
Note: Scope: The following steps determine a properly cleaned Caterpillar filter.Note: This specification applies to filters that were cleaned of ash only. This specification is only valid subsequent to the "Recommended Cleaning Procedure". This specification should not be used to determine if soot filled filters are properly cleaned. All filters must be baked appropriately using the "Recommended Cleaning Procedure" prior to application of this specification.HEALTH AND SAFETY
Wear goggles, gloves, protective clothing, and a National Institute for Occupational Safety and Health (NIOSH) approved P95 or N95 half-face respirator when handling a used Diesel Particulate Filter or Catalytic Converter Muffler. Failure to do so could result in personal injury.
Adhere to all local Health and Safety rules and regulations. Use all the personal protective equipment listed below:
Respirator
Safety shoes
Safety glasses
Latex gloves
Lab coatRESOURCESNecessary equipment:
38 cm (15 inch) long by 0.9 mm (0.04 inch) thick stainless steel probe for "200 cpsi" (Cells/Square inch) filters
Tape measureMETHODEvaluation of a cleaned filter:Note: A filter MUST meet all criteria in this section below to be considered clean.
Inspect both inlet and outlet surfaces for oil/fuel contamination, gouges and/or cracks. No cracks may be visible. Gouges may not be exceed 4.0 mm (0.15 inch) deep.
There must be no filter movement within the filters banding. This movement is defined as the substrate moving past the bent-over flange. The filter must be even or below the bent-over flange.
There must not be any signs of the steel fiber ring coming loose or any mat material (cottony gauze) slipping past the filter. See Illustration 75 below.
The flanges are not damaged beyond repair.
There are no dents deeper than 6.4 mm (0.25 inch) in the outer can of the filter and the outer can is not cracked, torn or otherwise breached.
No more than 20 cells are allowed to be damaged (showing soot) on the outlet face of the filter. Refer to Illustrations 76 and 77.
Inspect the ash depth in the cells using the "Check Cell Depth" instructions below.
Illustration 75 g02026392
Proper placement of the filter within the banding
(1) Outside Can
(2) Bent-over flange
(3) Steel fiber ring
(4) Mat material
(5) FilterNote: Filter must be below the bent over-flange (2).
Illustration 76 g02026398
Acceptable filter with less than 20 damaged cells
Illustration 77 g02026399
Unacceptable filter with too many damaged cells
Check Cell Depth
Check cell depth by dropping the stainless steel probe into a cell location noted by a dot in Illustration 78 below.
Lightly tap the probe with a finger until the probe does not travel into the cell any further. Mark the probe to record the depth.
Illustration 78 g02026405
Measure the distance from the tip of the probe which entered the cell to the mark made on the probe. This distance is the cell depth. Repeat this step 17 times per Illustration 78.
If the probe travels a minimum of 28.6 cm (11.25 inch) in all cells, the filter is considered clean.
If the probe encounters heavy resistance in