Information injection-pump assembly
ZEXEL
107492-2042
1074922042
Rating:
Service parts 107492-2042 INJECTION-PUMP ASSEMBLY:
1.
_
5.
AUTOM. ADVANCE MECHANIS
6.
COUPLING PLATE
9.
_
11.
Nozzle and Holder
12.
Open Pre:MPa(Kqf/cm2)
21.6{220}
15.
NOZZLE SET
Include in #1:
107492-2042
as INJECTION-PUMP ASSEMBLY
Cross reference number
ZEXEL
107492-2042
1074922042
Zexel num
Bosch num
Firm num
Name
Calibration Data:
Adjustment conditions
Test oil
1404 Test oil ISO4113 or {SAEJ967d}
1404 Test oil ISO4113 or {SAEJ967d}
Test oil temperature
degC
40
40
45
Nozzle and nozzle holder
105780-8240
Nozzle
105780-0110
Nozzle holder
105780-2170
Opening pressure
MPa
20.6
Opening pressure
kgf/cm2
210
Injection pipe
Outer diameter - inner diameter - length (mm) mm 8-3-600
Outer diameter - inner diameter - length (mm) mm 8-3-600
Overflow valve
131424-8420
Overflow valve opening pressure
kPa
255
221
289
Overflow valve opening pressure
kgf/cm2
2.6
2.25
2.95
Tester oil delivery pressure
kPa
255
255
255
Tester oil delivery pressure
kgf/cm2
2.6
2.6
2.6
PS/ACT control unit part no.
407910-3
03*
Selector switch no.
02
PS/ACT control unit part no.
407980-2
24*
Digi switch no.
01
Direction of rotation (viewed from drive side)
Right R
Right R
Injection timing adjustment
Direction of rotation (viewed from drive side)
Right R
Right R
Injection order
1-3-4-2
Pre-stroke
mm
5.6
5.57
5.63
Beginning of injection position
Drive side NO.1
Drive side NO.1
Difference between angles 1
Cal 1-3 deg. 90 89.75 90.25
Cal 1-3 deg. 90 89.75 90.25
Difference between angles 2
Cal 1-4 deg. 180 179.75 180.25
Cal 1-4 deg. 180 179.75 180.25
Difference between angles 3
Cyl.1-2 deg. 270 269.75 270.25
Cyl.1-2 deg. 270 269.75 270.25
Injection quantity adjustment
Adjusting point
-
Rack position
12.5
Pump speed
r/min
900
900
900
Average injection quantity
mm3/st.
93
91.4
94.6
Max. variation between cylinders
%
0
-3
3
Basic
*
Fixing the rack
*
PS407980-224*
V
2.25+-0.
01
PS407980-224*
mm
3.6+-0.0
3
PS407910-303*
V
2.25+-0.
01
PS407910-303*
mm
3.6+-0.0
3
Standard for adjustment of the maximum variation between cylinders
*
Injection quantity adjustment_02
Adjusting point
Z
Rack position
8.4+-0.5
Pump speed
r/min
625
625
625
Average injection quantity
mm3/st.
10
8.5
11.5
Max. variation between cylinders
%
0
-15
15
Fixing the rack
*
PS407980-224*
V
2.25+-0.
01
PS407980-224*
mm
3.6+-0.0
3
PS407910-303*
V
2.25+-0.
01
PS407910-303*
mm
3.6+-0.0
3
Standard for adjustment of the maximum variation between cylinders
*
Injection quantity adjustment_03
Adjusting point
A
Rack position
R1(12.5)
Pump speed
r/min
900
900
900
Average injection quantity
mm3/st.
93
92
94
Basic
*
Fixing the lever
*
Boost pressure
kPa
44
44
Boost pressure
mmHg
330
330
PS407980-224*
V
2.25+-0.
01
PS407980-224*
mm
3.6+-0.0
3
PS407910-303*
V
2.25+-0.
01
PS407910-303*
mm
3.6+-0.0
3
Injection quantity adjustment_04
Adjusting point
B
Rack position
R1+1.55
Pump speed
r/min
1500
1500
1500
Average injection quantity
mm3/st.
100.5
96.5
104.5
Fixing the lever
*
Boost pressure
kPa
44
44
Boost pressure
mmHg
330
330
PS407980-224*
V
2.25+-0.
01
PS407980-224*
mm
3.6+-0.0
3
PS407910-303*
V
2.25+-0.
01
PS407910-303*
mm
3.6+-0.0
3
Boost compensator adjustment
Pump speed
r/min
300
300
300
Rack position
R2-0.9
Boost pressure
kPa
21.3
20
22.6
Boost pressure
mmHg
160
150
170
Boost compensator adjustment_02
Pump speed
r/min
300
300
300
Rack position
R2(R1-0.
85)
Boost pressure
kPa
30.7
30.7
30.7
Boost pressure
mmHg
230
230
230
0000001601
CU407980-224*
*
Actuator retarding type
*
Supply voltage
V
12
11.5
12.5
Ambient temperature
degC
23
18
28
Pre-stroke
mm
2.5
2.45
2.55
Output voltage
V
2.83
2.82
2.84
Adjustment
*
_02
CU407980-224*
*
Supply voltage
V
12
11.5
12.5
Ambient temperature
degC
23
18
28
Pre-stroke
mm
5.6
5.57
5.63
Output voltage
V
1.2
1
1.4
Confirmation
*
_03
CU407980-224*
*
Supply voltage
V
12
11.5
12.5
Ambient temperature
degC
23
18
28
Output voltage
V
3.05
3.05
Confirmation of operating range
*
_04
CU407910-303*
*
Actuator retarding type
*
Supply voltage
V
12
11.5
12.5
Ambient temperature
degC
23
18
28
Pre-stroke
mm
2.5
2.45
2.55
Output voltage
V
2.83
2.82
2.84
Adjustment
*
_05
CU407910-303*
*
Supply voltage
V
12
11.5
12.5
Ambient temperature
degC
23
18
28
Pre-stroke
mm
5.6
5.57
5.63
Output voltage
V
1.2
1
1.4
Confirmation
*
_06
CU407910-303*
*
Supply voltage
V
12
11.5
12.5
Ambient temperature
degC
23
18
28
Output voltage
V
3.05
3.05
Confirmation of operating range
*
Test data Ex:
Governor adjustment
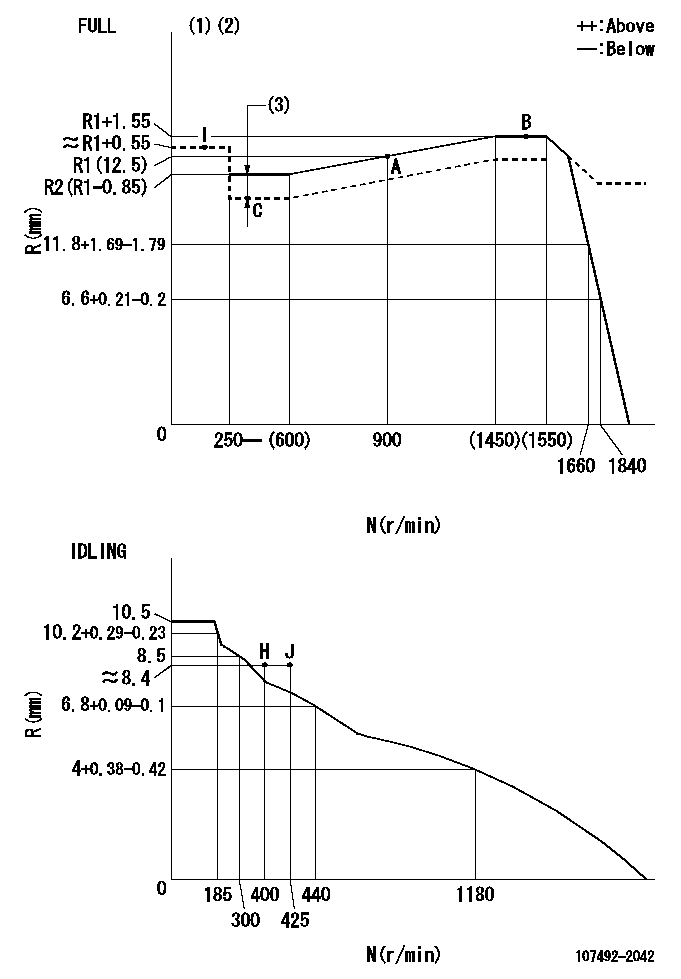
N:Pump speed
R:Rack position (mm)
(1)Torque cam stamping: T1
(2)Tolerance for racks not indicated: +-0.05mm.
(3)Boost compensator stroke: BCL
----------
T1=J47 BCL=0.9+-0.1mm
----------
----------
T1=J47 BCL=0.9+-0.1mm
----------
Speed control lever angle
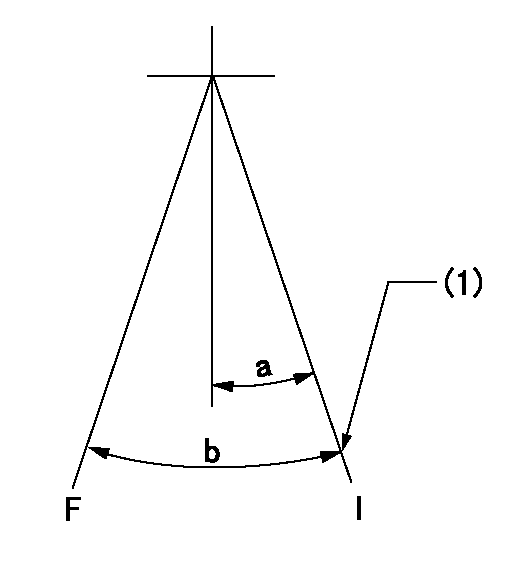
F:Full speed
I:Idle
(1)Stopper bolt set position 'H'
----------
----------
a=20deg+-5deg b=(35.5deg)+-3deg
----------
----------
a=20deg+-5deg b=(35.5deg)+-3deg
Stop lever angle
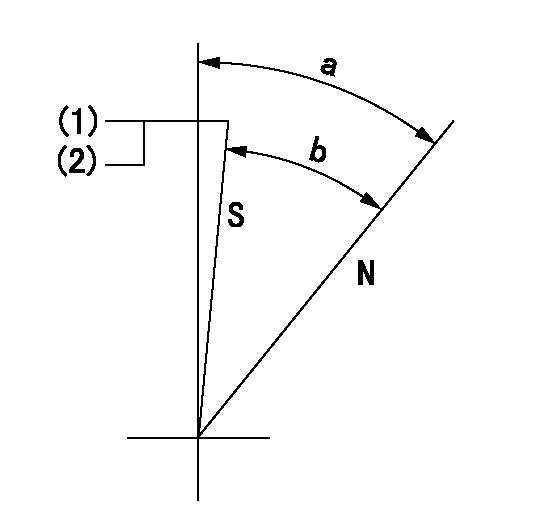
N:Pump normal
S:Stop the pump.
(1)Set the stopper bolt at speed = aa and rack position = bb and confirm non-injection.
(2)After setting the stopper bolt, confirm non-injection at speed cc.
----------
aa=1450r/min bb=6.2-0.5mm cc=300r/min
----------
a=36.5deg+-5deg b=(33deg)+-5deg
----------
aa=1450r/min bb=6.2-0.5mm cc=300r/min
----------
a=36.5deg+-5deg b=(33deg)+-5deg
0000001301

(1)Pump vertical direction
(2)Position of gear mark '3' at No 1 cylinder's beginning of injection
(3)B.T.D.C.: aa
(4)Pre-stroke: bb
----------
aa=7deg bb=5.6+-0.03mm
----------
a=(130deg)
----------
aa=7deg bb=5.6+-0.03mm
----------
a=(130deg)
0000001401
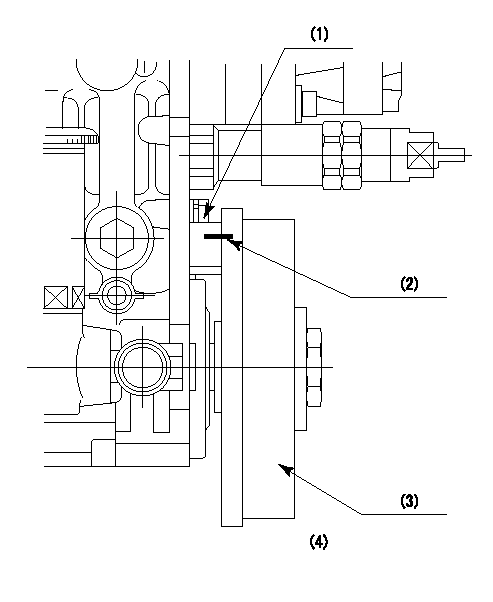
(1)Pointer
(2)Injection timing aligning mark
(3)Fly weight
(4)The actual shape and direction may be different from this illustration.
Operation sequence
1. Turn the prestroke actuator OFF.
2. Turn the camshaft as far as the No.1 cylinder's beginning of injection position.
3. Check that the pointer alignment mark of the injection pump and the alignment mark of the flywheel are matching.
4. If they are not matching, erase the alignment mark on the flywheel side, and stamp an alignment mark on the flywheel position that matches with the pointer side alignment mark.
5. Check again that the coupling's key groove position is in the No.1 cylinder's beginning of injection position.
----------
----------
----------
----------
0000001701
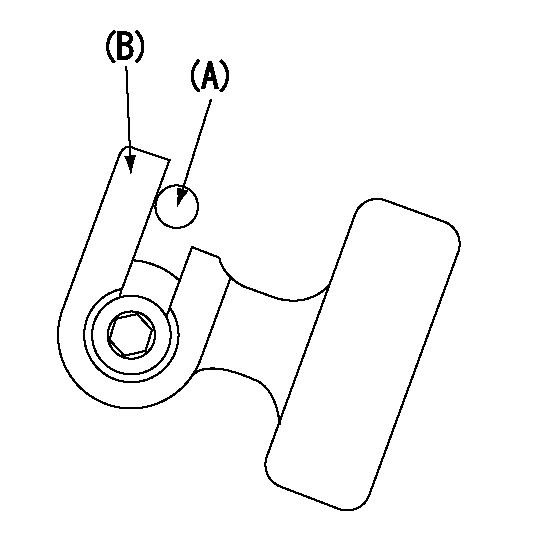
A : Stopper pin
B: Connector
----------
----------
----------
----------
0000001801
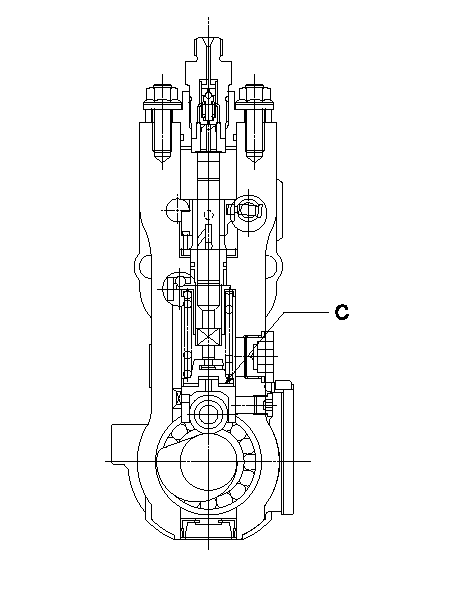
C:Shim
----------
----------
----------
----------
0000001901

A:Sealing position
B:Pre-stroke actuator
1. When installing the pre-stroke actuator on the pump, first tighten the installation bolts loosely, then move the actuator fully counterclockwise (viewed from the drive side).
Temporary tightening torque: 1 - 1.5 N.m (0.1 - 0.15 kgf.m)
2. Move the actuator in the clockwise direction when viewed from the drive side, and adjust so that it becomes the adjustment point of the adjustment value. Then tighten it.
Tightening torque: 7^9 N.m (0.7^0.9 kgf.m)
3. After prestroke actuator installation adjustment, simultaneously stamp both the actuator side and housing side.
----------
----------
----------
----------
0000002201 RACK SENSOR
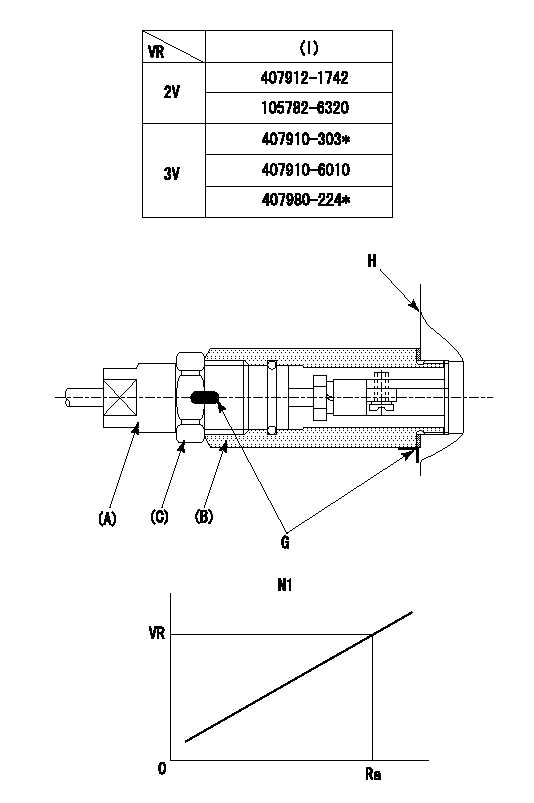
(VR) measurement voltage
(I) Part number of the control unit
(G) Apply red paint.
(H): End surface of the pump
1. Rack sensor adjustment (-0620)
(1)Fix the speed control lever at the full position
(2)Set the speed to N1 r/min.
(If the boost compensator is provided, apply boost pressure.)
(3)Adjust the bobbin (A) so that the rack sensor's output voltage is VR+-0.01.
(4)At that time, rack position must be Ra.
(5)Apply G at two places.
Connecting part between the joint (B) and the nut (F)
Connecting part between the joint (B) and the end surface of the pump (H)
----------
N1=1500r/min Ra=R1(12.5)+1.55mm
----------
----------
N1=1500r/min Ra=R1(12.5)+1.55mm
----------
Information:
Safety is basically common sense. There are standard safety rules but each situation has its own peculiarities which cannot always be covered by rules. Your experience and common sense will be your best guide to safety. Be ever watchful for safety hazards and correct deficiencies promptly.Use the following safety precautions as a general guide to safe driving and maintenance practice. It is your responsibility to practice and promote safety. 1. Obey the rules of the road.2. Never adjust or repair engine or vehicle while it is in operation.3. Remove all tools and electrical cords before starting engine or operating vehicle.4. Keep work area clean.5. Store oily rags in containers.6. Store flammable liquids in a safe place away from the work area.7. Do not smoke around batteries. Hydrogen gas generated by charging is explosive. Keep batteries in a well ventilated area.8. Observe NO SMOKING signs.9. Do not wear loose clothing.10. Never operate an engine except in a well ventilated area.11. Do not exceed 30 PSI (2 kg/cm2) of air pressure when cleaning with air. Servicing cab-over truck engines require additional safety precautions as follows: Before Tilting Cab:1. Check clearance above and in front of truck cab.2. Keep tool chests and workbenches away from front of cab.3. Inspect sleeper and cab interior for loose luggage, tools and liquid containers which could fall forward.4. Check "Buddy" or "Jump" seats on right side of cab to be sure they are secured in place. While Tilting Cab1. Be sure the governor, transmission and clutch linkage do not interfere with the cab.2. Check position of steering shaft U-joint to prevent binding.
BEFORE TILTING CAB CHECK AREA FOR SUFFICIENT CLEARANCE AND OBSTRUCTIONS3. Never work under a partially tilted cab, unless it is properly secured.4. When cab is tilted past the over-center position, use cables or chains to prevent the cab from falling beyond the over-center point. Do not rely on cab hydraulic lift mechanism to retain or break the fall of the cab. While Cab is Tilted1. If it is necessary to open a door, take care to avoid damage to door hinges and/or window glass. While Lowering Cab1. Watch all governor, steering, clutch and transmission linkage. Bellcranks may turn over center, shift levers jam against bottom of cab and some models of clutch links separate when tilting cab. These clutch linkage components can miss their mating part when the cab is lowered.2. Be sure mating ends of exhaust and air cleaner inlet pipes align properly.3. Be sure cab lowers properly on mounting and locating pins. Twisted or misaligned cabs may miss locating pins and cab latch will not secure cab in locked position.4. Lock cab latching mechanism when cab is all the way down.
BEFORE TILTING CAB CHECK AREA FOR SUFFICIENT CLEARANCE AND OBSTRUCTIONS3. Never work under a partially tilted cab, unless it is properly secured.4. When cab is tilted past the over-center position, use cables or chains to prevent the cab from falling beyond the over-center point. Do not rely on cab hydraulic lift mechanism to retain or break the fall of the cab. While Cab is Tilted1. If it is necessary to open a door, take care to avoid damage to door hinges and/or window glass. While Lowering Cab1. Watch all governor, steering, clutch and transmission linkage. Bellcranks may turn over center, shift levers jam against bottom of cab and some models of clutch links separate when tilting cab. These clutch linkage components can miss their mating part when the cab is lowered.2. Be sure mating ends of exhaust and air cleaner inlet pipes align properly.3. Be sure cab lowers properly on mounting and locating pins. Twisted or misaligned cabs may miss locating pins and cab latch will not secure cab in locked position.4. Lock cab latching mechanism when cab is all the way down.