Information injection-pump assembly
BOSCH
9 400 612 551
9400612551
ZEXEL
106991-1842
1069911842
ISUZU
1156031722
1156031722

Rating:
Service parts 106991-1842 INJECTION-PUMP ASSEMBLY:
1.
_
6.
COUPLING PLATE
7.
COUPLING PLATE
8.
_
9.
_
11.
Nozzle and Holder
1-15300-328-0
12.
Open Pre:MPa(Kqf/cm2)
15.7{160}/22.1{225}
15.
NOZZLE SET
Include in #1:
106991-1842
as INJECTION-PUMP ASSEMBLY
Cross reference number
BOSCH
9 400 612 551
9400612551
ZEXEL
106991-1842
1069911842
ISUZU
1156031722
1156031722
Zexel num
Bosch num
Firm num
Name
106991-1842
9 400 612 551
1156031722 ISUZU
INJECTION-PUMP ASSEMBLY
12PE1-N K 14CC INJECTION PUMP ASSY PE12P PE
12PE1-N K 14CC INJECTION PUMP ASSY PE12P PE
Calibration Data:
Adjustment conditions
Test oil
1404 Test oil ISO4113 or {SAEJ967d}
1404 Test oil ISO4113 or {SAEJ967d}
Test oil temperature
degC
40
40
45
Nozzle and nozzle holder
105780-8250
Bosch type code
1 688 901 101
Nozzle
105780-0120
Bosch type code
1 688 901 990
Nozzle holder
105780-2190
Opening pressure
MPa
20.7
Opening pressure
kgf/cm2
211
Injection pipe
Outer diameter - inner diameter - length (mm) mm 8-3-600
Outer diameter - inner diameter - length (mm) mm 8-3-600
Overflow valve
134424-4320
Overflow valve opening pressure
kPa
255
221
289
Overflow valve opening pressure
kgf/cm2
2.6
2.25
2.95
Tester oil delivery pressure
kPa
255
255
255
Tester oil delivery pressure
kgf/cm2
2.6
2.6
2.6
Direction of rotation (viewed from drive side)
Right R
Right R
Injection timing adjustment
Direction of rotation (viewed from drive side)
Right R
Right R
Injection order
1-4-9-8-
5-2-11-1
0-3-6-7-
Pre-stroke
mm
5.5
5.47
5.53
Rack position
Point A R=A
Point A R=A
Beginning of injection position
Governor side NO.1
Governor side NO.1
Difference between angles 1
Cal 1-4 deg. 15 14.75 15.25
Cal 1-4 deg. 15 14.75 15.25
Difference between angles 2
Cal 1-9 deg. 60 59.75 60.25
Cal 1-9 deg. 60 59.75 60.25
Difference between angles 3
Cal 1-8 deg. 75 74.75 75.25
Cal 1-8 deg. 75 74.75 75.25
Difference between angles 4
Cal 1-5 deg. 120 119.75 120.25
Cal 1-5 deg. 120 119.75 120.25
Difference between angles 5
Cyl.1-2 deg. 135 134.75 135.25
Cyl.1-2 deg. 135 134.75 135.25
Difference between angles 6
Cal 1-11 deg. 180 179.75 180.25
Cal 1-11 deg. 180 179.75 180.25
Difference between angles 7
Cal 1-10 deg. 195 194.75 195.25
Cal 1-10 deg. 195 194.75 195.25
Difference between angles 8
Cal 1-3 deg. 240 239.75 240.25
Cal 1-3 deg. 240 239.75 240.25
Difference between angles 9
Cal 1-6 deg. 255 254.75 255.25
Cal 1-6 deg. 255 254.75 255.25
Difference between angles 10
Cal 1-7 deg. 300 299.75 300.25
Cal 1-7 deg. 300 299.75 300.25
Difference between angles 11
Cal 1-12 deg. 315 314.75 315.25
Cal 1-12 deg. 315 314.75 315.25
Injection quantity adjustment
Adjusting point
-
Rack position
11.9
Pump speed
r/min
700
700
700
Average injection quantity
mm3/st.
135
133.4
136.6
Max. variation between cylinders
%
0
-3
3
Basic
*
Fixing the rack
*
Standard for adjustment of the maximum variation between cylinders
*
Injection quantity adjustment_02
Adjusting point
Z
Rack position
6.5+-0.5
Pump speed
r/min
430
430
430
Average injection quantity
mm3/st.
13.5
11.5
15.5
Max. variation between cylinders
%
0
-13
13
Fixing the rack
*
Standard for adjustment of the maximum variation between cylinders
*
Injection quantity adjustment_03
Adjusting point
A
Rack position
R1(11.9)
Pump speed
r/min
700
700
700
Average injection quantity
mm3/st.
135
134
136
Fixing the lever
*
Injection quantity adjustment_04
Adjusting point
B
Rack position
R1+0.8
Pump speed
r/min
1050
1050
1050
Average injection quantity
mm3/st.
132
128
136
Fixing the lever
*
Test data Ex:
Governor adjustment
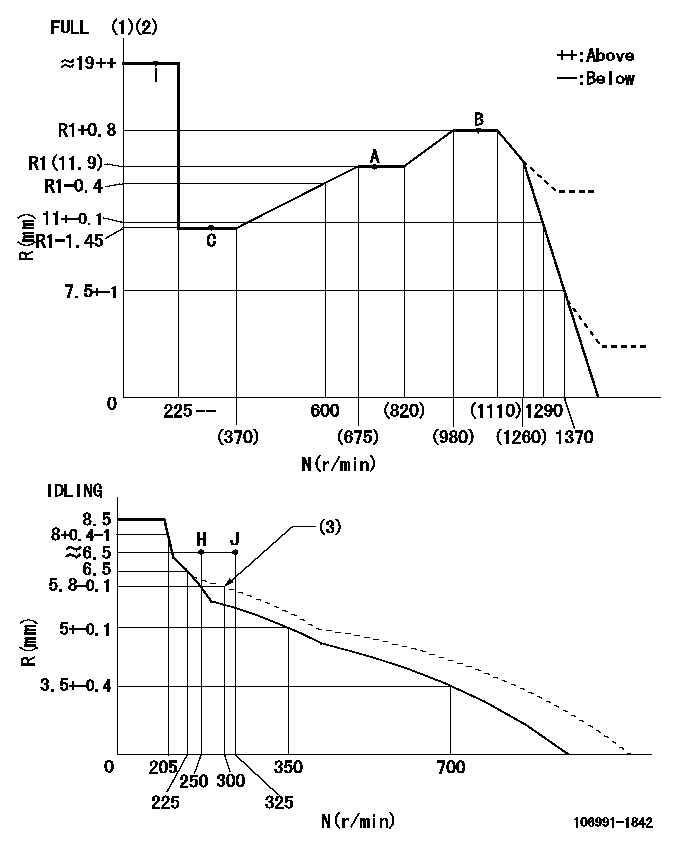
N:Pump speed
R:Rack position (mm)
(1)Torque cam stamping: T1
(2)Tolerance for racks not indicated: +-0.05mm.
(3)Damper spring setting
----------
T1=AD37
----------
----------
T1=AD37
----------
Timer adjustment
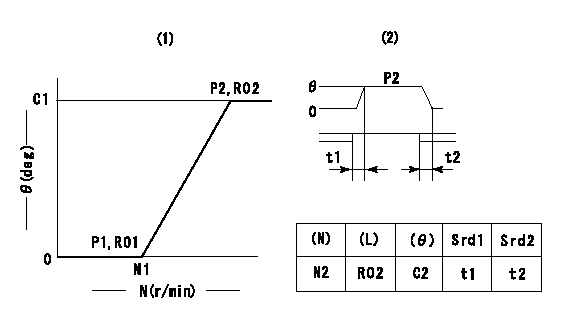
(1)Adjusting range
(2)Step response time
(N): Speed of the pump
(L): Load
(theta) Advance angle
(Srd1) Step response time 1
(Srd2) Step response time 2
1. Adjusting conditions for the variable timer
(1)Adjust the clearance between the pickup and the protrusion to L.
----------
L=1-0.2mm N2=800r/min C2=(8)deg t1=1.5--sec. t2=1.5--sec.
----------
N1=950++r/min P1=0kPa(0kgf/cm2) P2=392kPa(4kgf/cm2) C1=8+-0.3deg R01=0/4load R02=4/4load
----------
L=1-0.2mm N2=800r/min C2=(8)deg t1=1.5--sec. t2=1.5--sec.
----------
N1=950++r/min P1=0kPa(0kgf/cm2) P2=392kPa(4kgf/cm2) C1=8+-0.3deg R01=0/4load R02=4/4load
Speed control lever angle
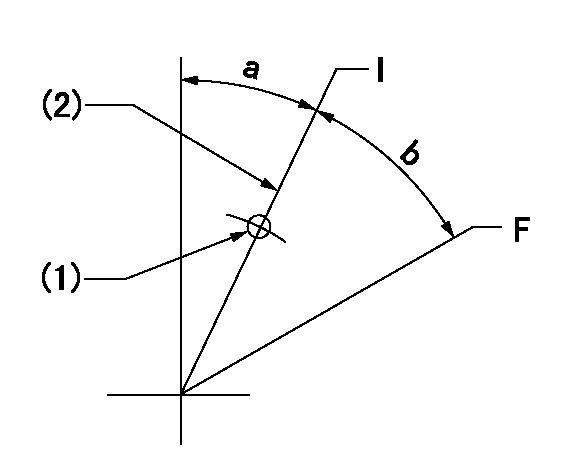
F:Full speed
I:Idle
(1)Use the pin at R = aa
(2)Stopper bolt set position 'H'
----------
aa=42.5mm
----------
a=22.5deg+-5deg b=(31deg)+-3deg
----------
aa=42.5mm
----------
a=22.5deg+-5deg b=(31deg)+-3deg
Stop lever angle
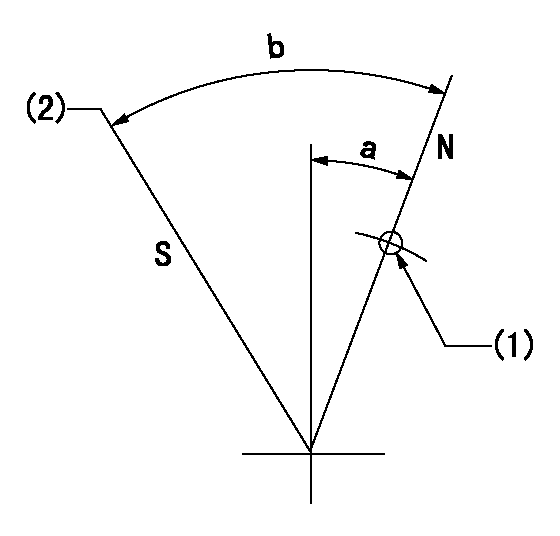
N:Pump normal
S:Stop the pump.
(1)Use the pin at R = aa
(2)Set the stopper bolt so that speed = bb and rack position = cc. (Confirm non-injection.)
----------
aa=40mm bb=0r/min cc=1.5+-0.3mm
----------
a=20deg+-5deg b=43deg+-5deg
----------
aa=40mm bb=0r/min cc=1.5+-0.3mm
----------
a=20deg+-5deg b=43deg+-5deg
0000001501 RACK SENSOR
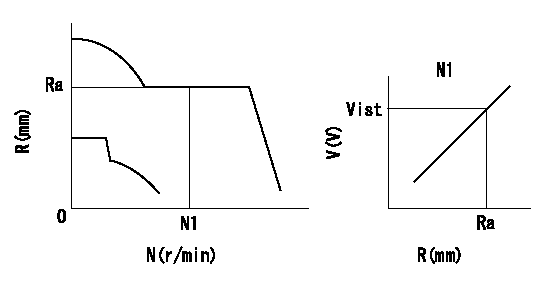
Rack sensor adjustment
1. Flange type rack sensor (rack sensor adjustment -5*20)
(1)These types of rack sensors do not need adjustment. Confirm the performance with the following procedures.
(2)Mount the rack sensor main body to the pump main body.
(3)Fix the pump lever at full.
(4)At supply voltage V1, pump speed N1 and rack position Ra, confirm that the amp's output voltage is Vist.
(5)Move the pump lever two or three times.
(6)Set again to full.
(7)Confirm that the amplifier output voltage is Vist.
(8)Fix the caution plate to the upper part of the rack sensor.
(For those without the caution plate instructions, make sure the nameplate of the rack sensor carries the "Don't hold here" caution.)
(9)Apply red paint to the rack sensor mounting bolts (2 places).
----------
V1=5+-0.01V N1=700r/min Ra=R1(11.9)mm Vist=1.57+-0.14V
----------
----------
V1=5+-0.01V N1=700r/min Ra=R1(11.9)mm Vist=1.57+-0.14V
----------
Timing setting
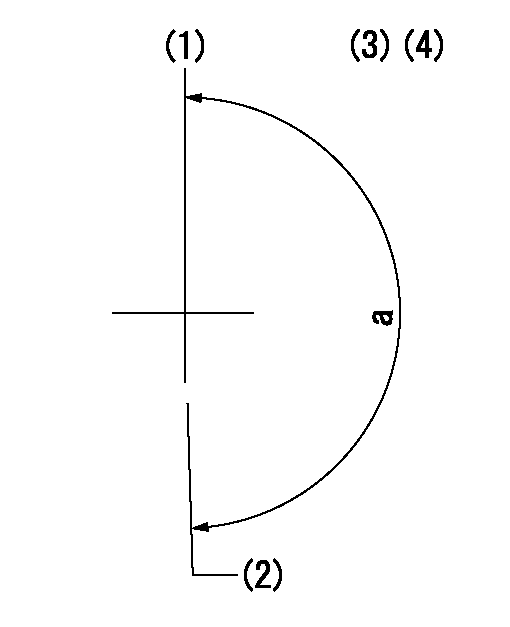
(1)Pump vertical direction
(2)Position of "Z" mark at the No 1 cylinder's beginning of injection (governor side)
(3)B.T.D.C.: aa
(4)-
----------
aa=4deg
----------
a=(180deg)
----------
aa=4deg
----------
a=(180deg)
Information:
*The serial number is above the fuel injection pump on the block.(1) Cylinder head bolts and nuts tightening procedure:1. Put engine oil on the threads of bolts and nuts. Tighten all bolts and nuts in number sequence to a torque of ... 45 N m (35 lb ft)2. Tighten all bolts and nuts in number sequence to a torque of ... 95 N m (70 lb ft)3. Again tighten all bolts and nuts in number sequence to a final torque of ... 135 N m (100 lb ft) Retighten the cylinder head bolts and nuts after the engine has run under part load for approximately thirty minutes.a. If the bolts and nuts move before the correct final torque is reached, retighten everything in the sequence shown to the following: 4.236 Engines ... 135 N m (100 lb ft)T4.236 Engines ... 120 N m (88 lb ft)b. If the bolts and nuts do not move before the correct final torque is reached, back each one off 30 to 60° (with an 8T3052 Degree Wheel) and retighten again, in the sequence shown, to the torque shown in Step a. After all the bolts and nuts are retightened, check the first 10 positions to make sure they are tightened to the correct torque. c. After 25 to 50 hours of service for a new or rebuilt engine, retorque the cylinder head bolts as shown in Step a above and adjust the valves again. New cylinder blocks have been introduced on the 4.236 and T4.236 engines. The new cylinder blocks have deeper cylinder head bolt holes and longer bolts. The old and new sizes are shown. The change became effective at engine serial number LDU027631M and up for the 4.236 engines and engine serial number LJU027774M and up for the T4.236 engines. The engine serial number is located above the fuel injection pump on the block. The new cylinder head bolts are not interchangeable between old and new blocks.(2) Torque for nuts that hold injectors ... 17 N m (12 lb ft) Replace the copper washer and rubber seal between the head and the injector every time the injector is removed. See Fuel Injector Installation in Testing And Adjusting.(3) Torque for fuel line nuts ... 20 N m (15 lb ft)(4) Torque for nuts or bolts that hold rocker shaft ... 43 N m (32 lb ft)(5) Clearance (cold), between rocker arm and valves (valve clearance): Intake ... 0.30 mm (.012 in)Exhaust ... 0.30 mm (.012 in)(6) Maximum permissible nozzle projection below cylinder head face after skimming ... 4.45 mm (.175 in) Skimming allowance (maximum) ... 0.30 mm (.012 in)(7) Depth of cylinder head (new) ... 103.188 0.38 mm (4.0625 .015 in) Minimum depth of cylinder head (after skimming) ... 102.502 mm (4.0355 in)Maximum permissible amount of bow (curve of cylinder head):Across width (transverse) ... 0.08 mm (.003 in)Across length (longitudinal) ... 0.15 mm (.006 in)See Cylinder Head Check in Testing And Adjusting.T4.236 Engines
Have questions with 106991-1842?
Group cross 106991-1842 ZEXEL
Isuzu
106991-1842
9 400 612 551
1156031722
INJECTION-PUMP ASSEMBLY
12PE1-N
12PE1-N