Information injection-pump assembly
BOSCH
9 400 618 713
9400618713
ZEXEL
106971-5170
1069715170
NISSAN-DIESEL
1680197013
1680197013
Rating:
Cross reference number
BOSCH
9 400 618 713
9400618713
ZEXEL
106971-5170
1069715170
NISSAN-DIESEL
1680197013
1680197013
Zexel num
Bosch num
Firm num
Name
9 400 618 713
1680197013 NISSAN-DIESEL
INJECTION-PUMP ASSEMBLY
RH10E * K 14CE INJECTION PUMP ASSY PE10P PE
RH10E * K 14CE INJECTION PUMP ASSY PE10P PE
Calibration Data:
Adjustment conditions
Test oil
1404 Test oil ISO4113 or {SAEJ967d}
1404 Test oil ISO4113 or {SAEJ967d}
Test oil temperature
degC
40
40
45
Nozzle and nozzle holder
105780-8250
Bosch type code
1 688 901 101
Nozzle
105780-0120
Bosch type code
1 688 901 990
Nozzle holder
105780-2190
Opening pressure
MPa
20.7
Opening pressure
kgf/cm2
211
Injection pipe
Outer diameter - inner diameter - length (mm) mm 8-3-600
Outer diameter - inner diameter - length (mm) mm 8-3-600
Overflow valve
131425-0120
Overflow valve opening pressure
kPa
157
123
191
Overflow valve opening pressure
kgf/cm2
1.6
1.25
1.95
Tester oil delivery pressure
kPa
255
255
255
Tester oil delivery pressure
kgf/cm2
2.6
2.6
2.6
RED3 control unit part number
407910-3
960
RED3 rack sensor specifications
mm
19
Direction of rotation (viewed from drive side)
Right R
Right R
Injection timing adjustment
Direction of rotation (viewed from drive side)
Right R
Right R
Injection order
10-9-4-3
-6-5-8-7
-2-1
Pre-stroke
mm
4.4
4.37
4.43
Beginning of injection position
Governor side NO.1
Governor side NO.1
Difference between angles 1
Cal 10-9 deg. 45 44.75 45.25
Cal 10-9 deg. 45 44.75 45.25
Difference between angles 2
Cal 10-4 deg. 72 71.75 72.25
Cal 10-4 deg. 72 71.75 72.25
Difference between angles 3
Cal 10-3 deg. 117 116.75 117.25
Cal 10-3 deg. 117 116.75 117.25
Difference between angles 4
Cal 10-6 deg. 144 143.75 144.25
Cal 10-6 deg. 144 143.75 144.25
Difference between angles 5
Cal 10-5 deg. 189 188.75 189.25
Cal 10-5 deg. 189 188.75 189.25
Difference between angles 6
Cal 10-8 deg. 216 215.75 216.25
Cal 10-8 deg. 216 215.75 216.25
Difference between angles 7
Cal 10-7 deg. 261 260.75 261.25
Cal 10-7 deg. 261 260.75 261.25
Difference between angles 8
Cal 10-2 deg. 288 287.75 288.25
Cal 10-2 deg. 288 287.75 288.25
Difference between angles 9
Cal 10-1 deg. 333 332.75 333.25
Cal 10-1 deg. 333 332.75 333.25
Injection quantity adjustment
Rack position
(12.6)
Vist
V
1.96
1.96
1.96
Pump speed
r/min
700
700
700
Average injection quantity
mm3/st.
114
112
116
Max. variation between cylinders
%
0
-4
4
Basic
*
Injection quantity adjustment_02
Rack position
(8.6)
Vist
V
2.6
2.5
2.7
Pump speed
r/min
400
400
400
Average injection quantity
mm3/st.
16
14
18
Max. variation between cylinders
%
0
-10
10
Governor adjustment
Pump speed
r/min
770--
Advance angle
deg.
0
0
0
Remarks
Start
Start
Governor adjustment_02
Pump speed
r/min
720
Advance angle
deg.
0.3
Governor adjustment_03
Pump speed
r/min
(850)
Advance angle
deg.
2
1.7
2.3
Governor adjustment_04
Pump speed
r/min
-
Advance angle
deg.
2
1.7
2.3
Remarks
Measure the actual speed.
Measure the actual speed.
Governor adjustment_05
Pump speed
r/min
1000
Advance angle
deg.
3.2
3.2
3.2
Governor adjustment_06
Pump speed
r/min
1090
Advance angle
deg.
7
6.7
7.3
Remarks
Finish
Finish
Test data Ex:
Speed control lever angle
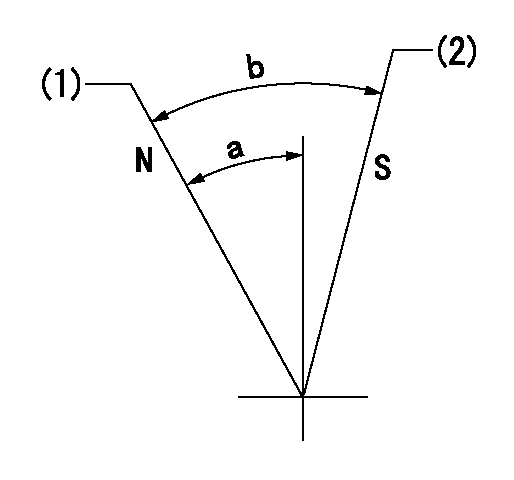
N:Pump normal
S:Stop the pump.
(1)Rack position = aa
(2)Rack position bb
----------
aa=20mm bb=1mm
----------
a=27deg+-5deg b=37deg+-5deg
----------
aa=20mm bb=1mm
----------
a=27deg+-5deg b=37deg+-5deg
0000000901
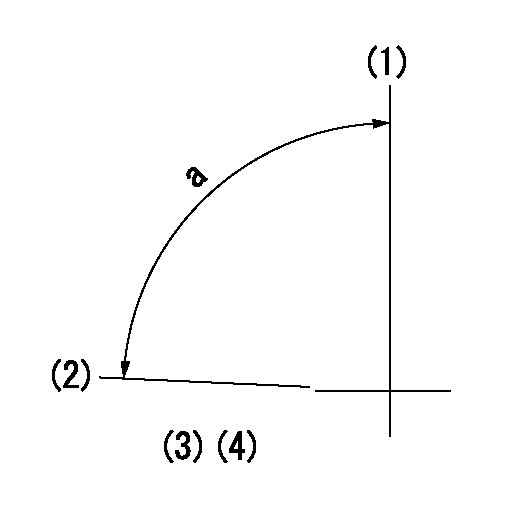
(1)Pump vertical direction
(2)Position of the coupling's key groove at the start of injection for the No. 10 cylinder.
(3)-
(4)-
----------
----------
a=(90deg)
----------
----------
a=(90deg)
Stop lever angle
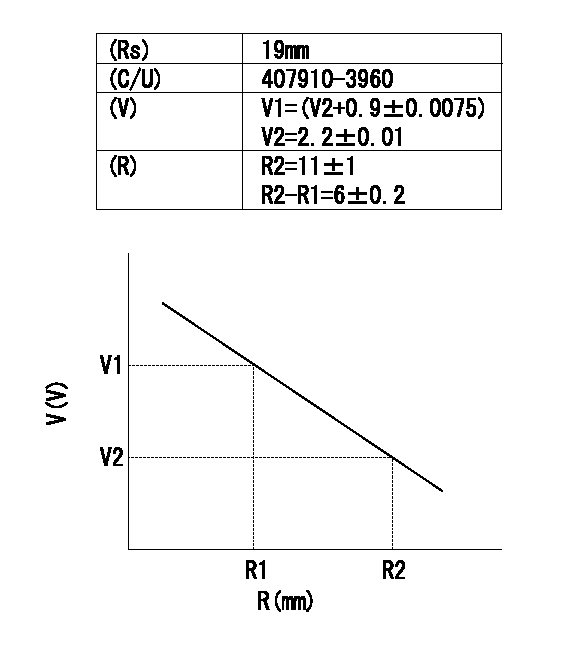
(Rs) rack sensor specifications
(C/U) control unit part number
(V) Rack sensor output voltage
(R) Rack position (mm)
1. Confirming governor output characteristics (rack 19 mm, span 6 mm)
(1)When the output voltages of the rack sensor are V1 and V2, check that the rack positions R1 and R2 in the table above are satisfied.
----------
----------
----------
----------
Information:
Start By:a. remove flywheelb. remove crankshaft rear seal and wear sleeve **Remove the crankshaft rear seal and wear sleeve only if the engine is equipped with the later design seal. The later design seal can be identified by the rotation marks on the seal.
Some flywheel housings will have more bolts holding the flywheel housing to the cylinder block.
1. If the engine is equipped with an electric starting motor, remove the electric starting motor from the flywheel housing.2. Remove the bolts that hold the oil pan plate to the flywheel housing. Loosen the bolts that hold the oil pan plate to the cylinder block.3. Install spacers between the oil pan plate and the cylinder block to hold the oil pan plate away from the flywheel housing.
3306 Engine Shown4. On 3306 Engines, remove turbocharger oil drain pipe (1).5. Install Tool (A) on the flywheel housing as shown, and fasten a hoist to it.6. Remove all bolts (2) and the flywheel housing from the engine. The weight of the flywheel housing is 37 kg (82 lb).Install Flywheel Housing
3306 Engine Shown1. Install Tool (A) on the flywheel housing. Fasten a hoist to the flywheel housing. 2. Put the gasket and flywheel housing in position on the engine. Install bolts (2) that hold it. Tighten the bolts to a torque of 100 14 N m (74 10 lb ft) as shown.3. Remove Tool (A) from the flywheel housing.4. On 3306 Engines, install turbocharger oil drain line (1).5. Cut the bottom of the flywheel housing gasket off even with the cylinder block and flywheel housing. Put 3S6252 RTV Silicone Adhesive/Sealant on the bottom of the gasket where it makes contact with the oil pan plate gasket.6. Remove the spacers from between the oil pan plate and the cylinder block. Install the bolts that hold the oil pan plate to the flywheel housing. Tighten the bolts that hold the oil pan plate to the cylinder block.7. If the engine is equipped with an electric starting motor, install it on the flywheel housing.End By:a. install crankshaft rear seal and wear sleeveb. install flywheel