Information injection-pump assembly
BOSCH
9 400 618 574
9400618574
ZEXEL
106961-0264
1069610264
NISSAN-DIESEL
1670097065
1670097065

Rating:
Service parts 106961-0264 INJECTION-PUMP ASSEMBLY:
1.
_
7.
COUPLING PLATE
8.
_
9.
_
11.
Nozzle and Holder
1660097012
12.
Open Pre:MPa(Kqf/cm2)
19.6(200)
15.
NOZZLE SET
Include in #1:
106961-0264
as INJECTION-PUMP ASSEMBLY
Cross reference number
BOSCH
9 400 618 574
9400618574
ZEXEL
106961-0264
1069610264
NISSAN-DIESEL
1670097065
1670097065
Zexel num
Bosch num
Firm num
Name
106961-0264
9 400 618 574
1670097065 NISSAN-DIESEL
INJECTION-PUMP ASSEMBLY
RD10 * K
RD10 * K
Calibration Data:
Adjustment conditions
Test oil
1404 Test oil ISO4113 or {SAEJ967d}
1404 Test oil ISO4113 or {SAEJ967d}
Test oil temperature
degC
40
40
45
Nozzle and nozzle holder
105780-8140
Bosch type code
EF8511/9A
Nozzle
105780-0000
Bosch type code
DN12SD12T
Nozzle holder
105780-2080
Bosch type code
EF8511/9
Opening pressure
MPa
17.2
Opening pressure
kgf/cm2
175
Injection pipe
Outer diameter - inner diameter - length (mm) mm 8-3-600
Outer diameter - inner diameter - length (mm) mm 8-3-600
Tester oil delivery pressure
kPa
157
157
157
Tester oil delivery pressure
kgf/cm2
1.6
1.6
1.6
Direction of rotation (viewed from drive side)
Right R
Right R
Injection timing adjustment
Direction of rotation (viewed from drive side)
Right R
Right R
Injection order
10-9-4-3
-6-5-8-7
-2-1
Pre-stroke
mm
3.65
3.6
3.7
Beginning of injection position
Governor side NO.1
Governor side NO.1
Difference between angles 1
Cal 10-9 deg. 45 44.5 45.5
Cal 10-9 deg. 45 44.5 45.5
Difference between angles 2
Cal 10-4 deg. 72 71.5 72.5
Cal 10-4 deg. 72 71.5 72.5
Difference between angles 3
Cal 10-3 deg. 117 116.5 117.5
Cal 10-3 deg. 117 116.5 117.5
Difference between angles 4
Cal 10-6 deg. 144 143.5 144.5
Cal 10-6 deg. 144 143.5 144.5
Difference between angles 5
Cal 10-5 deg. 189 188.5 189.5
Cal 10-5 deg. 189 188.5 189.5
Difference between angles 6
Cal 10-8 deg. 216 215.5 216.5
Cal 10-8 deg. 216 215.5 216.5
Difference between angles 7
Cal 10-7 deg. 261 260.5 261.5
Cal 10-7 deg. 261 260.5 261.5
Difference between angles 8
Cal 10-2 deg. 288 287.5 288.5
Cal 10-2 deg. 288 287.5 288.5
Difference between angles 9
Cal 10-1 deg. 333 332.5 333.5
Cal 10-1 deg. 333 332.5 333.5
Injection quantity adjustment
Adjusting point
A
Rack position
9.7
Pump speed
r/min
700
700
700
Average injection quantity
mm3/st.
116
115
117
Max. variation between cylinders
%
0
-4
4
Basic
*
Fixing the lever
*
Injection quantity adjustment_02
Adjusting point
B
Rack position
9.7
Pump speed
r/min
1000
1000
1000
Average injection quantity
mm3/st.
117
114
120
Max. variation between cylinders
%
0
-4
4
Fixing the lever
*
Injection quantity adjustment_03
Adjusting point
C
Rack position
6.5+-0.5
Pump speed
r/min
200
200
200
Average injection quantity
mm3/st.
10
8
12
Max. variation between cylinders
%
0
-10
10
Fixing the rack
*
Timer adjustment
Pump speed
r/min
600
Advance angle
deg.
0.5
Timer adjustment_02
Pump speed
r/min
750
Advance angle
deg.
0.8
Timer adjustment_03
Pump speed
r/min
1000
Advance angle
deg.
1.7
1.2
2.2
Timer adjustment_04
Pump speed
r/min
1250+-25
Advance angle
deg.
4
3.3
4.5
Remarks
Finish
Finish
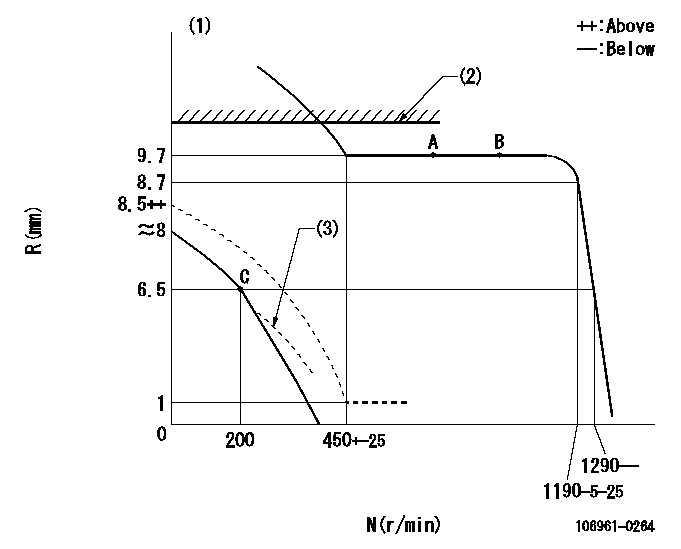
Test data Ex:
Governor adjustment

N:Pump speed
R:Rack position (mm)
(1)After completing adjustment of the broken line, set the lever at the unbroken line position.
(2)Rack limit using the stop lever: R1
(3)Beginning of damper spring operation: DL
----------
R1=11.2+0.2mm DL=5.5-0.2mm
----------
----------
R1=11.2+0.2mm DL=5.5-0.2mm
----------
0000000901

F:Full load
I:Idle
(1)Stopper bolt setting
----------
----------
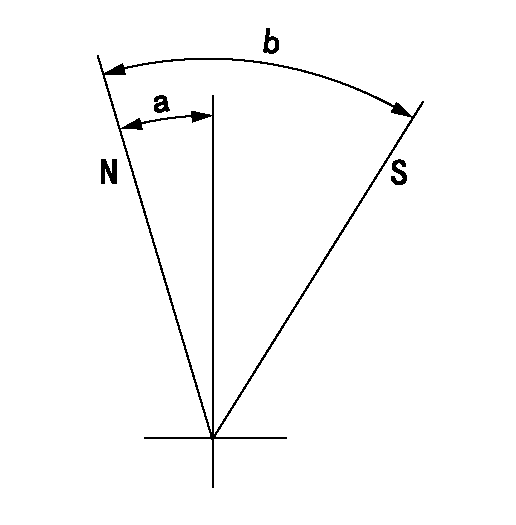
a=12deg+-5deg b=19deg+-3deg
----------
----------
a=12deg+-5deg b=19deg+-3deg
Stop lever angle

N:Pump normal
S:Stop the pump.
----------
----------
a=12deg+-5deg b=33deg+-3deg
----------
----------
a=12deg+-5deg b=33deg+-3deg
Information:
Model Identification Number
AFTERTREAT-SCR ES700101, 105-170, 231-259, 266-273
PARTS NEEDED
Qty
Part Number Description
1 4487104 DISC-SUPPORT
In order to allow equitable parts availability to all participating dealers, please limit your initial parts order to not exceed 32% of dealership population. This is an initial order recommendation only, and the ultimate responsibility for ordering the total number of parts needed to satisfy the program lies with the dealer.
ACTION REQUIRED
Prior to Disassembly:
Remove/Turn off all power to the dosing cabinet.
Lock Out and Tag Out the master disconnect.
Follow all mandated safety rules.
Please refer to the attached Rework Procedure.
SERVICE CLAIM ALLOWANCES
Product smu/age whichever comes first Caterpillar Dealer Suggested Customer Suggested
Parts % Labor Hrs% Parts % Labor Hrs% Parts % Labor Hrs%
0-8000 hrs,
0-24 mo 100.0% 100.0% 0.0% 0.0% 0.0% 0.0%
This is a 2.0-hour job
PARTS DISPOSITION
Handle the parts in accordance with your Warranty Bulletin on warranty parts handling.
Rework Procedure
Early production dosing cabinets under went several changes with the Diesel Exhaust Fluid Back Pressure Valves that were installed at the factory. (A) Plastic Housing, (B) Stainless Steel Housing, and (C) Stainless Steel Body with Plastic Cap. Refer Image 1.1.1.
Identify the Diesel Exhaust Fluid Back Pressure Valve in the dosing cabinet, and proceed to the appropriate rework procedure below.
Remove the Diesel Exhaust Fluid Back Pressure Valve from dosing cabinet. Refer to Image 1.1.2.
Disassemble and replace the internal support disc. Refer to Image 1.1.3.
Reassemble valve and tighten the assembly screws 5 Nm ( 43 in lb ). Reinstall valve into dosing cabinet.
Once Diesel Exhaust Fluid Back Pressure Valve has been reinstalled, it is necessary
to set the back pressure valve at ~40 psi. This is an important adjustment. If the back pressure valve is set too low it will not be able to seal against the DEF head pressure, and can flood the reactor. If the valve is set two high, it can stop all flow of DEF, and will force DEF out the pump pressure release valve, possibly damaging the pump.
Procedure to Set Back Pressure Valve
Plastic Housing (A) or Stainless Steel Housing (B)
The field method of setting the valve is to back off the adjustment screw until the spring pressure is released, tighten the screw until contact is made with the spring, then tighten the screw two complete revolutions. The adjustment screw gives ~20 psi per revolution of the screw, so two turns sets it at about 40 psi.
Note: Special care should be taken when determining when the screw makes contact with the spring. Occasionally the screw can be tight, making it hard to determine when the screw makes contact with the spring. Lubricating the screw can help.
Stainless Steel Body with Plastic Cap (C)
The valve may be marked as BPM025SV50P. Refer to Image 1.1.4. If the spring has 9 coils (A), unscrew
Have questions with 106961-0264?
Group cross 106961-0264 ZEXEL
Nissan-Diesel
Nissan-Diesel
Nissan-Diesel
Nissan-Diesel
Nissan-Diesel
Nissan-Diesel
Nissan-Diesel
Nissan-Diesel
106961-0264
9 400 618 574
1670097065
INJECTION-PUMP ASSEMBLY
RD10
RD10