Information injection-pump assembly
BOSCH
9 400 619 918
9400619918
ZEXEL
106891-1551
1068911551
ISUZU
1156032051
1156032051
Rating:
Service parts 106891-1551 INJECTION-PUMP ASSEMBLY:
1.
_
6.
COUPLING PLATE
7.
COUPLING PLATE
8.
_
9.
_
11.
Nozzle and Holder
12.
Open Pre:MPa(Kqf/cm2)
15.7{160}/22.1{225}
15.
NOZZLE SET
Include in #1:
106891-1551
as INJECTION-PUMP ASSEMBLY
Cross reference number
BOSCH
9 400 619 918
9400619918
ZEXEL
106891-1551
1068911551
ISUZU
1156032051
1156032051
Zexel num
Bosch num
Firm num
Name
9 400 619 918
1156032051 ISUZU
INJECTION-PUMP ASSEMBLY
8PE1 * K 14CD PE8P PE
8PE1 * K 14CD PE8P PE
Calibration Data:
Adjustment conditions
Test oil
1404 Test oil ISO4113 or {SAEJ967d}
1404 Test oil ISO4113 or {SAEJ967d}
Test oil temperature
degC
40
40
45
Nozzle and nozzle holder
105780-8140
Bosch type code
EF8511/9A
Nozzle
105780-0000
Bosch type code
DN12SD12T
Nozzle holder
105780-2080
Bosch type code
EF8511/9
Opening pressure
MPa
17.2
Opening pressure
kgf/cm2
175
Injection pipe
Outer diameter - inner diameter - length (mm) mm 8-3-600
Outer diameter - inner diameter - length (mm) mm 8-3-600
Overflow valve
134424-4320
Overflow valve opening pressure
kPa
255
221
289
Overflow valve opening pressure
kgf/cm2
2.6
2.25
2.95
Tester oil delivery pressure
kPa
157
157
157
Tester oil delivery pressure
kgf/cm2
1.6
1.6
1.6
Direction of rotation (viewed from drive side)
Right R
Right R
Injection timing adjustment
Direction of rotation (viewed from drive side)
Right R
Right R
Injection order
1-8-7-3-
6-5-4-2
Pre-stroke
mm
4.2
4.17
4.23
Rack position
Point A R=A
Point A R=A
Beginning of injection position
Governor side NO.1
Governor side NO.1
Difference between angles 1
Cal 1-8 deg. 45 44.75 45.25
Cal 1-8 deg. 45 44.75 45.25
Difference between angles 2
Cal 1-7 deg. 90 89.75 90.25
Cal 1-7 deg. 90 89.75 90.25
Difference between angles 3
Cal 1-3 deg. 135 134.75 135.25
Cal 1-3 deg. 135 134.75 135.25
Difference between angles 4
Cal 1-6 deg. 180 179.75 180.25
Cal 1-6 deg. 180 179.75 180.25
Difference between angles 5
Cal 1-5 deg. 225 224.75 225.25
Cal 1-5 deg. 225 224.75 225.25
Difference between angles 6
Cal 1-4 deg. 270 269.75 270.25
Cal 1-4 deg. 270 269.75 270.25
Difference between angles 7
Cyl.1-2 deg. 315 314.75 315.25
Cyl.1-2 deg. 315 314.75 315.25
Injection quantity adjustment
Adjusting point
A
Rack position
7.8
Pump speed
r/min
800
800
800
Average injection quantity
mm3/st.
101
99.5
102.5
Max. variation between cylinders
%
0
-2
2
Basic
*
Fixing the lever
*
Injection quantity adjustment_02
Adjusting point
C
Rack position
8.8
Pump speed
r/min
350
350
350
Average injection quantity
mm3/st.
100
96
104
Fixing the lever
*
Injection quantity adjustment_03
Adjusting point
D
Rack position
4.7+-0.5
Pump speed
r/min
265
265
265
Average injection quantity
mm3/st.
10
8.7
11.3
Max. variation between cylinders
%
0
-13
13
Basic
*
Fixing the rack
*
Timer adjustment
Pump speed
r/min
800--
Advance angle
deg.
0
0
0
Remarks
Start
Start
Timer adjustment_02
Pump speed
r/min
750
Advance angle
deg.
0.3
Timer adjustment_03
Pump speed
r/min
1100
Advance angle
deg.
3.5
3
4
Remarks
Finish
Finish
Test data Ex:
Governor adjustment
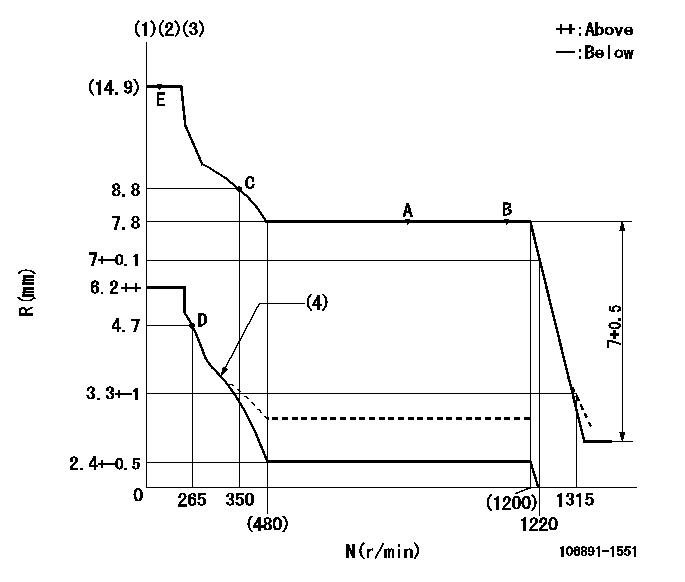
N:Pump speed
R:Rack position (mm)
(1)Lever ratio: RT
(2)Target shim dimension: TH
(3)Tolerance for racks not indicated: +-0.05mm.
(4)Damper spring setting: DL
----------
RT=0.8 TH=1.7mm DL=3.7-0.2mm
----------
----------
RT=0.8 TH=1.7mm DL=3.7-0.2mm
----------
Speed control lever angle

F:Full speed
----------
----------
a=7deg+-5deg
----------
----------
a=7deg+-5deg
0000000901
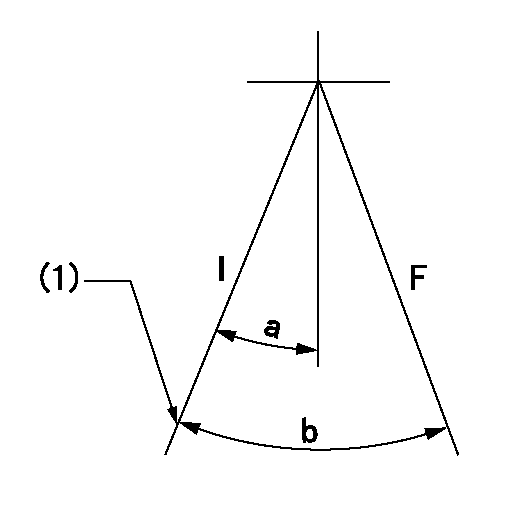
F:Full load
I:Idle
(1)Stopper bolt setting
----------
----------
a=10deg+-5deg b=29.5deg+-3deg
----------
----------
a=10deg+-5deg b=29.5deg+-3deg
Stop lever angle
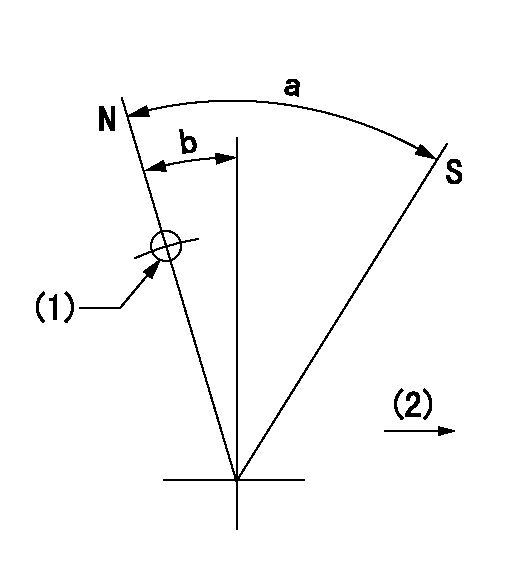
N:Pump normal
S:Stop the pump.
(1)Use the pin at R = aa
(2)Drive side
----------
aa=23.5mm
----------
a=73deg+-5deg b=40deg+-5deg
----------
aa=23.5mm
----------
a=73deg+-5deg b=40deg+-5deg
0000001501 ACS
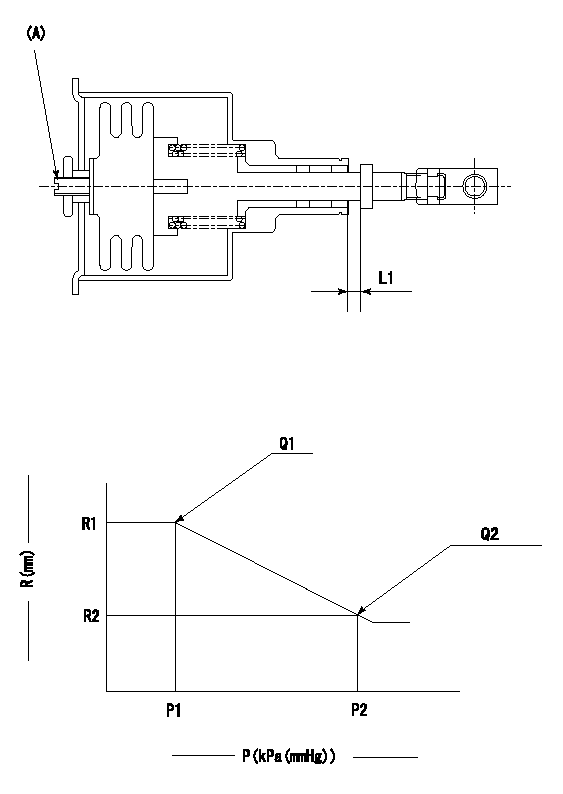
(A) Set screw
1. Aneroid compensator unit adjustment
Screw in (A) to obtain L1.
2. Adjustment following governor installation
(1)Set the speed of the pump to N1 r/min and fix the control lever at the full set position.
(2)Screw in the aneroid compensator to obtain the performance shown in the graph above.
----------
N1=1150r/min L1=(0.1~0.5)mm
----------
R1=7.8mm R2=7.1mm P1=(89.8)kPa((674)mmHg) P2=69.8+-0.7kPa(524+-5mmHg) Q1=120.5+-4cm3/1000st Q2=104+-10cm3/1000st
----------
N1=1150r/min L1=(0.1~0.5)mm
----------
R1=7.8mm R2=7.1mm P1=(89.8)kPa((674)mmHg) P2=69.8+-0.7kPa(524+-5mmHg) Q1=120.5+-4cm3/1000st Q2=104+-10cm3/1000st
Timing setting
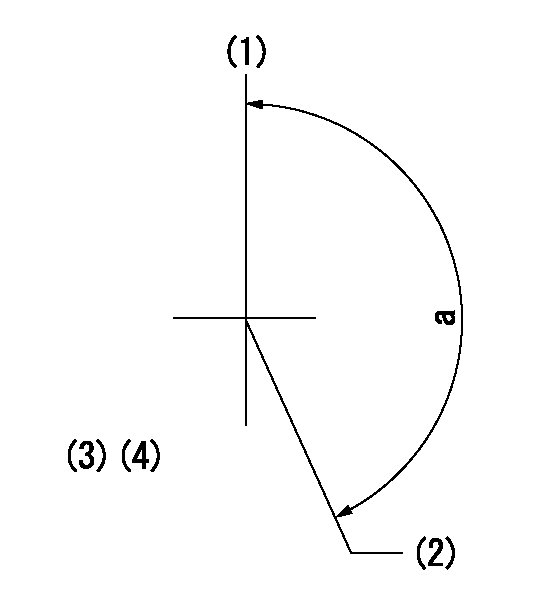
(1)Pump vertical direction
(2)Position of "Z" mark at the No 1 cylinder's beginning of injection (governor side)
(3)B.T.D.C.: aa
(4)-
----------
aa=12deg
----------
a=(170deg)
----------
aa=12deg
----------
a=(170deg)
Information:
1. Remove the bolts that hold the cylinder head assembly to the cylinder block.
To prevent damage to the two cylinder head-to-cylinder block dowels, keep the cylinder head assembly level during removal and installation.
2. Fasten a hoist to the cylinder head assembly as shown. Carefully remove the cylinder head assembly from the cylinder block. Remove the cylinder head gasket. The weight of the cylinder head assembly can range from 50 to 75 kg (110 to 165 lb). The following steps are for the installation of the cylinder head assembly.3. Be sure the mating surface of the cylinder head assembly and the cylinder block are thoroughly clean.4. Put a new cylinder head gasket in position on the cylinder block. Be sure the head gasket is dry. Fasten a hoist to the cylinder head assembly, and put it in position on the cylinder block.
3114 Cylinder Head Tightening Sequence
3116 Cylinder Head Tightening Sequence Bolts (1) are large diameter bolts (M20). Bolts (2) are small diameter bolts (M10).5. Apply clean engine oil on the threads of the cylinder head assembly mounting bolts.6. Install the bolts that hold the cylinder head assembly to the cylinder block, and tighten them as follows: a. Tighten the large diameter bolts in the number sequence shown to a torque of 150 15 N m (110 11 lb ft).b. Tighten the large diameter bolts in the number sequence shown to a torque of 435 20 N m (320 15 lb ft).c. Retorque the large diameter bolts in the number sequence shown to a torque of 435 20 N m (320 15 lb ft).d. Tighten the small diameter bolts in the number sequence shown to a torque of 55 7 N m (41 5 lb ft).End By:a. install unit fuel injectorsb. install fuel control linkagec. install rocker arm assemblies and push rodsd. install inlet manifolde. install exhaust manifoldf. install fuel filter and fuel filter base
