Information injection-pump assembly
ZEXEL
106891-1321
1068911321
ISUZU
1156025922
1156025922
Rating:
Service parts 106891-1321 INJECTION-PUMP ASSEMBLY:
1.
_
6.
COUPLING PLATE
7.
COUPLING PLATE
8.
_
9.
_
11.
Nozzle and Holder
1-15300-204-1
12.
Open Pre:MPa(Kqf/cm2)
15.7{160}/22.1{225}
15.
NOZZLE SET
Include in #1:
106891-1321
as INJECTION-PUMP ASSEMBLY
Cross reference number
ZEXEL
106891-1321
1068911321
ISUZU
1156025922
1156025922
Zexel num
Bosch num
Firm num
Name
Calibration Data:
Adjustment conditions
Test oil
1404 Test oil ISO4113 or {SAEJ967d}
1404 Test oil ISO4113 or {SAEJ967d}
Test oil temperature
degC
40
40
45
Nozzle and nozzle holder
105780-8140
Bosch type code
EF8511/9A
Nozzle
105780-0000
Bosch type code
DN12SD12T
Nozzle holder
105780-2080
Bosch type code
EF8511/9
Opening pressure
MPa
17.2
Opening pressure
kgf/cm2
175
Injection pipe
Outer diameter - inner diameter - length (mm) mm 8-3-600
Outer diameter - inner diameter - length (mm) mm 8-3-600
Overflow valve (drive side)
134424-4020
Overflow valve opening pressure (drive side)
kPa
255
221
289
Overflow valve opening pressure (drive side)
kgf/cm2
2.6
2.25
2.95
Overflow valve (governor side)
134424-2720
Overflow valve opening pressure (governor side)
kPa
255
221
289
Overflow valve opening pressure (governor side)
kgf/cm2
2.6
2.25
2.95
Tester oil delivery pressure
kPa
157
157
157
Tester oil delivery pressure
kgf/cm2
1.6
1.6
1.6
Direction of rotation (viewed from drive side)
Right R
Right R
Injection timing adjustment
Direction of rotation (viewed from drive side)
Right R
Right R
Injection order
1-8-7-3-
6-5-4-2
Pre-stroke
mm
4.2
4.17
4.23
Rack position
Point A R=A
Point A R=A
Beginning of injection position
Drive side NO.1
Drive side NO.1
Difference between angles 1
Cal 1-8 deg. 45 44.75 45.25
Cal 1-8 deg. 45 44.75 45.25
Difference between angles 2
Cal 1-7 deg. 90 89.75 90.25
Cal 1-7 deg. 90 89.75 90.25
Difference between angles 3
Cal 1-3 deg. 135 134.75 135.25
Cal 1-3 deg. 135 134.75 135.25
Difference between angles 4
Cal 1-6 deg. 180 179.75 180.25
Cal 1-6 deg. 180 179.75 180.25
Difference between angles 5
Cal 1-5 deg. 225 224.75 225.25
Cal 1-5 deg. 225 224.75 225.25
Difference between angles 6
Cal 1-4 deg. 270 269.75 270.25
Cal 1-4 deg. 270 269.75 270.25
Difference between angles 7
Cyl.1-2 deg. 315 314.75 315.25
Cyl.1-2 deg. 315 314.75 315.25
Injection quantity adjustment
Adjusting point
A
Rack position
7.3
Pump speed
r/min
800
800
800
Average injection quantity
mm3/st.
87.8
86.3
89.3
Max. variation between cylinders
%
0
-2
2
Basic
*
Fixing the lever
*
Injection quantity adjustment_02
Adjusting point
B
Rack position
7.5
Pump speed
r/min
500
500
500
Average injection quantity
mm3/st.
77.9
75.9
79.9
Fixing the lever
*
Injection quantity adjustment_03
Adjusting point
C
Rack position
7.3
Pump speed
r/min
1200
1200
1200
Average injection quantity
mm3/st.
106.5
102.5
110.5
Fixing the lever
*
Injection quantity adjustment_04
Adjusting point
D
Rack position
4.8+-0.5
Pump speed
r/min
225
225
225
Average injection quantity
mm3/st.
8.7
7.4
10
Max. variation between cylinders
%
0
-13
13
Fixing the rack
*
Timer adjustment
Pump speed
r/min
950--
Advance angle
deg.
0
0
0
Load
3/4
Remarks
Start
Start
Timer adjustment_02
Pump speed
r/min
900
Advance angle
deg.
0.3
Load
3/4
Timer adjustment_03
Pump speed
r/min
1150
Advance angle
deg.
5
4.5
5.5
Load
4/4
Remarks
Finish
Finish
Test data Ex:
Governor adjustment
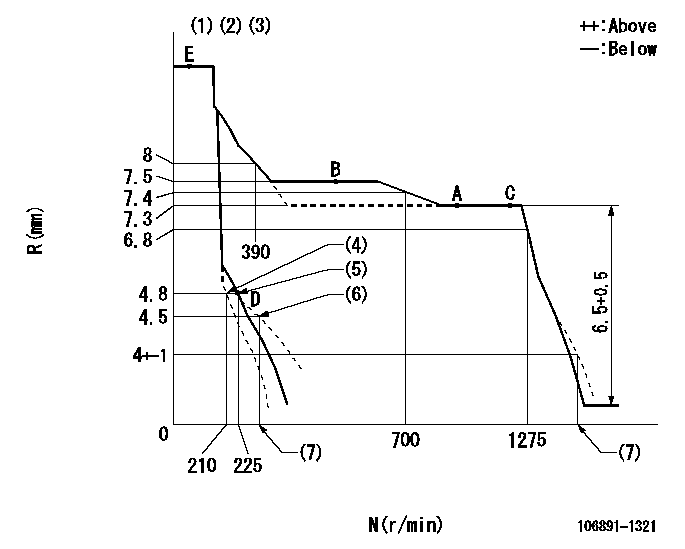
N:Pump speed
R:Rack position (mm)
(1)Variable speed specification.
(2)(Fix the load lever at full load.)
(3)Tolerance for racks not indicated: +-0.05mm.
(4)Main spring setting
(5)Set idle sub-spring
(6)Damper spring setting: DL
(7)(Actual measurement)
----------
DL=4.7+-0.1mm
----------
----------
DL=4.7+-0.1mm
----------
Speed control lever angle
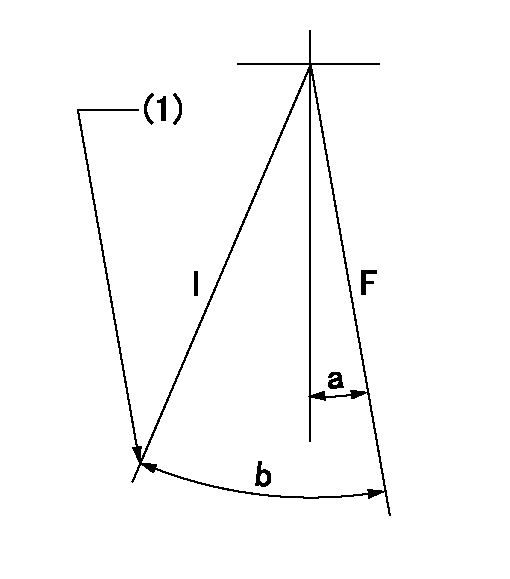
F:Full speed
I:Idle
(1)Stopper bolt setting
----------
----------
a=4.5deg+-5deg b=(20deg)+-5deg
----------
----------
a=4.5deg+-5deg b=(20deg)+-5deg
0000000901
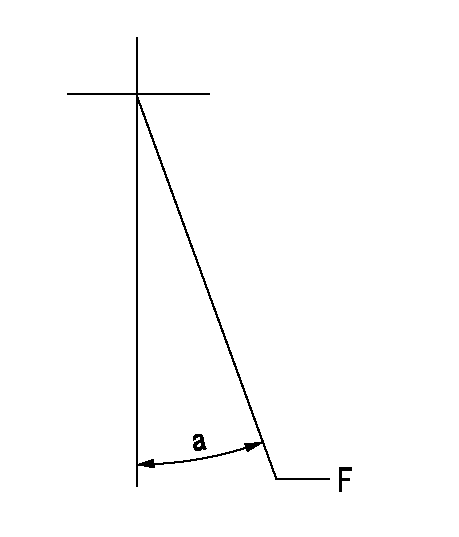
F:Full load
----------
----------
a=(17.5deg)+-5deg
----------
----------
a=(17.5deg)+-5deg
Stop lever angle
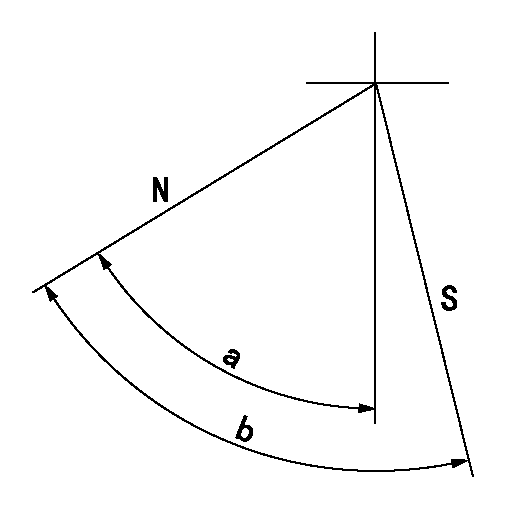
N:Pump normal
S:Stop the pump.
----------
----------
a=60deg+-5deg b=73deg+-5deg
----------
----------
a=60deg+-5deg b=73deg+-5deg
Timing setting
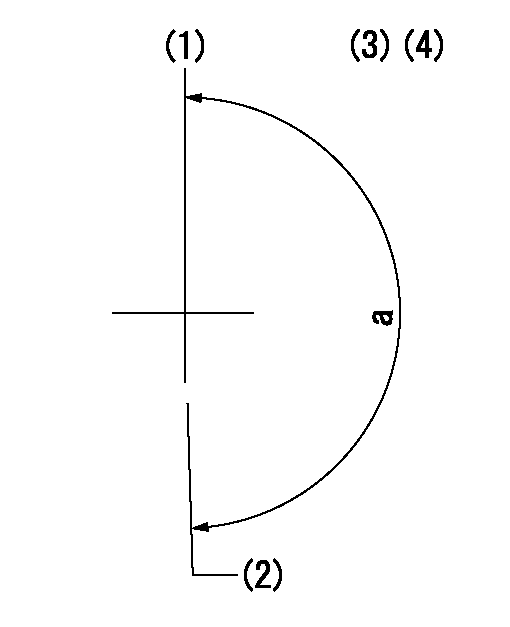
(1)Pump vertical direction
(2)Position of "Z" mark at the No 1 cylinder's beginning of injection (governor side)
(3)B.T.D.C.: aa
(4)-
----------
aa=10deg
----------
a=(180deg)
----------
aa=10deg
----------
a=(180deg)
Information:
Fuel Injection Pump
(1) Plug (timing pin hole)2. Remove plug (1) from the fuel injection pump housing.
Timing Pin Installed
(2) 6V4186 Timing Pin3. Install 6V4186 Timing Pin (2) in the fuel injection pump housing as shown. Slowly rotate the crankshaft counterclockwise (as seen from the flywheel end of the engine) until timing pin (2) goes into the slot in the fuel pump camshaft.
Timing Position Sensor Cover
(3) Cover (4) Housing (5) Timing Solenoid (BTM)4. Remove the timing position sensor cover (3) from housing (4).5. Rotate the crankshaft clockwise 15 degrees as seen from the flywheel end of the engine. Observe the motion of the timing advance power piston through housing (4).6. Rotate the crankshaft in the counterclockwise direction as seen from the rear of the engine until the timing advance power piston moves to its fully retracted position and light pressure is applied to the timing pin (2). Do not apply excessive force to rotate the engine with the timing pin installed. Excessive force will shear off the timing pin and/or cause fuel pump damage. Apply only enough force to retract the timing actuator power piston.
Install Timing Bolt
(6) 9S9082 Engine Turning Tool (7) Timing Bolt7. Put timing bolt in the timing hole in the flywheel housing. If the bolt can be installed in the timing hole in the flywheel, the static injection timing of the fuel injection pump is correct.8. If the timing bolt does not go into the timing hole in the flywheel, the timing is not correct. Perform the following steps to adjust the fuel injection pump static timing:
Automatic Timing Advance Unit
(Governor and Fuel Pump Drive Group) (8) BoltsA. Remove timing solenoid (BTM) (5).B. Remove timing advance housing (4).C. Loosen the four bolts (8) on the timing advance. With the timing pin installed in the fuel pump and the timing bolt removed, turn the engine crank shaft clockwise as viewed from the rear of the engine a minimum of 30 degrees. Make sure that the power piston of the timing advance does not move from its fully retracted position.D. Lightly tighten two of the four timing advance bolts to 2.3 N m (21 lb ft). Finger tight only so as not to bend the timing pin.E. Rotate the crankshaft counterclockwise as viewed from the rear of the engine (direction of rotation) slowly until the timing bolt can be installed in the flywheel. The number one piston is now at top dead center.F. Tighten the four timing advance bolts (8) to a torque of 10 N m (7 lb ft). Remove the timing pin from the fuel injection pump.G. Tighten the four timing advance bolts to a torque of 55 7 N m (41 5 lb ft). Remove the timing bolt from the flywheel.H. Turn the crankshaft two complete revolutions counterclockwise as viewed from the rear of the engine to make sure that the timing advance piston is in the fully retracted position. Repeat step 6 and 7 to check the timing again to see if the timing
