Information injection-pump assembly
ZEXEL
106873-3292
1068733292
HINO
220008602A
220008602a

Rating:
Cross reference number
ZEXEL
106873-3292
1068733292
HINO
220008602A
220008602a
Zexel num
Bosch num
Firm num
Name
Calibration Data:
Adjustment conditions
Test oil
1404 Test oil ISO4113 or {SAEJ967d}
1404 Test oil ISO4113 or {SAEJ967d}
Test oil temperature
degC
40
40
45
Nozzle and nozzle holder
105780-8250
Bosch type code
1 688 901 101
Nozzle
105780-0120
Bosch type code
1 688 901 990
Nozzle holder
105780-2190
Opening pressure
MPa
20.7
Opening pressure
kgf/cm2
211
Injection pipe
Outer diameter - inner diameter - length (mm) mm 8-3-600
Outer diameter - inner diameter - length (mm) mm 8-3-600
Overflow valve
134424-4120
Overflow valve opening pressure
kPa
255
221
289
Overflow valve opening pressure
kgf/cm2
2.6
2.25
2.95
Tester oil delivery pressure
kPa
255
255
255
Tester oil delivery pressure
kgf/cm2
2.6
2.6
2.6
Direction of rotation (viewed from drive side)
Right R
Right R
Injection timing adjustment
Direction of rotation (viewed from drive side)
Right R
Right R
Injection order
1-8-6-2-
7-5-4-3
Pre-stroke
mm
4.2
4.14
4.2
Beginning of injection position
Drive side NO.1
Drive side NO.1
Difference between angles 1
Cal 1-8 deg. 45 44.75 45.25
Cal 1-8 deg. 45 44.75 45.25
Difference between angles 2
Cal 1-6 deg. 90 89.75 90.25
Cal 1-6 deg. 90 89.75 90.25
Difference between angles 3
Cyl.1-2 deg. 135 134.75 135.25
Cyl.1-2 deg. 135 134.75 135.25
Difference between angles 4
Cal 1-7 deg. 180 179.75 180.25
Cal 1-7 deg. 180 179.75 180.25
Difference between angles 5
Cal 1-5 deg. 225 224.75 225.25
Cal 1-5 deg. 225 224.75 225.25
Difference between angles 6
Cal 1-4 deg. 270 269.75 270.25
Cal 1-4 deg. 270 269.75 270.25
Difference between angles 7
Cal 1-3 deg. 315 314.75 315.25
Cal 1-3 deg. 315 314.75 315.25
Injection quantity adjustment
Adjusting point
-
Rack position
12
Pump speed
r/min
700
700
700
Average injection quantity
mm3/st.
128.5
125.5
131.5
Max. variation between cylinders
%
0
-2
2
Basic
*
Fixing the rack
*
Standard for adjustment of the maximum variation between cylinders
*
Injection quantity adjustment_02
Adjusting point
Z
Rack position
8+-0.5
Pump speed
r/min
400
400
400
Average injection quantity
mm3/st.
13.3
10.3
16.3
Max. variation between cylinders
%
0
-15
15
Fixing the rack
*
Standard for adjustment of the maximum variation between cylinders
*
Injection quantity adjustment_03
Adjusting point
A
Rack position
R1(12)
Pump speed
r/min
700
700
700
Average injection quantity
mm3/st.
128.5
126.5
130.5
Basic
*
Fixing the lever
*
Injection quantity adjustment_04
Adjusting point
B
Rack position
R1+0.35
Pump speed
r/min
1100
1100
1100
Average injection quantity
mm3/st.
117.5
111.5
123.5
Fixing the lever
*
Timer adjustment
Pump speed
r/min
760--
Advance angle
deg.
0
0
0
Remarks
Start
Start
Timer adjustment_02
Pump speed
r/min
710
Advance angle
deg.
0.3
Timer adjustment_03
Pump speed
r/min
(770)
Advance angle
deg.
2.25
1.95
2.55
Remarks
Measure the actual speed.
Measure the actual speed.
Timer adjustment_04
Pump speed
r/min
(900)
Advance angle
deg.
2.25
1.95
2.55
Remarks
Measure the actual speed.
Measure the actual speed.
Timer adjustment_05
Pump speed
r/min
1050+50
Advance angle
deg.
6.75
6.45
7.05
Remarks
Finish
Finish
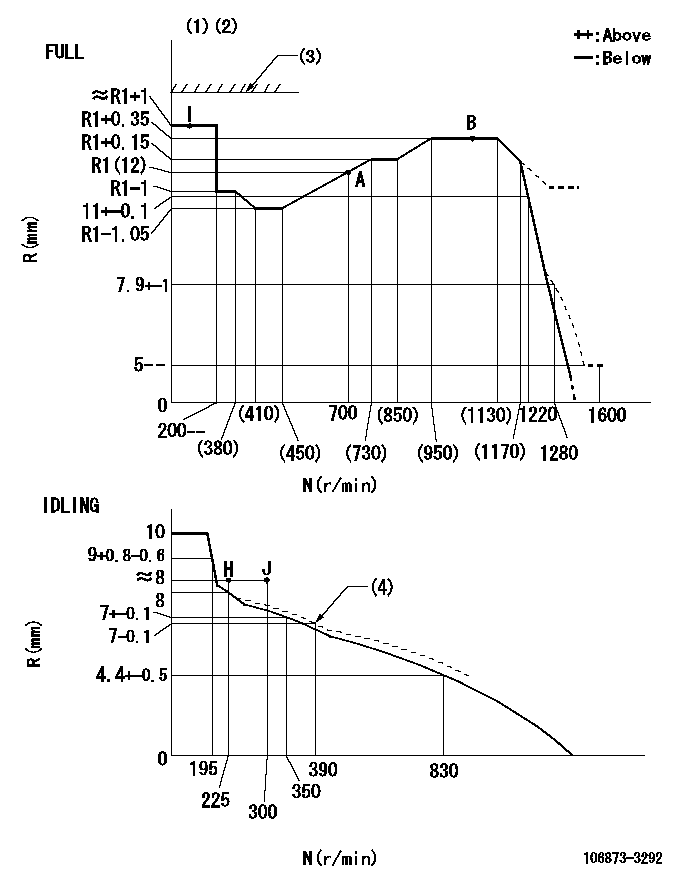
Test data Ex:
Governor adjustment

N:Pump speed
R:Rack position (mm)
(1)Torque cam stamping: T1
(2)Tolerance for racks not indicated: +-0.05mm.
(3)Stop lever's normal position setting: equivalent to RA
(4)Damper spring setting
----------
T1=AC14 RA=17.5mm
----------
----------
T1=AC14 RA=17.5mm
----------
Speed control lever angle

F:Full speed
I:Idle
(1)Use the hole at R = aa
(2)Stopper bolt set position 'H'
----------
aa=94mm
----------
a=17deg+-5deg b=(35.5deg)+-3deg
----------
aa=94mm
----------
a=17deg+-5deg b=(35.5deg)+-3deg
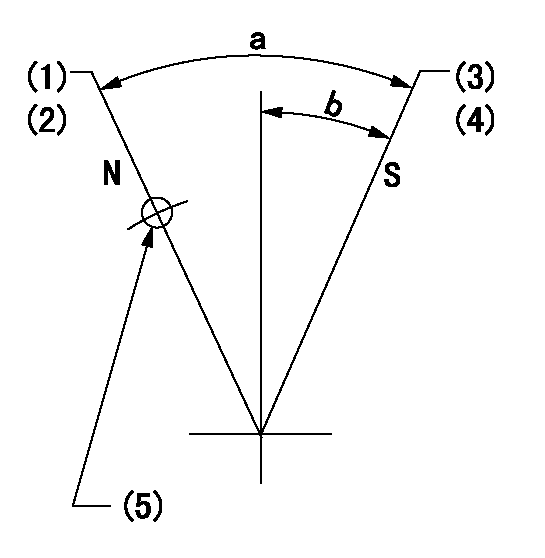
Stop lever angle

N:Pump normal
S:Stop the pump.
(1)Rack position = aa
(2)Set the stopper screw. (After setting, apply red paint.)
(3)Rack position = bb (speed = cc)
(4)Set the stopper screw. (After setting, apply red paint.)
(5)Use the hole above R = dd
----------
aa=(17.5)mm bb=1+-0.3mm cc=0r/min dd=35mm
----------
a=35deg+-5deg b=29.5deg+-5deg
----------
aa=(17.5)mm bb=1+-0.3mm cc=0r/min dd=35mm
----------
a=35deg+-5deg b=29.5deg+-5deg
0000001501 LEVER
Stop lever setting
When setting the stop lever after governor adjustment, confirm that rack position Ra can be obtained at full setting.
----------
Ra=R1(12)+1mm
----------
----------
Ra=R1(12)+1mm
----------
Timing setting

(1)Pump vertical direction
(2)Coupling's key groove position at No 1 cylinder's beginning of injection
(3)-
(4)-
----------
----------
a=(80deg)
----------
----------
a=(80deg)
Information:
Prior to stopping an engine that is being operated at low loads, run the engine at low idle for 30 seconds before stopping. But, if the engine is being operated at highway speeds and/or high loads, then it should be run at low idle for three minutes to reduce and stabilize internal engine temperature before stopping.To stop the engine, use the method listed that applies to the shutoff system on your truck.1. Turn the key switch to the OFF position, or2. ... pull OUT the manual shutoff control (if equipped), or3. ... push IN and hold the stop button until the engine stops, then release the button.Make sure the shutoff procedure is understood. Refer to the truck manufacturer's instructions for your type of engine shutoff system used. Fill the fuel tank at the end of each day of operation to drive out moist air and to prevent condensation. Do not fill the tank to the top. Fuel expands as it gets warm and may overflow.Manual Fuel Shutoff Lever
A manual shutdown lever is provided to override the governor control of the engine. The manual shutoff solenoid override lever is located on the side of the fuel pump. This shutdown will only move the fuel control linkage to the FUEL-OFF position. It does not shut off the air inlet. Shutoff Solenoid Override
The manual shutoff solenoid override lever is located on the side of the electronic governor. The engine can be shut OFF by rotating and holding the manual shutoff lever in the counterclockwise (CCW) direction. Rotating and holding the manual shutoff lever in the clockwise (CW) direction overrides the shutoff solenoid. The lever is spring loaded and will return to the neutral position when released.If the solenoid has been disabled, the engine cannot be shut OFF from inside the cab. The engine can be shut OFF by using the manual shutoff lever as an emergency shutoff lever.
DO NOT operate the engine without the rack actuator solenoid (BTM) in place and with the fuel shutoff solenoid disabled. Excessive engine speed (overspeed) may result.