Information injection-pump assembly
BOSCH
9 400 618 396
9400618396
ZEXEL
106873-2880
1068732880
MITSUBISHI
ME160955
me160955
Rating:
Service parts 106873-2880 INJECTION-PUMP ASSEMBLY:
1.
_
7.
COUPLING PLATE
8.
_
9.
_
11.
Nozzle and Holder
12.
Open Pre:MPa(Kqf/cm2)
17.7{180}/24.5{250}
15.
NOZZLE SET
Include in #1:
106873-2880
as INJECTION-PUMP ASSEMBLY
Cross reference number
BOSCH
9 400 618 396
9400618396
ZEXEL
106873-2880
1068732880
MITSUBISHI
ME160955
me160955
Zexel num
Bosch num
Firm num
Name
106873-2880
9 400 618 396
ME160955 MITSUBISHI
INJECTION-PUMP ASSEMBLY
8M20-2 K
8M20-2 K
Calibration Data:
Adjustment conditions
Test oil
1404 Test oil ISO4113 or {SAEJ967d}
1404 Test oil ISO4113 or {SAEJ967d}
Test oil temperature
degC
40
40
45
Nozzle and nozzle holder
105780-8140
Bosch type code
EF8511/9A
Nozzle
105780-0000
Bosch type code
DN12SD12T
Nozzle holder
105780-2080
Bosch type code
EF8511/9
Opening pressure
MPa
17.2
Opening pressure
kgf/cm2
175
Injection pipe
Outer diameter - inner diameter - length (mm) mm 8-3-600
Outer diameter - inner diameter - length (mm) mm 8-3-600
Overflow valve
131424-4620
Overflow valve opening pressure
kPa
255
221
289
Overflow valve opening pressure
kgf/cm2
2.6
2.25
2.95
Tester oil delivery pressure
kPa
157
157
157
Tester oil delivery pressure
kgf/cm2
1.6
1.6
1.6
Direction of rotation (viewed from drive side)
Right R
Right R
Injection timing adjustment
Direction of rotation (viewed from drive side)
Right R
Right R
Injection order
1-2-7-3-
4-5-6-8
Pre-stroke
mm
4.8
4.75
4.85
Beginning of injection position
Governor side NO.1
Governor side NO.1
Difference between angles 1
Cyl.1-2 deg. 45 44.5 45.5
Cyl.1-2 deg. 45 44.5 45.5
Difference between angles 2
Cal 1-7 deg. 90 89.5 90.5
Cal 1-7 deg. 90 89.5 90.5
Difference between angles 3
Cal 1-3 deg. 135 134.5 135.5
Cal 1-3 deg. 135 134.5 135.5
Difference between angles 4
Cal 1-4 deg. 180 179.5 180.5
Cal 1-4 deg. 180 179.5 180.5
Difference between angles 5
Cal 1-5 deg. 225 224.5 225.5
Cal 1-5 deg. 225 224.5 225.5
Difference between angles 6
Cal 1-6 deg. 270 269.5 270.5
Cal 1-6 deg. 270 269.5 270.5
Difference between angles 7
Cal 1-8 deg. 315 314.5 315.5
Cal 1-8 deg. 315 314.5 315.5
Injection quantity adjustment
Adjusting point
-
Rack position
10.4
Pump speed
r/min
650
650
650
Each cylinder's injection qty
mm3/st.
140
135.8
144.2
Basic
*
Fixing the rack
*
Standard for adjustment of the maximum variation between cylinders
*
Injection quantity adjustment_02
Adjusting point
C
Rack position
6.8+-0.5
Pump speed
r/min
225
225
225
Each cylinder's injection qty
mm3/st.
19
16.1
21.9
Fixing the rack
*
Standard for adjustment of the maximum variation between cylinders
*
Injection quantity adjustment_03
Adjusting point
A
Rack position
R1(10.4)
Pump speed
r/min
650
650
650
Average injection quantity
mm3/st.
140
139
141
Basic
*
Fixing the lever
*
Injection quantity adjustment_04
Adjusting point
E
Rack position
-
Pump speed
r/min
100
100
100
Average injection quantity
mm3/st.
165
125
205
Fixing the lever
*
Remarks
After startup boost setting
After startup boost setting
Test data Ex:
Governor adjustment
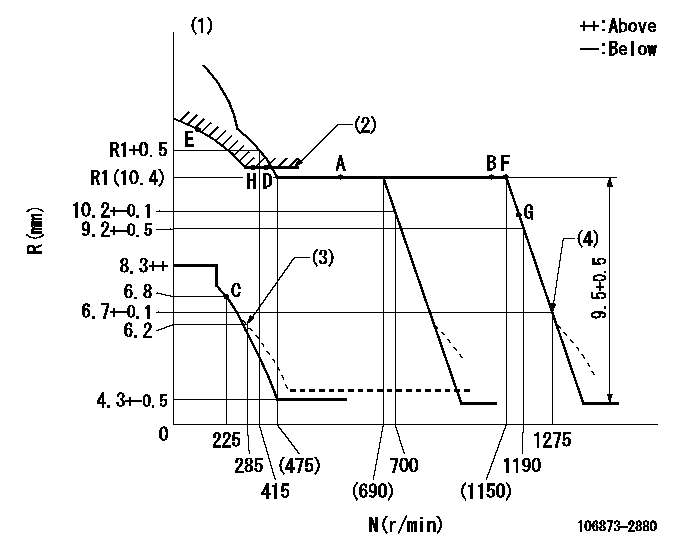
N:Pump speed
R:Rack position (mm)
(1)Tolerance for racks not indicated: +-0.05mm.
(2)Excess fuel setting for starting: SXL
(3)Damper spring setting
(4)When air cylinder is operating.
----------
SXL=10.6+-0.1mm
----------
----------
SXL=10.6+-0.1mm
----------
Timer adjustment
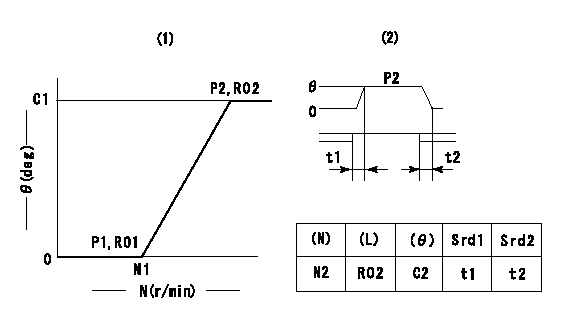
(1)Adjusting range
(2)Step response time
(N): Speed of the pump
(L): Load
(theta) Advance angle
(Srd1) Step response time 1
(Srd2) Step response time 2
1. Adjusting conditions for the variable timer
(1)Adjust the clearance between the pickup and the protrusion to L.
----------
L=1-0.2mm N2=800r/min C2=(8.8)deg t1=2.5--sec. t2=2.5--sec.
----------
N1=750++r/min P1=0kPa(0kgf/cm2) P2=392kPa(4kgf/cm2) C1=8.8+-0.3deg R01=0/4load R02=4/4load
----------
L=1-0.2mm N2=800r/min C2=(8.8)deg t1=2.5--sec. t2=2.5--sec.
----------
N1=750++r/min P1=0kPa(0kgf/cm2) P2=392kPa(4kgf/cm2) C1=8.8+-0.3deg R01=0/4load R02=4/4load
Speed control lever angle
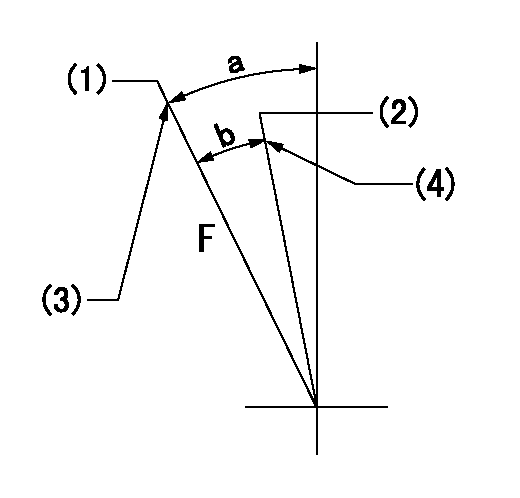
F:Full speed
(1)Set the pump speed at aa
(2)Set the pump speed at bb.
(3)Stopper bolt setting
(4)Stopper bolt setting
----------
aa=1275r/min bb=700r/min
----------
a=(22deg)+-5deg b=(5.5deg)+-5deg
----------
aa=1275r/min bb=700r/min
----------
a=(22deg)+-5deg b=(5.5deg)+-5deg
0000000901

F:Full load
I:Idle
(1)Stopper bolt setting
----------
----------
a=10deg+-5deg b=22.5deg+-3deg
----------
----------
a=10deg+-5deg b=22.5deg+-3deg
Stop lever angle
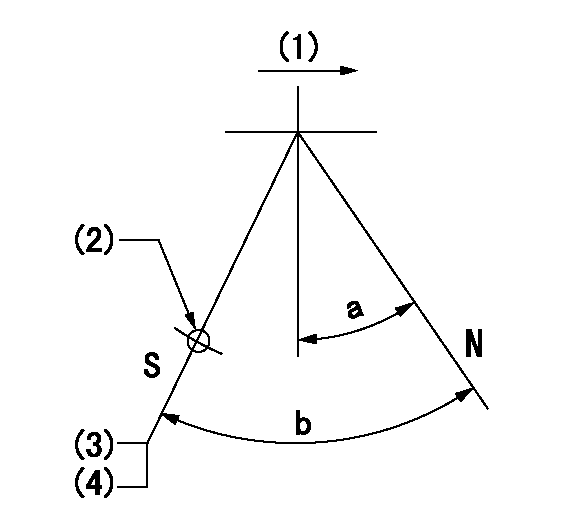
N:Pump normal
S:Stop the pump.
(1)Drive side
(2)Use the hole at R = aa
(3)Rack position bb
(4)Stopper bolt setting
----------
aa=36mm bb=4.3-0.5mm
----------
a=10.5deg+-5deg b=55deg+7deg-5deg
----------
aa=36mm bb=4.3-0.5mm
----------
a=10.5deg+-5deg b=55deg+7deg-5deg
0000001501 MICRO SWITCH
Adjustment of the micro-switch
Adjust the bolt to obtain the following lever position when the micro-switch is ON.
(1)Speed N1
(2)Rack position Ra
----------
N1=325r/min Ra=6.3+-0.1mm
----------
----------
N1=325r/min Ra=6.3+-0.1mm
----------
0000001601 RACK SENSOR

V1:Supply voltage
V2f:Full side output voltage
V2i:Idle side output voltage
(A) Black
(B) Yellow
(C) Red
(D) Trimmer
(E): Shaft
(F) Nut
(G) Load lever
1. Load sensor adjustment
(1)Connect as shown in the above diagram and apply supply voltage V1.
(2)Hold the load lever (G) against the full side.
(3)Turn the shaft so that the voltage between (A) and (B) is V2.
(4)Hold the load lever (G) against the idle side.
(5)Adjust (D) so that the voltage between (A) and (B) is V2i.
(6)Repeat the above adjustments.
(7)Tighten the nut (F) at the point satisfying the standards.
(8)Hold the load lever against the full side stopper and the idle side stopper.
(9)At this time, confirm that the full side output voltage is V2f and the idle side output voltage is V2i.
----------
V1=5+-0.02V V2f=0.15+0.03V V2i=2.35-0.03V
----------
----------
V1=5+-0.02V V2f=0.15+0.03V V2i=2.35-0.03V
----------
0000001701 LEVER
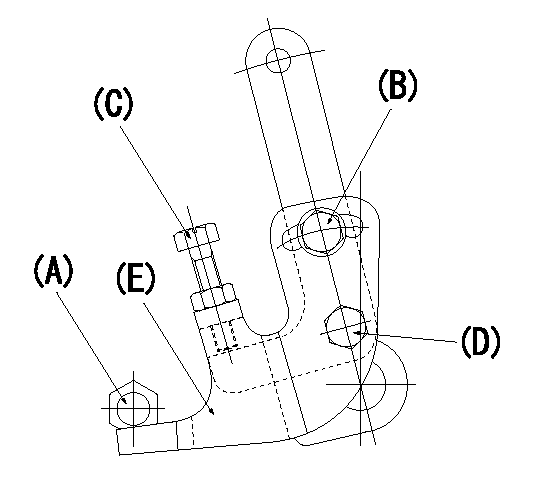
(A) Stopper
(B) bolt
Bolt c
(D) Bolt
(E) Lever
Speed lever angle and speed lever setting procedure
(1)Set the speed lever so that speed N = N1.
(2)With the lever (E) contacting the stopper (A), fully tighten bolts (B) and (D).
(3)Screw in bolt (C) and lock.
(4)Set the speed lever at the full position so that N = N2.
----------
N1=700r/min N2=1275r/min
----------
----------
N1=700r/min N2=1275r/min
----------
Timing setting

(1)Pump vertical direction
(2)Coupling's key groove position at No 1 cylinder's beginning of injection
(3)B.T.D.C.: aa
(4)-
----------
aa=12deg
----------
a=(40deg)
----------
aa=12deg
----------
a=(40deg)
Information:
Caterpillar Diesel Engines can operate effectively in cold weather. However, engine starting and operation in cold weather is dependent on the type of fuel used (and how well the fuel moves through fuel related components), oil viscosity and other optional starting aids. The purpose of this section is to explain potential problems and steps which can be taken to minimize starting and operation problems when the ambient air temperature is colder than 5°C (40°F).Fuel and the Effect from Cold Weather
The two types of diesel fuel recommended for your engine are grades No. 1 and No. 2. Although No. 2 diesel fuel is the most commonly used fuel, No. 1 diesel fuel or a blend of No. 1 and No. 2, is the fuel that is best suited for cold weather operation.During cold weather operation, it may be necessary for you to use No. 2 diesel fuel since quantities of No. 1 diesel fuel are limited and generally are only available in certain areas.There are three major differences between No. 1 and No. 2 diesel fuel.* No. 1 diesel fuel has a lower cloud point. The cloud point is the temperature at which a cloud or haze of wax crystals will begin to form in the fuel and cause fuel filters to plug.* No. 1 diesel fuel has a lower pour point. The pour point is the temperature which diesel fuel will begin to thicken and be more resistant to flow through fuel pumps and lines.* No. 1 diesel fuel has a lower BTU (kJ) (heat content) rating per unit volume of fuel than the average No. 2 diesel fuel. When using No. 1 diesel fuel, you may notice a drop in power and fuel efficiency, but should not experience any other operating effects. Before troubleshooting for low power or poor performance in winter months, check the type of fuel being used.Be aware of these fuel values when purchasing your diesel fuel and anticipate the average outside (ambient) temperature for the area your engine will be operating. Engines fueled in one climate may not operate satisfactorily if moved to another because of problems that result from cold weather.Attachments are available from your Caterpillar dealer to minimize cold weather starting and operation problems. The use of starting aids, engine oil pan heaters, engine coolant heaters, fuel heaters and fuel line insulation also provide a means of minimizing starting and fuel problems in cold weather when No. 2 diesel fuel is used.For further information on cylinder block (coolant) heaters, contact your Caterpillar dealer. The average No. 1 diesel fuel has a lower kJ (BTU) (heat content) rating per unit volume of fuel than the average No. 2 diesel fuel. When using No. 1 diesel fuel, you may notice a drop in power and fuel efficiency, but should not experience any other operating effects.Fuel Related Components in Cold Weather
Fuel Tanks
Store the fuel outside to allow water (condensation) to freeze after separation from the fuel and to indicate any immediate temperature affect on
Have questions with 106873-2880?
Group cross 106873-2880 ZEXEL
Mitsubishi
Mitsubishi
106873-2880
9 400 618 396
ME160955
INJECTION-PUMP ASSEMBLY
8M20-2
8M20-2
