Information injection-pump assembly
BOSCH
9 400 618 392
9400618392
ZEXEL
106873-2840
1068732840
MITSUBISHI
ME093024
me093024

Rating:
Service parts 106873-2840 INJECTION-PUMP ASSEMBLY:
1.
_
7.
COUPLING PLATE
8.
_
9.
_
11.
Nozzle and Holder
ME091308
12.
Open Pre:MPa(Kqf/cm2)
17.7{180}/21.6{220}
15.
NOZZLE SET
Include in #1:
106873-2840
as INJECTION-PUMP ASSEMBLY
Cross reference number
BOSCH
9 400 618 392
9400618392
ZEXEL
106873-2840
1068732840
MITSUBISHI
ME093024
me093024
Zexel num
Bosch num
Firm num
Name
106873-2840
9 400 618 392
ME093024 MITSUBISHI
INJECTION-PUMP ASSEMBLY
8DC9T2 * K 14CD INJECTION PUMP ASSY PE8P PE
8DC9T2 * K 14CD INJECTION PUMP ASSY PE8P PE
Calibration Data:
Adjustment conditions
Test oil
1404 Test oil ISO4113 or {SAEJ967d}
1404 Test oil ISO4113 or {SAEJ967d}
Test oil temperature
degC
40
40
45
Nozzle and nozzle holder
105780-8140
Bosch type code
EF8511/9A
Nozzle
105780-0000
Bosch type code
DN12SD12T
Nozzle holder
105780-2080
Bosch type code
EF8511/9
Opening pressure
MPa
17.2
Opening pressure
kgf/cm2
175
Injection pipe
Outer diameter - inner diameter - length (mm) mm 8-3-600
Outer diameter - inner diameter - length (mm) mm 8-3-600
Overflow valve
131424-4620
Overflow valve opening pressure
kPa
255
221
289
Overflow valve opening pressure
kgf/cm2
2.6
2.25
2.95
Tester oil delivery pressure
kPa
157
157
157
Tester oil delivery pressure
kgf/cm2
1.6
1.6
1.6
Direction of rotation (viewed from drive side)
Right R
Right R
Injection timing adjustment
Direction of rotation (viewed from drive side)
Right R
Right R
Injection order
1-2-7-3-
4-5-6-8
Pre-stroke
mm
4.8
4.75
4.85
Beginning of injection position
Governor side NO.1
Governor side NO.1
Difference between angles 1
Cyl.1-2 deg. 45 44.5 45.5
Cyl.1-2 deg. 45 44.5 45.5
Difference between angles 2
Cal 1-7 deg. 90 89.5 90.5
Cal 1-7 deg. 90 89.5 90.5
Difference between angles 3
Cal 1-3 deg. 135 134.5 135.5
Cal 1-3 deg. 135 134.5 135.5
Difference between angles 4
Cal 1-4 deg. 180 179.5 180.5
Cal 1-4 deg. 180 179.5 180.5
Difference between angles 5
Cal 1-5 deg. 225 224.5 225.5
Cal 1-5 deg. 225 224.5 225.5
Difference between angles 6
Cal 1-6 deg. 270 269.5 270.5
Cal 1-6 deg. 270 269.5 270.5
Difference between angles 7
Cal 1-8 deg. 315 314.5 315.5
Cal 1-8 deg. 315 314.5 315.5
Injection quantity adjustment
Adjusting point
-
Rack position
11.4
Pump speed
r/min
700
700
700
Each cylinder's injection qty
mm3/st.
148.1
143.7
152.5
Basic
*
Fixing the rack
*
Standard for adjustment of the maximum variation between cylinders
*
Injection quantity adjustment_02
Adjusting point
C
Rack position
6.1+-0.5
Pump speed
r/min
225
225
225
Each cylinder's injection qty
mm3/st.
15.8
13.4
18.2
Fixing the rack
*
Standard for adjustment of the maximum variation between cylinders
*
Injection quantity adjustment_03
Adjusting point
A
Rack position
R1(11.4)
Pump speed
r/min
700
700
700
Average injection quantity
mm3/st.
148.1
147.1
149.1
Basic
*
Fixing the lever
*
Boost pressure
kPa
28
28
Boost pressure
mmHg
210
210
Injection quantity adjustment_04
Adjusting point
B
Rack position
R1(11.4)
Pump speed
r/min
1100
1100
1100
Average injection quantity
mm3/st.
156
152
160
Fixing the lever
*
Boost pressure
kPa
28
28
Boost pressure
mmHg
210
210
Injection quantity adjustment_05
Adjusting point
D
Rack position
-
Pump speed
r/min
100
100
100
Average injection quantity
mm3/st.
115
75
155
Fixing the lever
*
Boost pressure
kPa
0
0
0
Boost pressure
mmHg
0
0
0
Boost compensator adjustment
Pump speed
r/min
650
650
650
Rack position
R2(R1-1.
4)
Boost pressure
kPa
3.3
3.3
5.3
Boost pressure
mmHg
25
25
40
Boost compensator adjustment_02
Pump speed
r/min
650
650
650
Rack position
R1-0.8
Boost pressure
kPa
8
6.7
9.3
Boost pressure
mmHg
60
50
70
Boost compensator adjustment_03
Pump speed
r/min
650
650
650
Rack position
R1(11.4)
Boost pressure
kPa
14.7
8
21.4
Boost pressure
mmHg
110
60
160
Timer adjustment
Pump speed
r/min
900--
Advance angle
deg.
0
0
0
Remarks
Start
Start
Timer adjustment_02
Pump speed
r/min
850
Advance angle
deg.
0.5
Timer adjustment_03
Pump speed
r/min
1100
Advance angle
deg.
4
3.5
4.5
Remarks
Finish
Finish
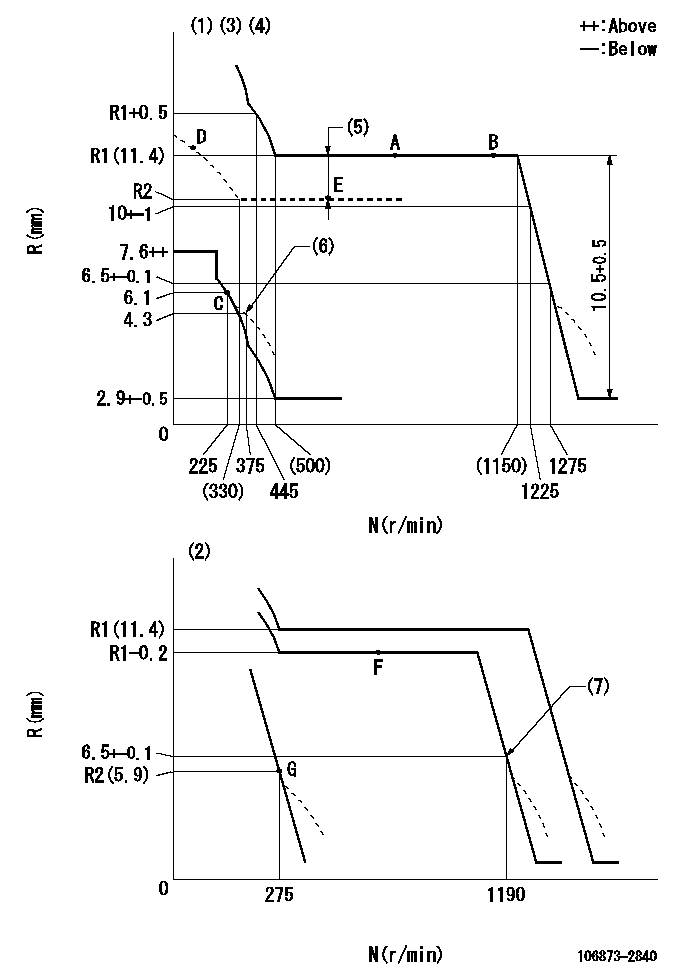
Test data Ex:
Governor adjustment

N:Pump speed
R:Rack position (mm)
(1)Adjust with speed control lever at full position (minimum-maximum speed specification)
(2)Adjust with the load control lever in the full position (variable speed specification).
(3)Tolerance for racks not indicated: +-0.05mm.
(4)Boost compensator cancel stroke: BSL
(5)Boost compensator stroke: BCL
(6)Damper spring setting
(7)When air cylinder is operating.
----------
BSL=1.6mm BCL=1.4+-0.1mm
----------
----------
BSL=1.6mm BCL=1.4+-0.1mm
----------
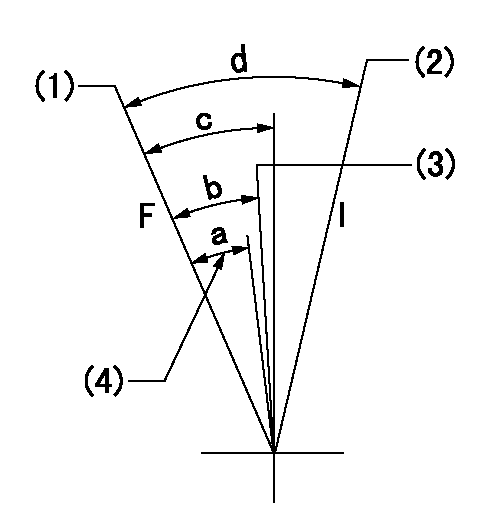
Speed control lever angle

F:Full speed
I:Idle
(1)Pump speed = aa
(2)Pump speed = bb
(3)Pump speed cc
(4)Air cylinder's adjustable range
----------
aa=1275r/min bb=275r/min cc=1190r/min
----------
a=(2deg) b=(2deg)+-5deg c=(7deg)+-5deg d=(16.5deg)+-5deg
----------
aa=1275r/min bb=275r/min cc=1190r/min
----------
a=(2deg) b=(2deg)+-5deg c=(7deg)+-5deg d=(16.5deg)+-5deg
0000000901

F:Full load
I:Idle
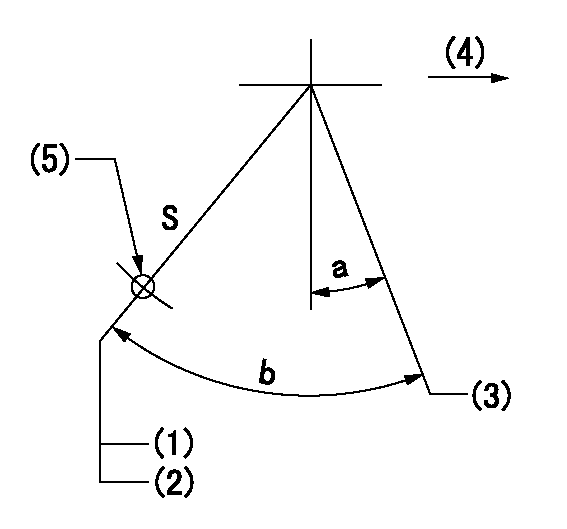
(1)Stopper bolt setting
----------
----------
a=10deg+-5deg b=31.5deg+-3deg
----------
----------
a=10deg+-5deg b=31.5deg+-3deg
Stop lever angle

S:Stop the pump.
(1)Rack position = aa
(2)Stopper bolt setting
(3)Free (at delivery)
(4)Drive side
(5)Use the hole at R = bb
----------
aa=3.3-0.5mm bb=32mm
----------
a=10.5deg+-5deg b=58deg+7deg-5deg
----------
aa=3.3-0.5mm bb=32mm
----------
a=10.5deg+-5deg b=58deg+7deg-5deg
0000001501 MICRO SWITCH
Adjustment of the micro-switch
Adjust the bolt to obtain the following lever position when the micro-switch is ON.
(1)Speed N1
(2)Rack position Ra
----------
N1=325r/min Ra=5.6+-0.1mm
----------
----------
N1=325r/min Ra=5.6+-0.1mm
----------
0000001601 2-STAGE CHANGEOVER DEVICE

RFD governor 2 stage changeover mechanism adjustment outline
(A) Bolt
(B) bolt
(c) Nut
(D) Return spring
(E) Bolt
(F) Bolt
(G) Screw
(H) Bolt
(I) Load lever
(J) Speed lever
(K) Air cylinder
(M Air inlet
Figure 1 is only for reference. Lever shape, etc, may vary.
1. Minimum-maximum speed specification adjustment (when running)
(a) Without applying air to the air cylinder, loosen bolts (A) and (B).
(1)High speed return L setting
(a) In the speed range Nf~Nf - 300r/min, adjust using the speed adjusting bolt to determine the temporary beginning of high speed control speed.
(b) Determine the rack position in the vicinity of Rf using the full load lever.
(c) Increase speed and confirm return distance L.
(d) Adjust using the tension lever bolt to obtain L.
(2)Setting full load rack position Rf
(a) Move the load control lever to the full side.
(b) Adjust the full load adjusting bolt so that Rf can be obtained, then fix.
(3)Setting the beginning of high speed operation Nf
(a) Adjust using bolt (E) so that Nf can be obtained, and then fix.
(4)Idle control setting (Re, Ni, Rc)
(a) Set the speed at Ns + 200r/min and move the load control lever to the idle side.
(b) Fix the lever in the position where Re can be obtained.
(c) Next, decrease speed to Ni and screw in the idle spring.
(d) Adjust to obtain rack position Ri.
(e) Increase the speed and after confirming that the rack position is Re at Ns, set the speed at 0.
(f) Confirm protrusion position Rc at idle.
(5)Damper spring adjustment
(a) Increase speed and set the speed at the rack position Rd - 0.1 mm
(b) Set using the damper spring so that the rack position Rd can be obtained.
(c) When Rd is not specified, Rd = Ri - 0.5 mm.
(6)High speed droop confirmation
(a) Return the load control lever to the full load lever position.
(b) Increase the speed and confirm that Rf can be obtained at Nf r/min.
(c) Confirm that speed is Nh at rack position Rh.
2. Variable speed specification adjustment (at operation)
(a) Remove return spring (D).
(b) Apply air pressure of 245~294 kPa {2.5~3 kg/cm2} to the air cylinder.
(c) Perform the following adjustment in this condition.
(1)Setting full load rack position Rf'
(a) Pull the load lever to the idle side.
(b) Obtain rack position Rf' using the nut (C). (Pump speed is Nf'-50 r/min.)
(2)Setting full speed Nf'
(a) Adjust using bolt (B) so that Nf can be obtained, and then fix.
(3)Low speed side setting
(a) At 350r/min, set bolt (F) at beginning of governor operation position, then fix.
3. Bolt (A) adjustment
(1)Install return spring (D) and perform the adjustments below at air pressure 0.
(a) Set at speed Nf using bolt (E).
(b) Screw in bolt (A).
(c) Screw in 1 more turn from the speed lever contact position
(d) Fix bolt (A).
(e) At this time confirm that the air cylinder's shaft moves approximately 1 mm towards the governor.
4. Lever operation confirmation using the air cylinder
(1)Apply 588 kPa {6 kg/cm2} air pressure to the air cylinder.
(2)Confirm that the cylinder piston is moved 50 mm by the spring (D).
----------
----------
----------
----------
Timing setting

(1)Pump vertical direction
(2)Coupling's key groove position at No 1 cylinder's beginning of injection
(3)-
(4)-
----------
----------
a=(40deg)
----------
----------
a=(40deg)
Information:
Your engine may not have the same or all of the gauges described. The illustrations shown are of typical gauges. Refer to the OEM Owner Manual for information on the layout of your gauge package. Gauges provide a "look" inside the engine. Be sure they are in good working order. Determine what is the "normal" operating range by observing your gauges over a period of time.Noticeable changes in gauge readings are an indicator of potential gauge or engine problems. This also applies to gauge readings that have changed significantly but are still within specifications. The cause of any sudden or significant change in the readings should be determined and corrected. Contact your Caterpillar dealer for assistance as needed.
Tachometer - Indicates engine rpm. When the throttle control lever is moved to the full speed position without load, the engine is running at high idle. When the throttle control lever is at the full speed position with maximum rated load, the engine is running at the full load rpm (assuming the engine and load are matched).The engine can be operated at high idle without damage, but should never be allowed to exceed high idle rpm with little or no load. The high idle rpm, and the full load rpm, are stamped on the engine's 9L6531 Information Plate.
Service Hour Meter - Indicates the total number of clock hours the engine has operated.
Engine Oil Pressure - Indicates engine oil pressure. The pressure reading will be greatest after starting a cold engine. Oil pressure will decrease as the engine warms while idling. As the engine speed is increased to full load speed, oil pressure will increase and stabilize. Normal oil pressure should read 240 to 480 kPa (35 to 70 psi) when the engine is running between 600 and 2100 rpm with SAE 10W30 oil, at operating oil temperature of 105°C (220°F).* 100 to 200 kPa (15 to 30 psi) below 600 rpmIf the gauge reading fluctuates after the load is stable:1. Remove the load.2. Reduce engine speed to low idle.3. Check and maintain oil level.
Engine Jacket Water Temperature - Indicates engine coolant water temperature. The gauge should normally indicate between 70 and 90°C (170 and 195°F). The water temperature reading may vary according to load, but should never exceed the boiling temperature for the pressurized system being used. Maximum allowable temperature is 99°C (210°F).
Never add coolant to an overheated engine; allow to cool first. Engine damage and/or personal injury may occur.
The jacket water inlet temperature is regulated with thermostats in the system. Always operate the engine with thermostats installed. Refer to the Cooling System-Thermostats topic in the Maintenance Section of this manual.Somewhat higher temperatures than described above may occur under certain conditions. Maximum allowable operating temperature is 105°C (220°F) with the cooling system pressurized. If the engine is operating above normal range and steam becomes apparent:1. Reduce the load and engine rpm.2. Inspect for cooling system for leaks.3. Determine if the engine must be shutdown immediately or if the engine can
Have questions with 106873-2840?
Group cross 106873-2840 ZEXEL
Mitsubishi
Mitsubishi
106873-2840
9 400 618 392
ME093024
INJECTION-PUMP ASSEMBLY
8DC9T2
8DC9T2