Information injection-pump assembly
ZEXEL
106871-3791
1068713791
HINO
220004621A
220004621a

Rating:
Service parts 106871-3791 INJECTION-PUMP ASSEMBLY:
1.
_
7.
COUPLING PLATE
8.
_
9.
_
11.
Nozzle and Holder
236001530B
12.
Open Pre:MPa(Kqf/cm2)
18.1(185)
15.
NOZZLE SET
Include in #1:
106871-3791
as INJECTION-PUMP ASSEMBLY
Cross reference number
ZEXEL
106871-3791
1068713791
HINO
220004621A
220004621a
Zexel num
Bosch num
Firm num
Name
106871-3791
220004621A HINO
INJECTION-PUMP ASSEMBLY
EF750 * K
EF750 * K
Calibration Data:
Adjustment conditions
Test oil
1404 Test oil ISO4113 or {SAEJ967d}
1404 Test oil ISO4113 or {SAEJ967d}
Test oil temperature
degC
40
40
45
Nozzle and nozzle holder
105780-8140
Bosch type code
EF8511/9A
Nozzle
105780-0000
Bosch type code
DN12SD12T
Nozzle holder
105780-2080
Bosch type code
EF8511/9
Opening pressure
MPa
17.2
Opening pressure
kgf/cm2
175
Injection pipe
Outer diameter - inner diameter - length (mm) mm 8-3-600
Outer diameter - inner diameter - length (mm) mm 8-3-600
Overflow valve
134424-1020
Overflow valve opening pressure
kPa
127
107
147
Overflow valve opening pressure
kgf/cm2
1.3
1.1
1.5
Tester oil delivery pressure
kPa
157
157
157
Tester oil delivery pressure
kgf/cm2
1.6
1.6
1.6
Direction of rotation (viewed from drive side)
Right R
Right R
Injection timing adjustment
Direction of rotation (viewed from drive side)
Right R
Right R
Injection order
1-8-6-2-
7-5-4-3
Pre-stroke
mm
4.4
4.34
4.4
Beginning of injection position
Drive side NO.1
Drive side NO.1
Difference between angles 1
Cal 1-8 deg. 45 44.75 45.25
Cal 1-8 deg. 45 44.75 45.25
Difference between angles 2
Cal 1-6 deg. 90 89.75 90.25
Cal 1-6 deg. 90 89.75 90.25
Difference between angles 3
Cyl.1-2 deg. 135 134.75 135.25
Cyl.1-2 deg. 135 134.75 135.25
Difference between angles 4
Cal 1-7 deg. 180 179.75 180.25
Cal 1-7 deg. 180 179.75 180.25
Difference between angles 5
Cal 1-5 deg. 225 224.75 225.25
Cal 1-5 deg. 225 224.75 225.25
Difference between angles 6
Cal 1-4 deg. 270 269.75 270.25
Cal 1-4 deg. 270 269.75 270.25
Difference between angles 7
Cal 1-3 deg. 315 314.75 315.25
Cal 1-3 deg. 315 314.75 315.25
Injection quantity adjustment
Adjusting point
A
Rack position
9.5
Pump speed
r/min
500
500
500
Average injection quantity
mm3/st.
120
117
123
Max. variation between cylinders
%
0
-4
4
Fixing the lever
*
Injection quantity adjustment_02
Adjusting point
B
Rack position
9.6
Pump speed
r/min
700
700
700
Average injection quantity
mm3/st.
121.8
119.8
123.8
Max. variation between cylinders
%
0
-2
2
Basic
*
Fixing the lever
*
Injection quantity adjustment_03
Adjusting point
C
Rack position
10.4
Pump speed
r/min
1100
1100
1100
Average injection quantity
mm3/st.
145
142
148
Max. variation between cylinders
%
0
-4
4
Fixing the lever
*
Injection quantity adjustment_04
Adjusting point
D
Rack position
5.4+-0.5
Pump speed
r/min
225
225
225
Average injection quantity
mm3/st.
11.5
8.5
14.5
Max. variation between cylinders
%
0
-15
15
Fixing the rack
*
Injection quantity adjustment_05
Adjusting point
E
Rack position
-
Pump speed
r/min
100
100
100
Average injection quantity
mm3/st.
140
140
160
Fixing the lever
*
Remarks
After startup boost setting
After startup boost setting
Injection quantity adjustment_06
Adjusting point
H
Rack position
9.6+-0.5
Pump speed
r/min
1175
1175
1175
Average injection quantity
mm3/st.
126
121
131
Max. variation between cylinders
%
0
-4
4
Fixing the lever
*
Timer adjustment
Pump speed
r/min
750--
Advance angle
deg.
0
0
0
Remarks
Start
Start
Timer adjustment_02
Pump speed
r/min
700
Advance angle
deg.
0.5
Timer adjustment_03
Pump speed
r/min
1100
Advance angle
deg.
3.5
3.2
3.8
Remarks
Finish
Finish
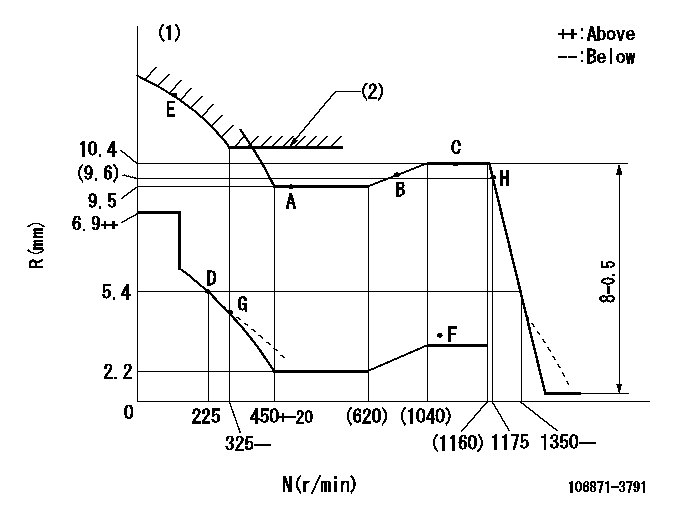
Test data Ex:
Governor adjustment

N:Pump speed
R:Rack position (mm)
(1)Damper spring setting: DL
(2)Excess fuel setting for starting: SXL
----------
DL=4.4-0.2mm SXL=10.4+0.2mm
----------
----------
DL=4.4-0.2mm SXL=10.4+0.2mm
----------
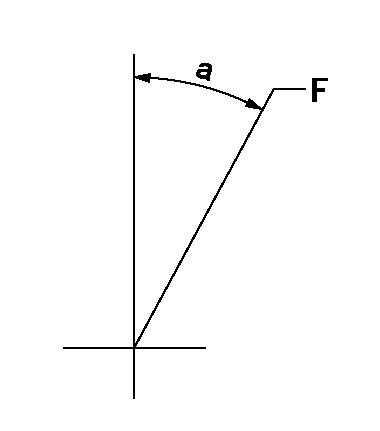
Speed control lever angle

F:Full speed
----------
----------
a=23deg+-5deg
----------
----------
a=23deg+-5deg
0000000901

F:Full load
I:Idle
(1)Stopper bolt setting
(2)Use the hole at R = aa
----------
aa=50mm
----------
a=39deg+-3deg b=39deg+-5deg
----------
aa=50mm
----------
a=39deg+-3deg b=39deg+-5deg
Stop lever angle

N:Pump normal
S:Stop the pump.
----------
----------
a=15deg+-5deg b=64deg+-5deg
----------
----------
a=15deg+-5deg b=64deg+-5deg
Timing setting

(1)Pump vertical direction
(2)Coupling's key groove position at No 1 cylinder's beginning of injection
(3)-
(4)-
----------
----------
a=(80deg)
----------
----------
a=(80deg)
Information:
A starting motor solenoid that will not operate may not be receiving battery current. Attach one lead of the voltmeter to the solenoid battery cable connection. Ground the other lead. No voltmeter reading indicates a faulty circuit from the battery. A voltmeter reading indicates further testing is necessary. Continue the test by attaching one voltmeter lead to the starting motor solenoid small wire terminal and the other lead to ground. Observe the voltmeter and turn the HEAT-START switch to START. A voltmeter reading indicates that the malfunction is in the solenoid. No voltmeter reading indicates that either the series-parallel switch is the fault or the HEAT-START switch does not close when turned to the START position. Attach one lead of the voltmeter to the HEAT-START switch battery wire terminal and ground the other lead. A voltmeter reading indicates a defective switch. No voltmeter reading indicates further testing of the series-parallel switch is necessary. A starting motor that operates too slow can be overloaded by excessive mechanical friction within the engine being started. Slow starting motor operation can also be caused by shorts, loose connections and/or excessive dirt within the motor. PINION CLEARANCE ADJUSTMENT: Whenever the solenoid is installed, the pinion clearance should be adjusted. The adjustment should be made with the starting motor removed.Bench test and adjust the pinion clearance at installation of solenoid as follows:
CIRCUIT FOR CHECKING AND ADJUSTING PINION CLEARANCE1. Install the solenoid without connector from the MOTOR terminal on solenoid to the motor.2. Connect a battery, of the same voltage as the solenoid, to the terminal marked SW.3. Connect the other side of battery to ground terminal or to solenoid frame.
CHECKING PINION CLEARANCE
ADJUSTING PINION CLEARANCE4. MOMENTARILY flash a jumper wire from the solenoid terminal marked MOTOR to the frame or ground terminal. The pinion will shift into cranking position and will remain there until the battery is disconnected.5. Push pinion towards commutator end to eliminate free movement.6. Pinion clearance should be .36 in. (9,14 mm).7. Adjust clearance by removing plug and turning shaft nut.General Reconditioning
Approximately every 200,000 miles, the starter should be removed so that it may be completely disassembled, washed and have all parts replaced that show evidence of being unsatisfactory for reason of wear. Do not use a degreaser or high temperature cleaning method when cleaning parts of the starter.No periodic service is indicated for the electric starter brushes between general reconditioning periods. The brushes should only be inspected after removal of the starter from the engine and removal of the commutator end bearing frame. The electric starter commutator end and drive end bearings are equipped with wicks for lubrication purposes. The wicks should be saturated with oil whenever the electric starter is removed or disassembled. It is suggested that cleaning and reconditioning be entrusted to your authorized dealer.Glow Plugs
TESTING GLOW PLUGS: Glow plugs can be checked with an ammeter. Disconnect the wire lead from the glow plug terminal on the HEAT-START switch. Install an ammeter, in series, between the disconnected lead and
Have questions with 106871-3791?
Group cross 106871-3791 ZEXEL
Hino
106871-3791
220004621A
INJECTION-PUMP ASSEMBLY
EF750
EF750
