Information injection-pump assembly
ZEXEL
106693-1150
1066931150
ISUZU
1156016050
1156016050
Rating:
Service parts 106693-1150 INJECTION-PUMP ASSEMBLY:
1.
_
7.
COUPLING PLATE
8.
_
9.
_
11.
Nozzle and Holder
1-15300-128-1
12.
Open Pre:MPa(Kqf/cm2)
17.7(180)
15.
NOZZLE SET
Include in #1:
106693-1150
as INJECTION-PUMP ASSEMBLY
Cross reference number
ZEXEL
106693-1150
1066931150
ISUZU
1156016050
1156016050
Zexel num
Bosch num
Firm num
Name
106693-1150
1156016050 ISUZU
INJECTION-PUMP ASSEMBLY
6QA1 * K
6QA1 * K
Calibration Data:
Adjustment conditions
Test oil
1404 Test oil ISO4113 or {SAEJ967d}
1404 Test oil ISO4113 or {SAEJ967d}
Test oil temperature
degC
40
40
45
Nozzle and nozzle holder
105780-8140
Bosch type code
EF8511/9A
Nozzle
105780-0000
Bosch type code
DN12SD12T
Nozzle holder
105780-2080
Bosch type code
EF8511/9
Opening pressure
MPa
17.2
Opening pressure
kgf/cm2
175
Injection pipe
Outer diameter - inner diameter - length (mm) mm 8-3-600
Outer diameter - inner diameter - length (mm) mm 8-3-600
Overflow valve
134424-1920
Overflow valve opening pressure
kPa
127
107
147
Overflow valve opening pressure
kgf/cm2
1.3
1.1
1.5
Tester oil delivery pressure
kPa
157
157
157
Tester oil delivery pressure
kgf/cm2
1.6
1.6
1.6
Direction of rotation (viewed from drive side)
Right R
Right R
Injection timing adjustment
Direction of rotation (viewed from drive side)
Right R
Right R
Injection order
1-4-2-6-
3-5
Pre-stroke
mm
3
2.97
3.03
Beginning of injection position
Drive side NO.1
Drive side NO.1
Difference between angles 1
Cal 1-4 deg. 60 59.75 60.25
Cal 1-4 deg. 60 59.75 60.25
Difference between angles 2
Cyl.1-2 deg. 120 119.75 120.25
Cyl.1-2 deg. 120 119.75 120.25
Difference between angles 3
Cal 1-6 deg. 180 179.75 180.25
Cal 1-6 deg. 180 179.75 180.25
Difference between angles 4
Cal 1-3 deg. 240 239.75 240.25
Cal 1-3 deg. 240 239.75 240.25
Difference between angles 5
Cal 1-5 deg. 300 299.75 300.25
Cal 1-5 deg. 300 299.75 300.25
Injection quantity adjustment
Adjusting point
A
Rack position
7.2
Pump speed
r/min
1150
1150
1150
Average injection quantity
mm3/st.
126
124
128
Max. variation between cylinders
%
0
-4
4
Fixing the lever
*
Injection quantity adjustment_02
Adjusting point
B
Rack position
6.8
Pump speed
r/min
700
700
700
Average injection quantity
mm3/st.
108
106
110
Max. variation between cylinders
%
0
-3
3
Basic
*
Fixing the lever
*
Injection quantity adjustment_03
Adjusting point
C
Rack position
4.2+-0.5
Pump speed
r/min
225
225
225
Average injection quantity
mm3/st.
13
9.8
16.2
Max. variation between cylinders
%
0
-13
13
Fixing the rack
*
Remarks
Adjust only variation between cylinders; adjust governor according to governor specifications.
Adjust only variation between cylinders; adjust governor according to governor specifications.
Injection quantity adjustment_04
Adjusting point
D
Rack position
-
Pump speed
r/min
150
150
150
Average injection quantity
mm3/st.
115
115
Fixing the lever
*
Remarks
After startup boost setting
After startup boost setting
Timer adjustment
Pump speed
r/min
900+50
Advance angle
deg.
0
0
0
Remarks
Start
Start
Timer adjustment_02
Pump speed
r/min
1150
Advance angle
deg.
5.5
5
6
Remarks
Finish
Finish
Test data Ex:
Governor adjustment
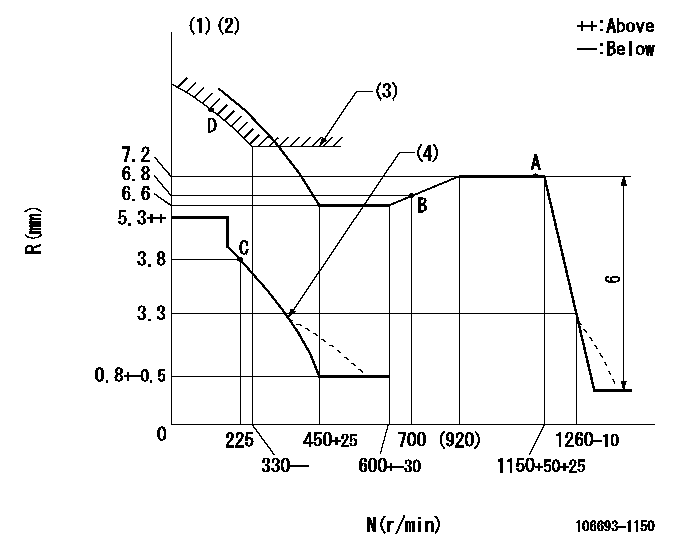
N:Pump speed
R:Rack position (mm)
(1)Lever ratio: RT
(2)Target shim dimension: TH
(3)Excess fuel setting for starting: SXL
(4)Damper spring setting: DL
----------
RT=0.8 TH=2.8mm SXL=8.1+0.2mm DL=3.3-0.5mm
----------
----------
RT=0.8 TH=2.8mm SXL=8.1+0.2mm DL=3.3-0.5mm
----------
Speed control lever angle
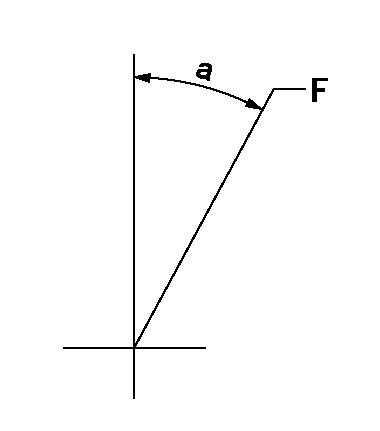
F:Full speed
----------
----------
a=5deg+-5deg
----------
----------
a=5deg+-5deg
0000000901
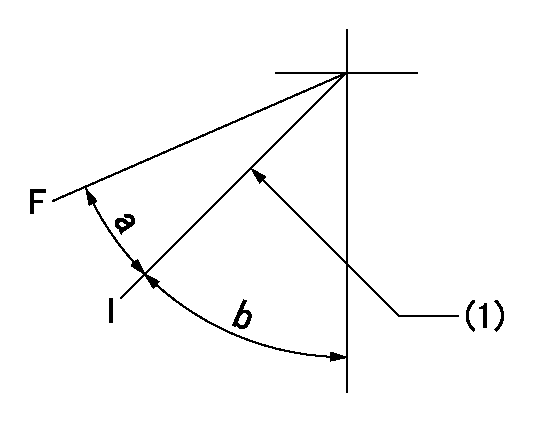
F:Full load
I:Idle
(1)Stopper bolt setting
----------
----------
a=31deg+-3deg b=10deg+-5deg
----------
----------
a=31deg+-3deg b=10deg+-5deg
Stop lever angle
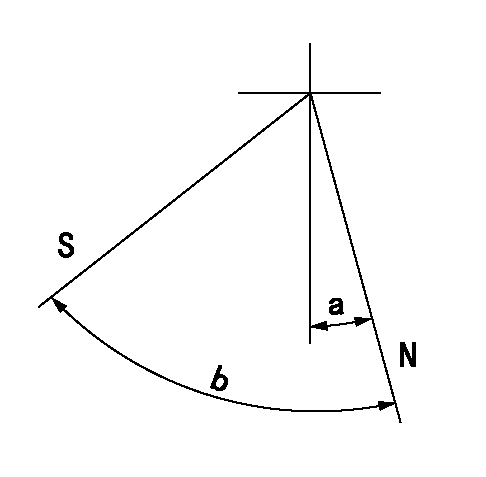
N:Pump normal
S:Stop the pump.
----------
----------
a=0deg+-5deg b=64deg+-5deg
----------
----------
a=0deg+-5deg b=64deg+-5deg
0000001501 GOVERNOR TORQUE CONTROL

Dr:Torque control stroke
(A): Without torque control spring capsule
1. Adjustment procedures
(1)Procedure is the same as that for the RFD (former type), except that the positive torque control stroke must be determined at the full lever setting.
2. Procedures for adjustment
(1)Remove the torque control spring capsule.
(2)Operate the pump at approximately N1. (End of idling spring operation < N1.)
(3)Tilt the lever to the full side.
(4)Set so that R = RF.
(5)Increase the speed by pushing in the screw (attached to the bracket on the rear of the tension lever) through the adjusting window.
(6)Adjust so that the torque control stroke Dr1 can be obtained.
(7)Align N2 and N3 with the torque control spring capsule.
3. Final confirmation
(1)After final confirmation, temporarily set the load lever to N = N1, R = idling position.
(2)From this condition, increase speed to N = N4.
(3)Confirm that positive torque control stroke is Dr2.
----------
N1=500r/min N2=600+-30r/min N3=(920)r/min N4=1100r/min RF=6.6mm Dr1=0.6mm Dr2=0+0.3mm
----------
----------
N1=500r/min N2=600+-30r/min N3=(920)r/min N4=1100r/min RF=6.6mm Dr1=0.6mm Dr2=0+0.3mm
----------
Timing setting
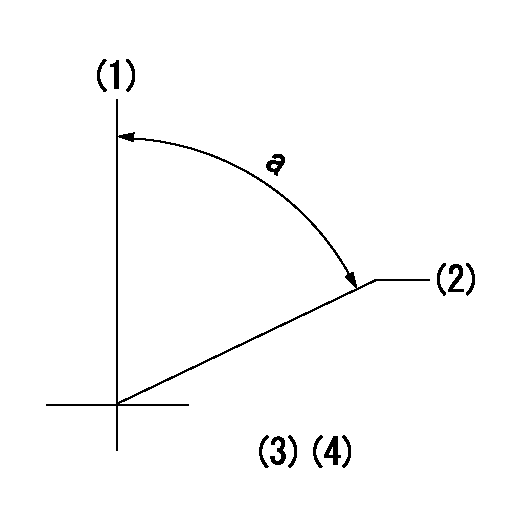
(1)Pump vertical direction
(2)Position of timer's threaded hole at No 1 cylinder's beginning of injection
(3)-
(4)-
----------
----------
a=(70deg)
----------
----------
a=(70deg)
Information:
To Remove the Flywheel
1. Remove the gearbox and flywheel housing.2. Remove clutch assembly.3. Remove the flywheel (see Note). With some applications, the flywheel is secured to the crankshaft with 12 setscrews and washers.4. Remove the clutch pilot bearing (if fitted). To facilitate safe flywheel removal, remove two diametrically opposed securing setscrews and in their place, fit two suitably sized studs, finger tight only. The remaining setscrews can now be removed and the flywheel withdrawn under control.To Renew the Flywheel Ring Gear
1. Place the flywheel in a suitable container of clean cold water and support it by positioning four metal blocks under the ring gear. Arrange the flywheel assembly so that, when placed in the water the ring gear is uppermost and clear of the water line by approximately 1/4 in (6,5 mm). Heat the ring gear evenly around its circumference, thus expanding it. This will allow the flywheel to drop away from the ring gear.2. Heat the new ring gear to an approximate temperature of 475°F (246°C). Fit the gear over the flywheel with the lead-in on the teeth facing towards the front of the flywheel and allow the ring to cool.To Refit the Flywheel
1. Using the method of removal but in reverse, mount the flywheel to the crankshaft flange so that the untapped hole in the flange is in line with the seventh unused smaller hole in the flywheel.2. Engage the securing setscrews with new hardened steel washers and tighten to a torque of 80 lbf ft (11,0 kfg m) -108 Nm. Where the flywheel is secured with place bolts, without washers, these should be tightened to 90 lbf ft (12,4 kgf m) - 122 Nm. Place bolts can be identified by the 6 slots cut in the head face and the embossed letter 'T'.3. Set up a clock indicator gauge with the base secured to the flywheel housing or cylinder block and adjust the clock so that the stylus is contacting the flywheel periphery. Turn the crankshaft and check the total reading. The flywheel should run true within 0.012 in (0,30 mm) total indicator reading.
P14. Now adjust the clock gauge so that the plunger is at right angles to the crankshaft flange and rests on the vertical machined face of the flywheel, at the outermost point of the face (Fig. P.1). Press the crankshaft one way to take up the end float, and turn the flywheel. The run-out on the flywheel face should be within 0.001 in (0,025 mm) per inch (25 mm) of flywheel radius from the crankshaft axis to the clock gauge stylus. If not, remove flywheel and check mating faces for burrs and dirt.5. Lock the setscrews with the tab washers where fitted.6. Refit the clutch and gearbox, etc.To Remove the Flywheel Housing
1. Remove the flywheel.2. Unscrew the nuts or setscrews securing the flywheel housing
Have questions with 106693-1150?
Group cross 106693-1150 ZEXEL
Isuzu
106693-1150
1156016050
INJECTION-PUMP ASSEMBLY
6QA1
6QA1