Information injection-pump assembly
ZEXEL
106684-4220
1066844220
KOMATSU
6215711680
6215711680
Rating:
Service parts 106684-4220 INJECTION-PUMP ASSEMBLY:
1.
_
3.
GOVERNOR
5.
AUTOM. ADVANCE MECHANIS
7.
COUPLING PLATE
8.
_
9.
_
11.
Nozzle and Holder
6215-11-3300
12.
Open Pre:MPa(Kqf/cm2)
24.5{250}
15.
NOZZLE SET
Include in #1:
106684-4220
as INJECTION-PUMP ASSEMBLY
Cross reference number
ZEXEL
106684-4220
1066844220
KOMATSU
6215711680
6215711680
Zexel num
Bosch num
Firm num
Name
Calibration Data:
Adjustment conditions
Test oil
1404 Test oil ISO4113 or {SAEJ967d}
1404 Test oil ISO4113 or {SAEJ967d}
Test oil temperature
degC
40
40
45
Nozzle and nozzle holder
105780-8130
Bosch type code
EFEP215A
Nozzle
105780-0050
Bosch type code
DN6TD119NP1T
Nozzle holder
105780-2090
Bosch type code
EFEP215
Opening pressure
MPa
17.2
Opening pressure
kgf/cm2
175
Injection pipe
Outer diameter - inner diameter - length (mm) mm 8-4-1000
Outer diameter - inner diameter - length (mm) mm 8-4-1000
Overflow valve
131425-1620
Overflow valve opening pressure
kPa
255
221
289
Overflow valve opening pressure
kgf/cm2
2.6
2.25
2.95
Tester oil delivery pressure
kPa
157
157
157
Tester oil delivery pressure
kgf/cm2
1.6
1.6
1.6
Direction of rotation (viewed from drive side)
Right R
Right R
Injection timing adjustment
Direction of rotation (viewed from drive side)
Right R
Right R
Injection order
1-5-3-6-
2-4
Pre-stroke
mm
3
2.95
3.05
Beginning of injection position
Drive side NO.1
Drive side NO.1
Difference between angles 1
Cal 1-5 deg. 60 59.5 60.5
Cal 1-5 deg. 60 59.5 60.5
Difference between angles 2
Cal 1-3 deg. 120 119.5 120.5
Cal 1-3 deg. 120 119.5 120.5
Difference between angles 3
Cal 1-6 deg. 180 179.5 180.5
Cal 1-6 deg. 180 179.5 180.5
Difference between angles 4
Cyl.1-2 deg. 240 239.5 240.5
Cyl.1-2 deg. 240 239.5 240.5
Difference between angles 5
Cal 1-4 deg. 300 299.5 300.5
Cal 1-4 deg. 300 299.5 300.5
Injection quantity adjustment
Adjusting point
A
Rack position
13.5
Pump speed
r/min
600
600
600
Average injection quantity
mm3/st.
371
368
374
Max. variation between cylinders
%
0
-3
3
Basic
*
Fixing the rack
*
Remarks
Standard point A's rack position same as 106682-9300 in row L.
Standard point A's rack position same as 106682-9300 in row L.
Injection quantity adjustment_02
Adjusting point
-
Rack position
5.6+-0.5
Pump speed
r/min
400
400
400
Average injection quantity
mm3/st.
13
11.5
14.5
Max. variation between cylinders
%
0
-15
15
Fixing the rack
*
Injection quantity adjustment_03
Remarks
Rack limit setting R = 15.2+0.2
Rack limit setting R = 15.2+0.2
Test data Ex:
Timing setting
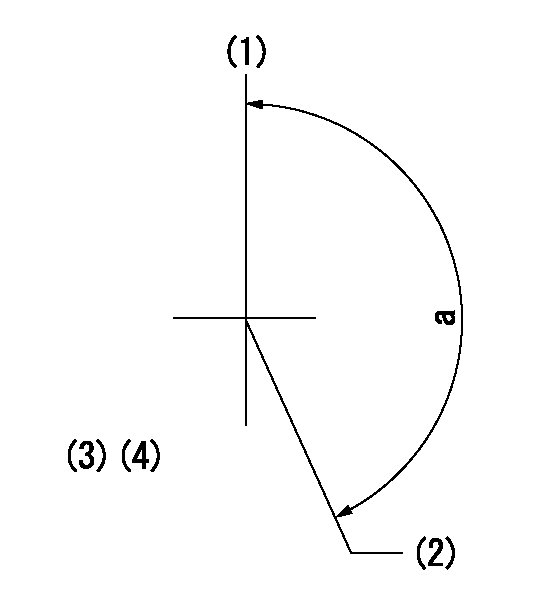
(1)Pump vertical direction
(2)Coupling's key groove position at No 1 cylinder's beginning of injection
(3)-
(4)-
----------
----------
a=(160deg)
----------
----------
a=(160deg)
Information:
You must read and understand the warnings and instructions contained in the Safety section of this manual before performing any operation or maintenance procedures.Before proceeding with Every 1000 Hour maintenance, perform all previous maintenance interval requirements.Engine Protection Devices
Inspect for Proper Operation
Refer to the Service Manual for the procedure. All engine protective devices must be checked and maintained to provide the engine with proper protection if a component malfunction or failure should occur. Check all engine protective devices. Never use the Emergency Shutdown controls for a normal stopping procedure.SR4 Generator and Control Panel (If Equipped)
SR4 Generator
Before working inside the generator, make sure that the starting motor can not be activated by any automatic or manual signal.When the engine-generator is operating, voltages up to 600V are present in these areas near or on the regulator: 1. the regulator terminal strip2. the excitation transformer terminal strip (self-excited generator only)Do not short these terminals to ground with any part of the body or any conductive material. Loss of life or injury could result from electrical shock or injury from molten metal.
Electronic components in the regulator can be damaged during generator operation if contact is made between the part and ground.
Clean/Inspect Voltage Regulator
If moisture is allowed to remain in contact with an electrical winding, some of the moisture will eventually be absorbed. This will lower the resistance of the winding insulation. The insulation used on the windings of Caterpillar generators is moisture resistant, but constant exposure to moisture will gradually lower the insulation's resistance.Dirt can make the problem worse because it can hold the moisture in contact with the insulation. Salt (from coastal location sea air) can also make the problem much worse. This is because salt tends to absorb moisture from the air. When the salt and moisture combine, they make a good electrical conductor.* Clean the voltage regulator and generator of dirt and debris. Use a brush to loosen accumulations of dirt and a vacuum system for removal. Use of compressed air is not recommended, because of moisture present in the form of condensate.Carbon tracking on insulators can be caused by dirt or loose connections. These carbon paths must be cleaned or the insulators replaced. Failure to correct a carbon tracking problem will eventually result in a short in the electrical circuit.* Visually check for loose or broken wires and connections. Check the wires and connections on the regulator assembly. Check all wires and connections in the generator. Make any necessary repairs to the wiring as required.Visually inspect the generator and control panel. Check for loose, broken, or damaged wiring or components. The inspection only takes a few minutes and could avert a potential problem that could cause your generator set to fail.Operational Checks
Start the engine. Use the starting procedure found in the SR4 Generators and Control Panels Operation and Maintenance Manual, SEBU6150.The following operational checks include: * generator operation and engine starting* lubricating and fuel systems* overall operationThe checks should take no longer than five minutes to complete. A