Information injection-pump assembly
BOSCH
9 400 617 550
9400617550
ZEXEL
106682-4422
1066824422
KOMATSU
6162732141
6162732141
Rating:
Service parts 106682-4422 INJECTION-PUMP ASSEMBLY:
1.
_
5.
AUTOM. ADVANCE MECHANIS
7.
COUPLING PLATE
8.
_
9.
_
11.
Nozzle and Holder
12.
Open Pre:MPa(Kqf/cm2)
26.0(265)
15.
NOZZLE SET
Include in #1:
106682-4422
as INJECTION-PUMP ASSEMBLY
Cross reference number
BOSCH
9 400 617 550
9400617550
ZEXEL
106682-4422
1066824422
KOMATSU
6162732141
6162732141
Zexel num
Bosch num
Firm num
Name
Calibration Data:
Adjustment conditions
Test oil
1404 Test oil ISO4113 or {SAEJ967d}
1404 Test oil ISO4113 or {SAEJ967d}
Test oil temperature
degC
40
40
45
Nozzle and nozzle holder
105780-8130
Bosch type code
EFEP215A
Nozzle
105780-0050
Bosch type code
DN6TD119NP1T
Nozzle holder
105780-2090
Bosch type code
EFEP215
Opening pressure
MPa
17.2
Opening pressure
kgf/cm2
175
Injection pipe
Outer diameter - inner diameter - length (mm) mm 8-4-1000
Outer diameter - inner diameter - length (mm) mm 8-4-1000
Overflow valve
131425-1620
Overflow valve opening pressure
kPa
255
221
289
Overflow valve opening pressure
kgf/cm2
2.6
2.25
2.95
Tester oil delivery pressure
kPa
157
157
157
Tester oil delivery pressure
kgf/cm2
1.6
1.6
1.6
Direction of rotation (viewed from drive side)
Left L
Left L
Injection timing adjustment
Direction of rotation (viewed from drive side)
Left L
Left L
Injection order
1-5-3-6-
2-4
Pre-stroke
mm
3.2
3.15
3.25
Beginning of injection position
Drive side NO.1
Drive side NO.1
Difference between angles 1
Cal 1-5 deg. 60 59.5 60.5
Cal 1-5 deg. 60 59.5 60.5
Difference between angles 2
Cal 1-3 deg. 120 119.5 120.5
Cal 1-3 deg. 120 119.5 120.5
Difference between angles 3
Cal 1-6 deg. 180 179.5 180.5
Cal 1-6 deg. 180 179.5 180.5
Difference between angles 4
Cyl.1-2 deg. 240 239.5 240.5
Cyl.1-2 deg. 240 239.5 240.5
Difference between angles 5
Cal 1-4 deg. 300 299.5 300.5
Cal 1-4 deg. 300 299.5 300.5
Injection quantity adjustment
Adjusting point
A
Rack position
15.2
Pump speed
r/min
900
900
900
Average injection quantity
mm3/st.
382
378
386
Max. variation between cylinders
%
0
-3
3
Basic
*
Fixing the lever
*
Boost pressure
kPa
53.3
53.3
Boost pressure
mmHg
400
400
Injection quantity adjustment_02
Adjusting point
C
Rack position
6.8+-0.5
Pump speed
r/min
325
325
325
Average injection quantity
mm3/st.
29
24
34
Max. variation between cylinders
%
0
-15
15
Fixing the rack
*
Boost pressure
kPa
0
0
0
Boost pressure
mmHg
0
0
0
Injection quantity adjustment_03
Adjusting point
E
Rack position
18.4+0.2
Pump speed
r/min
100
100
100
Average injection quantity
mm3/st.
416
416
456
Fixing the lever
*
Boost pressure
kPa
0
0
0
Boost pressure
mmHg
0
0
0
Rack limit
*
Boost compensator adjustment
Pump speed
r/min
500
500
500
Rack position
R1-2.5
Boost pressure
kPa
9.3
6.6
12
Boost pressure
mmHg
70
50
90
Boost compensator adjustment_02
Pump speed
r/min
500
500
500
Rack position
R1(16.7)
Boost pressure
kPa
40
33.3
46.7
Boost pressure
mmHg
300
250
350
Test data Ex:
Governor adjustment
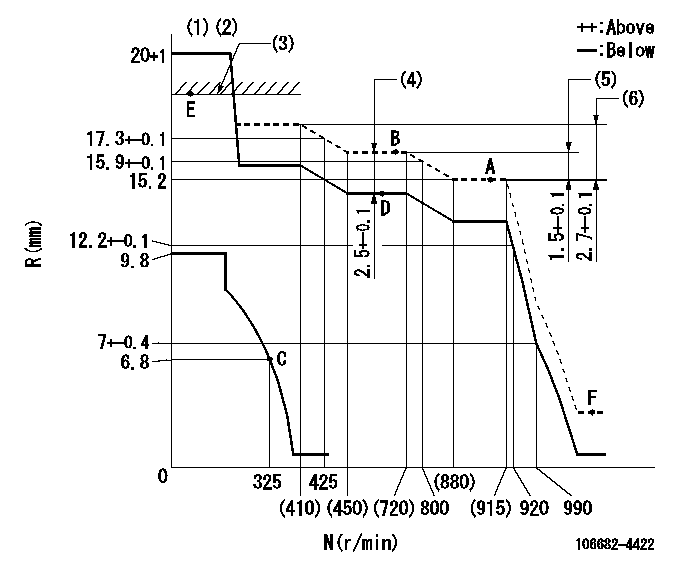
N:Pump speed
R:Rack position (mm)
(1)Target notch: K
(2)Tolerance for racks not indicated: +-0.05mm.
(3)RACK LIMIT: RAL
(4)Boost compensator stroke
(5)Rack difference between N = N1 and N = N2
(6)Rack difference between N = N3 and N = N4
----------
K=16 RAL=18.4+0.2mm N1=900r/min N2=650r/min N3=900r/min N4=350r/min
----------
----------
K=16 RAL=18.4+0.2mm N1=900r/min N2=650r/min N3=900r/min N4=350r/min
----------
Speed control lever angle
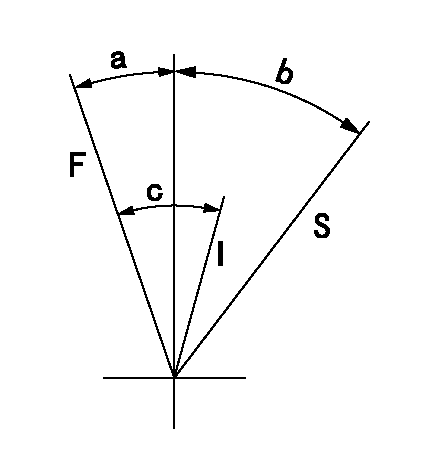
F:Full speed
I:Idle
S:Stop
----------
----------
a=16deg+-5deg b=27deg+-3deg c=26deg+-5deg
----------
----------
a=16deg+-5deg b=27deg+-3deg c=26deg+-5deg
0000001501 LEVER
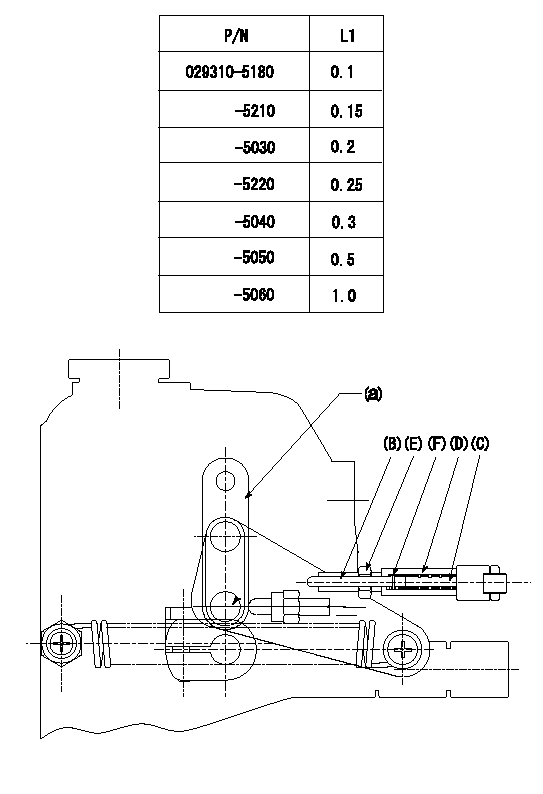
Speed lever adjustment
1. (1) For idling hold the speed lever (a) against the push rod (B).
(2)At this time, confirm that the spring (C) is not bent by the operating torque of the speed lever.
2. (1) To stop, bend the spring (C) using the speed lever.
(2)Set so that the rack position is L2.
(3)Set and fix using lock nut (E) so that it contacts the guide screw (D).
(4)Adjust rack position at this time using shim (F).
3. Confirm that the speed lever returns to the idling position when pulled in the stop direction and then released.
----------
L2=0.2~2mm
----------
----------
L2=0.2~2mm
----------
Timing setting
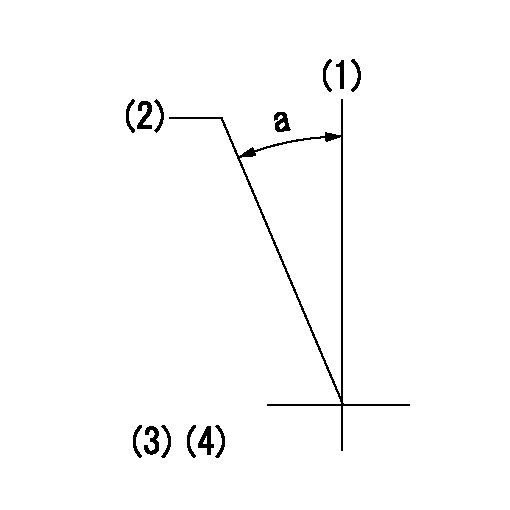
(1)Pump vertical direction
(2)Coupling's key groove position at No 1 cylinder's beginning of injection
(3)-
(4)-
----------
----------
a=(30deg)
----------
----------
a=(30deg)
Information:
Measure wear of the cylinder bore at the top and bottom of piston ring travel.(1) Cylinder bore [standard, original size] ... 114.300 to 114.338 mm (4.5000 to 4.5015 in) The recommendation is made to make the cylinder bore the next size larger when the size of the bore is ... 114.452 mm (4.5060 in)Cylinder bore must be made the next size larger when the size of the bore is ... 114.529 mm (4.5090 in)Cylinder bore [0.51 mm (.020 in) larger than the original size] ... 114.821 0.013 mm (4.5205 .0005 in)The recommendation is made to make the cylinder bore the next size larger when the size of the bore is ... 114.960 mm (4.5260 in)Cylinder bore must be made the next size larger when the size of the bore is ... 115.037 mm (4.5290 in)Cylinder bore [1.02 mm (.040 in) larger than the original size] ... 115.329 0.013 mm (4.5405 .0005 in)Maximum permissible wear of cylinder bores (replacement of the cylinder block is necessary) ... 115.545 mm (4.5490 in)(2) Bore in block for camshaft bearing ... 67.374 0.013 mm (2.6525 .0005 in) Install camshaft bearings with the oil hole toward the top of the cylinder block.(3) Width of main bearing cap ... 166.624 0.018 mm (6.5600 .0007 in) Minimum permissible width of main bearing cap ... 166.573 mm (6.5580 in)Width of main bearing cap guide (in cylinder block) ... 166.599 0.013 mm (6.5590 .0005 in)(4) Bore in block for main bearing ... 94.171 0.013 mm (3.7075 .0005 in) Permissible amount of distortion in bore ... 94.13 to 94.21 mm (3.706 to 3.709 in) (5) Torque for bolts holding caps for main bearings: a. Put 2P2506 Thread Lubricant on bolt threads and washer face.b. Tighten all bolts in number sequence to ... 40 4 N m (30 3 lb ft)c. Put a mark on each bolt and cap.d. Tighten all bolts in number sequence from mark ... 120 5° (6) Dimension (new) from centerline of crankshaft bearing bore to bottom of block (pan rails) ... 95.250 0.038 mm (3.7500 .0015 in)(7) Dimension (new) from centerline of crankshaft bearing bore to top of block (top deck) ... 322.66 0.13 mm (12.703 .005 in)
There are holes in the bores for the main bearings, between the cylinders for piston cooling orifices. These holes must have orifices or plugs installed or low oil pressure will be the result.
If the base for the oil cooler is 357.2 mm (14.06 in) long the engine has piston cooling orifices installed. If the base for the oil cooler is 268.2 mm (10.56 in) long the engine has plugs installed.Piston cooling orifices were eliminated from 3208 truck engines effective with truck engine 2Z30692 with a rating of 150 KW (200 hp) @ 2000 rpm or 160 KW (215 hp) @ 2200 rpm. On earlier engines