Information injection-pump assembly
BOSCH
9 400 610 336
9400610336
ZEXEL
106672-9820
1066729820
KOMATSU
6127711152
6127711152

Rating:
Service parts 106672-9820 INJECTION-PUMP ASSEMBLY:
1.
_
6.
COUPLING PLATE
7.
COUPLING PLATE
8.
_
9.
_
11.
Nozzle and Holder
6127-11-3104
12.
Open Pre:MPa(Kqf/cm2)
21.6{220}
15.
NOZZLE SET
Include in #1:
106672-9820
as INJECTION-PUMP ASSEMBLY
Cross reference number
BOSCH
9 400 610 336
9400610336
ZEXEL
106672-9820
1066729820
KOMATSU
6127711152
6127711152
Zexel num
Bosch num
Firm num
Name
9 400 610 336
6127711152 KOMATSU
INJECTION-PUMP ASSEMBLY
S6D155 K 14CA INJECTION PUMP ASSY PE6P,6PD PE
S6D155 K 14CA INJECTION PUMP ASSY PE6P,6PD PE
Calibration Data:
Adjustment conditions
Test oil
1404 Test oil ISO4113 or {SAEJ967d}
1404 Test oil ISO4113 or {SAEJ967d}
Test oil temperature
degC
40
40
45
Nozzle and nozzle holder
105780-8130
Bosch type code
EFEP215A
Nozzle
105780-0050
Bosch type code
DN6TD119NP1T
Nozzle holder
105780-2090
Bosch type code
EFEP215
Opening pressure
MPa
17.2
Opening pressure
kgf/cm2
175
Injection pipe
Outer diameter - inner diameter - length (mm) mm 8-3-600
Outer diameter - inner diameter - length (mm) mm 8-3-600
Overflow valve
131425-1620
Overflow valve opening pressure
kPa
255
255
255
Overflow valve opening pressure
kgf/cm2
2.6
2.6
2.6
Tester oil delivery pressure
kPa
157
157
157
Tester oil delivery pressure
kgf/cm2
1.6
1.6
1.6
Direction of rotation (viewed from drive side)
Right R
Right R
Injection timing adjustment
Direction of rotation (viewed from drive side)
Right R
Right R
Injection order
1-5-3-6-
2-4
Pre-stroke
mm
2.5
2.45
2.55
Beginning of injection position
Drive side NO.1
Drive side NO.1
Difference between angles 1
Cal 1-5 deg. 60 59.5 60.5
Cal 1-5 deg. 60 59.5 60.5
Difference between angles 2
Cal 1-3 deg. 120 119.5 120.5
Cal 1-3 deg. 120 119.5 120.5
Difference between angles 3
Cal 1-6 deg. 180 179.5 180.5
Cal 1-6 deg. 180 179.5 180.5
Difference between angles 4
Cyl.1-2 deg. 240 239.5 240.5
Cyl.1-2 deg. 240 239.5 240.5
Difference between angles 5
Cal 1-4 deg. 300 299.5 300.5
Cal 1-4 deg. 300 299.5 300.5
Injection quantity adjustment
Adjusting point
A
Rack position
12.9
Pump speed
r/min
1000
1000
1000
Each cylinder's injection qty
mm3/st.
263
257.7
268.3
Basic
*
Fixing the lever
*
Injection quantity adjustment_02
Adjusting point
B
Rack position
6.5+-0.5
Pump speed
r/min
300
300
300
Average injection quantity
mm3/st.
36.9
32.9
40.9
Max. variation between cylinders
%
0
-10
10
Fixing the rack
*
Test data Ex:
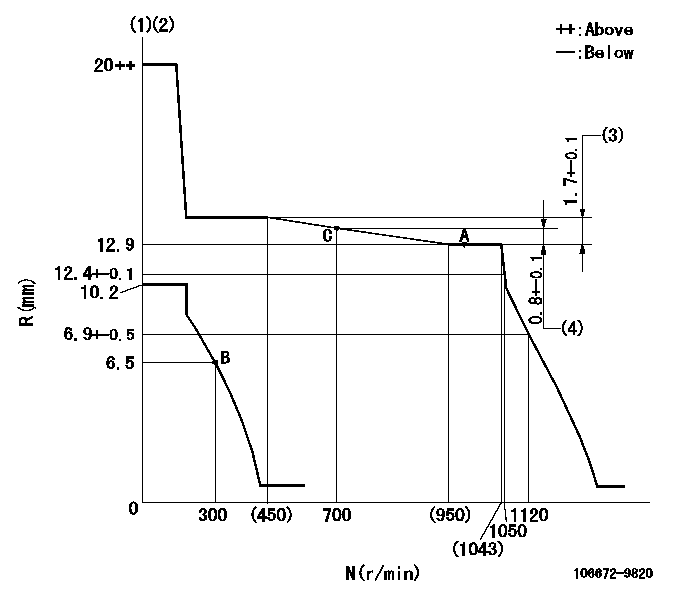
Governor adjustment

N:Pump speed
R:Rack position (mm)
(1)Target notch: K
(2)Tolerance for racks not indicated: +-0.05mm.
(3)Rack difference between N = N1 and N = N2
(4)Rack difference to N = N3
----------
K=17 N1=1000r/min N2=250r/min N3=1000r/min
----------
----------
K=17 N1=1000r/min N2=250r/min N3=1000r/min
----------
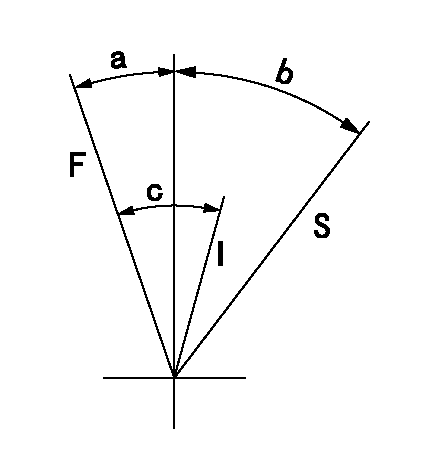
Speed control lever angle

F:Full speed
I:Idle
S:Stop
----------
----------
a=19deg+-5deg b=31deg+-3deg c=33deg+-5deg
----------
----------
a=19deg+-5deg b=31deg+-3deg c=33deg+-5deg
Timing setting

(1)Pump vertical direction
(2)Position of spline gear's aligning mark at No 1 cylinder's beginning of injection (key position)
(3)-
(4)-
----------
----------
a=(50deg)
----------
----------
a=(50deg)
Information:
Rework Procedure
Replacement of Diesel Oxidation Catalyst (DOC):
1. Remove three 222-8823 Bolts and three 232-3209 Washers to separate the 360-8875 Bellows Tube Assembly from the 360-8849 Catalytic Converter Group. Refer to Image1.1.1.
Image1.1.1
2. Loosen the clamp. Remove the DOC from the Catalytic Converter Group. Refer to Images1.2.1 and 1.2.2.
Image1.2.1
Image1.2.2
3. Remove the ring from the DOC. Remove the clamp from the catalytic converter. Refer to Images1.3.1 and 1.3.2.
Image1.3.1
Image1.3.2
4. Remove the five screws and five washers from the insulation around the DOC. Remove the insulation from the DOC. The insulation will be reused. Refer to Images1.4.1 and 1.4.2.
Image1.4.1
Image1.4.2
5. Install the insulation that was removed from the old DOC on to the new DOC. Refer to Image1.5.1.
Image1.5.1
6. Clean the sealing surface of the DOC flange. Clean the sealing surface of the flange on the catalytic converter group. Clean the ring that was removed from the old DOC. Refer to Images1.6.1, 1.6.2, and 1.6.3.
Image1.6.1
Image1.6.2
Image1.6.3
7. Apply seal paste to both sides of the ring, to the flange surfaces of the new DOC, and the catalytic converter. Refer to Image1.7.1.
Note: Make sure to cover the complete ring and flange surfaces with seal paste when applying it.
Image1.7.1
8. Place the ring on the flange of the new DOC. Position the new DOC against the catalytic converter. Refer to Images1.8.1 and 1.8.2.
Image1.8.1
Image1.8.2
9. Orient the DOC so that it will line up correctly with the bellows tube. Install and orient the clamp in order to hold the new DOC in place. Apply sealing paste or high temperature grease to the bolt of the clamp. Tighten the clamp. Then reattach the DOC to the bellows tube. Refer to Image1.9.1.
Image1.9.1
10. Tap the clamp around the circumference to properly seat the clamp. Tighten the clamp to a specified torque of 18 N.m (13.3 ft-lb). Apply sealing paste or high temperature grease to the three 222-8823 Bolts to assemble the bellows. Refer to Image1.10.1.
Image1.10.1
11. Write down the number of active regenerations. This number can be found in the Monitor Service Menu in the Aftertreatment Status section. Enter this information to the claim story when you submit your claim. Refer to Image1.11.1.
Image1.11.1