Information injection-pump assembly
BOSCH
9 400 612 222
9400612222
ZEXEL
106671-6550
1066716550
ISUZU
1156034170
1156034170

Rating:
Service parts 106671-6550 INJECTION-PUMP ASSEMBLY:
1.
_
7.
COUPLING PLATE
8.
_
9.
_
11.
Nozzle and Holder
1-15300-414-0
12.
Open Pre:MPa(Kqf/cm2)
18.1{185}/22.1{225}
14.
NOZZLE
Include in #1:
106671-6550
as INJECTION-PUMP ASSEMBLY
Cross reference number
BOSCH
9 400 612 222
9400612222
ZEXEL
106671-6550
1066716550
ISUZU
1156034170
1156034170
Zexel num
Bosch num
Firm num
Name
Calibration Data:
Adjustment conditions
Test oil
1404 Test oil ISO4113 or {SAEJ967d}
1404 Test oil ISO4113 or {SAEJ967d}
Test oil temperature
degC
40
40
45
Nozzle and nozzle holder
105780-8140
Bosch type code
EF8511/9A
Nozzle
105780-0000
Bosch type code
DN12SD12T
Nozzle holder
105780-2080
Bosch type code
EF8511/9
Opening pressure
MPa
17.2
Opening pressure
kgf/cm2
175
Injection pipe
Outer diameter - inner diameter - length (mm) mm 8-3-600
Outer diameter - inner diameter - length (mm) mm 8-3-600
Overflow valve
134424-4320
Overflow valve opening pressure
kPa
255
221
289
Overflow valve opening pressure
kgf/cm2
2.6
2.25
2.95
Tester oil delivery pressure
kPa
255
255
255
Tester oil delivery pressure
kgf/cm2
2.6
2.6
2.6
Direction of rotation (viewed from drive side)
Left L
Left L
Injection timing adjustment
Direction of rotation (viewed from drive side)
Left L
Left L
Injection order
1-5-3-6-
2-4
Pre-stroke
mm
3.6
3.57
3.63
Beginning of injection position
Governor side NO.1
Governor side NO.1
Difference between angles 1
Cal 1-5 deg. 60 59.75 60.25
Cal 1-5 deg. 60 59.75 60.25
Difference between angles 2
Cal 1-3 deg. 120 119.75 120.25
Cal 1-3 deg. 120 119.75 120.25
Difference between angles 3
Cal 1-6 deg. 180 179.75 180.25
Cal 1-6 deg. 180 179.75 180.25
Difference between angles 4
Cyl.1-2 deg. 240 239.75 240.25
Cyl.1-2 deg. 240 239.75 240.25
Difference between angles 5
Cal 1-4 deg. 300 299.75 300.25
Cal 1-4 deg. 300 299.75 300.25
Injection quantity adjustment
Adjusting point
A
Rack position
10.8
Pump speed
r/min
1150
1150
1150
Average injection quantity
mm3/st.
103
102
104
Max. variation between cylinders
%
0
-3
3
Basic
*
Fixing the lever
*
Boost pressure
kPa
113
113
Boost pressure
mmHg
850
850
Injection quantity adjustment_02
Adjusting point
-
Rack position
7.6+-0.5
Pump speed
r/min
425
425
425
Average injection quantity
mm3/st.
13.5
10.3
16.7
Max. variation between cylinders
%
0
-15
15
Fixing the rack
*
Boost pressure
kPa
0
0
0
Boost pressure
mmHg
0
0
0
Remarks
Adjust only variation between cylinders; adjust governor according to governor specifications.
Adjust only variation between cylinders; adjust governor according to governor specifications.
Injection quantity adjustment_03
Adjusting point
E
Rack position
11++
Pump speed
r/min
100
100
100
Average injection quantity
mm3/st.
110
100
120
Fixing the lever
*
Boost pressure
kPa
0
0
0
Boost pressure
mmHg
0
0
0
Rack limit
*
Boost compensator adjustment
Pump speed
r/min
500
500
500
Rack position
R1-1.4
Boost pressure
kPa
40
36
44
Boost pressure
mmHg
300
270
330
Boost compensator adjustment_02
Pump speed
r/min
500
500
500
Rack position
R1(10.8)
Boost pressure
kPa
100
93.3
106.7
Boost pressure
mmHg
750
700
800
Timer adjustment
Pump speed
r/min
1200++
Advance angle
deg.
0
0
0
Remarks
Do not advance until starting N = 1200.
Do not advance until starting N = 1200.
Timer adjustment_02
Pump speed
r/min
-
Advance angle
deg.
0.7
0.7
0.7
Remarks
Measure the actual speed, stop
Measure the actual speed, stop
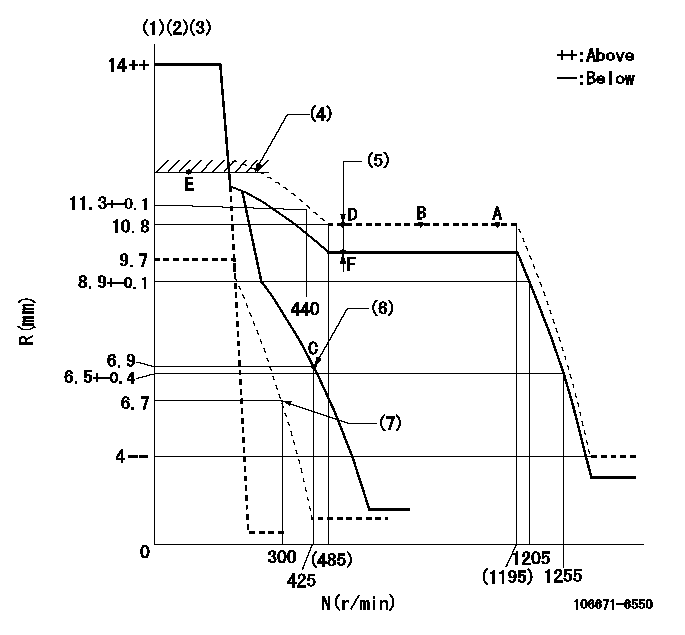
Test data Ex:
Governor adjustment

N:Pump speed
R:Rack position (mm)
(1)Target notch: K
(2)Tolerance for racks not indicated: +-0.05mm.
(3)Deliver with positive torque control spring not operating
(4)RACK LIMIT
(5)Boost compensator stroke: BCL
(6)Main spring setting
(7)Set idle sub-spring
----------
K=10 BCL=1.4+-0.1mm
----------
----------
K=10 BCL=1.4+-0.1mm
----------
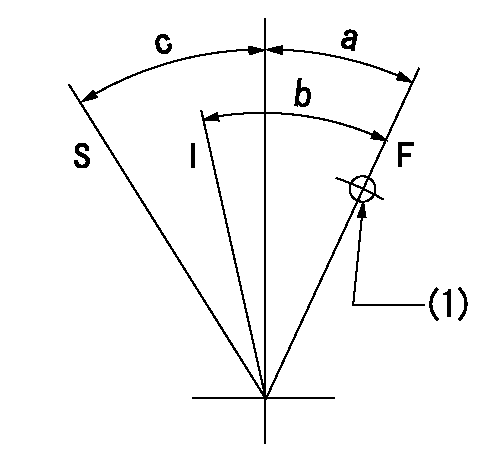
Speed control lever angle

F:Full speed
I:Idle
S:Stop
(1)Use the hole at R = aa
----------
aa=70mm
----------
a=9deg+-5deg b=26deg+-5deg c=31deg+-3deg
----------
aa=70mm
----------
a=9deg+-5deg b=26deg+-5deg c=31deg+-3deg
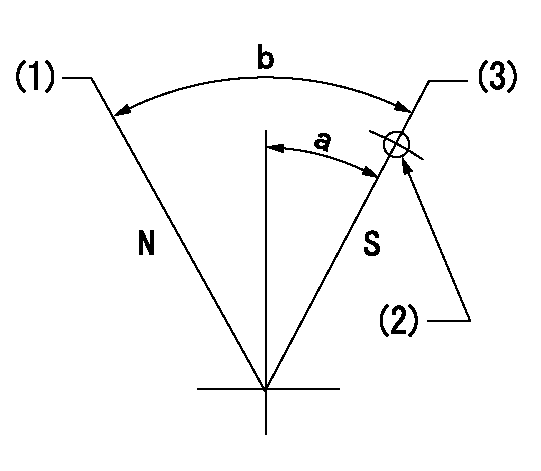
Stop lever angle

N:Pump normal
S:Stop the pump.
(1)Normal
(2)Use the hole at R = aa
(3)Rack position bb, pump speed cc (seal at delivery)
----------
aa=23mm bb=1-0.5mm cc=0r/min
----------
a=15deg+-5deg b=70deg+-5deg
----------
aa=23mm bb=1-0.5mm cc=0r/min
----------
a=15deg+-5deg b=70deg+-5deg
0000001501 TAMPER PROOF

Tamperproofing-equipped boost compensator cover installation procedure
(A) After adjusting the boost compensator, tighten the bolts to remove the heads.
(1)Before adjusting the governor and the boost compensator, tighten the screw to the specified torque.
(Tightening torque T = T1 maximum)
(2)After adjusting the governor and the boost compensator, tighten to the specified torque to break off the bolt heads.
(Tightening torque T = T2)
----------
T1=2.5N-m(0.25kgf-m) T2=2.9~4.4N-m(0.3~0.45kgf-m)
----------
----------
T1=2.5N-m(0.25kgf-m) T2=2.9~4.4N-m(0.3~0.45kgf-m)
----------
Timing setting

(1)Pump vertical direction
(2)Position of timer's threaded installation hole at No 1 cylinder's beginning of injection
(3)B.T.D.C.: aa
(4)-
----------
aa=7deg
----------
a=(50deg)
----------
aa=7deg
----------
a=(50deg)
Information:
Indicator Lamps
The MECP indicator lamps provide the following status information:
"SUMMARY SHUTDOWN"
"SUMMARY ALARM"
"PLC FAILURE"
"ENGINE PRELUBE"The lamps activate when the "HORN SILENCE/LAMP TEST" switch is placed in the LAMP TEST.
Illustration 5 g00562727
"SUMMARY SHUTDOWN" Indicator Lamp
The "SUMMARY SHUTDOWN" lamp displays the status of the engine protection shutdown system.A red "SUMMARY SHUTDOWN" lamp indicates that a engine protection shutdown has occurred. The exact shutdown is annunciated on the PC window. A flashing "SUMMARY SHUTDOWN" lamp indicates an shutdown that is not acknowledged. A solid "SUMMARY SHUTDOWN" lamp indicates that the shutdown has been acknowledged.The cause of the shutdown is provided by the display screen. To acknowledge the indicator, turn the "HORN SILENCE/LAMP TEST" switch to the "HORN SILENCE" position. Correct the condition before restarting the engine. The control panel must be reset before the engine can be restarted. To reset the control panel, turn the "OFF/RESET, LOCAL, and REMOTE" switch to the "OFF/RESET" position. The air shutoff is activated for any shutdown. The air shutoff must also be reset before the engine can be restarted. If an overspeed shutdown occurs, the Engine Speed Switch must also be reset.Note: When a shutdown occurs the air damper closes. This secures the intake air. The air damper must be reset in order to start the engine. "SUMMARY ALARM" Indicator Lamp
The "SUMMARY ALARM" lamp provides a summary of the active MMS alarms. A red "SUMMARY ALARM" lamp indicates an alarm condition. Specific information on the alarm is provided on the PC window. A flashing "SUMMARY ALARM" lamp indicates an alarm that has not been acknowledged. A solid "SUMMARY ALARM" lamp indicates that the alarm has been acknowledged. The lamp will remain illuminated until the alarm condition is resolved."PLC FAILURE" Indicator Lamp
The "PLC FAILURE" lamp provides status of the PLC timer.The programmable logic control regularly sends a signal to a timer. If the timer fails to receive the signal, the yellow "PLC FAILURE" lamp illuminates. This indicates that the programmable logic control may not be providing full protection for the engine. Running the engine during abnormal conditions may cause engine damage.In the event of a PLC failure, the redundant relay logic shutdown system will provide minimum protection. The PLC failure should be corrected as soon as possible. While the "PLC FAILURE" lamp is illuminated the PC display may not be correct. Use the backup gauges for accurate information. If the programmable logic control is inoperative, the redundant shutdown system will provide minimum protection.PLC failure may be caused by the mode. Loss of the 24 Volt DC power may also cause a PLC failure. The system must be in the run mode.The "PLC FAILURE" lamp is illuminated and the "SUMMARY ALARM" lamp is flashing. Wait for five seconds. Count the number of flashes. The number of flashes corresponds to the slot that contains a faulty module."ENGINE PRELUBE" Indicator Lamp
The "ENGINE PRELUBE" lamp provides the status of engine lubrication.A green "ENGINE PRELUBE" lamp indicates that the engine is prelubed and that the engine is ready to start. Place the "PRELUBE-RUN-START"