Information injection-pump assembly
BOSCH
9 400 616 731
9400616731
ZEXEL
106671-1832
1066711832
ISUZU
1156028511
1156028511
Rating:
Service parts 106671-1832 INJECTION-PUMP ASSEMBLY:
1.
_
7.
COUPLING PLATE
8.
_
9.
_
11.
Nozzle and Holder
1-15300-303-2
12.
Open Pre:MPa(Kqf/cm2)
19.6{200}
15.
NOZZLE SET
Include in #1:
106671-1832
as INJECTION-PUMP ASSEMBLY
Cross reference number
BOSCH
9 400 616 731
9400616731
ZEXEL
106671-1832
1066711832
ISUZU
1156028511
1156028511
Zexel num
Bosch num
Firm num
Name
9 400 616 731
1156028511 ISUZU
INJECTION-PUMP ASSEMBLY
6RB1-MTC K 14CA INJECTION PUMP ASSY PE6P,6PD PE
6RB1-MTC K 14CA INJECTION PUMP ASSY PE6P,6PD PE
Calibration Data:
Adjustment conditions
Test oil
1404 Test oil ISO4113 or {SAEJ967d}
1404 Test oil ISO4113 or {SAEJ967d}
Test oil temperature
degC
40
40
45
Nozzle and nozzle holder
105780-8130
Bosch type code
EFEP215A
Nozzle
105780-0050
Bosch type code
DN6TD119NP1T
Nozzle holder
105780-2090
Bosch type code
EFEP215
Opening pressure
MPa
17.2
Opening pressure
kgf/cm2
175
Injection pipe
Outer diameter - inner diameter - length (mm) mm 8-3-600
Outer diameter - inner diameter - length (mm) mm 8-3-600
Overflow valve
134424-3920
Overflow valve opening pressure
kPa
127
107
147
Overflow valve opening pressure
kgf/cm2
1.3
1.1
1.5
Tester oil delivery pressure
kPa
157
157
157
Tester oil delivery pressure
kgf/cm2
1.6
1.6
1.6
Direction of rotation (viewed from drive side)
Right R
Right R
Injection timing adjustment
Direction of rotation (viewed from drive side)
Right R
Right R
Injection order
1-4-2-6-
3-5
Pre-stroke
mm
4.2
4.15
4.25
Beginning of injection position
Drive side NO.1
Drive side NO.1
Difference between angles 1
Cal 1-4 deg. 60 59.5 60.5
Cal 1-4 deg. 60 59.5 60.5
Difference between angles 2
Cyl.1-2 deg. 120 119.5 120.5
Cyl.1-2 deg. 120 119.5 120.5
Difference between angles 3
Cal 1-6 deg. 180 179.5 180.5
Cal 1-6 deg. 180 179.5 180.5
Difference between angles 4
Cal 1-3 deg. 240 239.5 240.5
Cal 1-3 deg. 240 239.5 240.5
Difference between angles 5
Cal 1-5 deg. 300 299.5 300.5
Cal 1-5 deg. 300 299.5 300.5
Injection quantity adjustment
Adjusting point
A
Rack position
11.5
Pump speed
r/min
1000
1000
1000
Average injection quantity
mm3/st.
412
409
415
Max. variation between cylinders
%
0
-3
3
Basic
*
Fixing the lever
*
Boost pressure
kPa
140
140
Boost pressure
mmHg
1050
1050
Injection quantity adjustment_02
Adjusting point
-
Rack position
4.5
Pump speed
r/min
305
305
305
Average injection quantity
mm3/st.
15.5
12.3
18.7
Max. variation between cylinders
%
0
-13
13
Fixing the rack
*
Boost pressure
kPa
0
0
0
Boost pressure
mmHg
0
0
0
Remarks
Adjust only variation between cylinders; adjust governor according to governor specifications.
Adjust only variation between cylinders; adjust governor according to governor specifications.
Injection quantity adjustment_03
Adjusting point
C
Rack position
7.9
Pump speed
r/min
500
500
500
Average injection quantity
mm3/st.
207
201
213
Fixing the lever
*
Boost pressure
kPa
0
0
0
Boost pressure
mmHg
0
0
0
Boost compensator adjustment
Pump speed
r/min
500
500
500
Rack position
7.9
Boost pressure
kPa
22
20.7
23.3
Boost pressure
mmHg
165
155
175
Boost compensator adjustment_02
Pump speed
r/min
500
500
500
Rack position
(11.5)
Boost pressure
kPa
126.6
126.6
126.6
Boost pressure
mmHg
950
950
950
Timer adjustment
Pump speed
r/min
1050++
Advance angle
deg.
0
0
0
Remarks
Do not advance until starting N = 1050.
Do not advance until starting N = 1050.
Timer adjustment_02
Pump speed
r/min
-
Advance angle
deg.
1
1
1
Remarks
Measure the actual speed, stop
Measure the actual speed, stop
Test data Ex:
Governor adjustment

N:Pump speed
R:Rack position (mm)
(1)Lever ratio: RT
(2)Target shim dimension: TH
(3)Tolerance for racks not indicated: +-0.05mm.
(4)Boost compensator excessive fuel lever setting: L1 (at boost pressure 0)
(5)Boost compensator stroke: BCL
(6)Set idle sub-spring
(7)Main spring setting
----------
RT=1 TH=2.5mm L1=12.5+-0.1mm BCL=(3.6)+-0.1mm
----------
----------
RT=1 TH=2.5mm L1=12.5+-0.1mm BCL=(3.6)+-0.1mm
----------
Speed control lever angle
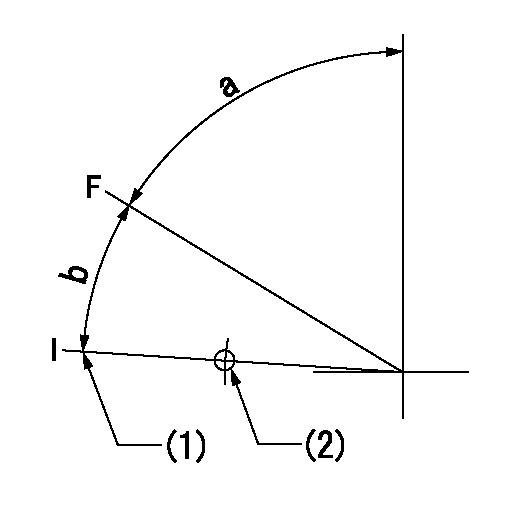
F:Full speed
I:Idle
(1)Use the hole at R = aa
(2)Stopper bolt setting
----------
aa=85.1mm
----------
a=68deg+-5deg b=14deg+-5deg
----------
aa=85.1mm
----------
a=68deg+-5deg b=14deg+-5deg
0000000901
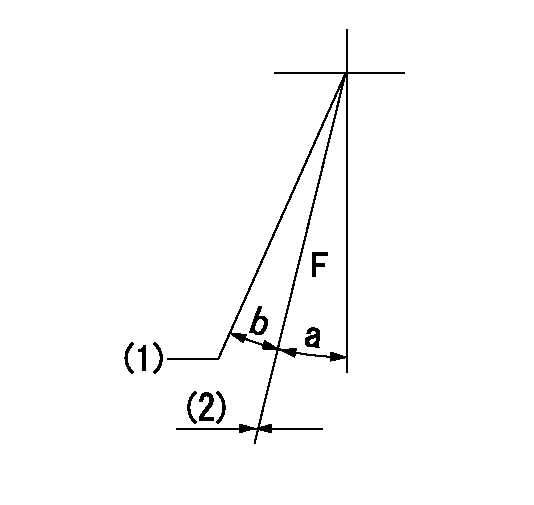
F:Full load
(1)Set the tamper proofing.
(2)Fix using the stopper bolt (seal at shipping).
----------
----------
a=16deg+-5deg b=(2.5deg)
----------
----------
a=16deg+-5deg b=(2.5deg)
Stop lever angle
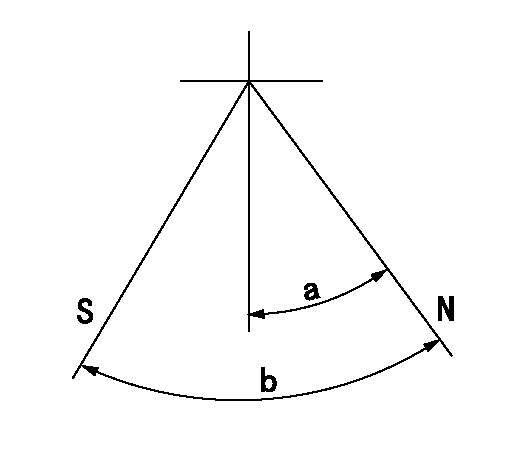
N:Pump normal
S:Stop the pump.
----------
----------
a=32deg+-5deg b=64deg+-5deg
----------
----------
a=32deg+-5deg b=64deg+-5deg
0000001101
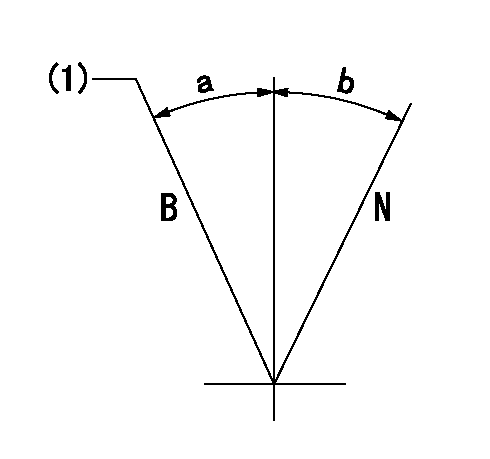
N:Normal
B:When boosted
(1)Rack position = aa at boost pressure 0.
----------
aa=12.5+-0.1mm
----------
a=(15deg) b=(15deg)
----------
aa=12.5+-0.1mm
----------
a=(15deg) b=(15deg)
0000001501 TAMPER PROOF
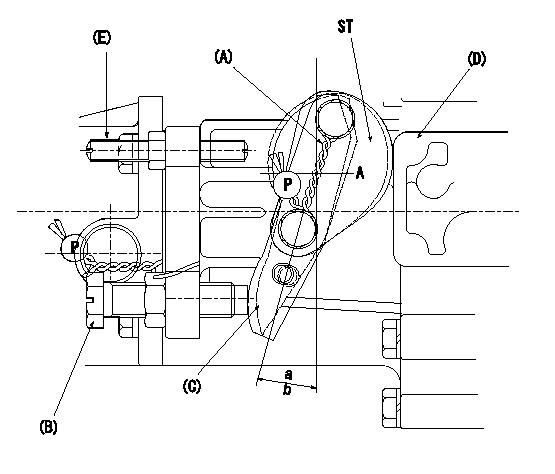
(A): sealing wire
(B): full load stopper bolt
(C): load lever
(D): governor cover boss
(E): tamper lever installation bolt
ST:Sealing
a, b: load lever angle
1. Method for setting tamperproof proofing
(1)After completing governor adjustment, install lever marked A when the load lever (C)'s angle is equal to or greater than a but less than b, and lever marked B when angle is equal to or greater than c but equal to or less than d (as shown in figure).
Sealing A: PN1
Sealing B: PN2
(2)At R1 and N1 loosen bolt B until the lever installed in (1) contacts the governor cover boss.
(3)Confirm that the rack position at this time is R = R2 or less.
(4)After this, readjust the full rack position using the load lever C.
(5)Seal bolt E.
----------
a=11deg b=16deg c=16deg d=21deg PN1=154386-3300 PN2=154386-3400 R1=L R2=(2)mm N1=1400r/min
----------
----------
a=11deg b=16deg c=16deg d=21deg PN1=154386-3300 PN2=154386-3400 R1=L R2=(2)mm N1=1400r/min
----------
Timing setting
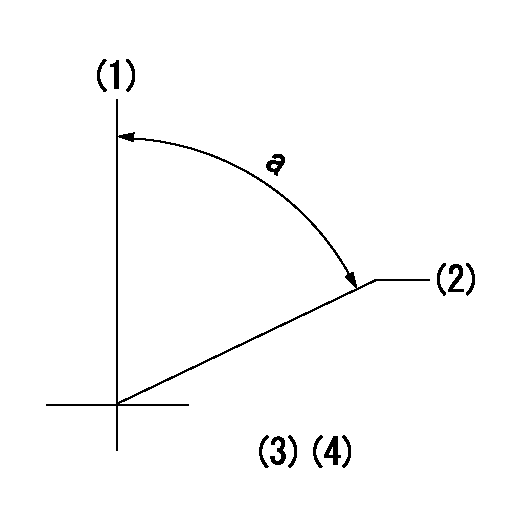
(1)Pump vertical direction
(2)Position of timer's threaded hole at No 1 cylinder's beginning of injection
(3)B.T.D.C.: aa
(4)-
----------
aa=15deg
----------
a=(70deg)
----------
aa=15deg
----------
a=(70deg)
Information:
Stand By:a. remove engineb. remove timing gear coverc. remove flywheel housingd. remove pistons and connecting rods
Keep all parts clean from contaminants. Contaminants put into the system may cause rapid wear and shortened component life.
1. Turn the crankshaft until the timing mark (C) on the crankshaft gear (1) is in alignment with the timing mark (C) on camshaft gear (2).2. Make a mark on the teeth of the fuel pump drive gear and the idler gear in their engaged position at location (X). Make a mark on the engaged teeth of idler gear and camshaft gear at location (Y). This will give assistance in the correct timing of the camshaft for the fuel injection pump during crankshaft installation. 3. Fasten a hoist to the crankshaft.4. Remove the caps for the main bearings.5. Remove the crankshaft. Weight of the crankshaft is 95 kg (210 lb.).6. Remove the main bearings from the main bearing caps. Remove the crankshaft main bearings from the cylinder block. 7. Use tool (A) to remove the crankshaft gear and the oil seal wear sleeve.Install Crankshaft
Install the bearings dry when the clearance checks are made. Put clean engine oil on the main bearings for final assembly.
Make sure the upper and lower halves of the main bearings are installed so the bearing tabs fit into the notch in the cylinder block and main bearing caps.
1. Clean the bearing surfaces in the cylinder block. Install the upper halves of the main bearings in the block.2. Heat the crankshaft gear to a maximum temperature of 315° C (600° F). Install the gear on the crankshaft. Fasten a hoist to the crankshaft and put the crankshaft in position in the cylinder block with all timing marks in alignment.3. Clean the bearing surfaces of the main bearing caps. Install the lower halves of the main bearings in the caps. When the bearing clearance is checked and the engine is in a vertical position, such as in the vehicle, the crankshaft will have to be lifted up and held against the upper halves of the main bearings to get a correct measurement with the Plastigage. The Plastigage will not hold the weight of the crankshaft and give a correct indication. If the engine is in a horizontal position, it is not necessary to hold the crankshaft up. Do not turn the crankshaft when the Plastigage is in position to check clearances. 4. Check the main bearing clearances with Plastigage (B) as follows:a. Put a piece of Plastigage (B) in position as shown.
Make sure the part number on the main bearing cap is toward the front of the engine and the number on the main bearing cap is the same as the number on the cylinder block on the left side of each main bearing cap.
Do not turn the crankshaft when Plastigage (B) is in position.b. Install the main bearing caps. Put 2P2506 Thread Lubricant on the bolt threads and the face of the washers and install the bolts. Tighten the bolts to a