Information injection-pump assembly
ZEXEL
106671-0131
1066710131
Rating:
Cross reference number
ZEXEL
106671-0131
1066710131
Zexel num
Bosch num
Firm num
Name
106671-0131
INJECTION-PUMP ASSEMBLY
Calibration Data:
Adjustment conditions
Test oil
1404 Test oil ISO4113 or {SAEJ967d}
1404 Test oil ISO4113 or {SAEJ967d}
Test oil temperature
degC
40
40
45
Nozzle and nozzle holder
105780-8140
Bosch type code
EF8511/9A
Nozzle
105780-0000
Bosch type code
DN12SD12T
Nozzle holder
105780-2080
Bosch type code
EF8511/9
Opening pressure
MPa
17.2
Opening pressure
kgf/cm2
175
Injection pipe
Outer diameter - inner diameter - length (mm) mm 8-3-600
Outer diameter - inner diameter - length (mm) mm 8-3-600
Overflow valve opening pressure
kPa
157
123
191
Overflow valve opening pressure
kgf/cm2
1.6
1.25
1.95
Tester oil delivery pressure
kPa
157
157
157
Tester oil delivery pressure
kgf/cm2
1.6
1.6
1.6
Direction of rotation (viewed from drive side)
Right R
Right R
Injection timing adjustment
Direction of rotation (viewed from drive side)
Right R
Right R
Injection order
1-4-2-6-
3-5
Pre-stroke
mm
3.65
3.6
3.7
Beginning of injection position
Drive side NO.1
Drive side NO.1
Difference between angles 1
Cal 1-4 deg. 60 59.5 60.5
Cal 1-4 deg. 60 59.5 60.5
Difference between angles 2
Cyl.1-2 deg. 120 119.5 120.5
Cyl.1-2 deg. 120 119.5 120.5
Difference between angles 3
Cal 1-6 deg. 180 179.5 180.5
Cal 1-6 deg. 180 179.5 180.5
Difference between angles 4
Cal 1-3 deg. 240 239.5 240.5
Cal 1-3 deg. 240 239.5 240.5
Difference between angles 5
Cal 1-5 deg. 300 299.5 300.5
Cal 1-5 deg. 300 299.5 300.5
Injection quantity adjustment
Adjusting point
A
Rack position
R2(11.5)
Pump speed
r/min
1100
1100
1100
Average injection quantity
mm3/st.
153.8
149.8
157.8
Max. variation between cylinders
%
0
-5
5
Fixing the lever
*
Boost pressure
kPa
30.7
30.7
Boost pressure
mmHg
230
230
Injection quantity adjustment_02
Adjusting point
B
Rack position
11.8
Pump speed
r/min
600
600
600
Average injection quantity
mm3/st.
161.7
159.7
163.7
Max. variation between cylinders
%
0
-4
4
Basic
*
Fixing the lever
*
Boost pressure
kPa
30.7
30.7
Boost pressure
mmHg
230
230
Injection quantity adjustment_03
Adjusting point
C
Rack position
7.4+-0.5
Pump speed
r/min
225
225
225
Average injection quantity
mm3/st.
10.1
9.1
11.1
Max. variation between cylinders
%
0
-10
10
Fixing the rack
*
Boost pressure
kPa
0
0
0
Boost pressure
mmHg
0
0
0
Injection quantity adjustment_04
Adjusting point
D
Rack position
R1(10.7)
Pump speed
r/min
300
300
300
Average injection quantity
mm3/st.
120.6
118.6
122.6
Fixing the lever
*
Boost pressure
kPa
0
0
0
Boost pressure
mmHg
0
0
0
Injection quantity adjustment_05
Adjusting point
E
Rack position
12.3
Pump speed
r/min
300
300
300
Average injection quantity
mm3/st.
171.1
166.1
176.1
Fixing the lever
*
Rack limit
*
Boost compensator adjustment
Pump speed
r/min
300
300
300
Rack position
R1(10.7)
Boost pressure
kPa
4
Boost pressure
mmHg
30
Boost compensator adjustment_02
Pump speed
r/min
300
300
300
Rack position
12.3
Boost pressure
kPa
17.3
17.3
17.3
Boost pressure
mmHg
130
130
130
Test data Ex:
Governor adjustment
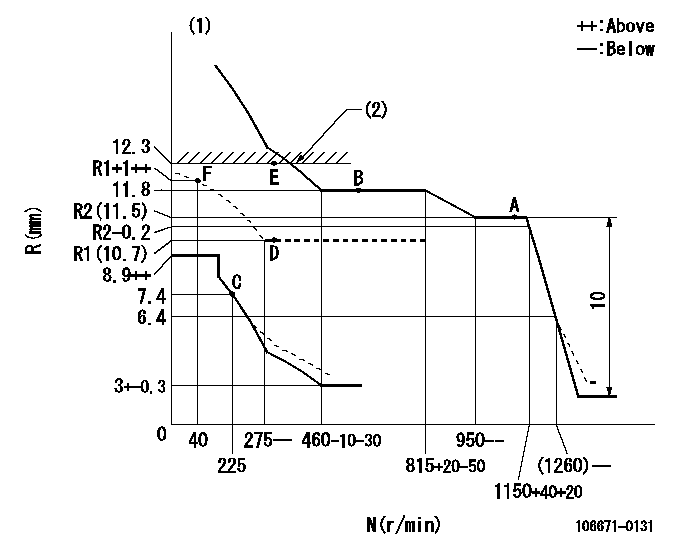
N:Pump speed
R:Rack position (mm)
(1)Damper spring setting: DL
(2)Rack limit using stop lever
----------
DL=6.4-0.2mm
----------
----------
DL=6.4-0.2mm
----------
Timer adjustment
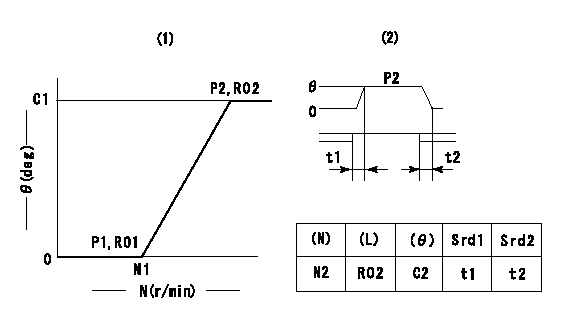
(1)Adjusting range
(2)Step response time
(N): Speed of the pump
(L): Load
(theta) Advance angle
(Srd1) Step response time 1
(Srd2) Step response time 2
1. Adjusting conditions for the variable timer
(1)Adjust the clearance between the pickup and the protrusion to L.
----------
L=1-0.2mm N2=800r/min C2=(6.5)deg t1=2--sec. t2=2--sec.
----------
N1=1250++r/min P1=0kPa(0kgf/cm2) P2=392kPa(4kgf/cm2) C1=6.5+-0.5deg R01=0/4load R02=4/4load
----------
L=1-0.2mm N2=800r/min C2=(6.5)deg t1=2--sec. t2=2--sec.
----------
N1=1250++r/min P1=0kPa(0kgf/cm2) P2=392kPa(4kgf/cm2) C1=6.5+-0.5deg R01=0/4load R02=4/4load
Speed control lever angle

F:Full speed
----------
----------
a=31deg+-5deg
----------
----------
a=31deg+-5deg
0000000901
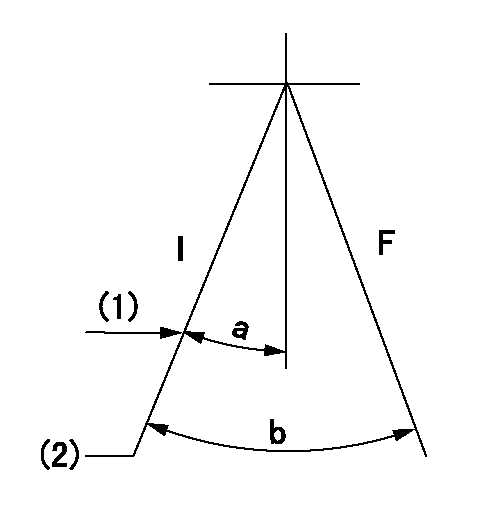
F:Full load
I:Idle
(1)Stopper bolt setting
(2)At center of threaded hole above R = aa
----------
aa=17mm
----------
a=22deg+-5deg b=32.5deg+-3deg
----------
aa=17mm
----------
a=22deg+-5deg b=32.5deg+-3deg
Stop lever angle
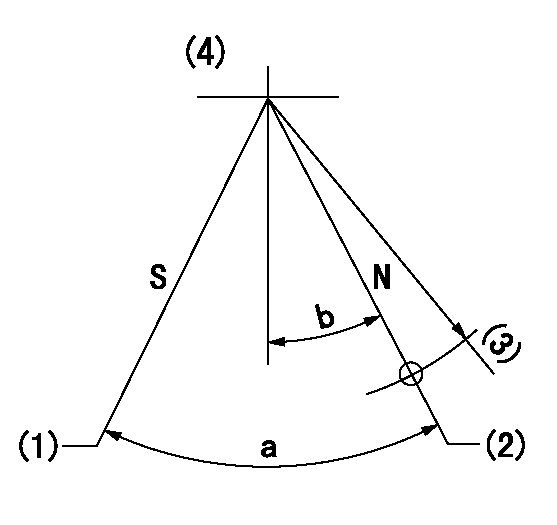
N:Pump normal
S:Stop the pump.
(1)Rack position = aa
(2)Rack position bb
(3)R = cc
(4)Adjust after setting excess fuel lever.
----------
aa=1+0.5mm bb=12.3mm cc=50mm
----------
a=32.5deg+-5deg b=19.5deg+-5deg
----------
aa=1+0.5mm bb=12.3mm cc=50mm
----------
a=32.5deg+-5deg b=19.5deg+-5deg
0000001101
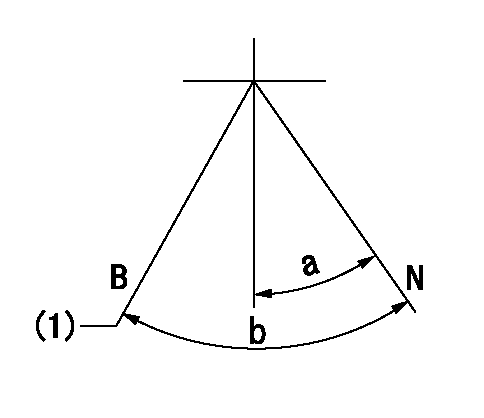
N:Normal
B:When boosted
(1)Rack position = aa
----------
aa=13mm
----------
a=(18deg) b=(32deg)
----------
aa=13mm
----------
a=(18deg) b=(32deg)
0000001501 RACK SENSOR

V1:Supply voltage
V2f:Full side output voltage
V2i:Idle side output voltage
(A) Black
(B) Yellow
(C) Red
(D) Trimmer
(E): Shaft
(F) Nut
(G) Load lever
1. Load sensor adjustment
(1)Connect as shown in the above diagram and apply supply voltage V1.
(2)Hold the load lever (G) against the full side.
(3)Turn the shaft so that the voltage between (A) and (B) is V2.
(4)Hold the load lever (G) against the idle side.
(5)Adjust (D) so that the voltage between (A) and (B) is V2i.
(6)Repeat the above adjustments.
(7)Tighten the nut (F) at the point satisfying the standards.
(8)Hold the load lever against the full side stopper and the idle side stopper.
(9)At this time, confirm that the full side output voltage is V2f and the idle side output voltage is V2i.
----------
V1= 5+-0.02V V2f=0.3+0.03V V2i=2.2-0.03V
----------
----------
V1= 5+-0.02V V2f=0.3+0.03V V2i=2.2-0.03V
----------
Timing setting
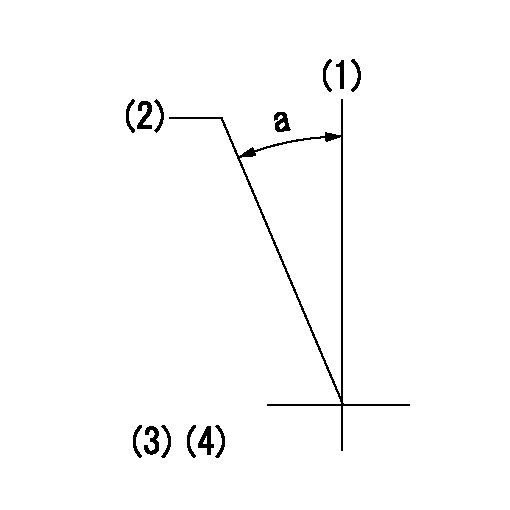
(1)Pump vertical direction
(2)Coupling's key groove position at No 1 cylinder's beginning of injection
(3)-
(4)-
----------
----------
a=(20deg)
----------
----------
a=(20deg)
Information:
ACTION REQUIRED
See the attached Rework Procedure.
OWNER NOTIFICATION
U.S. and Canadian owners will receive the attached Owner Notification.
SERVICE CLAIM ALLOWANCES
Service Claim Allowances for Inspection
Caterpillar Dealer Suggested Customer Suggested
Parts Labor Hrs. Parts Labor Hrs. Parts Labor Hrs.
0 1 0 0 0 0
Service Claim Allowances for Replacement of the Filter Housing (if required)
Parts Labor Hrs. Parts Labor Hrs. Parts Labor Hrs.
100% 1 0 0 0 0
Note: This is a 2-hour job if replacement is necessary.
PARTS DISPOSITION
Handle the parts in accordance with your Warranty Bulletin on warranty parts handling.
MAKE EVERY EFFORT TO COMPLETE THIS PROGRAM AS SOON AS POSSIBLE.
Attach. (1-Owner Notification)
(2-Rework Procedure)
COPY OF OWNER NOTIFICATION FOR U.S. AND CANADIAN OWNERS
XYZ Corporation
3240 Arrow Drive
Anywhere, YZ 99999
Safety - THE SPIN ON FUEL FILTER BASE NEEDS TO BE INSPECTED
MODELS INVOLVED - CERTAIN 3508, 3508B, 3512, 3512B, 3516, 3516B DIESEL STANDBY ENGINES
Dear Caterpillar Product Owner:
The spin-on fuel filter base needs to be inspected on the products listed below. The stud height may be incorrect which can cause the spin-on fuel filter to blow off of the filter base and result in a fuel leakage hazard. You will not be charged for the service performed.
Contact your local Caterpillar dealer immediately to schedule this service. The dealer will advise you of the time required to complete this service. Please refer the dealer to their Service Letter dated November 23, 2000 when scheduling this service.
We regret the inconvenience this may cause you, but urge you to have this service performed for your added safety and satisfaction.
Caterpillar Inc.
Identification #(s)
Attached to November 23, 2000 Service Letter
Rework Procedure
Verification of Stud Height
Shut off the fuel supply to the engine.
Before removing the fuel filter, have a container ready to catch the fuel that will drain from the fuel system.
Remove the "Spin On" Fuel Filter. A filter wrench may be required.
Keep the fuel filter as it will be required for re-installation.
Measure the threaded nipple from the flat surface on the bottom of the filter base to the end of the nipple. See Illustration #1
Illustration #1
Check the stud height measurement from step #5 with Table #1
Table #1 - Stud Height Measurement
Acceptable Unacceptable
Stud Height 23.3 mm & up Less than 23.3 mm
If the stud height is falls in the "Unacceptable" Range, the fuel filter base must be replaced. See fuel filter base replacement instructions.
If the stud height is falls in the "Acceptable" range, the fuel filter should be reinstalled.
Return fuel flow to the engine.
Start the engine and check for leaks.
Replacement of 1N3789 Fuel Filter Base
Remove the fuel priming pump or cover from the base.
Loosen the fuel lines flowing into and out of the filter base.
Remove the fuel line adapters and the sensor (or plug) from the filter base before removing the filter base from the engine.
Remove the two mounts bolts, nuts and washers that mount the filter base. The filter base can then be removed.
Install a new 1N3789 Fuel Filter Base. Using the existing bolts, nuts and washers.
Note: The old 1N3789 Fuel Filter Base is not repairable and must be scrapped.
Reinstall the fuel line adapters and the sensor (or plug) with a new 3J1907 (adapters) and 6V5048 (sensor/plug) O-ring seals.
Reinstall the fuel lines.
Re-install the fuel priming pump or cover with new 9Y8589 and 9Y6094
Have questions with 106671-0131?
Group cross 106671-0131 ZEXEL
Nissan-Diesel
Nissan-Diesel
Nissan-Diesel
106671-0131
INJECTION-PUMP ASSEMBLY