Information injection-pump assembly
BOSCH
9 400 610 832
9400610832
ZEXEL
106662-4271
1066624271

Rating:
Service parts 106662-4271 INJECTION-PUMP ASSEMBLY:
1.
_
5.
AUTOM. ADVANCE MECHANIS
6.
COUPLING PLATE
7.
COUPLING PLATE
8.
_
9.
_
11.
Nozzle and Holder
6221-13-3400
12.
Open Pre:MPa(Kqf/cm2)
24.0{245}
15.
NOZZLE SET
Include in #1:
106662-4271
as INJECTION-PUMP ASSEMBLY
Cross reference number
BOSCH
9 400 610 832
9400610832
ZEXEL
106662-4271
1066624271
Zexel num
Bosch num
Firm num
Name
Calibration Data:
Adjustment conditions
Test oil
1404 Test oil ISO4113 or {SAEJ967d}
1404 Test oil ISO4113 or {SAEJ967d}
Test oil temperature
degC
40
40
45
Nozzle and nozzle holder
105780-8140
Bosch type code
EF8511/9A
Nozzle
105780-0000
Bosch type code
DN12SD12T
Nozzle holder
105780-2080
Bosch type code
EF8511/9
Opening pressure
MPa
17.2
Opening pressure
kgf/cm2
175
Injection pipe
Outer diameter - inner diameter - length (mm) mm 8-3-600
Outer diameter - inner diameter - length (mm) mm 8-3-600
Overflow valve
131425-1520
Overflow valve opening pressure
kPa
255
221
289
Overflow valve opening pressure
kgf/cm2
2.6
2.25
2.95
Tester oil delivery pressure
kPa
157
157
157
Tester oil delivery pressure
kgf/cm2
1.6
1.6
1.6
RED3 control unit part number
407910-2
470
RED3 rack sensor specifications
mm
15
Direction of rotation (viewed from drive side)
Right R
Right R
Injection timing adjustment
Direction of rotation (viewed from drive side)
Right R
Right R
Injection order
1-5-3-6-
2-4
Pre-stroke
mm
3.9
3.85
3.95
Beginning of injection position
Drive side NO.1
Drive side NO.1
Difference between angles 1
Cal 1-5 deg. 60 59.5 60.5
Cal 1-5 deg. 60 59.5 60.5
Difference between angles 2
Cal 1-3 deg. 120 119.5 120.5
Cal 1-3 deg. 120 119.5 120.5
Difference between angles 3
Cal 1-6 deg. 180 179.5 180.5
Cal 1-6 deg. 180 179.5 180.5
Difference between angles 4
Cyl.1-2 deg. 240 239.5 240.5
Cyl.1-2 deg. 240 239.5 240.5
Difference between angles 5
Cal 1-4 deg. 300 299.5 300.5
Cal 1-4 deg. 300 299.5 300.5
Injection quantity adjustment
Rack position
(12)
Vist
V
1.6
1.6
1.6
Pump speed
r/min
1100
1100
1100
Average injection quantity
mm3/st.
118.5
117
120
Max. variation between cylinders
%
0
-3
3
Basic
*
Injection quantity adjustment_02
Rack position
(6.8)
Vist
V
2.6
2.5
2.7
Pump speed
r/min
425
425
425
Average injection quantity
mm3/st.
16
14.8
17.2
Max. variation between cylinders
%
0
-15
15
Injection quantity adjustment_03
Remarks
Rack limit setting V = 0.9-0.04
Rack limit setting V = 0.9-0.04
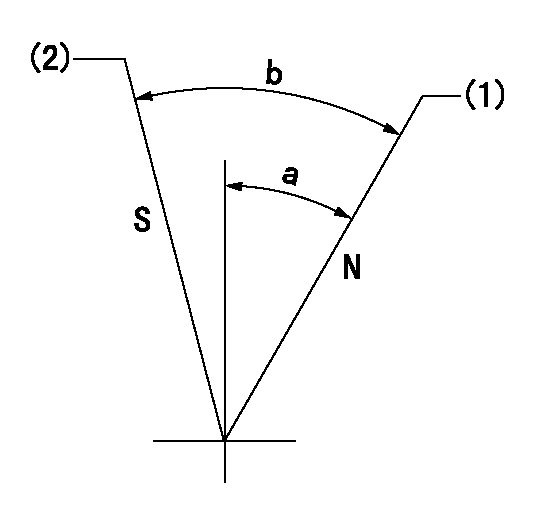
Test data Ex:
Speed control lever angle

N:Pump normal
S:Stop the pump.
(1)Vist = aa, (rack position = bb)
(2)Rack position = cc
----------
aa=0.8V bb=16mm cc=1mm
----------
a=19deg+-5deg b=29deg+-5deg
----------
aa=0.8V bb=16mm cc=1mm
----------
a=19deg+-5deg b=29deg+-5deg
0000000901

(1)Pump vertical direction
(2)Position of camshaft's key groove at No 1 cylinder's beginning of injection
(3)B.T.D.C.: aa
(4)-
----------
aa=17deg
----------
a=(50deg)
----------
aa=17deg
----------
a=(50deg)
Stop lever angle

(Rs) rack sensor specifications
(C/U) control unit part number
(V) Rack sensor output voltage
(R) Rack position (mm)
1. Confirming governor output characteristics (rack 15 mm, span 6 mm)
(1)When the output voltages of the rack sensor are V1 and V2, check that the rack positions R1 and R2 in the table above are satisfied.
----------
----------
----------
----------
Information:
Problem
A failed sleeve or sleeve to head joint 3176 Truck Engines may cause fuel dilution of the cooling system, coolant entry into the injector cavity, or coolant entry into the cylinder.
Affected Product
Mode & Identification Number
3176 (2YG4902-9368*)
*If not previously reworked and stamped with "3S" next to Serial No. PlateParts Needed
4 - 7C2597 Gasket (water lines)5 - 8C3684 Antifreeze (gal) (if contaminated with fuel)6 - 3H2388 seal-O ring (spacer to head)6 - 4P7135 sleeve6 - 5P8066 O-ring (upper injector)1 - 1S7057 Gasket (turbo oil supply)1 - 7W2398 Gasket (turbo drain)6 - 9X7722 O-ring (lower injector)1 - 9Y7044 Gasket-Cylinder Head (only if head needs removal)Action Required
1. When it is necessary to replace a sleeve due to failure of the sleeve or the sleeve to head joint:a) Check for 3S stamped on the block next to the serial number plate. If block is stamped with 3S, change only the failed sleeve using 4P7135 sleeves. The 4C6730 Roller Expander and 4C6714 Swage must be used to install the new sleeves. See Special Instruction SEHS9246. Failure on engines marked 3S should be filed as normal warranty.b) If block is not stamped 3S replace all six sleeves using 4P7135 sleeves. The 4C6730 Roller Expander and 4C6714 Swage must be used to install the new sleeves. See Special Instruction SEHS9246.2. Ream all sleeves and check injector sleeve seating surface in head. Install the injector and check for good seat using blue dykem.3. Stamp 3S in the block next to the serial number plate after work is complete.Engine Disassembly
Cylinder Head Removal - It is possible to replace the sleeves without removing the cylinder head. See Special Instruction SEHS9246. However, in some applications it may be more efficient to remove the head. This decision is left to the dealer. Reason to remove the head must be explained in the claim story.
Off Engine Test
Test electronic unit injectors for leaks and VOP on test bench if milage is less than 150,000 mi. Replace as necessary.
Engine Assembly
1) Pressurize the cooling system to 15 psi. Look for leakage in and around sleeve cavity to check installation process. Replace any leaking sleeves.2) Test for fuel leaks past the upper injector O-rings by blocking the fuel return line and pressurizing to 100 psi. (observe for 3 minutes)3) Install the remainder of the parts to complete assembly of the engine.4) If failure resulted in fuel in the coolant, flush and fill cooling system. Flush the system for a minimum of 30 minutes using 4C4609/4C4613 Cleaner (may use 6V4511 as a substitute). Fill the cooling system using a 50% mixture of low silicate antifreeze and distilled water. If Caterpillar antifreeze is not used, add 6% cooling system conditioner.Service Claim Allowances
This a labor breakdown for in-frame repair when the block has been stamped 3S.
This is a labor breakdown (when the block has not been stamped 3S) if removal of the cylinder is needed. Head removal must be justified in the claim story.
Additional Labor segments can be claimed if necessary.
Parts Disposition
Handle the parts in accordance with your Warranty