Information injection-pump assembly
ZEXEL
104749-5381
1047495381
Rating:
Cross reference number
ZEXEL
104749-5381
1047495381
Zexel num
Bosch num
Firm num
Name
104749-5381
INJECTION-PUMP ASSEMBLY
Calibration Data:
Adjustment conditions
Test oil
1404 Test oil ISO4113orSAEJ967d
1404 Test oil ISO4113orSAEJ967d
Test oil temperature
degC
45
45
50
Nozzle
105780-0060
Bosch type code
NP-DN0SD1510
Nozzle holder
105780-2150
Opening pressure
MPa
13
13
13.3
Opening pressure
kgf/cm2
133
133
136
Injection pipe
157805-7320
Injection pipe
Inside diameter - outside diameter - length (mm) mm 2-6-450
Inside diameter - outside diameter - length (mm) mm 2-6-450
Joint assembly
157641-4720
Tube assembly
157641-4020
Transfer pump pressure
kPa
20
20
20
Transfer pump pressure
kgf/cm2
0.2
0.2
0.2
Direction of rotation (viewed from drive side)
Right R
Right R
Injection timing adjustment
Pump speed
r/min
750
750
750
Boost pressure
kPa
32
30.7
33.3
Boost pressure
mmHg
240
230
250
Average injection quantity
mm3/st.
46.9
46.4
47.4
Difference in delivery
mm3/st.
3.5
Basic
*
Oil temperature
degC
50
48
52
Remarks
CBS
CBS
Injection timing adjustment_02
Pump speed
r/min
1500
1500
1500
Boost pressure
kPa
72
70.7
73.3
Boost pressure
mmHg
540
530
550
Average injection quantity
mm3/st.
52.3
51.8
52.8
Difference in delivery
mm3/st.
3.5
Basic
*
Oil temperature
degC
50
48
52
Remarks
Full
Full
Injection timing adjustment_03
Pump speed
r/min
550
550
550
Boost pressure
kPa
0
0
0
Boost pressure
mmHg
0
0
0
Average injection quantity
mm3/st.
39.6
36.6
42.6
Oil temperature
degC
50
48
52
Injection timing adjustment_04
Pump speed
r/min
750
750
750
Boost pressure
kPa
32
30.7
33.3
Boost pressure
mmHg
240
230
250
Average injection quantity
mm3/st.
46.9
45.9
47.9
Difference in delivery
mm3/st.
3.5
Basic
*
Oil temperature
degC
50
48
52
Injection timing adjustment_05
Pump speed
r/min
1500
1500
1500
Boost pressure
kPa
0
0
0
Boost pressure
mmHg
0
0
0
Average injection quantity
mm3/st.
37.4
34.9
39.9
Oil temperature
degC
50
48
52
Injection timing adjustment_06
Pump speed
r/min
1500
1500
1500
Boost pressure
kPa
72
70.7
73.3
Boost pressure
mmHg
540
530
550
Average injection quantity
mm3/st.
52.3
51.3
53.3
Difference in delivery
mm3/st.
3.5
Basic
*
Oil temperature
degC
50
48
52
Injection timing adjustment_07
Pump speed
r/min
2250
2250
2250
Boost pressure
kPa
72
70.7
73.3
Boost pressure
mmHg
540
530
550
Average injection quantity
mm3/st.
50.9
47.9
53.9
Oil temperature
degC
52
50
54
Injection quantity adjustment
Pump speed
r/min
2650
2650
2650
Boost pressure
kPa
72
70.7
73.3
Boost pressure
mmHg
540
530
550
Average injection quantity
mm3/st.
24.4
21.4
27.4
Difference in delivery
mm3/st.
5.5
Basic
*
Oil temperature
degC
55
52
58
Injection quantity adjustment_02
Pump speed
r/min
2950
2950
2950
Boost pressure
kPa
72
70.7
73.3
Boost pressure
mmHg
540
530
550
Average injection quantity
mm3/st.
4
Oil temperature
degC
55
52
58
Injection quantity adjustment_03
Pump speed
r/min
2650
2650
2650
Boost pressure
kPa
72
70.7
73.3
Boost pressure
mmHg
540
530
550
Average injection quantity
mm3/st.
24.4
21.4
27.4
Difference in delivery
mm3/st.
5.5
Oil temperature
degC
55
52
58
Governor adjustment
Pump speed
r/min
375
375
375
Boost pressure
kPa
0
0
0
Boost pressure
mmHg
0
0
0
Average injection quantity
mm3/st.
8.9
6.9
10.9
Difference in delivery
mm3/st.
2
Basic
*
Oil temperature
degC
48
46
50
Governor adjustment_02
Pump speed
r/min
375
375
375
Boost pressure
kPa
0
0
0
Boost pressure
mmHg
0
0
0
Average injection quantity
mm3/st.
8.9
6.9
10.9
Difference in delivery
mm3/st.
2
Oil temperature
degC
48
46
50
Timer adjustment
Pump speed
r/min
150
150
150
Boost pressure
kPa
0
0
0
Boost pressure
mmHg
0
0
0
Average injection quantity
mm3/st.
35
25
45
Basic
*
Oil temperature
degC
48
46
50
Remarks
IDLE
IDLE
Timer adjustment_02
Pump speed
r/min
150
150
150
Boost pressure
kPa
0
0
0
Boost pressure
mmHg
0
0
0
Average injection quantity
mm3/st.
35
25
45
Oil temperature
degC
48
46
50
Remarks
IDLE
IDLE
Speed control lever angle
Pump speed
r/min
375
375
375
Boost pressure
kPa
0
0
0
Boost pressure
mmHg
0
0
0
Average injection quantity
mm3/st.
0
0
0
Oil temperature
degC
48
46
50
Remarks
Magnet OFF at idling position
Magnet OFF at idling position
0000000901
Pump speed
r/min
1250
1250
1250
Boost pressure
kPa
72
70.7
73.3
Boost pressure
mmHg
540
530
550
Overflow quantity
cm3/min
630
500
760
Oil temperature
degC
50
48
52
Remarks
Full
Full
_02
Pump speed
r/min
375
375
375
Boost pressure
kPa
0
0
0
Boost pressure
mmHg
0
0
0
Overflow quantity
cm3/min
380
250
510
Oil temperature
degC
48
46
50
Remarks
IDLE
IDLE
Stop lever angle
Pump speed
r/min
1250
1250
1250
Boost pressure
kPa
72
70.7
73.3
Boost pressure
mmHg
540
530
550
Pressure
kPa
412
392
432
Pressure
kgf/cm2
4.2
4
4.4
Basic
*
Oil temperature
degC
50
48
52
Stop lever angle_02
Pump speed
r/min
1250
1250
1250
Boost pressure
kPa
72
70.7
73.3
Boost pressure
mmHg
540
530
550
Pressure
kPa
412
392
432
Pressure
kgf/cm2
4.2
4
4.4
Basic
*
Oil temperature
degC
50
48
52
0000001101
Pump speed
r/min
1250
1250
1250
Boost pressure
kPa
72
70.7
73.3
Boost pressure
mmHg
540
530
550
Timer stroke
mm
4.7
4.5
4.9
Basic
*
Oil temperature
degC
50
48
52
_02
Pump speed
r/min
600
600
600
Boost pressure
kPa
72
70.7
73.3
Boost pressure
mmHg
540
530
550
Timer stroke
mm
0.5
0.1
1.5
Oil temperature
degC
50
48
52
_03
Pump speed
r/min
1250
1250
1250
Boost pressure
kPa
72
70.7
73.3
Boost pressure
mmHg
540
530
550
Timer stroke
mm
4.7
4.5
4.9
Basic
*
Oil temperature
degC
50
48
52
_04
Pump speed
r/min
1500
1500
1500
Boost pressure
kPa
72
70.7
73.3
Boost pressure
mmHg
540
530
550
Timer stroke
mm
6.3
5.9
6.7
Oil temperature
degC
50
48
52
_05
Pump speed
r/min
2000
2000
2000
Boost pressure
kPa
72
70.7
73.3
Boost pressure
mmHg
540
530
550
Timer stroke
mm
9
8.7
9.4
Oil temperature
degC
50
48
52
0000001201
Max. applied voltage
V
8
8
8
Test voltage
V
13
12
14
Timing setting
K dimension
mm
3.3
3.2
3.4
KF dimension
mm
5.8
5.7
5.9
MS dimension
mm
0.9
0.8
1
Control lever angle alpha
deg.
20
16
24
Control lever angle beta
deg.
45
40
50
Test data Ex:
0000001801 POTENTIOMETER ADJUSTMENT
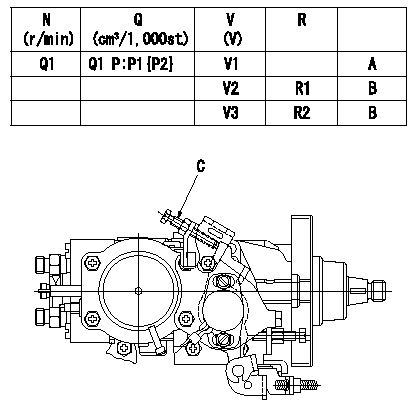
Adjusting method (applied voltage Vi, dummy bolt method)
1. Hold the dummy bolt against the control lever when N=N1, Q=Q1. Fix using the locknut.
2. When adjusting the potentiometer, position the control lever against the dummy bolt and adjust the potentiometer so that the output voltage is V1.
3. After completing adjustment remove the dummy bolt. Confirm that the potentiometer output voltage is as specified above at the control lever idle position and full position.
N:Pump speed
V:Output voltage
Q:Injection quantity
P:Boost pressure
A:Adjusting point
B:Checking point
R:Lever position
R1:Idle
R2:Full speed
(C) Nut 013020-6040
(D) Dummy bolt 146526-3300
----------
N1=1000r/min V1=4.76+-0.03V Q1=28.8+-1.0cm3/1,000st Vi=10V
----------
N1=1000r/min V1=4.76+-0.03V V2=(1.06+-0.45)V V3=(8.38+-0.65)V Q1=28.8+-1.0cm3/1,000st
----------
N1=1000r/min V1=4.76+-0.03V Q1=28.8+-1.0cm3/1,000st Vi=10V
----------
N1=1000r/min V1=4.76+-0.03V V2=(1.06+-0.45)V V3=(8.38+-0.65)V Q1=28.8+-1.0cm3/1,000st
0000001901 V-FICD ADJUSTMENT
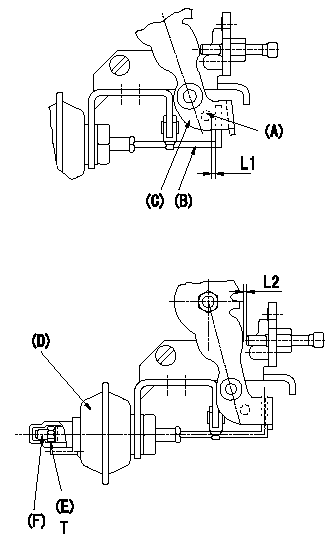
Adjustment of the V-FICD (perform with W-FICD released)
1. Adjust to obtain L1.
2. Confirm that L2 is obtained when negative pressure P1 (kPa) {P2 (mmHg)} is applied to the actuator.
Adjust the stroke using the actuator stroke adjusting screw (F).
(A): Pin
(B): Actuator shaft
(C): Control lever
(D): Actuator
(E): Lock nut (torque T)
----------
L1=1+1mm L2=1.32+-0.1mm P1=-53.3kPa P2=-400mmHg
----------
L1=1+1mm L2=1.32+-0.1mm T=1.2~1.5N-m{0.12~0.15kgf-m}
----------
L1=1+1mm L2=1.32+-0.1mm P1=-53.3kPa P2=-400mmHg
----------
L1=1+1mm L2=1.32+-0.1mm T=1.2~1.5N-m{0.12~0.15kgf-m}
0000002001 W-CSD ADJUSTMENT
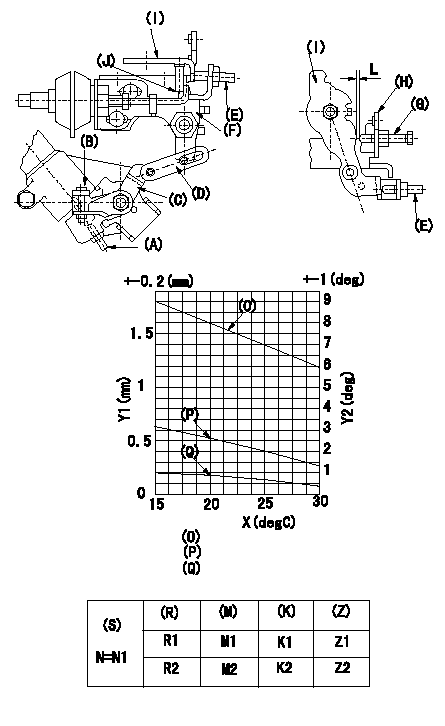
Adjustment of the W-CSD
1. Adjustment of the timer stroke
Adjust screw (A) so that the timer stroke is the value determined from the graph.
2. Adjustment of the position of the intermediate lever.
Insert a shim L between the control lever I and the idle setscrew G.
Align the intermediate lever (F) with the aligning line and fix screw intermediate lever's adjusting (E) so that it contacts the control lever.
3. Adjustment of the FICD
Insert a shim LT between the control lever I and the idle setscrew G.
Use adjusting screw (B) to fix the CSD lever (C) in the position where it operates the intermediate lever via the rod (D).
(J) Aligning mark
(O) = timer stroke adjustment (mm): TA = -0.041t+2.42
(P) Lever position (deg): theta 1 = -0.108t+4.79 (-20 deg C <= t <= 20 deg C)
Theta 2 = -0.133t + 5.29 (20 deg C =< t =< 50 deg C)
(Q) Lever position (mm): L1 = -0.035t+1.57 (-20 deg C <= t <= 20 deg C)
L2 = -0.044t + 1.75 (20 deg C =< t =< 50 deg C)
The (Q) indicates the clearance between the control lever and the idle set screw.
X:Temperature t (deg C)
Y1:Timer stroke TA (mm)
Y2:Control lever position at theta L (deg, mm)
(R) Cooling water temperature (deg C)
(S) Cooling water temperature: increase direction
N:Pump speed (r/min)
(M) Timer piston stroke (mm)
(K) Lever angle (deg)
(Z) Lever position (mm)
----------
L=1.2+-0.05mm LT=L+-0.05mm
----------
L=1.2+-0.05mm N1=500r/min R1=20degC R2=-20degC M1=1.9+-0.4mm M2=3.4+-0.6mm K1=3.6+-1deg K2=7.9+-3deg Z1=1.2+-0.3mm Z2=2.6+-1mm
----------
L=1.2+-0.05mm LT=L+-0.05mm
----------
L=1.2+-0.05mm N1=500r/min R1=20degC R2=-20degC M1=1.9+-0.4mm M2=3.4+-0.6mm K1=3.6+-1deg K2=7.9+-3deg Z1=1.2+-0.3mm Z2=2.6+-1mm
0000002101 DASHPOT ADJUSTMENT
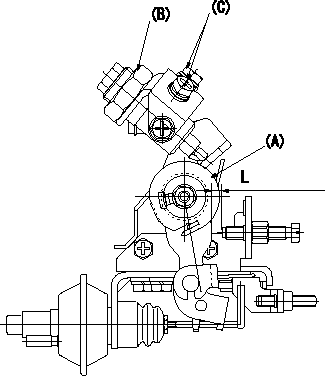
Adjustment of the dash pot
1. Hold the position of the control lever (A) at a (gap L).
2. In the above condition, adjust the position of the dash pot so that the tip end of the dash pot (B) contacts the control lever (A) and fix with the nut (C).
TT
----------
L=5.2-0.5mm T=6~9N-m(0.6~0.9Kgf-m) a=15.8-1.5deg
----------
L=5.2-0.5mm
----------
L=5.2-0.5mm T=6~9N-m(0.6~0.9Kgf-m) a=15.8-1.5deg
----------
L=5.2-0.5mm
Information:
Cylinder Liner
Use same piston which was removed from cylinder liner being checked.Use the following procedure to check a liner:
Fig. 6-Piston to Liner Clearance1. Put piston in liner with piston "front" and liner "front" aligned. Move piston down until bottom edge of piston skirt is 1.00 in. (25.4 mm) (1, Fig. 6) above bottom of liner.Use a feeler gauge to measure distance (2) between piston skirt and liner 90° to piston pin bore. Record the measured distance (2).Piston to cylinder liner clearance for new parts is: 2. Turn piston 90° in liner. Use a feeler gauge to measure distance between piston skirt and liner 90° to piston pin bore. Record the measured distance.The difference between the distance measured in Step 1 and the distance in Step 2 is the distance the liner is out of round at the bottom of the liner.
Fig. 7-Piston to Liner Clearance3. Pull piston out of liner. Put piston in liner up-side down with piston "front" and liner "front" aligned. Move piston so bottom edge of piston skirt is 1.00 in. (25.4 mm) (1, Fig. 7) below top of liner.Use a feeler gauge to measure distance (2) between piston skirt and liner at 90° to piston pin bore. Record the measured distance (2).4. Turn piston 90° in liner. Use a feeler gauge to measure distance between piston skirt and liner 90° to piston pin bore. Record the measured distance.The difference between the distance measured in Step 3 and the distance measured in Step 4 is the distance the liner is out of round at the top of the liner.If liner is out of round more than 0.002 in. (0.05 mm), at top or bottom, install a new one.5. Find difference between distance measured in Step 1 and distance measured in Step 3. This is the distance the liner is tapered.If liner is tapered more than 0.002 in. (0.05 mm), install a new one.Use a wire brush to carefully remove all rust and scale from the outside of the cylinder liners. Make certain there are no nicks or burrs in the areas where the packings will seat.After removing the rust and scale from the cylinder liners wash thoroughly with solvent and dry them.
Fig. 8-D17004BR Cylinder BrushUse D17004BR Cylinder Brush (Fig. 8) to deglaze each cylinder liner. Match the existing cross hatch pattern when deglazing.Refer to "Basic Engine" in FOS Manual-ENGINES for additional information on deglazing cylinder liners.Immediately after deglazing, clean cylinder liner bore with waterless hand cleaner or soap. Rinse cylinder liner bores with clean water until rinse water is clear. Dry liners with clean towels. Wipe bore with clean engine oil. IMPORTANT: Solvents will not remove honing residue.Recheck liner-to-piston skirt clearance. See Group 0403 for piston repair.Piston Cooling Orifices
Inspect for damage or clogging.
Fig. 9-Piston Cooling OrificeIf a piston cooling orifice (2, Fig. 9) is clogged, use a soft wire (1) to push material out of hole.If an orifice is damaged install a new one.Installation
Fig. 10-Piston Cooling OrificesInstall piston cooling orifices (Fig. 10) and tighten to
Have questions with 104749-5381?
Group cross 104749-5381 ZEXEL
Isuzu
Isuzu
Isuzu
Isuzu
Isuzu
104749-5381
INJECTION-PUMP ASSEMBLY