Information injection-pump assembly
ZEXEL
104749-5360
1047495360

Rating:
Cross reference number
ZEXEL
104749-5360
1047495360
Zexel num
Bosch num
Firm num
Name
104749-5360
INJECTION-PUMP ASSEMBLY
Calibration Data:
Adjustment conditions
Test oil
1404 Test oil ISO4113orSAEJ967d
1404 Test oil ISO4113orSAEJ967d
Test oil temperature
degC
45
45
50
Nozzle
105780-0060
Bosch type code
NP-DN0SD1510
Nozzle holder
105780-2150
Opening pressure
MPa
13
13
13.3
Opening pressure
kgf/cm2
133
133
136
Injection pipe
157805-7320
Injection pipe
Inside diameter - outside diameter - length (mm) mm 2-6-450
Inside diameter - outside diameter - length (mm) mm 2-6-450
Joint assembly
157641-4720
Tube assembly
157641-4020
Transfer pump pressure
kPa
20
20
20
Transfer pump pressure
kgf/cm2
0.2
0.2
0.2
Direction of rotation (viewed from drive side)
Right R
Right R
Injection timing adjustment
Pump speed
r/min
750
750
750
Boost pressure
kPa
32
30.7
33.3
Boost pressure
mmHg
240
230
250
Average injection quantity
mm3/st.
46.9
46.4
47.4
Difference in delivery
mm3/st.
3.5
Basic
*
Oil temperature
degC
50
48
52
Remarks
CBS
CBS
Injection timing adjustment_02
Pump speed
r/min
1500
1500
1500
Boost pressure
kPa
72
70.7
73.3
Boost pressure
mmHg
540
530
550
Average injection quantity
mm3/st.
52.3
51.8
52.8
Difference in delivery
mm3/st.
3.5
Basic
*
Oil temperature
degC
50
48
52
Remarks
Full
Full
Injection timing adjustment_03
Pump speed
r/min
550
550
550
Boost pressure
kPa
0
0
0
Boost pressure
mmHg
0
0
0
Average injection quantity
mm3/st.
39.6
36.6
42.6
Oil temperature
degC
50
48
52
Injection timing adjustment_04
Pump speed
r/min
750
750
750
Boost pressure
kPa
32
30.7
33.3
Boost pressure
mmHg
240
230
250
Average injection quantity
mm3/st.
46.9
45.9
47.9
Difference in delivery
mm3/st.
3.5
Basic
*
Oil temperature
degC
50
48
52
Injection timing adjustment_05
Pump speed
r/min
1500
1500
1500
Boost pressure
kPa
0
0
0
Boost pressure
mmHg
0
0
0
Average injection quantity
mm3/st.
37.4
34.9
39.9
Oil temperature
degC
50
48
52
Injection timing adjustment_06
Pump speed
r/min
1500
1500
1500
Boost pressure
kPa
72
70.7
73.3
Boost pressure
mmHg
540
530
550
Average injection quantity
mm3/st.
52.3
51.3
53.3
Difference in delivery
mm3/st.
3.5
Basic
*
Oil temperature
degC
50
48
52
Injection timing adjustment_07
Pump speed
r/min
2250
2250
2250
Boost pressure
kPa
72
70.7
73.3
Boost pressure
mmHg
540
530
550
Average injection quantity
mm3/st.
50.9
47.9
53.9
Oil temperature
degC
52
50
54
Injection quantity adjustment
Pump speed
r/min
2750
2750
2750
Boost pressure
kPa
72
70.7
73.3
Boost pressure
mmHg
540
530
550
Average injection quantity
mm3/st.
24.4
21.4
27.4
Difference in delivery
mm3/st.
5.5
Basic
*
Oil temperature
degC
55
52
58
Injection quantity adjustment_02
Pump speed
r/min
2950
2950
2950
Boost pressure
kPa
72
70.7
73.3
Boost pressure
mmHg
540
530
550
Average injection quantity
mm3/st.
4
Oil temperature
degC
55
52
58
Injection quantity adjustment_03
Pump speed
r/min
2750
2750
2750
Boost pressure
kPa
72
70.7
73.3
Boost pressure
mmHg
540
530
550
Average injection quantity
mm3/st.
24.4
21.4
27.4
Difference in delivery
mm3/st.
5.5
Oil temperature
degC
55
52
58
Governor adjustment
Pump speed
r/min
375
375
375
Boost pressure
kPa
0
0
0
Boost pressure
mmHg
0
0
0
Average injection quantity
mm3/st.
8.9
6.9
10.9
Difference in delivery
mm3/st.
2
Basic
*
Oil temperature
degC
48
46
50
Governor adjustment_02
Pump speed
r/min
375
375
375
Boost pressure
kPa
0
0
0
Boost pressure
mmHg
0
0
0
Average injection quantity
mm3/st.
8.9
6.9
10.9
Difference in delivery
mm3/st.
2
Oil temperature
degC
48
46
50
Timer adjustment
Pump speed
r/min
150
150
150
Boost pressure
kPa
0
0
0
Boost pressure
mmHg
0
0
0
Average injection quantity
mm3/st.
35
25
45
Basic
*
Oil temperature
degC
48
46
50
Remarks
IDLE
IDLE
Timer adjustment_02
Pump speed
r/min
150
150
150
Boost pressure
kPa
0
0
0
Boost pressure
mmHg
0
0
0
Average injection quantity
mm3/st.
35
25
45
Oil temperature
degC
48
46
50
Remarks
IDLE
IDLE
Speed control lever angle
Pump speed
r/min
375
375
375
Boost pressure
kPa
0
0
0
Boost pressure
mmHg
0
0
0
Average injection quantity
mm3/st.
0
0
0
Oil temperature
degC
48
46
50
Remarks
Magnet OFF at idling position
Magnet OFF at idling position
0000000901
Pump speed
r/min
1250
1250
1250
Boost pressure
kPa
72
70.7
73.3
Boost pressure
mmHg
540
530
550
Overflow quantity
cm3/min
630
500
760
Oil temperature
degC
50
48
52
Remarks
Full
Full
_02
Pump speed
r/min
375
375
375
Boost pressure
kPa
0
0
0
Boost pressure
mmHg
0
0
0
Overflow quantity
cm3/min
380
250
510
Oil temperature
degC
48
46
50
Remarks
IDLE
IDLE
Stop lever angle
Pump speed
r/min
1250
1250
1250
Boost pressure
kPa
72
70.7
73.3
Boost pressure
mmHg
540
530
550
Pressure
kPa
412
392
432
Pressure
kgf/cm2
4.2
4
4.4
Basic
*
Oil temperature
degC
50
48
52
Stop lever angle_02
Pump speed
r/min
1250
1250
1250
Boost pressure
kPa
72
70.7
73.3
Boost pressure
mmHg
540
530
550
Pressure
kPa
412
392
432
Pressure
kgf/cm2
4.2
4
4.4
Basic
*
Oil temperature
degC
50
48
52
0000001101
Pump speed
r/min
1250
1250
1250
Boost pressure
kPa
72
70.7
73.3
Boost pressure
mmHg
540
530
550
Timer stroke
mm
4.7
4.5
4.9
Basic
*
Oil temperature
degC
50
48
52
_02
Pump speed
r/min
600
600
600
Boost pressure
kPa
72
70.7
73.3
Boost pressure
mmHg
540
530
550
Timer stroke
mm
0.5
0.1
1.5
Oil temperature
degC
50
48
52
_03
Pump speed
r/min
1250
1250
1250
Boost pressure
kPa
72
70.7
73.3
Boost pressure
mmHg
540
530
550
Timer stroke
mm
4.7
4.5
4.9
Basic
*
Oil temperature
degC
50
48
52
_04
Pump speed
r/min
1500
1500
1500
Boost pressure
kPa
72
70.7
73.3
Boost pressure
mmHg
540
530
550
Timer stroke
mm
6.3
5.9
6.7
Oil temperature
degC
50
48
52
_05
Pump speed
r/min
2000
2000
2000
Boost pressure
kPa
72
70.7
73.3
Boost pressure
mmHg
540
530
550
Timer stroke
mm
9
8.7
9.4
Oil temperature
degC
50
48
52
0000001201
Max. applied voltage
V
8
8
8
Test voltage
V
13
12
14
0000001401
Pump speed
r/min
1250
1250
1250
Boost pressure
kPa
72
70.7
73.3
Boost pressure
mmHg
540
530
550
Average injection quantity
mm3/st.
35
34
36
Timer stroke TA
mm
4.3
4.1
4.5
Timer stroke variation dT
mm
0.4
0.4
0.4
Basic
*
Oil temperature
degC
50
48
52
_02
Pump speed
r/min
1250
1250
1250
Boost pressure
kPa
72
70.7
73.3
Boost pressure
mmHg
540
530
550
Average injection quantity
mm3/st.
35
34
36
Timer stroke TA
mm
4.3
3.9
4.7
Basic
*
Oil temperature
degC
50
48
52
_03
Pump speed
r/min
1250
1250
1250
Boost pressure
kPa
72
70.7
73.3
Boost pressure
mmHg
540
530
550
Average injection quantity
mm3/st.
21.6
20.6
22.6
Timer stroke TA
mm
3.7
3.1
4.3
Oil temperature
degC
50
48
52
Timing setting
K dimension
mm
3.3
3.2
3.4
KF dimension
mm
5.8
5.7
5.9
MS dimension
mm
0.9
0.8
1
Control lever angle alpha
deg.
20
16
24
Control lever angle beta
deg.
45
40
50
Test data Ex:
0000001801 V-FICD ADJUSTMENT

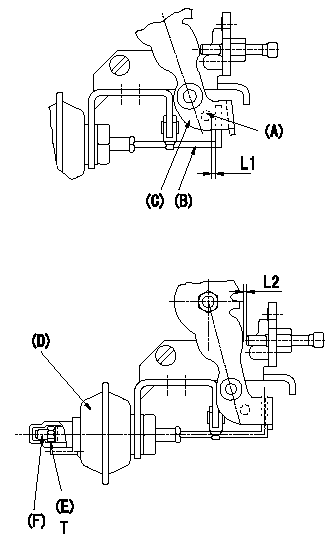
Adjustment of the V-FICD (perform with W-FICD released)
1. Adjust to obtain L1.
2. Confirm that L2 is obtained when negative pressure P1 (kPa) {P2 (mmHg)} is applied to the actuator.
Adjust the stroke using the actuator stroke adjusting screw (F).
(A): Pin
(B): Actuator shaft
(C): Control lever
(D): Actuator
(E): Lock nut (torque T)
----------
L1=1+1mm L2=1.32+-0.1mm P1=-53.3kPa P2=-400mmHg
----------
L1=1+1mm L2=1.32+-0.1mm T=1.2~1.5N-m{0.12~0.15kgf-m}
----------
L1=1+1mm L2=1.32+-0.1mm P1=-53.3kPa P2=-400mmHg
----------
L1=1+1mm L2=1.32+-0.1mm T=1.2~1.5N-m{0.12~0.15kgf-m}
0000001901 W-CSD ADJUSTMENT

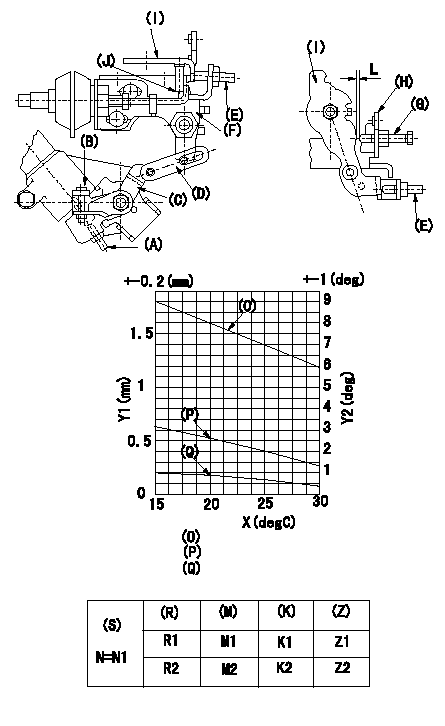
Adjustment of the W-CSD
1. Adjustment of the timer stroke
Adjust screw (A) so that the timer stroke is the value determined from the graph.
2. Adjustment of the position of the intermediate lever.
Insert a shim L between the control lever I and the idle setscrew G.
Align the intermediate lever (F) with the aligning line and fix screw intermediate lever's adjusting (E) so that it contacts the control lever.
3. Adjustment of the FICD
Insert a shim LT between the control lever I and the idle setscrew G.
Use adjusting screw (B) to fix the CSD lever (C) in the position where it operates the intermediate lever via the rod (D).
(J) Aligning mark
(O) = timer stroke adjustment (mm): TA = -0.041t+2.42
(P) Lever position (deg): theta 1 = -0.108t+4.79 (-20 deg C <= t <= 20 deg C)
Theta 2 = -0.133t + 5.29 (20 deg C =< t =< 50 deg C)
(Q) Lever position (mm): L1 = -0.035t+1.57 (-20 deg C <= t <= 20 deg C)
L2 = -0.044t + 1.75 (20 deg C =< t =< 50 deg C)
The (Q) indicates the clearance between the control lever and the idle set screw.
X:Temperature t (deg C)
Y1:Timer stroke TA (mm)
Y2:Control lever position at theta L (deg, mm)
(R) Cooling water temperature (deg C)
(S) Cooling water temperature: increase direction
N:Pump speed (r/min)
(M) Timer piston stroke (mm)
(K) Lever angle (deg)
(Z) Lever position (mm)
----------
L=1.2+-0.05mm LT=L+-0.05mm
----------
L=1.2+-0.05mm N1=500r/min R1=20degC R2=-20degC M1=1.9+-0.4mm M2=3.4+-0.6mm K1=3.6+-1deg K2=7.9+-3deg Z1=1.2+-0.3mm Z2=2.6+-1mm
----------
L=1.2+-0.05mm LT=L+-0.05mm
----------
L=1.2+-0.05mm N1=500r/min R1=20degC R2=-20degC M1=1.9+-0.4mm M2=3.4+-0.6mm K1=3.6+-1deg K2=7.9+-3deg Z1=1.2+-0.3mm Z2=2.6+-1mm
Information:
Starting System
Use a D.C. voltmeter to locate starting system components which do not function.Move starting control switch to energize the starter solenoid. Starter solenoid operation is audible as the starter motor pinion engages with the ring gear on the engine flywheel. The solenoid operation should also close the electric circuit to the motor. Attach one voltmeter lead to the solenoid terminal that is connected to the motor. Ground the other lead. Energize the starter solenoid and observe the voltmeter. A battery voltage reading indicates the malfunction is in the motor. It must be removed for further testing. No voltmeter reading indicates that the solenoid contacts do not close and the solenoid must be repaired or the starter pinion clearance should be adjusted.A starting motor solenoid that will not operate may not be receiving battery current. Attach one lead of the voltmeter to the solenoid battery cable connection. Ground the other lead. No voltmeter reading indicates a faulty circuit from the battery. A voltmeter reading indicates further testing is necessary.Continue the test by attaching one voltmeter lead to the starting motor solenoid small wire terminal and the other lead to ground. Observe the voltmeter and energize the starter solenoid. A voltmeter reading indicates that the malfunction is in the solenoid. No voltmeter reading indicates the starter switch or wiring is the fault.Attach one lead of the voltmeter to the starter switch battery wire terminal and ground the other lead. A voltmeter reading indicates a defective switch.A starting motor that operates too slow can be overloaded by excessive mechanical friction within the engine being started. Slow starting motor operation can also be caused by shorts, loose connections and/or excessive dirt within the motor.Pinion Clearance Adjustment (Prestolite)
There are two adjustments on this type motor. Armature end play and pinion position.Armature End Play
Adjust the end play to .005 to .030 in. (0.13 to 0.76 mm) by adding or removing thrust washers on the commutator end of the armature shaft.Pinion Position
This adjustment is accomplished in two steps.1. To adjust the pinion distance, connect the solenoid to a 12 volt battery as shown.Momentarily flash the jumper lead from the motor terminal stud of the solenoid to the terminal stud at (1) in the commutator end head to shift the solenoid and drive into the cranking position.
CONNECTIONS FOR ADJUSTING THE PINION POSITION
1. Jumper lead flashing point.Remove the jumper lead. The drive will remain in the cranking position until the battery is disconnected.Push the drive toward the commutator end of the motor to eliminate any slack movement in the linkage and measure the distance between the outside edge of the drive sleeve and the thrust washer. The distance (3) must be .02 to .05 in. (0.5 to 1.3 mm).Adjust to this dimension by turning the adjusting nut (2) in or out as required.
PINION POSITION ADJUSTMENT
2. Adjusting nut. 3. Distance.2. To test assembly of solenoid, it will be necessary to have an interference block cut to the dimensions shown.
INTERFERENCE BLOCK DIMENSIONSConnect the solenoid to 24 volts as
Have questions with 104749-5360?
Group cross 104749-5360 ZEXEL
104749-5360
INJECTION-PUMP ASSEMBLY