Information injection-pump assembly
ZEXEL
104748-0201
1047480201
MAZDA
RF3513800A
rf3513800a

Rating:
Cross reference number
ZEXEL
104748-0201
1047480201
MAZDA
RF3513800A
rf3513800a
Zexel num
Bosch num
Firm num
Name
Calibration Data:
Adjustment conditions
Test oil
1404 Test oil ISO4113orSAEJ967d
1404 Test oil ISO4113orSAEJ967d
Test oil temperature
degC
45
45
50
Nozzle
105000-2010
Bosch type code
NP-DN12SD12TT
Nozzle holder
105780-2080
Opening pressure
MPa
14.7
14.7
15.19
Opening pressure
kgf/cm2
150
150
155
Injection pipe
Inside diameter - outside diameter - length (mm) mm 2-6-840
Inside diameter - outside diameter - length (mm) mm 2-6-840
Transfer pump pressure
kPa
20
20
20
Transfer pump pressure
kgf/cm2
0.2
0.2
0.2
Direction of rotation (viewed from drive side)
Left L
Left L
Injection timing adjustment
Pump speed
r/min
1375
1375
1375
Average injection quantity
mm3/st.
35.9
35.4
36.4
Difference in delivery
mm3/st.
2.5
Basic
*
Remarks
For Japan
For Japan
Injection timing adjustment_02
Pump speed
r/min
2600
2600
2600
Average injection quantity
mm3/st.
12.8
9.8
15.8
Remarks
For Japan
For Japan
Injection timing adjustment_03
Pump speed
r/min
2325
2325
2325
Average injection quantity
mm3/st.
32.2
30.2
34.2
Remarks
For Japan
For Japan
Injection timing adjustment_04
Pump speed
r/min
1375
1375
1375
Average injection quantity
mm3/st.
35.9
34.9
36.9
Remarks
For Japan
For Japan
Injection timing adjustment_05
Pump speed
r/min
600
600
600
Average injection quantity
mm3/st.
31
29
33
Remarks
For Japan
For Japan
Injection quantity adjustment
Pump speed
r/min
2600
2600
2600
Average injection quantity
mm3/st.
12.8
10.8
14.8
Basic
*
Remarks
For Japan
For Japan
Injection quantity adjustment_02
Pump speed
r/min
2700
2700
2700
Average injection quantity
mm3/st.
6
Remarks
For Japan
For Japan
Governor adjustment
Pump speed
r/min
410
410
410
Average injection quantity
mm3/st.
7
6
8
Difference in delivery
mm3/st.
2
Basic
*
Remarks
For Japan
For Japan
Governor adjustment_02
Pump speed
r/min
410
410
410
Average injection quantity
mm3/st.
7
5
9
Remarks
For Japan
For Japan
Timer adjustment
Pump speed
r/min
100
100
100
Average injection quantity
mm3/st.
42
42
Basic
*
Remarks
For Japan
For Japan
Speed control lever angle
Pump speed
r/min
410
410
410
Average injection quantity
mm3/st.
0
0
0
Remarks
For Japan: Magnet OFF
For Japan: Magnet OFF
0000000901
Pump speed
r/min
1375
1375
1375
Overflow quantity
cm3/min
410
278
542
Remarks
For Japan
For Japan
Stop lever angle
Pump speed
r/min
1375
1375
1375
Pressure
kPa
460.5
431
490
Pressure
kgf/cm2
4.7
4.4
5
Basic
*
Remarks
For Japan
For Japan
Stop lever angle_02
Pump speed
r/min
600
600
600
Pressure
kPa
245.5
216
275
Pressure
kgf/cm2
2.5
2.2
2.8
Remarks
For Japan
For Japan
Stop lever angle_03
Pump speed
r/min
1375
1375
1375
Pressure
kPa
460.5
431
490
Pressure
kgf/cm2
4.7
4.4
5
Remarks
For Japan
For Japan
Stop lever angle_04
Pump speed
r/min
2325
2325
2325
Pressure
kPa
706
677
735
Pressure
kgf/cm2
7.2
6.9
7.5
Remarks
For Japan
For Japan
0000001101
Pump speed
r/min
1375
1375
1375
Timer stroke
mm
4.2
4
4.4
Basic
*
Remarks
For Japan
For Japan
_02
Pump speed
r/min
1375
1375
1375
Timer stroke
mm
4.2
3.9
4.5
Remarks
For Japan
For Japan
_03
Pump speed
r/min
1800
1800
1800
Timer stroke
mm
6.7
6.1
7.3
Remarks
For Japan
For Japan
_04
Pump speed
r/min
2325
2325
2325
Timer stroke
mm
7.8
7.2
8.4
Remarks
For Japan
For Japan
0000001201
Max. applied voltage
V
8
8
8
Test voltage
V
13
12
14
0000001401
Pump speed
r/min
1375
1375
1375
Average injection quantity
mm3/st.
28.2
27.2
29.2
Timer stroke TA
mm
3.6
3.4
3.8
Basic
*
_02
Pump speed
r/min
1375
1375
1375
Average injection quantity
mm3/st.
28.2
26.7
29.7
Timer stroke TA
mm
3.6
3.3
3.9
_03
Pump speed
r/min
1375
1375
1375
Average injection quantity
mm3/st.
16.1
14.6
17.6
Timer stroke TA
mm
2.4
1.7
3.1
Timing setting
K dimension
mm
3.3
3.2
3.4
KF dimension
mm
5.8
5.7
5.9
MS dimension
mm
1.5
1.4
1.6
Control lever angle alpha
deg.
15
11
19
Control lever angle beta
deg.
40
35
45
Test data Ex:
0000001801 CSD LEVER/M-CSD ADJUSTMENT

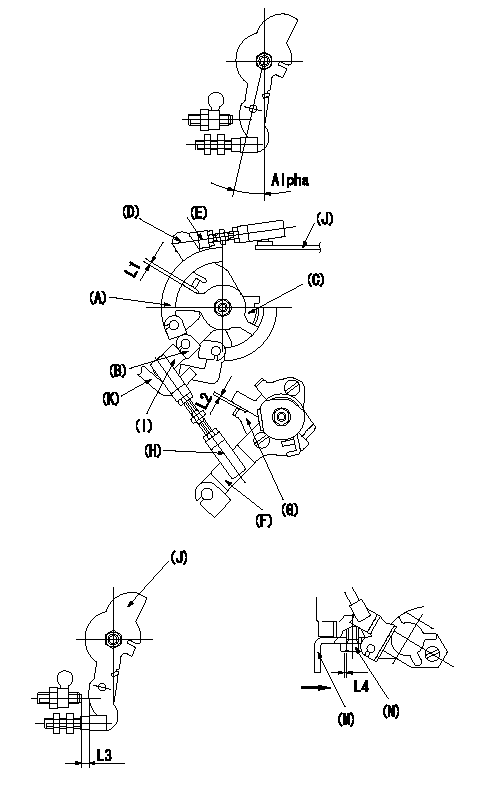
CSD lever assembly adjustment specifications
1. Fixing the side link lever
With the side link levers (A), (B) contacting the stopper (C), adjust the length of the connecting rod (E) so that the clearance between side link lever(D)'s hook and levers (A), (B) is L1.
2. Fixing the CSD lever stopper
At roller holder advance angle a, adjust the lever shaft ball pin to contact the roller holder.
At this time, fix the stopper (G) so that the distance between the CSD lever (F) and the stopper (G) is L2. (Tightening torque T)
3. Fix the CSD lever and the side link lever connecting rod.
Move CSD lever (F) through its full stroke (until it contacts the other stopper). Then, adjust the length of rod (H) connecting the side link lever (I) and CSD lever (F) so that the position of the control lever (J) on the top of the pump is b and fix.
O = at idle to b, L3
4. Fixing the pump supporting bracket
With the bracket (M) pushed in the direction of the arrow, set the distance shown in the figure between the bracket (M) and the bolt (N) to L4 and fix.
----------
a=0(deg) b=6.5(deg) Alpha=15+-4(deg) L1=2.8+1(mm) L2=0.5+2(mm) L3=4.2(mm) L4=0(mm)
----------
L1=2.8+1(mm) L2=0.5+2(mm) L3=4.2(mm) L4=0(mm) b=6.5(deg) Alpha=15+-4(deg)
----------
a=0(deg) b=6.5(deg) Alpha=15+-4(deg) L1=2.8+1(mm) L2=0.5+2(mm) L3=4.2(mm) L4=0(mm)
----------
L1=2.8+1(mm) L2=0.5+2(mm) L3=4.2(mm) L4=0(mm) b=6.5(deg) Alpha=15+-4(deg)
Information:
Display
The upper display (1) and lower display (2) of the GSC provide information about the generator set.* The upper display (1) shows AC voltage, current, and frequency of one phase of the generator output. Each phase can be viewed one at a time by pushing phase select key (4). The upper display (1) is also used to show the various fault codes for system faults. For more information on fault codes, refer to the Service Manual Module SENR5809 for Fault Descriptions.* The lower display (2) shows: system battery voltage, engine hours, engine speed, engine oil pressure, and engine coolant temperature. The value for one of those conditions is displayed for two seconds, then the display scrolls to the value for the next condition. A small pointer identifies the engine condition that corresponds to the value that is showing. When engine meter key (3) is pressed, the lower display stops scrolling and continuously shows one particular value. The pointer flashes above the condition whose value is showing. When the engine meter key is pressed a second time, the display returns to scrolling.* The lower display also shows a relay status indicator. When a GSC relay is activated, the corresponding relay indicator (K1, K2, etc.) is shown on lower display (2). When a relay is not activated, the corresponding indicator (K1, K2, etc.) is not shown. Refer to the Service Manual Module SENR5809 for a description of the relay functions.Both the upper and lower display are used for programming functions when in the service mode. For more information, refer to the Service Manual Module SENR5809 for Service Modes.Keypad
The keypad (3) is used to control the information that is shown on upper display (1) and the lower display (2). The seven keys of keypad have two sets of functions: normal functions and service functions. For a description of the service functions of the keys, refer to the Service Manual Module SENR5809 for Service Models. The normal functions of the keys are as follows. Leftmost key (5) - This key only functions when the GSC is in the service mode. This key is used to scroll right. PHASE SELECT key (6) - This key selects which phase of the generator output shows on the GSC upper display. Pressing this key allows the operator to check the voltage, current, and frequency of each phase, one at a time. ENGINE METER key (7) - This key stops the scrolling of engine conditions on the lower display (2). The lower display continuously shows the value for one particular engine condition. The pointer for the particular engine condition flashes to indicate scrolling is stopped. Pressing the key again resumes the scrolling. LAMP TEST key (8) - This key perfumes a lamp test on the GSC and the optional alarm module for a maximum of ten seconds, if held pressed. On the GSC: the eight fault indicators are ON CONTINUOUSLY - every segment of the upper display (1) and the lower display (2) are ON. For the