Information injection-pump assembly
ZEXEL
104740-0402
1047400402
MAZDA
PN4113800D
pn4113800d

Rating:
Cross reference number
ZEXEL
104740-0402
1047400402
MAZDA
PN4113800D
pn4113800d
Zexel num
Bosch num
Firm num
Name
Calibration Data:
Adjustment conditions
Test oil
1404 Test oil ISO4113orSAEJ967d
1404 Test oil ISO4113orSAEJ967d
Test oil temperature
degC
45
45
50
Nozzle
105780-0060
Bosch type code
NP-DN0SD1510
Nozzle holder
105780-2150
Opening pressure
MPa
13
13
13.3
Opening pressure
kgf/cm2
133
133
136
Injection pipe
157805-7320
Injection pipe
Inside diameter - outside diameter - length (mm) mm 2-6-450
Inside diameter - outside diameter - length (mm) mm 2-6-450
Joint assembly
157641-4720
Tube assembly
157641-4020
Transfer pump pressure
kPa
20
20
20
Transfer pump pressure
kgf/cm2
0.2
0.2
0.2
Direction of rotation (viewed from drive side)
Right R
Right R
Injection timing adjustment
Pump speed
r/min
1500
1500
1500
Average injection quantity
mm3/st.
31.8
31.3
32.3
Difference in delivery
mm3/st.
2.5
Basic
*
Injection timing adjustment_02
Pump speed
r/min
2635
2635
2635
Average injection quantity
mm3/st.
12.4
9.9
14.9
Injection timing adjustment_03
Pump speed
r/min
2350
2350
2350
Average injection quantity
mm3/st.
30.1
28.1
32.1
Injection timing adjustment_04
Pump speed
r/min
1500
1500
1500
Average injection quantity
mm3/st.
31.8
30.8
32.8
Injection timing adjustment_05
Pump speed
r/min
1000
1000
1000
Average injection quantity
mm3/st.
30.2
28.2
32.2
Injection quantity adjustment
Pump speed
r/min
2635
2635
2635
Average injection quantity
mm3/st.
12.4
10.4
14.4
Difference in delivery
mm3/st.
4
Basic
*
Injection quantity adjustment_02
Pump speed
r/min
2850
2850
2850
Average injection quantity
mm3/st.
5
Governor adjustment
Pump speed
r/min
410
410
410
Average injection quantity
mm3/st.
7
6
8
Difference in delivery
mm3/st.
2
Basic
*
Governor adjustment_02
Pump speed
r/min
410
410
410
Average injection quantity
mm3/st.
7
6
8
Governor adjustment_03
Pump speed
r/min
500
500
500
Average injection quantity
mm3/st.
5
Timer adjustment
Pump speed
r/min
100
100
100
Average injection quantity
mm3/st.
70
60
80
Basic
*
Speed control lever angle
Pump speed
r/min
410
410
410
Average injection quantity
mm3/st.
0
0
0
Remarks
Magnet OFF
Magnet OFF
0000000901
Pump speed
r/min
1500
1500
1500
Overflow quantity
cm3/min
558
408
708
Stop lever angle
Pump speed
r/min
1500
1500
1500
Pressure
kPa
539.5
520
559
Pressure
kgf/cm2
5.5
5.3
5.7
Basic
*
Stop lever angle_02
Pump speed
r/min
1500
1500
1500
Pressure
kPa
539.5
520
559
Pressure
kgf/cm2
5.5
5.3
5.7
Stop lever angle_03
Pump speed
r/min
2350
2350
2350
Pressure
kPa
755.5
726
785
Pressure
kgf/cm2
7.7
7.4
8
0000001101
Pump speed
r/min
1500
1500
1500
Timer stroke
mm
6.2
6
6.4
Basic
*
_02
Pump speed
r/min
1000
1000
1000
Timer stroke
mm
2.5
2.1
2.9
_03
Pump speed
r/min
1500
1500
1500
Timer stroke
mm
6.2
5.9
6.5
_04
Pump speed
r/min
2000
2000
2000
Timer stroke
mm
8.7
8.1
9.3
_05
Pump speed
r/min
2350
2350
2350
Timer stroke
mm
10.1
9.6
10.6
0000001201
Max. applied voltage
V
8
8
8
Test voltage
V
13
12
14
0000001401
Pump speed
r/min
1500
1500
1500
Average injection quantity
mm3/st.
21.6
21.1
22.1
Timer stroke variation dT
mm
1.2
1
1.4
Basic
*
_02
Pump speed
r/min
1500
1500
1500
Average injection quantity
mm3/st.
21.6
20.6
22.6
Timer stroke variation dT
mm
1.2
0.9
1.5
_03
Pump speed
r/min
1500
1500
1500
Average injection quantity
mm3/st.
10
8.5
11.5
Timer stroke variation dT
mm
2.4
1.9
2.9
Timing setting
K dimension
mm
3.3
3.2
3.4
KF dimension
mm
5.72
5.62
5.82
MS dimension
mm
1.2
1.1
1.3
Control lever angle alpha
deg.
25
21
29
Control lever angle beta
deg.
43
40
46
Test data Ex:
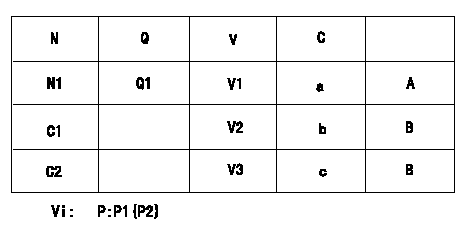
0000001801 POTENTIOMETER ADJUSTMENT

N:Pump speed
Q:Injection quantity
V:Output voltage
C:Position of the control lever
C1:Idle
C2:Full
A:Adjusting point
B:Checking point
P:Boost pressure
Vi:Applied voltage
----------
----------
N1=1000r/min Vi=10.00V Q1=20.8+-1.0cm3/1,000st V1=4.66+-0.03V V2=(1.00)V V3=(7.80)V P1=-kPa P2=-mmHg a=(20.5)deg b=0deg c=43+-3deg
----------
----------
N1=1000r/min Vi=10.00V Q1=20.8+-1.0cm3/1,000st V1=4.66+-0.03V V2=(1.00)V V3=(7.80)V P1=-kPa P2=-mmHg a=(20.5)deg b=0deg c=43+-3deg
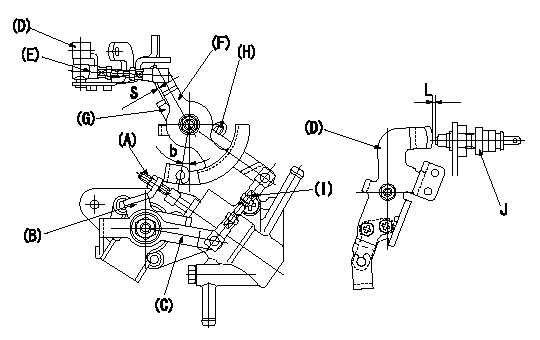
0000001901 SIDE LINK LEVER ADJUSTMENT

Side link lever adjustment
1. Adjusting the side link lever
Hold the control lever (D) at position a.
With the side link lever (G) contacting the stopper (H), turn the A/T lever (F) lightly clockwise to eliminate any rod (E) play.
At this time, adjust the length of rod (E) so that the gap between the A/T lever (F) and the lever (G) is S. Then fix.
J = idle switch
L = the dimension when the switch is depressed (ie, on)
----------
a=0deg S=1+-0.2mm
----------
S=1+-0.2mm b=10deg
----------
a=0deg S=1+-0.2mm
----------
S=1+-0.2mm b=10deg
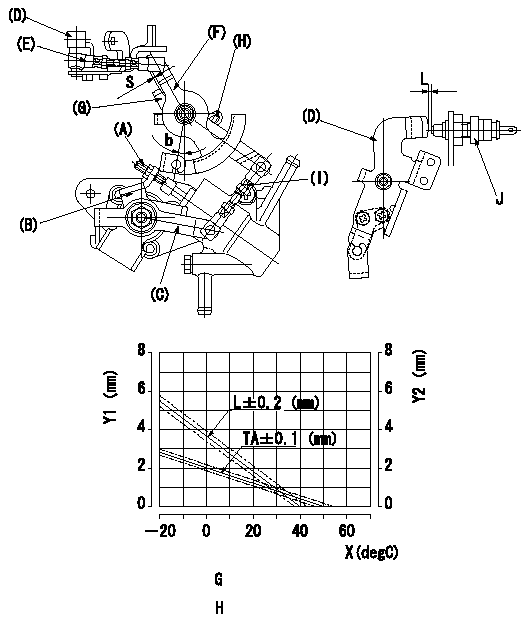
0000002001 W-CSD ADJUSTMENT

Adjustment of the W-CSD
1. Adjustment of the advance angle of the timer
(1)Determine the timer advance angle using the graph.
(2)Adjust screw A so that the timer advance angle determined in item (1) is obtained.
2. Adjustment of the W-FICD
Adjust the rod (I) so that the clearance from the control lever is L as determined from the graph.
At this time, CSD lever (B) and FICD lever (C) must contact. When the FICD lever is rotated clockwise, confirm that (D), (E), (F), (G), and (H) operate with no play.
Y1 = timer stroke TA
Y2 = control lever gap L
X = temperature t
G = timer stroke TA:
H = control lever gap L:
----------
----------
TA=-0.041t+2.46 (t>=-20degC) L=-0.0925t+3.65 (t>=-20decC)
----------
----------
TA=-0.041t+2.46 (t>=-20degC) L=-0.0925t+3.65 (t>=-20decC)
Information:
Illustration 7 g06347860
Injector male spade terminals
There are two options to build injector adapter harness for C3.3.If available, use the injector connector removed from C3.3 harness. Cut both 100 mm wires from the connector and attach bullet terminals that fit in the injector adapter harness C3.8 terminal from injector test kit.If no harness is available, build a harness with the following. Two female spade terminals for injector male spade terminal, two 16 gauge 100 mm wires, and two bullet terminals for injector adapter harness C3.8 terminal.
Illustration 8 g06345429
Injector adapter harness C2.4
Illustration 9 g06346223
Injector adapter harness C3.8
Illustration 10 g06346237
Injector male spade terminals
There are two options to build injector adapter harness for C2.4.If available, use the injector connector removed from C2.4 harness. Cut both 100 mm wires from the connector and attach bullet terminals that fit in the injector adapter harness C3.8 terminal from injector test kit.If no harness is available, build a harness with the following. Two female spade terminals for injector male spade terminal, two 16 gauge 100 mm wires, and two bullet terminals for injector adapter harness C3.8 terminal.Injector Test Set-up
Illustration 11 g06346391
Mounted nozzle test group
Find a suitable stable and surface to either mount or place the nozzle test group. Fill fuel container with #1 diesel and install high-pressure hose assembly. Use adaptors, if needed, based on nozzle tester. Tighten the fuel line adapter to (25 ft lbs). Install the fuel line adapter and tighten to (25 ft lbs) to allow connection to the injector.
Illustration 12 g06346423
Injector holder assembly
Take the injector test kit and remove all parts to assemble, as shown above. Take the injector holder and the clear fuel shield with screws from the kit and remove the screws using a 3mm alan wrench. Assemble the parts so the clear fuel shield with screws is on the bottom. While, the mounted injector holder is on top with the screws removed from before.
Illustration 13 g06346719
Fuel collector and injector holder
Place injector holder onto a fuel collector or another container to capture the injection spray.
Illustration 14 g06346839
Injector setup and harness connection
Install the injector that is needing to be tested into the opening at the top of injector holder. Attach the return fuel drain hose and run the drain hose to another fuel collector. Make the harness connection using the correct adapter for the C2.4, C3.3, and C3.8 engines. Connect the injector pulse tool and the injector adapter harness to the injector.
Illustration 15 g06346868
Complete setup of nozzle tester and injector test kit
Once injector test kit and nozzle test group are set up, connect fuel line adaptor on the high-pressure hose assembly to the injector, leave connection loose. Actuate the lever on the nozzle test group until fuel drips from connection allowing air to purge from setup. Tighten fuel line adaptor at injector to (25 ft lbs).Injector Test Procedure
Illustration 16 g06346881
Mounted nozzle test group (close-up)
Inspect the injector for any leaks. Using the lever on the nozzle tester group, build injection fuel pressure to (5000 psi). Turn the locking valve to insure there is no leakage back through the tester.
Let the nozzle test