Information injection-pump assembly
BOSCH
9 400 616 081
9400616081
ZEXEL
101693-9870
1016939870
NISSAN-DIESEL
16713Z6068
16713z6068
Rating:
Service parts 101693-9870 INJECTION-PUMP ASSEMBLY:
1.
_
7.
COUPLING PLATE
8.
_
9.
_
11.
Nozzle and Holder
16600-Z5578
12.
Open Pre:MPa(Kqf/cm2)
16.7{170}/21.6{220}
15.
NOZZLE SET
Cross reference number
BOSCH
9 400 616 081
9400616081
ZEXEL
101693-9870
1016939870
NISSAN-DIESEL
16713Z6068
16713z6068
Zexel num
Bosch num
Firm num
Name
9 400 616 081
16713Z6068 NISSAN-DIESEL
INJECTION-PUMP ASSEMBLY
FE6TB K 14BF INJECTION PUMP ASSY PE6AD PE
FE6TB K 14BF INJECTION PUMP ASSY PE6AD PE
Calibration Data:
Adjustment conditions
Test oil
1404 Test oil ISO4113 or {SAEJ967d}
1404 Test oil ISO4113 or {SAEJ967d}
Test oil temperature
degC
40
40
45
Nozzle and nozzle holder
105780-8140
Bosch type code
EF8511/9A
Nozzle
105780-0000
Bosch type code
DN12SD12T
Nozzle holder
105780-2080
Bosch type code
EF8511/9
Opening pressure
MPa
17.2
Opening pressure
kgf/cm2
175
Injection pipe
Outer diameter - inner diameter - length (mm) mm 6-2-600
Outer diameter - inner diameter - length (mm) mm 6-2-600
Overflow valve
134424-1520
Overflow valve opening pressure
kPa
162
147
177
Overflow valve opening pressure
kgf/cm2
1.65
1.5
1.8
Tester oil delivery pressure
kPa
157
157
157
Tester oil delivery pressure
kgf/cm2
1.6
1.6
1.6
Direction of rotation (viewed from drive side)
Right R
Right R
Injection timing adjustment
Direction of rotation (viewed from drive side)
Right R
Right R
Injection order
1-4-2-6-
3-5
Pre-stroke
mm
3.9
3.85
3.95
Beginning of injection position
Drive side NO.1
Drive side NO.1
Difference between angles 1
Cal 1-4 deg. 60 59.5 60.5
Cal 1-4 deg. 60 59.5 60.5
Difference between angles 2
Cyl.1-2 deg. 120 119.5 120.5
Cyl.1-2 deg. 120 119.5 120.5
Difference between angles 3
Cal 1-6 deg. 180 179.5 180.5
Cal 1-6 deg. 180 179.5 180.5
Difference between angles 4
Cal 1-3 deg. 240 239.5 240.5
Cal 1-3 deg. 240 239.5 240.5
Difference between angles 5
Cal 1-5 deg. 300 299.5 300.5
Cal 1-5 deg. 300 299.5 300.5
Injection quantity adjustment
Adjusting point
-
Rack position
13.2
Pump speed
r/min
700
700
700
Average injection quantity
mm3/st.
100.4
98.4
102.4
Max. variation between cylinders
%
0
-3.5
3.5
Basic
*
Fixing the rack
*
Standard for adjustment of the maximum variation between cylinders
*
Injection quantity adjustment_02
Adjusting point
H
Rack position
9.5+-0.5
Pump speed
r/min
275
275
275
Average injection quantity
mm3/st.
8.6
6.8
10.4
Max. variation between cylinders
%
0
-10
10
Fixing the rack
*
Standard for adjustment of the maximum variation between cylinders
*
Injection quantity adjustment_03
Adjusting point
A
Rack position
R1(13.2)
Pump speed
r/min
700
700
700
Average injection quantity
mm3/st.
100.4
99.4
101.4
Basic
*
Fixing the lever
*
Boost pressure
kPa
28
28
Boost pressure
mmHg
210
210
Injection quantity adjustment_04
Adjusting point
B
Rack position
(R1+0.2)
Pump speed
r/min
1400
1400
1400
Average injection quantity
mm3/st.
107.5
104.3
110.7
Fixing the lever
*
Boost pressure
kPa
28
28
Boost pressure
mmHg
210
210
Injection quantity adjustment_05
Adjusting point
C
Rack position
R2(R1+0.
8)
Pump speed
r/min
400
400
400
Average injection quantity
mm3/st.
104.5
101.3
107.7
Fixing the lever
*
Boost pressure
kPa
28
28
Boost pressure
mmHg
210
210
Injection quantity adjustment_06
Adjusting point
D
Rack position
R2-1.8
Pump speed
r/min
400
400
400
Average injection quantity
mm3/st.
66.7
64.7
68.7
Fixing the lever
*
Boost pressure
kPa
0
0
0
Boost pressure
mmHg
0
0
0
Injection quantity adjustment_07
Adjusting point
I
Rack position
-
Pump speed
r/min
150
150
150
Average injection quantity
mm3/st.
89
89
109
Fixing the lever
*
Boost pressure
kPa
0
0
0
Boost pressure
mmHg
0
0
0
Rack limit
*
Boost compensator adjustment
Pump speed
r/min
400
400
400
Rack position
R2-1.8
Boost pressure
kPa
4
2.7
5.3
Boost pressure
mmHg
30
20
40
Boost compensator adjustment_02
Pump speed
r/min
400
400
400
Rack position
R2(R1+0.
8)
Boost pressure
kPa
14.7
14.7
14.7
Boost pressure
mmHg
110
110
110
Timer adjustment
Pump speed
r/min
1170--
Advance angle
deg.
0
0
0
Load
3/4
Remarks
Start
Start
Timer adjustment_02
Pump speed
r/min
1120
Advance angle
deg.
0.5
Load
3/4
Timer adjustment_03
Pump speed
r/min
1400
Advance angle
deg.
3
2.5
3.5
Load
4/4
Remarks
Finish
Finish
Test data Ex:
Governor adjustment
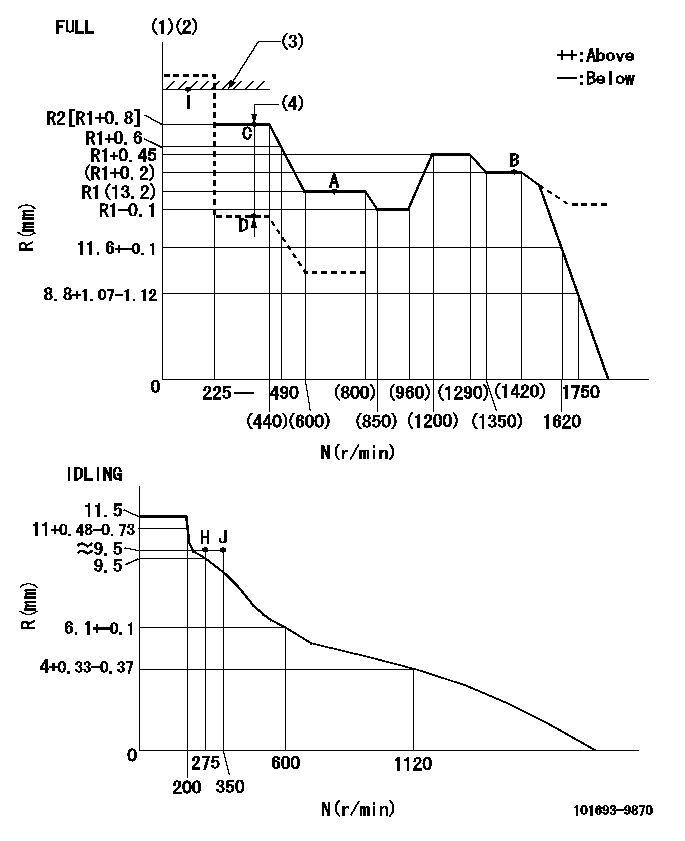
N:Pump speed
R:Rack position (mm)
(1)Torque cam stamping: T1
(2)Tolerance for racks not indicated: +-0.05mm.
(3)RACK LIMIT
(4)Boost compensator stroke: BCL
----------
T1=H82 BCL=1.8+-0.1mm
----------
----------
T1=H82 BCL=1.8+-0.1mm
----------
Speed control lever angle

F:Full speed
I:Idle
(1)Use the hole at R = aa
(2)Stopper bolt set position 'H'
----------
aa=36mm
----------
a=26.5deg+-5deg b=39deg+-3deg
----------
aa=36mm
----------
a=26.5deg+-5deg b=39deg+-3deg
Stop lever angle

N:Pump normal
S:Stop the pump.
(1)Use the pin at R = aa
----------
aa=42mm
----------
a=40deg+-5deg b=27deg+-5deg
----------
aa=42mm
----------
a=40deg+-5deg b=27deg+-5deg
0000001501 RACK SENSOR
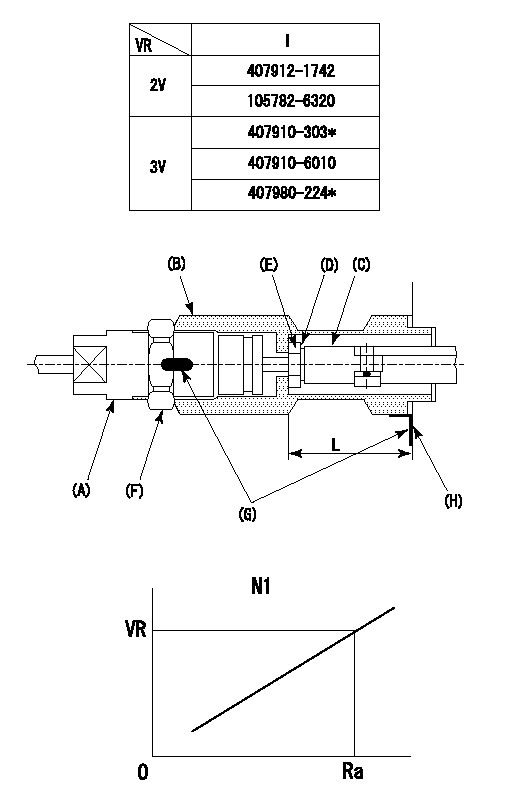
(VR) measurement voltage
(I) Part number of the control unit
(G) Apply red paint.
(H): End surface of the pump
1. Rack limit adjustment
(1)Fix the rack at the rack limit position Ra.
(2)Install the shim (D) to the rod (C) and tighten nut (E).
(3)Select a shim (D) so that the distance between the end surface of the pump and the nut (E) is L.
(4)Release the rack fixing and mount the joint (B) and fix.
(5)At this time, confirm that the shim (D) does not interfere with the joint (B).
2. Rack sensor adjustment (-0420)
(1)Screw in the bobbin (A) until it contacts the joint (B).
(2)Fix the speed control lever at the full side.
(3)Set the speed to N1 r/min.
(4)Adjust the depth that the bobbin (A) is screwed in so that the control unit's rack sensor output voltage is VR+-0.02 V, then tighten the nut (F).
(5)Apply G at two places.
Connecting part between the joint (B) and the nut (F)
Connecting part between the joint (B) and the end surface of the pump (H)
----------
L=33-0.2mm N1=700r/min Ra=R1(13.2)mm
----------
----------
L=33-0.2mm N1=700r/min Ra=R1(13.2)mm
----------
Timing setting

(1)Pump vertical direction
(2)Position of timer's threaded hole at No 1 cylinder's beginning of injection
(3)-
(4)-
----------
----------
a=(60deg)
----------
----------
a=(60deg)
Information:
Actual RackThe ECM's interpretation of the signal from the Rack Position Sensor which represents actual position of the rack.Actual Timing AdvanceDegrees of advance beyond static, as measured by the Timing Position Sensor (assumes that Timing Position Sensor is calibrated).After Market DeviceA device or accessory installed by the customer after the vehicle is delivered.Air-To-Air Aftercooler (ATAAC)A means of cooling intake air after the turbocharger, using ambient air for cooling. The intake air is passed through an aftercooler (heat exchanger) mounted in front of the radiator before going to the intake manifold.Alternating Current (AC)The direction of current flow changes (alternates) regularly and constantly.American Wire Gauge (AWG)A measure of the diameter (and therefor the current carrying ability) of electrical wire. The smaller the AWG number, the larger the wire.Before Top Dead Center (BTDC) or Before Top Center (BTC)The 180° of crankshaft rotation before the piston reaches Top Dead Center (normal direction of rotation).Boost Pressure SensorThis sensor measures inlet manifold air pressure and sends a signal to the ECM.Brushless Torque Motor (BTM)Solenoid used to move fuel rack servo spool valve and timing advance spool valve.Bypass CircuitA circuit, usually temporary, to substitute for an existing circuit, typically for test purposes.CalibrationAs used here, is an electronic adjustment of a sensor signal.Cruise Control RangeThe range that the cruise control can operate within. Usually limited to the speed range anticipated on the open road.CodeSee Diagnostic Code.Customer Specified ParameterA Parameter that can be changed and whose value is set by the customer. Protected by Customer Passwords.Data LinkAn electrical connection for communication with other microprocessor based devices that are compatible with the American Trucking Association and SAE Standard such as trip recorders, electronic dashboards, and maintenance systems. The Data Link is also the communication medium used for programming and troubleshooting with Caterpillar devices.Desired Rack Position ("Des Rack Pos" on ECAP)The rack setting calculated by the ECM as needed to attain or maintain the Desired RPM.Desired RPMAn input to the electronic governor within the ECM. The electronic governor uses inputs from the Throttle Position Sensor, Engine Speed/Timing Sensor and Customer Parameters to determine "Desired RPM".Desired Timing Advance ("Des Timing Adv" on ECAP)The injection timing advance calculated by the ECM as required to meet emission and performance specifications.Diagnostic CodeSometimes referred to as a "fault code", it is an indication of a problem or event in the PEEC III System.Diagnostic LampSometimes referred to as the "check engine light", it is used to warn the operator of the presence of an active diagnostic code.Digital Diagnostic Tool (DDT)A Caterpillar electronic service tool used for programming and for diagnosing the 3406B PEEC III system.Direct CurrentThe type of current where the only direction of current flow is consistently in one direction only.Duty CycleSame as Pulse Width Modulation.Electronic Control Analyzer Programmer (ECAP)A Caterpillar Electronic Service Tool used for programming and diagnosing a variety of electronic controls. Electronic Control Module (ECM)The engine control computer that provides power to the PEEC III electronics, monitors PEEC III inputs and acts as a governor to control engine rpm.Engine Speed
