Information injection-pump assembly
BOSCH
9 400 615 981
9400615981
ZEXEL
101691-1991
1016911991
MITSUBISHI
ME088110
me088110

Rating:
Cross reference number
BOSCH
9 400 615 981
9400615981
ZEXEL
101691-1991
1016911991
MITSUBISHI
ME088110
me088110
Zexel num
Bosch num
Firm num
Name
101691-1991
9 400 615 981
ME088110 MITSUBISHI
INJECTION-PUMP ASSEMBLY
6D31 * K
6D31 * K
Calibration Data:
Adjustment conditions
Test oil
1404 Test oil ISO4113 or {SAEJ967d}
1404 Test oil ISO4113 or {SAEJ967d}
Test oil temperature
degC
40
40
45
Nozzle and nozzle holder
105780-8140
Bosch type code
EF8511/9A
Nozzle
105780-0000
Bosch type code
DN12SD12T
Nozzle holder
105780-2080
Bosch type code
EF8511/9
Opening pressure
MPa
17.2
Opening pressure
kgf/cm2
175
Injection pipe
Outer diameter - inner diameter - length (mm) mm 6-2-600
Outer diameter - inner diameter - length (mm) mm 6-2-600
Overflow valve
131424-5620
Overflow valve opening pressure
kPa
157
123
191
Overflow valve opening pressure
kgf/cm2
1.6
1.25
1.95
Tester oil delivery pressure
kPa
157
157
157
Tester oil delivery pressure
kgf/cm2
1.6
1.6
1.6
Direction of rotation (viewed from drive side)
Right R
Right R
Injection timing adjustment
Direction of rotation (viewed from drive side)
Right R
Right R
Injection order
1-5-3-6-
2-4
Pre-stroke
mm
3.5
3.45
3.55
Beginning of injection position
Drive side NO.1
Drive side NO.1
Difference between angles 1
Cal 1-5 deg. 60 59.5 60.5
Cal 1-5 deg. 60 59.5 60.5
Difference between angles 2
Cal 1-3 deg. 120 119.5 120.5
Cal 1-3 deg. 120 119.5 120.5
Difference between angles 3
Cal 1-6 deg. 180 179.5 180.5
Cal 1-6 deg. 180 179.5 180.5
Difference between angles 4
Cyl.1-2 deg. 240 239.5 240.5
Cyl.1-2 deg. 240 239.5 240.5
Difference between angles 5
Cal 1-4 deg. 300 299.5 300.5
Cal 1-4 deg. 300 299.5 300.5
Injection quantity adjustment
Adjusting point
A
Rack position
9.6
Pump speed
r/min
750
750
750
Average injection quantity
mm3/st.
50.3
49.3
51.3
Max. variation between cylinders
%
0
-2.5
2.5
Basic
*
Fixing the lever
*
Injection quantity adjustment_02
Adjusting point
-
Rack position
8.4+-0.5
Pump speed
r/min
325
325
325
Average injection quantity
mm3/st.
7.5
6.2
8.8
Max. variation between cylinders
%
0
-14
14
Fixing the rack
*
Remarks
Adjust only variation between cylinders; adjust governor according to governor specifications.
Adjust only variation between cylinders; adjust governor according to governor specifications.
Injection quantity adjustment_03
Adjusting point
C
Rack position
-
Pump speed
r/min
100
100
100
Average injection quantity
mm3/st.
67.5
67.5
72.5
Fixing the lever
*
Rack limit
*
Timer adjustment
Pump speed
r/min
750
Advance angle
deg.
0
0
0
Remarks
Do not advance until starting N = 750.
Do not advance until starting N = 750.
Timer adjustment_02
Pump speed
r/min
750
Advance angle
deg.
0.5
Timer adjustment_03
Pump speed
r/min
-
Advance angle
deg.
3
3
3
Remarks
Measure the actual speed, stop
Measure the actual speed, stop
Test data Ex:
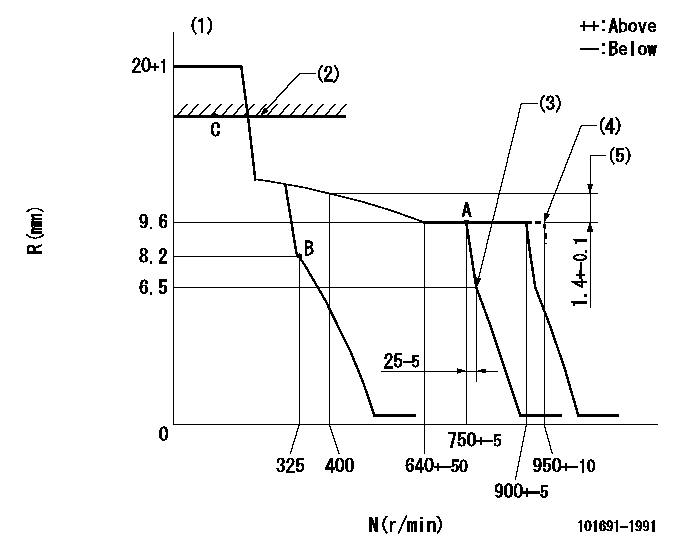
Governor adjustment

N:Pump speed
R:Rack position (mm)
(1)Target notch: K
(2)RACK LIMIT
(3)Idle sub spring setting: L1.
(4)At shipping
(5)Rack difference between N = N1 and N = N2
----------
K=15 L1=6.3+-0.1mm N1=750r/min N2=400r/min
----------
----------
K=15 L1=6.3+-0.1mm N1=750r/min N2=400r/min
----------
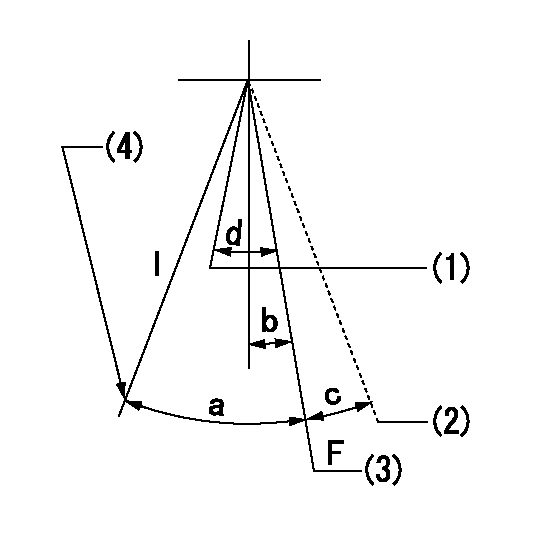
Speed control lever angle

F:Full speed
I:Idle
(1)Set the pump speed at aa
(2)At shipping
(3)Set the pump speed at bb.
(4)Stopper bolt setting
----------
aa=750r/min bb=900r/min
----------
a=26deg+-5deg b=3deg+-5deg c=(2deg) d=7deg+-5deg
----------
aa=750r/min bb=900r/min
----------
a=26deg+-5deg b=3deg+-5deg c=(2deg) d=7deg+-5deg
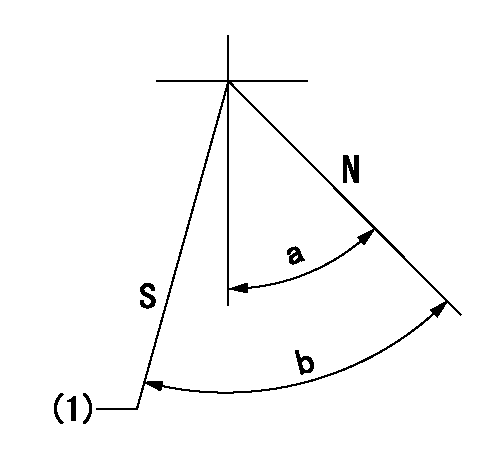
Stop lever angle

N:Pump normal
S:Stop the pump.
(1)At shipping
----------
----------
a=38deg+-5deg b=53deg+-5deg
----------
----------
a=38deg+-5deg b=53deg+-5deg
Timing setting

(1)Pump vertical direction
(2)Position of gear mark '3' at No 1 cylinder's beginning of injection
(3)B.T.D.C.: aa
(4)-
----------
aa=20deg
----------
a=(140deg)
----------
aa=20deg
----------
a=(140deg)
Information:
start by:a) remove fuel injection pump housing and governor1. Install the fuel injection pump housing on tool (A). 2. Remove seven bolts (1) and governor housing (2). Later fuel injection pump housings have a thrust washer for the fuel injection pump camshaft. The thrust washer is behind the flange for the flyweights on the camshaft. To hold the thrust washer in place governor shaft (3) and the camshaft must be held in toward the fuel transfer pump any time sleeve (4) is removed. 3. Remove the plug from the cover and install tool (B) in the hole as shown. Turn the injection pump camshaft until tool (B) can be pushed into the groove (slot) in the camshaft. Any time the drive sleeve is removed from the camshaft a new one must be installed. The camshaft has serrations (splines) that cut grooves into the drive sleeve when it is installed to give a positive drive connection. If a formerly used drive sleeve is installed again it can slip (slide around) on the camshaft. 4. Install tool (C) in the threads of sleeve (4). Tighten the bolt until the sleeve can be removed. 5. Remove four bolts (5) and fuel transfer pump body (6) from the housing.6. Disconnect drain line (7) from the fitting on the back of fuel transfer pump body. 7. Remove gear (8) and O-ring seal (9) from the pump body. 8. Remove seals (10) from the pump body. 9. Remove drive gear (11) and the key from the camshaft. Install Fuel Transfer Pump
The fuel injection camshaft must be held in toward the fuel transfer pump during installation of the fuel transfer pump parts to hold the camshaft thrust washer in its counterbore. The thrust washer will be damaged when the sleeve is installed on the camshaft if it is not in the correct position. 1. Install key (1) and drive gear (2) on the shaft.2. Put No. 3 Aviation Permatex on the outside diameter of the seals for body (3). 3. Use tooling (B) to install the first seal in the body with the lip down and the second seal with the lip up. Install the first seal to a depth of 11.5 mm (.453 in.) and the second seal to a depth of 0.75 mm (.030 in.).4. Remove the extra permatex from the body and seals after installation. Be sure the drain hole between the seals is open. 5. Install O-ring seal (4) and gear (5) on the body. 6. Install tool (C) in the end of the fuel injection pump camshaft. Connect drain line (6) to the fitting on the back of the body and put the body in position on the fuel injection pump housing. Install the bolts that hold the body in place.7. Install tool (E) in the camshaft so it will not turn.8. Put a new sleeve (7) on the camshaft. A new drive sleeve must be installed because a used drive sleeve can slip (slide around) on the camshaft.9. Tighten
The fuel injection camshaft must be held in toward the fuel transfer pump during installation of the fuel transfer pump parts to hold the camshaft thrust washer in its counterbore. The thrust washer will be damaged when the sleeve is installed on the camshaft if it is not in the correct position. 1. Install key (1) and drive gear (2) on the shaft.2. Put No. 3 Aviation Permatex on the outside diameter of the seals for body (3). 3. Use tooling (B) to install the first seal in the body with the lip down and the second seal with the lip up. Install the first seal to a depth of 11.5 mm (.453 in.) and the second seal to a depth of 0.75 mm (.030 in.).4. Remove the extra permatex from the body and seals after installation. Be sure the drain hole between the seals is open. 5. Install O-ring seal (4) and gear (5) on the body. 6. Install tool (C) in the end of the fuel injection pump camshaft. Connect drain line (6) to the fitting on the back of the body and put the body in position on the fuel injection pump housing. Install the bolts that hold the body in place.7. Install tool (E) in the camshaft so it will not turn.8. Put a new sleeve (7) on the camshaft. A new drive sleeve must be installed because a used drive sleeve can slip (slide around) on the camshaft.9. Tighten
Have questions with 101691-1991?
Group cross 101691-1991 ZEXEL
Mitsubishi
101691-1991
9 400 615 981
ME088110
INJECTION-PUMP ASSEMBLY
6D31
6D31