Information injection-pump assembly
BOSCH
9 400 615 875
9400615875
ZEXEL
101608-9430
1016089430
NISSAN-DIESEL
16713Z6763
16713z6763

Rating:
Service parts 101608-9430 INJECTION-PUMP ASSEMBLY:
1.
_
7.
COUPLING PLATE
8.
_
9.
_
11.
Nozzle and Holder
16600-Z6005
12.
Open Pre:MPa(Kqf/cm2)
16.7{170}/22.6{230}
14.
NOZZLE
Include in #1:
101608-9430
as INJECTION-PUMP ASSEMBLY
Include in #2:
104257-1110
as _
Cross reference number
BOSCH
9 400 615 875
9400615875
ZEXEL
101608-9430
1016089430
NISSAN-DIESEL
16713Z6763
16713z6763
Zexel num
Bosch num
Firm num
Name
9 400 615 875
16713Z6763 NISSAN-DIESEL
INJECTION-PUMP ASSEMBLY
MD92 K 14BF INJECTION PUMP ASSY PE6AD PE
MD92 K 14BF INJECTION PUMP ASSY PE6AD PE
Calibration Data:
Adjustment conditions
Test oil
1404 Test oil ISO4113 or {SAEJ967d}
1404 Test oil ISO4113 or {SAEJ967d}
Test oil temperature
degC
40
40
45
Nozzle and nozzle holder
105780-8260
Bosch type code
9 430 610 133
Nozzle
105780-0120
Bosch type code
1 688 901 990
Nozzle holder
105780-2190
Opening pressure
MPa
18
Opening pressure
kgf/cm2
184
Injection pipe
Outer diameter - inner diameter - length (mm) mm 6-2-600
Outer diameter - inner diameter - length (mm) mm 6-2-600
Overflow valve
131424-8921
Overflow valve opening pressure
kPa
157
123
191
Overflow valve opening pressure
kgf/cm2
1.6
1.25
1.95
Tester oil delivery pressure
kPa
255
255
255
Tester oil delivery pressure
kgf/cm2
2.6
2.6
2.6
Direction of rotation (viewed from drive side)
Left L
Left L
Injection timing adjustment
Direction of rotation (viewed from drive side)
Left L
Left L
Injection order
1-4-2-6-
3-5
Pre-stroke
mm
3.7
3.65
3.75
Beginning of injection position
Governor side NO.1
Governor side NO.1
Difference between angles 1
Cal 1-4 deg. 60 59.5 60.5
Cal 1-4 deg. 60 59.5 60.5
Difference between angles 2
Cyl.1-2 deg. 120 119.5 120.5
Cyl.1-2 deg. 120 119.5 120.5
Difference between angles 3
Cal 1-6 deg. 180 179.5 180.5
Cal 1-6 deg. 180 179.5 180.5
Difference between angles 4
Cal 1-3 deg. 240 239.5 240.5
Cal 1-3 deg. 240 239.5 240.5
Difference between angles 5
Cal 1-5 deg. 300 299.5 300.5
Cal 1-5 deg. 300 299.5 300.5
Injection quantity adjustment
Adjusting point
-
Rack position
11.8
Pump speed
r/min
800
800
800
Average injection quantity
mm3/st.
95
93.4
96.6
Max. variation between cylinders
%
0
-3.5
3.5
Basic
*
Fixing the rack
*
Standard for adjustment of the maximum variation between cylinders
*
Injection quantity adjustment_02
Adjusting point
Z
Rack position
9.5+-0.5
Pump speed
r/min
280
280
280
Average injection quantity
mm3/st.
12
11
13
Max. variation between cylinders
%
0
-10
10
Fixing the rack
*
Standard for adjustment of the maximum variation between cylinders
*
Injection quantity adjustment_03
Adjusting point
A
Rack position
R1(11.8)
Pump speed
r/min
800
800
800
Average injection quantity
mm3/st.
95
94
96
Basic
*
Fixing the lever
*
Injection quantity adjustment_04
Adjusting point
B
Rack position
R1+0.9
Pump speed
r/min
1450
1450
1450
Average injection quantity
mm3/st.
100.5
96.5
104.5
Fixing the lever
*
Injection quantity adjustment_05
Adjusting point
I
Rack position
-
Pump speed
r/min
100
100
100
Average injection quantity
mm3/st.
125
125
135
Fixing the lever
*
Rack limit
*
Timer adjustment
Pump speed
r/min
970--
Advance angle
deg.
0
0
0
Remarks
Start
Start
Timer adjustment_02
Pump speed
r/min
920
Advance angle
deg.
0.5
Timer adjustment_03
Pump speed
r/min
(1000)
Advance angle
deg.
1.5
1
2
Timer adjustment_04
Pump speed
r/min
1160
Advance angle
deg.
1.5
1
2
Timer adjustment_05
Pump speed
r/min
1450
Advance angle
deg.
7
6.5
7.5
Remarks
Finish
Finish
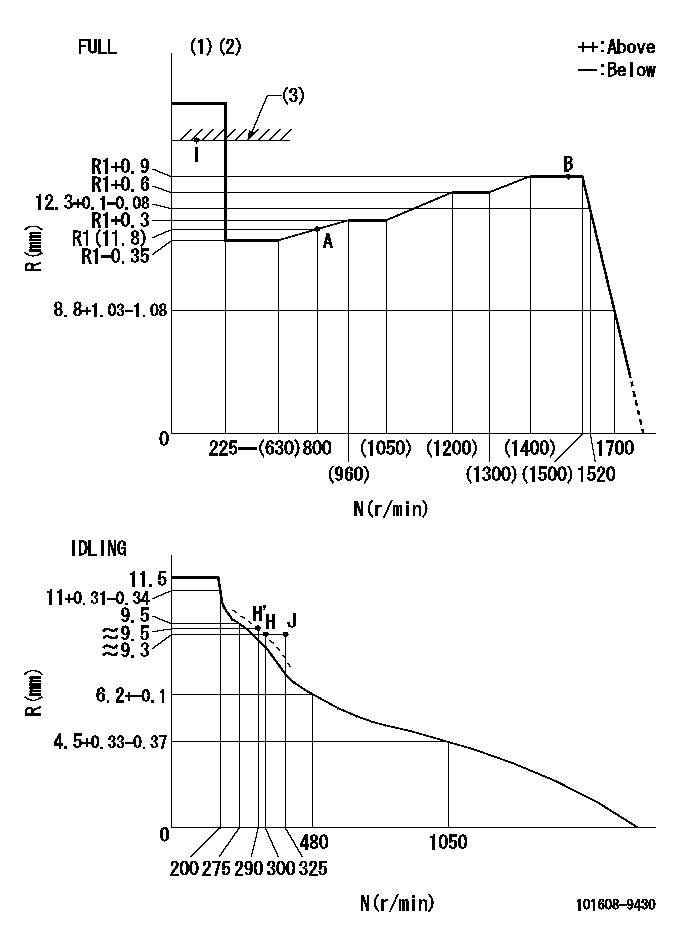
Test data Ex:
Governor adjustment

N:Pump speed
R:Rack position (mm)
(1)Torque cam stamping: T1
(2)Tolerance for racks not indicated: +-0.05mm.
(3)RACK LIMIT
----------
T1=L85
----------
----------
T1=L85
----------
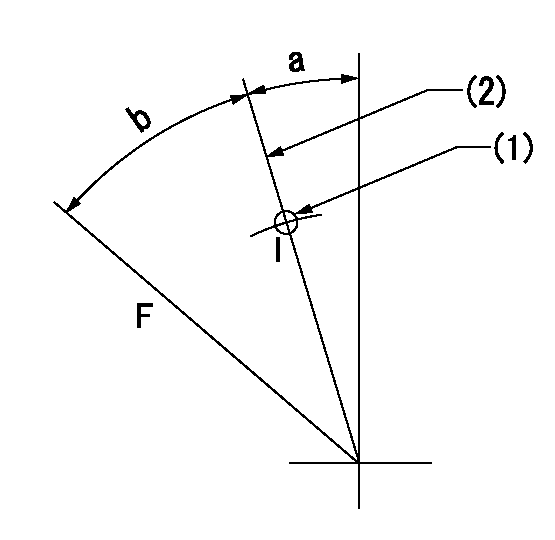
Speed control lever angle

F:Full speed
I:Idle
(1)Use the hole at R = aa
(2)Stopper bolt setting
----------
aa=38mm
----------
a=6.5deg+-5deg b=35deg+-3deg
----------
aa=38mm
----------
a=6.5deg+-5deg b=35deg+-3deg
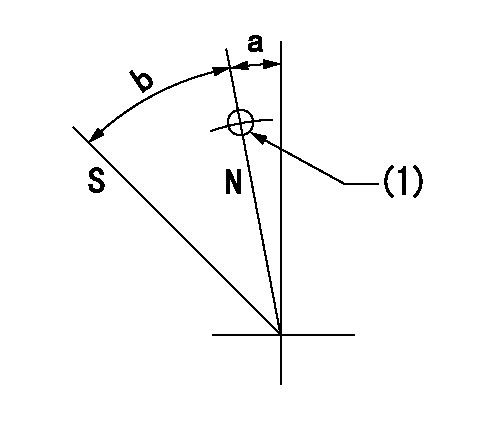
Stop lever angle

N:Pump normal
S:Stop the pump.
(1)Use the pin at R = aa
----------
aa=42mm
----------
a=5deg+-5deg b=40deg+-5deg
----------
aa=42mm
----------
a=5deg+-5deg b=40deg+-5deg
Timing setting

(1)Pump vertical direction
(2)Position of timer's threaded hole at No 1 cylinder's beginning of injection
(3)-
(4)-
----------
----------
a=(80deg)
----------
----------
a=(80deg)
Information:
This Program can only be administered after a failure occurs. The decision whether to apply the Program is made by the dealer. When reporting the repair, use "PS5562" as the Part Number and "7755" as the Group Number. Use "96" as the Warranty Claim Description Code and use "Z" as the SIMS Description Code.
Termination Date
December 31, 1999Problem
The connection plate from the fuel injection pump lever may wear prematurely causing the return spring to disconnect on certain 307 Excavators. When the return spring disconnects, the fuel injection pump will no longer operate properly.
Affected Product
Model & Identification Number
307 (2WM96-1002)
Parts Needed
1 - 5C2890 Nut1 - 8T4138 Bolt2 - 9X8256 Washer1 - 1393951 Strip1 - 1643187 PlateAction Required
See the attached Rework Procedures.
Service Claim Allowances
This is a 0.5-hour job.
Parts Disposition
Handle the parts in accordance with your Warranty Bulletin on warranty parts handling.
Attach.(1-Rework Procedure)Rework Procedure
1. Disconnect 3W6485 Spring from both sides.2. Unscrew 8T4134 Nut, remove 9X8256 Washer and 1190312 Plate, put back in place 9X8256 Washer and 8T4134 Nut. (Refer to Illustration 1).3. Install 1393951 Strip using existing bolt located on top left side of the 6I0835 Front Housing. The strip must be oriented so to be aligned with the spring which will be connected to the lever. See Illustration 2.4. Install the new 1643187 Plate against the pump lever, using the hole which is below the connection to the governor cable. 8T4138 Bolt goes through 9X8256 Washer, 1643187 Plate, pump lever, 9X8256 Washer and 5C2890 Nut. Refer to Illustrations 3 and 4.5. Connect 3W6485 Spring to 1393951 Strip and 1643187 Plate. Refer to Illustrations 2 and 3)
Illustration 1
Illustration 2
Illustration 3
Illustration 4