Information injection-pump assembly
BOSCH
9 400 615 724
9400615724
ZEXEL
101607-6731
1016076731
MITSUBISHI
ME075478
me075478

Rating:
Include in #1:
101402-7780
as _
Cross reference number
BOSCH
9 400 615 724
9400615724
ZEXEL
101607-6731
1016076731
MITSUBISHI
ME075478
me075478
Zexel num
Bosch num
Firm num
Name
101607-6731
9 400 615 724
ME075478 MITSUBISHI
INJECTION-PUMP ASSEMBLY
6D17 K
6D17 K
Calibration Data:
Adjustment conditions
Test oil
1404 Test oil ISO4113 or {SAEJ967d}
1404 Test oil ISO4113 or {SAEJ967d}
Test oil temperature
degC
40
40
45
Nozzle and nozzle holder
105780-8140
Bosch type code
EF8511/9A
Nozzle
105780-0000
Bosch type code
DN12SD12T
Nozzle holder
105780-2080
Bosch type code
EF8511/9
Opening pressure
MPa
17.2
Opening pressure
kgf/cm2
175
Injection pipe
Outer diameter - inner diameter - length (mm) mm 6-2-600
Outer diameter - inner diameter - length (mm) mm 6-2-600
Overflow valve
131424-8420
Overflow valve opening pressure
kPa
255
221
289
Overflow valve opening pressure
kgf/cm2
2.6
2.25
2.95
Tester oil delivery pressure
kPa
157
157
157
Tester oil delivery pressure
kgf/cm2
1.6
1.6
1.6
Direction of rotation (viewed from drive side)
Left L
Left L
Injection timing adjustment
Direction of rotation (viewed from drive side)
Left L
Left L
Injection order
1-5-3-6-
2-4
Pre-stroke
mm
3.2
3.15
3.25
Beginning of injection position
Governor side NO.1
Governor side NO.1
Difference between angles 1
Cal 1-5 deg. 60 59.5 60.5
Cal 1-5 deg. 60 59.5 60.5
Difference between angles 2
Cal 1-3 deg. 120 119.5 120.5
Cal 1-3 deg. 120 119.5 120.5
Difference between angles 3
Cal 1-6 deg. 180 179.5 180.5
Cal 1-6 deg. 180 179.5 180.5
Difference between angles 4
Cyl.1-2 deg. 240 239.5 240.5
Cyl.1-2 deg. 240 239.5 240.5
Difference between angles 5
Cal 1-4 deg. 300 299.5 300.5
Cal 1-4 deg. 300 299.5 300.5
Injection quantity adjustment
Adjusting point
-
Rack position
12
Pump speed
r/min
850
850
850
Each cylinder's injection qty
mm3/st.
85.1
82.5
87.7
Basic
*
Fixing the rack
*
Standard for adjustment of the maximum variation between cylinders
*
Injection quantity adjustment_02
Adjusting point
Z
Rack position
9.5+-0.5
Pump speed
r/min
800
800
800
Each cylinder's injection qty
mm3/st.
10.8
9.2
12.4
Fixing the rack
*
Standard for adjustment of the maximum variation between cylinders
*
Injection quantity adjustment_03
Adjusting point
A
Rack position
R1(12)
Pump speed
r/min
850
850
850
Average injection quantity
mm3/st.
85.1
84.1
86.1
Basic
*
Fixing the lever
*
Injection quantity adjustment_04
Adjusting point
B
Rack position
R1+0.85
Pump speed
r/min
1450
1450
1450
Average injection quantity
mm3/st.
99.9
95.9
103.9
Fixing the lever
*
Injection quantity adjustment_05
Adjusting point
I
Rack position
-
Pump speed
r/min
100
100
100
Average injection quantity
mm3/st.
91
81
101
Fixing the lever
*
Rack limit
*
Timer adjustment
Pump speed
r/min
1100
Advance angle
deg.
0.5
Timer adjustment_02
Pump speed
r/min
1300
Advance angle
deg.
2.5
2.5
3.5
Timer adjustment_03
Pump speed
r/min
1450
Advance angle
deg.
6
5.5
6.5
Remarks
Finish
Finish
Test data Ex:
Governor adjustment
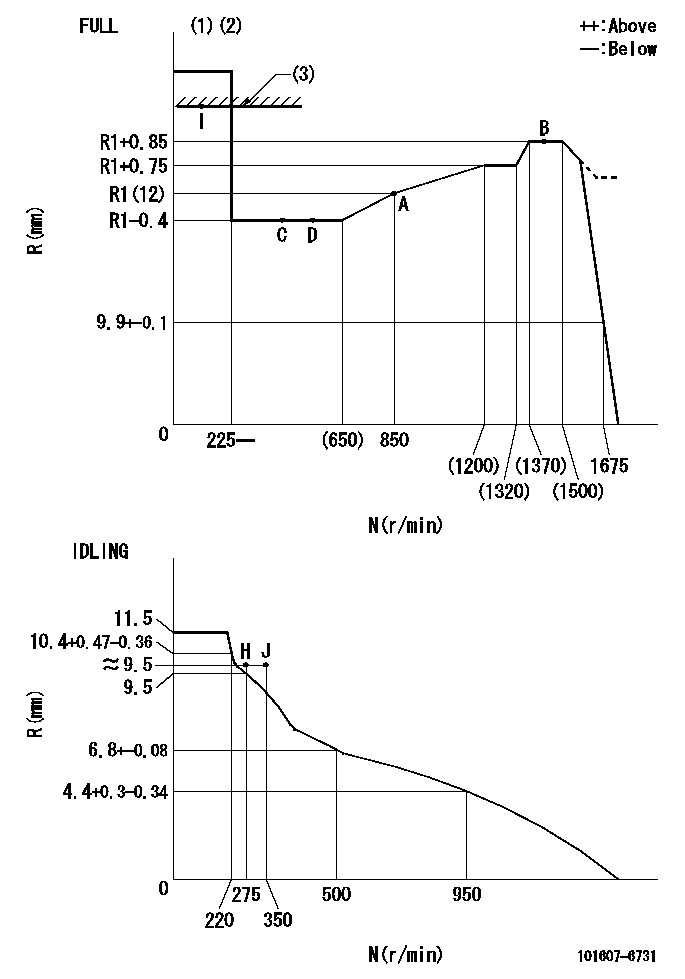
N:Pump speed
R:Rack position (mm)
(1)Torque cam stamping: T1
(2)Tolerance for racks not indicated: +-0.05mm.
(3)RACK LIMIT
----------
T1=H28
----------
----------
T1=H28
----------
Speed control lever angle
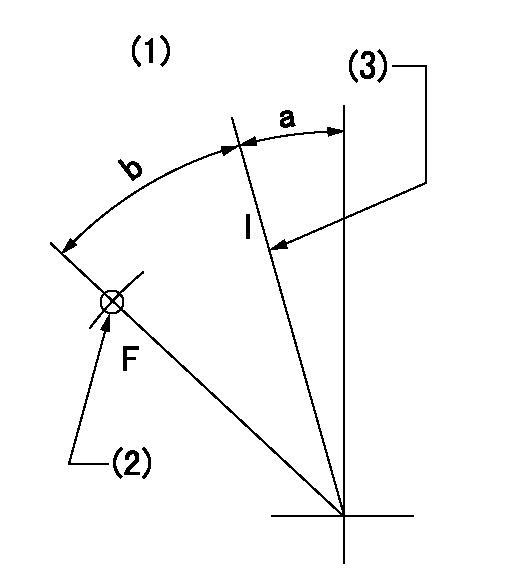
F:Full speed
I:Idle
(1)Accelerator lever
(2)Use the hole at R = aa
(3)Stopper bolt set position 'H'
----------
aa=29mm
----------
a=24deg+-5deg b=(47.5deg)+-3deg
----------
aa=29mm
----------
a=24deg+-5deg b=(47.5deg)+-3deg
Stop lever angle
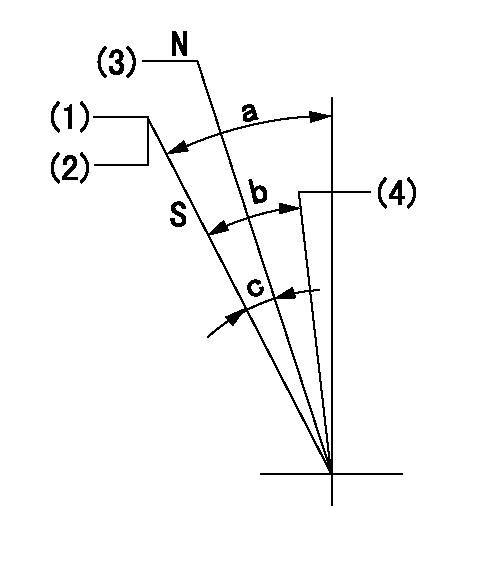
N:Engine manufacturer's normal use
S:Stop the pump.
(1)Set the stopper bolt at pump speed = aa and rack position = bb (non-injection rack position). Confirm non-injection.
(2)After setting the stopper bolt, confirm non-injection at speed cc. Rack position = dd (non-injection rack position).
(3)Rack position = approximately ee.
(4)Free (at delivery)
----------
aa=1450r/min bb=7.2-0.5mm cc=275r/min dd=(8.8)mm ee=15mm
----------
a=36.5deg+-5deg b=(25deg) c=13deg+-5deg
----------
aa=1450r/min bb=7.2-0.5mm cc=275r/min dd=(8.8)mm ee=15mm
----------
a=36.5deg+-5deg b=(25deg) c=13deg+-5deg
0000001501 LEVER
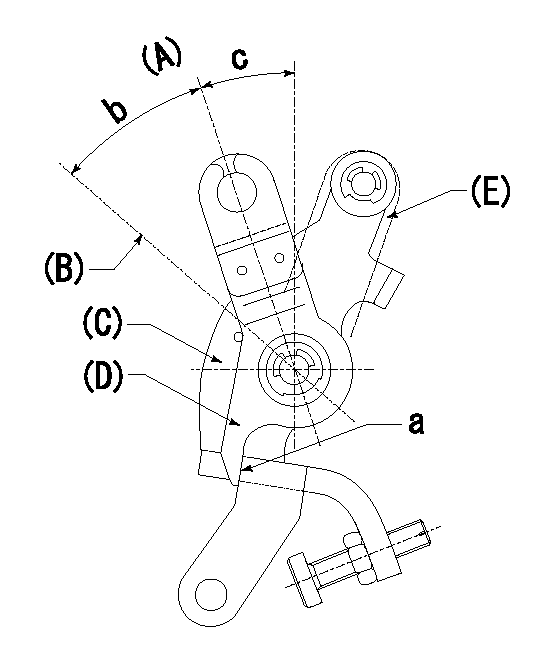
(A) Idle
(B) Full speed
(C) Base lever
(D) Accelerator lever
(E) Accelerator lever delivery position
1. Measure speed lever angle
(1)Measure the angle when the accelerator lever (D) contacted the base lever (C) at a.
----------
----------
b=(47.5deg)+-3deg c=24deg+-5deg
----------
----------
b=(47.5deg)+-3deg c=24deg+-5deg
0000001601 RACK SENSOR

V1:Supply voltage
V2f:Full side output voltage
V2i:Idle side output voltage
(A) Black
(B) Yellow
(C) Red
(D) Trimmer
(E): Shaft
(F) Nut
(G) Load lever
1. Load sensor adjustment
(1)Connect as shown in the above diagram and apply supply voltage V1.
(2)Hold the load lever (G) against the full side.
(3)Turn the shaft so that the voltage between (A) and (B) is V2.
(4)Hold the load lever (G) against the idle side.
(5)Adjust (D) so that the voltage between (A) and (B) is V2i.
(6)Repeat the above adjustments.
(7)Tighten the nut (F) at the point satisfying the standards.
(8)Hold the load lever against the full side stopper and the idle side stopper.
(9)At this time, confirm that the full side output voltage is V2f and the idle side output voltage is V2i.
----------
V1=3.57+-0.02V V2f=3+0.05V V2i=1+0.1V
----------
----------
V1=3.57+-0.02V V2f=3+0.05V V2i=1+0.1V
----------
0000001701 MICRO SWITCH
Adjust the bolt to obtain the following lever position when the micro-switch is ON.
1. Microswitch adjustment (OPEN type)
Confirm with the lever angle at full.
(1)Speed N1
(2)Rack position Ra
----------
N1=1675r/min Ra=9.9+-0.1mm
----------
----------
N1=1675r/min Ra=9.9+-0.1mm
----------
Timing setting
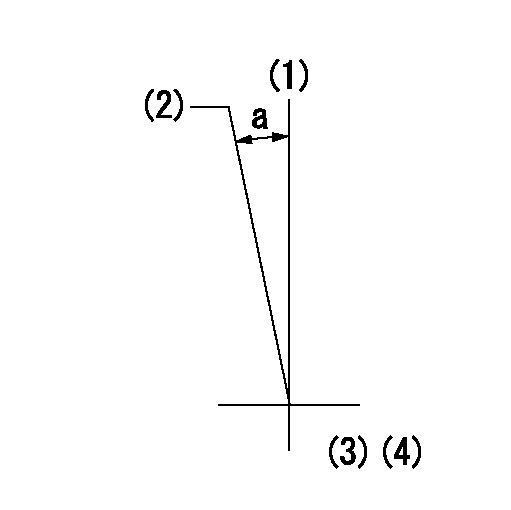
(1)Pump vertical direction
(2)Position of timer's tooth at No 1 cylinder's beginning of injection
(3)B.T.D.C.: aa
(4)-
----------
aa=10deg
----------
a=(2deg)
----------
aa=10deg
----------
a=(2deg)
Information:
Required Parts
Table 1
Required Parts List
Item Qty New Part Number Part Name Former Part Number(1)
1 1 525-3348 Plate As 461-5730
2 1 398-2993 Tank Filler Cap 398-3011
3 1 525-3357 Cover As 431-4872
4 4 9X-2038 Washer 5P-4115
5 4 8T-4138 Bolt -
6 1 246-2641 Padlock -
7 1 525-3351 (2) Guard As 461-5732
(1) The former part number listed is for reference only and may differ.
(2) For Heavy Duty(HD) rear guard assembly.Standard Rear Plate Assembly
Illustration 1 g06212425
(A) 447-5514 Film
(B) 430-3036 Film
(C) For english use 484-5902 Film and for international use 393-2614 FilmHeavy Duty Rear Guard Assembly
Illustration 2 g06212430Rework Procedure - Heavy Duty Rear Guard Assembly
Description: To adapt early heavy duty rear guard assembly (with DEF door design) for assembly with new standard rear plate assembly.Note: This rework will not provide the heavy duty shroud on the guard assembly (7) at the fill opening, that comes on the new heavy duty rear guard assembly from the factory as shown in the Illustration 2. Only the shroud on the new standard rear plate assembly (1) will be in place to protect that fill location as shown in the Illustration 2.
Illustration 3 g06213073
(D) door
(E) hinge
Remove the hinge (E) and door (D).
Illustration 4 g06212502
Cutout section with rounded corners
(F) 190 mm (7.5 inch)
(G) 40 mm (1.8 inch)
(H) 40 mm (1.8 inch)
(I) 95 mm (3.7 inch)
Illustration 5 g06212524
Cutout section with chamfered corners
(J) 55 mm (2.2 inch)
(K) 15 mm (0.6 inch)
(L) 80 mm (3.2 inch)
Cutout section from opening down by a clearance of (H) from original radius (G). The cutout should extend the entire width of opening. But corners can be significantly rounded as per dimensions shown in the Illustration 4 or chamfered as per dimensions shown in the Illustration 5. Either method is acceptable.Note: If DEF in the hydraulic tank is suspected, do not start the engine or operate the machine without first reviewing Special Instruction , M0064940 for procedure to address inadvertent adding of DEF to the machine hydraulic tank.
Have questions with 101607-6731?
Group cross 101607-6731 ZEXEL
Mitsubishi
Mitsubishi
Mitsubishi
Mitsubishi
101607-6731
9 400 615 724
ME075478
INJECTION-PUMP ASSEMBLY
6D17
6D17