Information injection-pump assembly
BOSCH
9 400 615 718
9400615718
ZEXEL
101607-6650
1016076650
MITSUBISHI
ME075472
me075472

Rating:
Service parts 101607-6650 INJECTION-PUMP ASSEMBLY:
1.
_
6.
COUPLING PLATE
7.
COUPLING PLATE
8.
_
9.
_
11.
Nozzle and Holder
ME076952
12.
Open Pre:MPa(Kqf/cm2)
15.7{160}/21.6{220}
14.
NOZZLE
Include in #1:
101607-6650
as INJECTION-PUMP ASSEMBLY
Include in #2:
109341-1003
as _
Cross reference number
BOSCH
9 400 615 718
9400615718
ZEXEL
101607-6650
1016076650
MITSUBISHI
ME075472
me075472
Zexel num
Bosch num
Firm num
Name
101607-6650
9 400 615 718
ME075472 MITSUBISHI
INJECTION-PUMP ASSEMBLY
6D16 K 14BF INJECTION PUMP ASSY PE6AD PE
6D16 K 14BF INJECTION PUMP ASSY PE6AD PE
Calibration Data:
Adjustment conditions
Test oil
1404 Test oil ISO4113 or {SAEJ967d}
1404 Test oil ISO4113 or {SAEJ967d}
Test oil temperature
degC
40
40
45
Nozzle and nozzle holder
105780-8140
Bosch type code
EF8511/9A
Nozzle
105780-0000
Bosch type code
DN12SD12T
Nozzle holder
105780-2080
Bosch type code
EF8511/9
Opening pressure
MPa
17.2
Opening pressure
kgf/cm2
175
Injection pipe
Outer diameter - inner diameter - length (mm) mm 6-2-600
Outer diameter - inner diameter - length (mm) mm 6-2-600
Overflow valve
131424-8420
Overflow valve opening pressure
kPa
255
221
289
Overflow valve opening pressure
kgf/cm2
2.6
2.25
2.95
Tester oil delivery pressure
kPa
157
157
157
Tester oil delivery pressure
kgf/cm2
1.6
1.6
1.6
Direction of rotation (viewed from drive side)
Left L
Left L
Injection timing adjustment
Direction of rotation (viewed from drive side)
Left L
Left L
Injection order
1-5-3-6-
2-4
Pre-stroke
mm
3.2
3.15
3.25
Beginning of injection position
Governor side NO.1
Governor side NO.1
Difference between angles 1
Cal 1-5 deg. 60 59.5 60.5
Cal 1-5 deg. 60 59.5 60.5
Difference between angles 2
Cal 1-3 deg. 120 119.5 120.5
Cal 1-3 deg. 120 119.5 120.5
Difference between angles 3
Cal 1-6 deg. 180 179.5 180.5
Cal 1-6 deg. 180 179.5 180.5
Difference between angles 4
Cyl.1-2 deg. 240 239.5 240.5
Cyl.1-2 deg. 240 239.5 240.5
Difference between angles 5
Cal 1-4 deg. 300 299.5 300.5
Cal 1-4 deg. 300 299.5 300.5
Injection quantity adjustment
Adjusting point
-
Rack position
11.7
Pump speed
r/min
850
850
850
Each cylinder's injection qty
mm3/st.
77.4
75.1
79.7
Basic
*
Fixing the rack
*
Standard for adjustment of the maximum variation between cylinders
*
Injection quantity adjustment_02
Adjusting point
Z
Rack position
9.5+-0.5
Pump speed
r/min
800
800
800
Each cylinder's injection qty
mm3/st.
10.8
9.2
12.4
Fixing the rack
*
Standard for adjustment of the maximum variation between cylinders
*
Injection quantity adjustment_03
Adjusting point
A
Rack position
R1(11.7)
Pump speed
r/min
850
850
850
Average injection quantity
mm3/st.
77.4
76.4
78.4
Basic
*
Fixing the lever
*
Injection quantity adjustment_04
Adjusting point
B
Rack position
R1+0.55
Pump speed
r/min
1450
1450
1450
Average injection quantity
mm3/st.
87.7
83.7
91.7
Fixing the lever
*
Injection quantity adjustment_05
Adjusting point
C
Rack position
R1-0.4
Pump speed
r/min
500
500
500
Average injection quantity
mm3/st.
56
52
60
Fixing the lever
*
Injection quantity adjustment_06
Adjusting point
E
Rack position
(R1+0.5)
Pump speed
r/min
1100
1100
1100
Average injection quantity
mm3/st.
87.6
83.6
91.6
Fixing the lever
*
Injection quantity adjustment_07
Adjusting point
I
Rack position
-
Pump speed
r/min
100
100
100
Average injection quantity
mm3/st.
91
81
101
Fixing the lever
*
Rack limit
*
Timer adjustment
Pump speed
r/min
1150--
Advance angle
deg.
0
0
0
Remarks
Start
Start
Timer adjustment_02
Pump speed
r/min
1100
Advance angle
deg.
0.5
Timer adjustment_03
Pump speed
r/min
1450
Advance angle
deg.
6
5.5
6.5
Remarks
Finish
Finish
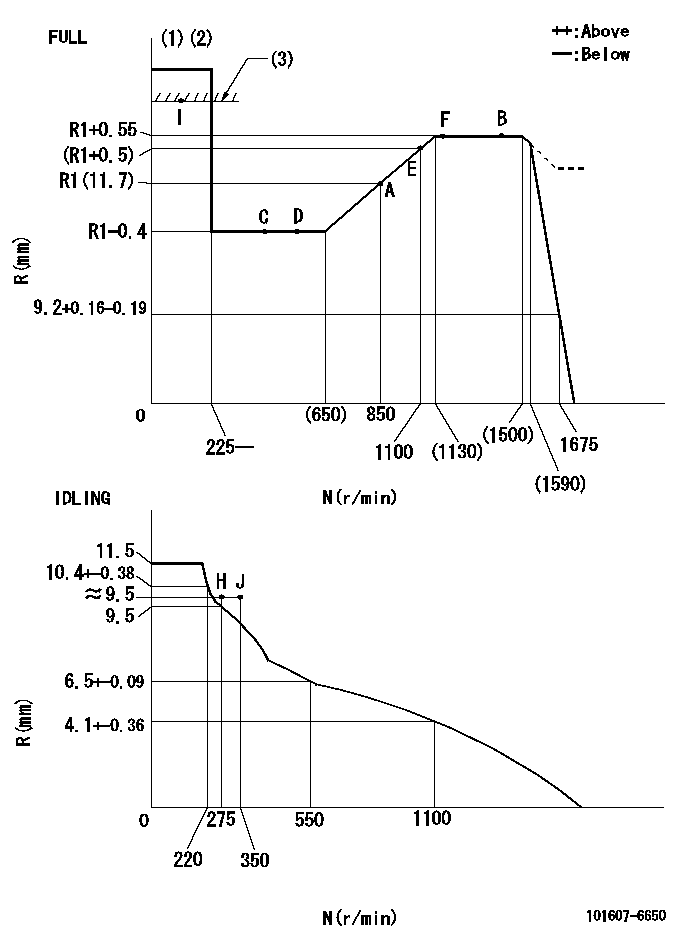
Test data Ex:
Governor adjustment

N:Pump speed
R:Rack position (mm)
(1)Torque cam stamping: T1
(2)Tolerance for racks not indicated: +-0.05mm.
(3)RACK LIMIT
----------
T1=H50
----------
----------
T1=H50
----------
Speed control lever angle

F:Full speed
I:Idle
(1)Stopper bolt set position 'H'
----------
----------
a=18.5deg+-5deg b=(42deg)+-3deg
----------
----------
a=18.5deg+-5deg b=(42deg)+-3deg
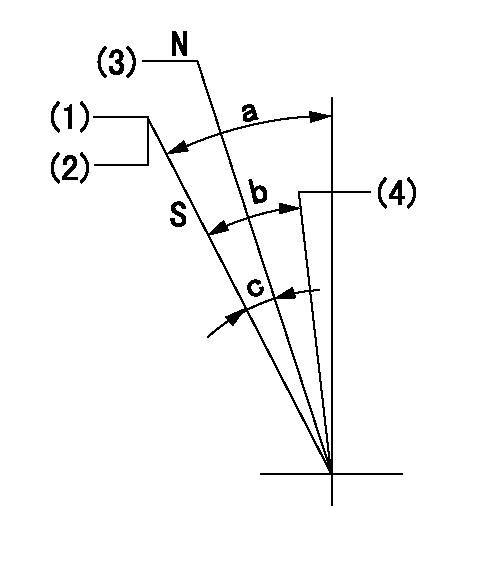
Stop lever angle

N:Engine manufacturer's normal use
S:Stop the pump.
(1)Set the stopper bolt so that speed = aa and rack position = bb and confirm non-injection.
(2)After setting the stopper bolt, confirm non-injection at speed cc. Rack position = dd (non-injection rack position).
(3)Rack position = approximately ee (speed lever full, speed = ff).
(4)Free (at delivery)
----------
aa=1450r/min bb=7.2-0.5mm cc=275r/min dd=(8.8)mm ee=15mm ff=0r/min
----------
a=36.5deg+-5deg b=(25deg) c=13deg+-5deg
----------
aa=1450r/min bb=7.2-0.5mm cc=275r/min dd=(8.8)mm ee=15mm ff=0r/min
----------
a=36.5deg+-5deg b=(25deg) c=13deg+-5deg
0000001501 MICRO SWITCH
Adjust the bolt to obtain the following lever position when the micro-switch is ON.
1. Microswitch adjustment (OPEN type)
Confirm with the lever angle at full.
(1)Speed N1
(2)Rack position Ra
2. Idle side microswitch adjustment (OPEN type)
Confirm with the lever angle at idle.
(1)Speed N2
(2)Rack position Rb
----------
N1=1675r/min Ra=8.5+-0.1mm N2=275r/min Rb=9.7+-0.1mm
----------
----------
N1=1675r/min Ra=8.5+-0.1mm N2=275r/min Rb=9.7+-0.1mm
----------
0000001601 RACK SENSOR

V1:Supply voltage
V2f:Full side output voltage
V2i:Idle side output voltage
(A) Black
(B) Yellow
(C) Red
(D) Trimmer
(E): Shaft
(F) Nut
(G) Load lever
1. Load sensor adjustment
(1)Connect as shown in the above diagram and apply supply voltage V1.
(2)Hold the load lever (G) against the full side.
(3)Turn the shaft so that the voltage between (A) and (B) is V2.
(4)Hold the load lever (G) against the idle side.
(5)Adjust (D) so that the voltage between (A) and (B) is V2i.
(6)Repeat the above adjustments.
(7)Tighten the nut (F) at the point satisfying the standards.
(8)Hold the load lever against the full side stopper and the idle side stopper.
(9)At this time, confirm that the full side output voltage is V2f and the idle side output voltage is V2i.
----------
V1=3.57+-0.02V V2f=3+0.05V V2i=1+0.1V
----------
----------
V1=3.57+-0.02V V2f=3+0.05V V2i=1+0.1V
----------
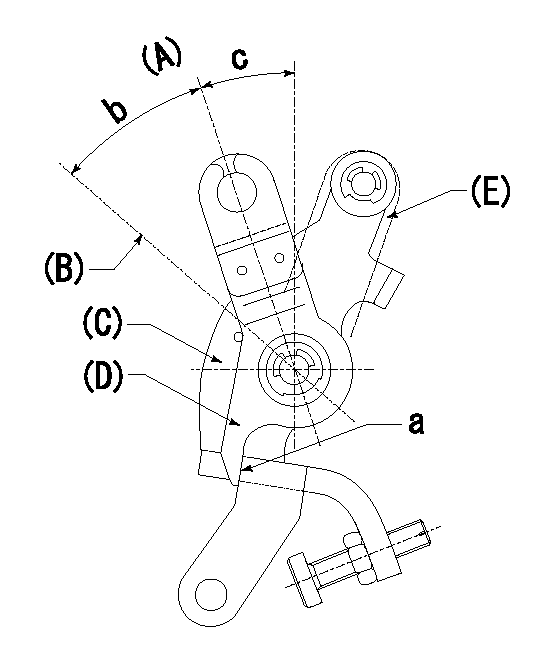
0000001701 LEVER

(A) Idle
(B) Full speed
(C) Base lever
(D) Accelerator lever
(E) Accelerator lever delivery position
1. Measure speed lever angle
(1)Measure the angle when the accelerator lever (D) contacted the base lever (C) at a.
----------
----------
b=(42deg)+-3deg c=18.5deg+-5deg
----------
----------
b=(42deg)+-3deg c=18.5deg+-5deg
Timing setting

(1)Pump vertical direction
(2)Position of timer's tooth at No 1 cylinder's beginning of injection
(3)B.T.D.C.: aa
(4)-
----------
aa=10deg
----------
a=(2deg)
----------
aa=10deg
----------
a=(2deg)
Information:
Model year 2007 and newer (U.S. EPA 2007 certified) on-highway diesel engines REQUIRE the use of Ultra Low Sulfur Diesel (ULSD) fuel (≤ 15 ppm sulfur)."Sulfur-free" diesel fuel (≤ 10 ppm sulfur) is strongly recommended for use in "EURO IV" certified on-highway diesel engines, while diesel fuel with ≤ 50 ppm sulfur is acceptable.Low Sulfur Diesel (LSD) fuel (≤ 500 ppm sulfur) is strongly recommended (required in the U.S.) for use in model year 2006 and older on-highway diesel engines, while diesel fuel with ≤ 5000 ppm sulfur is acceptable for use in areas of the world where allowed by law. Diesel Oxidation Catalyst (DOC) equipped engines require the use of LSD fuel or ULSD fuel.
Note: In the U.S., burning fuel with greater than 15 ppm sulfur in model year 2007 and newer on-highway diesel engines is illegal and punishable with civil penalties.The two basic types of distillate diesel fuel are No. 2 diesel fuel and No. 1 diesel fuel. No. 2 diesel fuel is the most commonly available summer grade diesel fuel. No. 1 diesel fuel is a winter grade diesel fuel. During the winter months fuel suppliers will typically blend No. 1 and No. 2 diesel fuel in various percentages in order to meet the historical low ambient temperature cold-flow needs for a given area or region. No. 2 diesel fuel is a heavier diesel fuel than No. 1 diesel fuel. In cold weather, heavier fuels can cause problems with fuel filters, fuel lines, fuel tanks, and fuel storage. Heavier diesel fuels such as No. 2 diesel fuel can be used in diesel engines that operate in cold temperatures with an appropriate amount of a well proven pour point depressant additive. For more information on fuels which include blends of No. 1 and No. 2 diesel fuel, consult your fuel supplier.When you use No. 2 diesel fuel or other heavier fuels, some of the fuel's characteristics may interfere with successful cold weather operation. Additional information about the characteristics of diesel fuel is available. This information contains a discussion on the modification to the characteristics of diesel fuel. There are several possible methods that can be used to compensate for the fuel qualities that may interfere with cold weather operation. These methods include the use of starting aids, engine coolant heaters, fuel heaters, and de-icers. In addition, the manufacturer of the fuel can add cold flow improvers and/or blend No. 1 and No.2 diesel in various percentages.Not all areas of the world classify diesel fuel using the No. 1 and No. 2 nomenclature described above. But, the basic principles of using additives and/or blending fuels of different densities in order to help compensate for the fuel qualities that may interfere with cold weather operation are the same.Starting Aids
The use of a starting aid is a conventional method of assistance for cold starts in low temperature conditions. A variety of starting aids are available for Caterpillar engines. Follow the recommendations that are provided by the manufacturer of the
Have questions with 101607-6650?
Group cross 101607-6650 ZEXEL
Mitsubishi
Mitsubishi
Mitsubishi
101607-6650
9 400 615 718
ME075472
INJECTION-PUMP ASSEMBLY
6D16
6D16