Information injection-pump assembly
BOSCH
F 019 Z10 378
f019z10378
ZEXEL
101607-6162
1016076162

Rating:
Service parts 101607-6162 INJECTION-PUMP ASSEMBLY:
1.
_
6.
COUPLING PLATE
7.
COUPLING PLATE
8.
_
9.
_
11.
Nozzle and Holder
12.
Open Pre:MPa(Kqf/cm2)
15.7(160)/21.6(220)
14.
NOZZLE
Include in #1:
101607-6162
as INJECTION-PUMP ASSEMBLY
Include in #2:
104746-6751
as _
Cross reference number
BOSCH
F 019 Z10 378
f019z10378
ZEXEL
101607-6162
1016076162
Zexel num
Bosch num
Firm num
Name
Calibration Data:
Adjustment conditions
Test oil
1404 Test oil ISO4113 or {SAEJ967d}
1404 Test oil ISO4113 or {SAEJ967d}
Test oil temperature
degC
40
40
45
Nozzle and nozzle holder
105780-8140
Bosch type code
EF8511/9A
Nozzle
105780-0000
Bosch type code
DN12SD12T
Nozzle holder
105780-2080
Bosch type code
EF8511/9
Opening pressure
MPa
17.2
Opening pressure
kgf/cm2
175
Injection pipe
Outer diameter - inner diameter - length (mm) mm 6-2-600
Outer diameter - inner diameter - length (mm) mm 6-2-600
Overflow valve
131424-8420
Overflow valve opening pressure
kPa
255
221
289
Overflow valve opening pressure
kgf/cm2
2.6
2.25
2.95
Tester oil delivery pressure
kPa
157
157
157
Tester oil delivery pressure
kgf/cm2
1.6
1.6
1.6
Direction of rotation (viewed from drive side)
Left L
Left L
Injection timing adjustment
Direction of rotation (viewed from drive side)
Left L
Left L
Injection order
1-5-3-6-
2-4
Pre-stroke
mm
3.2
3.15
3.25
Beginning of injection position
Governor side NO.1
Governor side NO.1
Difference between angles 1
Cal 1-5 deg. 60 59.5 60.5
Cal 1-5 deg. 60 59.5 60.5
Difference between angles 2
Cal 1-3 deg. 120 119.5 120.5
Cal 1-3 deg. 120 119.5 120.5
Difference between angles 3
Cal 1-6 deg. 180 179.5 180.5
Cal 1-6 deg. 180 179.5 180.5
Difference between angles 4
Cyl.1-2 deg. 240 239.5 240.5
Cyl.1-2 deg. 240 239.5 240.5
Difference between angles 5
Cal 1-4 deg. 300 299.5 300.5
Cal 1-4 deg. 300 299.5 300.5
Injection quantity adjustment
Adjusting point
-
Rack position
11.7
Pump speed
r/min
850
850
850
Each cylinder's injection qty
mm3/st.
77.4
75.1
79.7
Basic
*
Fixing the rack
*
Standard for adjustment of the maximum variation between cylinders
*
Injection quantity adjustment_02
Adjusting point
Z
Rack position
9.5+-0.5
Pump speed
r/min
800
800
800
Each cylinder's injection qty
mm3/st.
10.8
9.2
12.4
Fixing the rack
*
Standard for adjustment of the maximum variation between cylinders
*
Injection quantity adjustment_03
Adjusting point
A
Rack position
R1(11.7)
Pump speed
r/min
850
850
850
Average injection quantity
mm3/st.
77.4
76.4
78.4
Basic
*
Fixing the lever
*
Injection quantity adjustment_04
Adjusting point
B
Rack position
R1+0.55
Pump speed
r/min
1450
1450
1450
Average injection quantity
mm3/st.
87.7
83.7
91.7
Fixing the lever
*
Injection quantity adjustment_05
Adjusting point
C
Rack position
R1-0.4
Pump speed
r/min
500
500
500
Average injection quantity
mm3/st.
56
52
60
Fixing the lever
*
Injection quantity adjustment_06
Adjusting point
E
Rack position
(R1+0.5)
Pump speed
r/min
1100
1100
1100
Average injection quantity
mm3/st.
87.6
83.6
91.6
Fixing the lever
*
Injection quantity adjustment_07
Adjusting point
I
Rack position
-
Pump speed
r/min
100
100
100
Average injection quantity
mm3/st.
91
81
101
Fixing the lever
*
Rack limit
*
Timer adjustment
Pump speed
r/min
1080
Advance angle
deg.
0.5
Timer adjustment_02
Pump speed
r/min
-
Advance angle
deg.
2.5
2.5
2.5
Remarks
Measure the actual speed.
Measure the actual speed.
Timer adjustment_03
Pump speed
r/min
1390
Advance angle
deg.
6
5.5
6.5
Remarks
Finish
Finish
Test data Ex:
Governor adjustment

N:Pump speed
R:Rack position (mm)
(1)Torque cam stamping: T1
(2)Tolerance for racks not indicated: +-0.05mm.
(3)RACK LIMIT
----------
T1=H50
----------
----------
T1=H50
----------
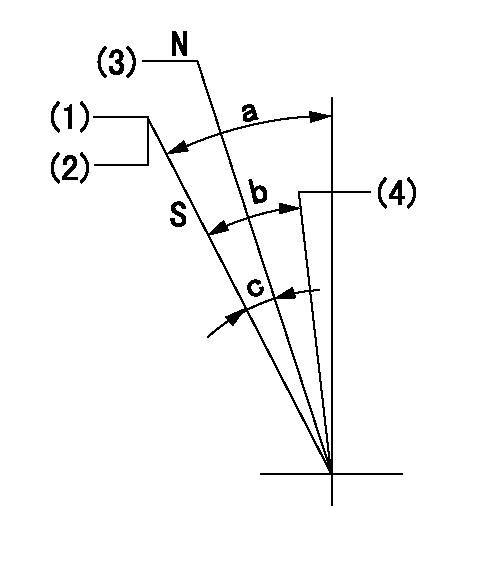
Speed control lever angle

F:Full speed
I:Idle
(1)Stopper bolt set position 'H'
----------
----------
a=18.5deg+-5deg b=(42deg)+-3deg
----------
----------
a=18.5deg+-5deg b=(42deg)+-3deg
Stop lever angle

N:Engine manufacturer's normal use
S:Stop the pump.
(1)Set the stopper bolt at pump speed = aa and rack position = bb (non-injection rack position). Confirm non-injection.
(2)After setting the stopper bolt, confirm non-injection at speed cc. Rack position = dd (non-injection rack position).
(3)Rack position = approximately ee.
(4)Free (at delivery)
----------
aa=1450r/min bb=7.2-0.5mm cc=275r/min dd=(8.8)mm ee=15mm
----------
a=36.5deg+-5deg b=(25deg) c=13deg+-5deg
----------
aa=1450r/min bb=7.2-0.5mm cc=275r/min dd=(8.8)mm ee=15mm
----------
a=36.5deg+-5deg b=(25deg) c=13deg+-5deg
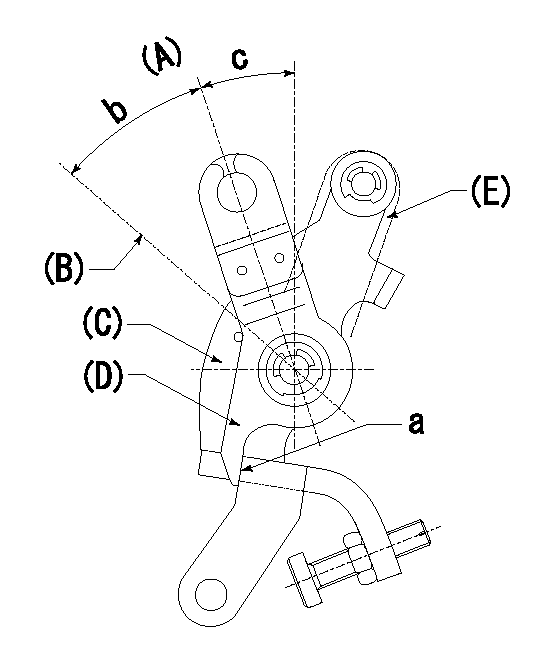
0000001501 LEVER

(A) Idle
(B) Full speed
(C) Base lever
(D) Accelerator lever
(E) Accelerator lever delivery position
1. Measure speed lever angle
(1)Measure the angle when the accelerator lever (D) contacted the base lever (C) at a.
----------
----------
b=(42deg)+-3deg c=18.5deg+-5deg
----------
----------
b=(42deg)+-3deg c=18.5deg+-5deg
0000001601 RACK SENSOR

V1:Supply voltage
V2f:Full side output voltage
V2i:Idle side output voltage
(A) Black
(B) Yellow
(C) Red
(D) Trimmer
(E): Shaft
(F) Nut
(G) Load lever
1. Load sensor adjustment
(1)Connect as shown in the above diagram and apply supply voltage V1.
(2)Hold the load lever (G) against the full side.
(3)Turn the shaft so that the voltage between (A) and (B) is V2.
(4)Hold the load lever (G) against the idle side.
(5)Adjust (D) so that the voltage between (A) and (B) is V2i.
(6)Repeat the above adjustments.
(7)Tighten the nut (F) at the point satisfying the standards.
(8)Hold the load lever against the full side stopper and the idle side stopper.
(9)At this time, confirm that the full side output voltage is V2f and the idle side output voltage is V2i.
----------
V1=3.57+-0.02V V2f=3+0.05V V2i=1+0.1V
----------
----------
V1=3.57+-0.02V V2f=3+0.05V V2i=1+0.1V
----------
0000001701 MICRO SWITCH
Adjust the bolt to obtain the following lever position when the micro-switch is OFF.
1. Microswitch adjustment (OPEN type)
Confirm with the lever angle at full.
(1)Speed N1
(2)Rack position Ra
----------
N1=1675r/min Ra=8.5+-0.1mm
----------
----------
N1=1675r/min Ra=8.5+-0.1mm
----------
Timing setting

(1)Pump vertical direction
(2)Position of timer's tooth at No 1 cylinder's beginning of injection
(3)B.T.D.C.: aa
(4)-
----------
aa=10deg
----------
a=(3deg)
----------
aa=10deg
----------
a=(3deg)
Information:
password protection for the CCM is initially enabled. Password protection may be necessary for some applications. Use the following procedure to enable password protection. Changing the password protection can be done with the PC software for the CCM . The password protection can also be changed by using a host device to write the IIDs.Disabling PasswordsTo disable the passwords, the AA12 and AA8A PIDs must be used.Note: Refer to the Operation and Maintenance Manual, "Parameter Identifiers for General Usage".
Use IID 34 with a unit number of 61. Write to PID AA8A with the level 3 password. This will set the security level in the CCM to level 3. The message will be 5000340C0061AA8Ab1b2b3b4b5b6b7b8cs. The example above shows that b1 through b8 are the ASCII characters of the password. If the password is all spaces, simply end the message after PID AA8A. Do not include any of the data bytes. The CCM will automatically add spaces when a character is not present.
Use IID 34 with a unit number of 61. Write PID AA 12 with bit 3 set. This will disable the password protection. The message will be 500034050061AA1204cs. This message will disable the passwords. Baud rate changes will be enabled. The CCM will be set for a direct connection. Bits 1 and 2 should be set to 1 if the last two items need to be set the other way. Note: When the passwords are disabled, all three passwords are set to all blanks (spaces).Enabling PasswordsThe AA12 and the F012 PIDs must be used in order to enable the password protection.Note: Refer to the Operation and Maintenance Manual, "Parameter Identifiers for General Usage".
Use IID 34 with a unit number of 61. Write to PID AA12 to clear bit 3. The message format will be 500034050061AA1200cs. This message will enable the following items: passwords, change of baud rate and set the CCM for direct connect. Bits 1 and 2 should be set to 1 if the last two items need to be set the other way.
In order to enable the changes, the power to the CCM must be cycled or the security level must be written to zero. The security level is written to zero by using IID 34. The message will be 500034050061F01200cs. Note: When the passwords were disabled, each character was set to a blank or space. Set the level 3 password on the CCM to something other than spaces.