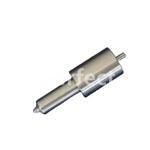
Information injection-pump assembly
ZEXEL
101607-1162
1016071162
Rating:
Service parts 101607-1162 INJECTION-PUMP ASSEMBLY:
1.
_
6.
COUPLING PLATE
7.
COUPLING PLATE
8.
_
9.
_
11.
Nozzle and Holder
ME076615
12.
Open Pre:MPa(Kqf/cm2)
15.7{160}/21.6{220}
15.
NOZZLE SET
Cross reference number
ZEXEL
101607-1162
1016071162
Zexel num
Bosch num
Firm num
Name
101607-1162
INJECTION-PUMP ASSEMBLY
Calibration Data:
Adjustment conditions
Test oil
1404 Test oil ISO4113 or {SAEJ967d}
1404 Test oil ISO4113 or {SAEJ967d}
Test oil temperature
degC
40
40
45
Nozzle and nozzle holder
105780-8140
Bosch type code
EF8511/9A
Nozzle
105780-0000
Bosch type code
DN12SD12T
Nozzle holder
105780-2080
Bosch type code
EF8511/9
Opening pressure
MPa
17.2
Opening pressure
kgf/cm2
175
Injection pipe
Outer diameter - inner diameter - length (mm) mm 6-2-600
Outer diameter - inner diameter - length (mm) mm 6-2-600
Overflow valve
131424-5520
Overflow valve opening pressure
kPa
255
221
289
Overflow valve opening pressure
kgf/cm2
2.6
2.25
2.95
Tester oil delivery pressure
kPa
157
157
157
Tester oil delivery pressure
kgf/cm2
1.6
1.6
1.6
Direction of rotation (viewed from drive side)
Left L
Left L
Injection timing adjustment
Direction of rotation (viewed from drive side)
Left L
Left L
Injection order
1-5-3-6-
2-4
Pre-stroke
mm
3.2
3.15
3.25
Beginning of injection position
Governor side NO.1
Governor side NO.1
Difference between angles 1
Cal 1-5 deg. 60 59.5 60.5
Cal 1-5 deg. 60 59.5 60.5
Difference between angles 2
Cal 1-3 deg. 120 119.5 120.5
Cal 1-3 deg. 120 119.5 120.5
Difference between angles 3
Cal 1-6 deg. 180 179.5 180.5
Cal 1-6 deg. 180 179.5 180.5
Difference between angles 4
Cyl.1-2 deg. 240 239.5 240.5
Cyl.1-2 deg. 240 239.5 240.5
Difference between angles 5
Cal 1-4 deg. 300 299.5 300.5
Cal 1-4 deg. 300 299.5 300.5
Injection quantity adjustment
Adjusting point
-
Rack position
11.6
Pump speed
r/min
850
850
850
Each cylinder's injection qty
mm3/st.
72.5
70.3
74.7
Basic
*
Fixing the rack
*
Standard for adjustment of the maximum variation between cylinders
*
Injection quantity adjustment_02
Adjusting point
H
Rack position
9.5+-0.5
Pump speed
r/min
275
275
275
Each cylinder's injection qty
mm3/st.
8.3
7.1
9.5
Fixing the rack
*
Standard for adjustment of the maximum variation between cylinders
*
Injection quantity adjustment_03
Adjusting point
A
Rack position
R1(11.6)
Pump speed
r/min
850
850
850
Average injection quantity
mm3/st.
72.5
71.5
73.5
Basic
*
Fixing the lever
*
Injection quantity adjustment_04
Adjusting point
B
Rack position
R1-0.15
Pump speed
r/min
1400
1400
1400
Average injection quantity
mm3/st.
79.5
75.5
83.5
Fixing the lever
*
Injection quantity adjustment_05
Adjusting point
C
Rack position
R1+0.65
Pump speed
r/min
500
500
500
Average injection quantity
mm3/st.
71.5
67.5
75.5
Fixing the lever
*
Timer adjustment
Pump speed
r/min
1150
Advance angle
deg.
0.5
Timer adjustment_02
Pump speed
r/min
1200
Advance angle
deg.
0.9
0.4
1.4
Timer adjustment_03
Pump speed
r/min
1380
Advance angle
deg.
5
4.5
5.5
Remarks
Finish
Finish
Test data Ex:
Governor adjustment
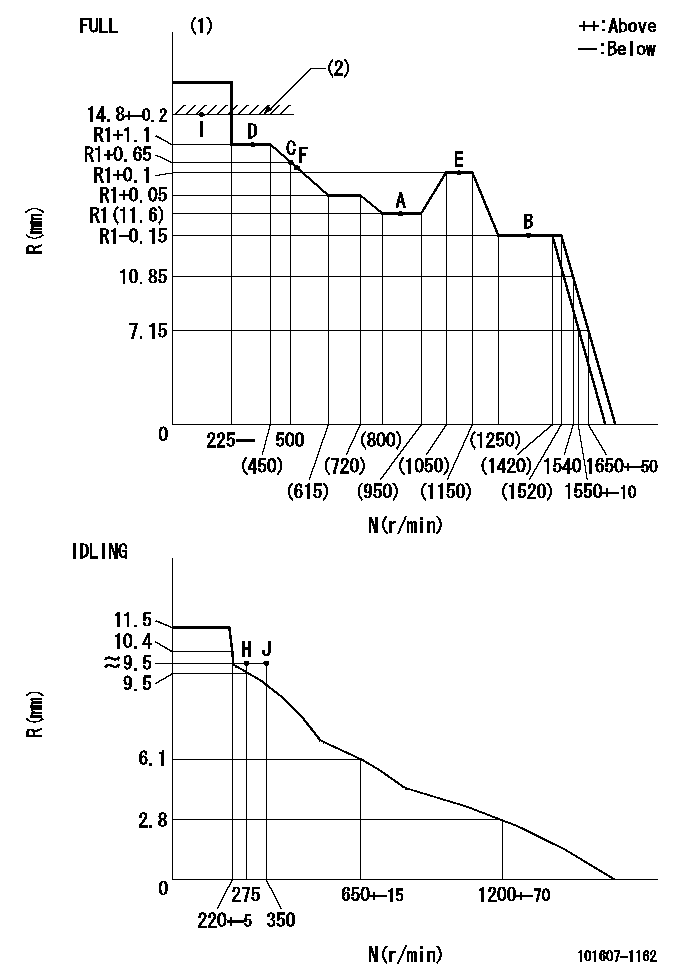
N:Pump speed
R:Rack position (mm)
(1)Torque cam stamping: T1
(2)RACK LIMIT
----------
T1=G27
----------
----------
T1=G27
----------
Speed control lever angle

F:Full speed
I:Idle
(1)Use the hole at R = aa
(2)Stopper bolt set position 'H'
----------
aa=29mm
----------
a=10deg+-5deg b=(44deg)+-3deg
----------
aa=29mm
----------
a=10deg+-5deg b=(44deg)+-3deg
Stop lever angle
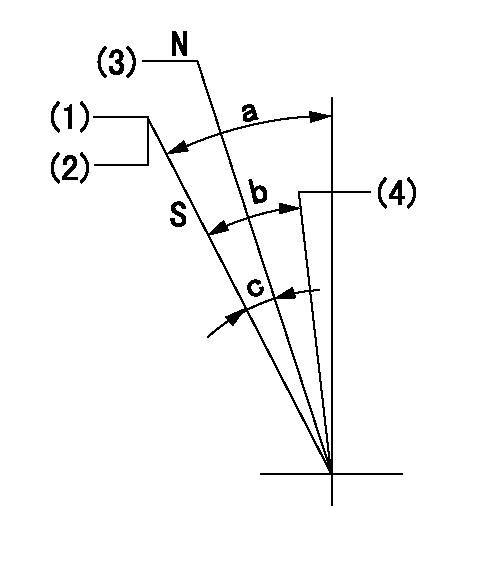
N:Engine manufacturer's normal use
S:Stop the pump.
(1)Set the stopper bolt at pump speed = aa and rack position = bb (non-injection rack position). Confirm non-injection.
(2)After setting the stopper bolt, confirm non-injection at speed cc. Rack position = dd (non-injection rack position).
(3)Rack position = approximately ee.
(4)Free (at shipping)
----------
aa=1400r/min bb=6.9-0.5mm cc=275r/min dd=(8.9)-0.5mm ee=15mm
----------
a=36.5deg+-5deg b=(25deg) c=13.5deg+-5deg
----------
aa=1400r/min bb=6.9-0.5mm cc=275r/min dd=(8.9)-0.5mm ee=15mm
----------
a=36.5deg+-5deg b=(25deg) c=13.5deg+-5deg
0000001201
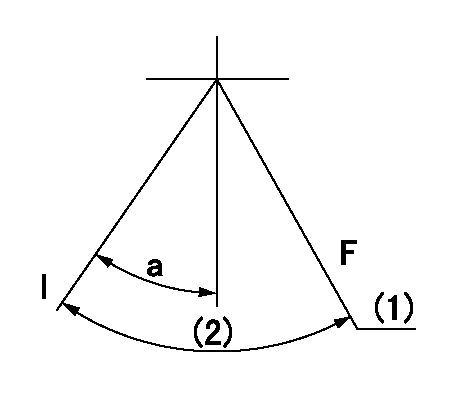
F:At operation, hold it in the full speed position.
I:Idle
(1)At rack position aa and pump speed bb, set the stopper bolt. (After setting it, apply red paint.)
(2)Actual measurement
----------
aa=7.15mm bb=1550+-10r/min
----------
a=15deg+-5deg
----------
aa=7.15mm bb=1550+-10r/min
----------
a=15deg+-5deg
0000001501 MICRO SWITCH
Adjustment of the micro-switch
Adjust the bolt to obtain the following lever position when the micro-switch is ON.
(1)Speed N1
(2)Rack position Ra
----------
N1=400r/min Ra=9.2+-0.1mm
----------
----------
N1=400r/min Ra=9.2+-0.1mm
----------
Timing setting

(1)Pump vertical direction
(2)Position of timer's tooth at No 1 cylinder's beginning of injection
(3)B.T.D.C.: aa
(4)-
----------
aa=11deg
----------
a=(0deg)
----------
aa=11deg
----------
a=(0deg)
Information:
4C4911 Battery Load Tester
4C4911 Battery Load TesterThe 4C4911 Battery Load Tester is a portable unit in a metal case for use under field conditions and high temperatures. It can be used to load test all 6, 8 and 12V batteries. This tester has two heavy-duty load cables that can easily be fastened to the battery terminals, and a load adjustment knob on the top permits the current being drawn from the battery to be adjusted to a maximum of 1000 amperes. The tester is cooled by an internal fan that is automatically activated when a load is applied.The tester has a built in Liquid Crystal Display (LCD) digital voltmeter and amperage meter. The digital voltmeter accurately measures the battery voltage at the battery, through tracer wires buried inside the load cables. The digital amperage meter accurately displays the current being drawn from the battery under test. Make reference to Operating Manual, SEHS9249 for more complete information for use of the 4C4911 Battery Load Tester.8T0900 AC/DC Clamp-On Ammeter
8T0900 AC/DC Clamp-On AmmeterThe 8T0900 AC/DC Clamp-On Ammeter is a completely portable, self-contained instrument that allows electrical current measurements to be made without breaking the circuit or disturbing the insulation on conductors. A digital display is located on the ammeter for reading current directly in a range from 1 to 1200 amperes. If an optional 6V6014 Cable is connected between this ammeter and one of the digital multimeters, current readings of less than 1 ammeter can then be read directly from the display of the multimeter.A lever is used to open the jaws over the conductor [up to a diameter of 19 mm (.75 in)], and the spring loaded jaws are then closed around the conductor for current measurement. A trigger switch that can be locked in the ON or OFF position is used to turn on the ammeter. When the turn-on trigger is released, the last current reading is held on the display for five seconds. This allows accurate measurements to be taken in limited access areas where the digital display is not visible to the operator. A zero control is provided for DC operation, and power for the ammeter is supplied by batteries located inside the handle. Make reference to Special Instruction, SEHS8420 for more complete information for use of the 8T0900 Clamp-On Ammeter.6V7070 Heavy-Duty Digital Multimeter
6V7070 Heavy-Duty Digital MultimeterThe 6V7070 Heavy-Duty Digital Multimeter is a completely portable, hand held instrument with a digital display. This multimeter is built with extra protection against damage in field applications, and is equipped with seven functions and 29 ranges. The 6V7070 Multimeter has an instant ohms indicator that permits continuity checking for fast circuit inspection. It also can be used for troubleshooting small value capacitors.The 6V7800 Regular-duty Digital Multimeter (a low cost option to the Heavy-Duty Multimeter) is also available; however, the 6V7800 Multimeter does not have the 10A range or the instant ohms feature of the 6V7070 Multimeter. Make reference to Special Instruction, SEHS7734 for more complete information for use of the
Have questions with 101607-1162?
Group cross 101607-1162 ZEXEL
Mitsubishi
Mitsubishi
Mitsubishi
Mitsubishi
101607-1162
INJECTION-PUMP ASSEMBLY
