Information injection-pump assembly
BOSCH
9 400 612 750
9400612750
ZEXEL
101606-0380
1016060380
ISUZU
8976021410
8976021410
Rating:
Service parts 101606-0380 INJECTION-PUMP ASSEMBLY:
1.
_
7.
COUPLING PLATE
8.
_
9.
_
11.
Nozzle and Holder
8-94391-291-4
12.
Open Pre:MPa(Kqf/cm2)
16.2{165}/19.6{200}
14.
NOZZLE
Include in #1:
101606-0380
as INJECTION-PUMP ASSEMBLY
Include in #2:
104746-1710
as _
Cross reference number
BOSCH
9 400 612 750
9400612750
ZEXEL
101606-0380
1016060380
ISUZU
8976021410
8976021410
Zexel num
Bosch num
Firm num
Name
101606-0380
9 400 612 750
8976021410 ISUZU
INJECTION-PUMP ASSEMBLY
6HL1-N K 14BN INJECTION PUMP ASSY PE
6HL1-N K 14BN INJECTION PUMP ASSY PE
Calibration Data:
Adjustment conditions
Test oil
1404 Test oil ISO4113 or {SAEJ967d}
1404 Test oil ISO4113 or {SAEJ967d}
Test oil temperature
degC
40
40
45
Nozzle and nozzle holder
105780-8310
Nozzle
105780-0120
Bosch type code
1 688 901 990
Nozzle holder
105780-2240
Opening pressure
MPa
18
Opening pressure
kgf/cm2
184
Injection pipe
Outer diameter - inner diameter - length (mm) mm 6-2-600
Outer diameter - inner diameter - length (mm) mm 6-2-600
Overflow valve
131424-8620
Overflow valve opening pressure
kPa
206
206
206
Overflow valve opening pressure
kgf/cm2
2.1
2.1
2.1
Tester oil delivery pressure
kPa
255
255
255
Tester oil delivery pressure
kgf/cm2
2.6
2.6
2.6
Direction of rotation (viewed from drive side)
Left L
Left L
Injection timing adjustment
Direction of rotation (viewed from drive side)
Left L
Left L
Injection order
1-5-3-6-
2-4
Pre-stroke
mm
3.8
3.75
3.85
Rack position
Point A R=A
Point A R=A
Beginning of injection position
Governor side NO.1
Governor side NO.1
Difference between angles 1
Cal 1-5 deg. 60 59.5 60.5
Cal 1-5 deg. 60 59.5 60.5
Difference between angles 2
Cal 1-3 deg. 120 119.5 120.5
Cal 1-3 deg. 120 119.5 120.5
Difference between angles 3
Cal 1-6 deg. 180 179.5 180.5
Cal 1-6 deg. 180 179.5 180.5
Difference between angles 4
Cyl.1-2 deg. 240 239.5 240.5
Cyl.1-2 deg. 240 239.5 240.5
Difference between angles 5
Cal 1-4 deg. 300 299.5 300.5
Cal 1-4 deg. 300 299.5 300.5
Injection quantity adjustment
Adjusting point
-
Rack position
14.2
Pump speed
r/min
850
850
850
Average injection quantity
mm3/st.
65
63.4
66.6
Max. variation between cylinders
%
0
-2.5
2.5
Basic
*
Fixing the rack
*
Standard for adjustment of the maximum variation between cylinders
*
Injection quantity adjustment_02
Adjusting point
Z
Rack position
9.7+-0.5
Pump speed
r/min
295
295
295
Average injection quantity
mm3/st.
13
11.7
14.3
Max. variation between cylinders
%
0
-14
14
Fixing the rack
*
Standard for adjustment of the maximum variation between cylinders
*
Injection quantity adjustment_03
Adjusting point
A
Rack position
R1(14.2)
Pump speed
r/min
850
850
850
Average injection quantity
mm3/st.
65
64
66
Basic
*
Fixing the lever
*
Test data Ex:
Governor adjustment
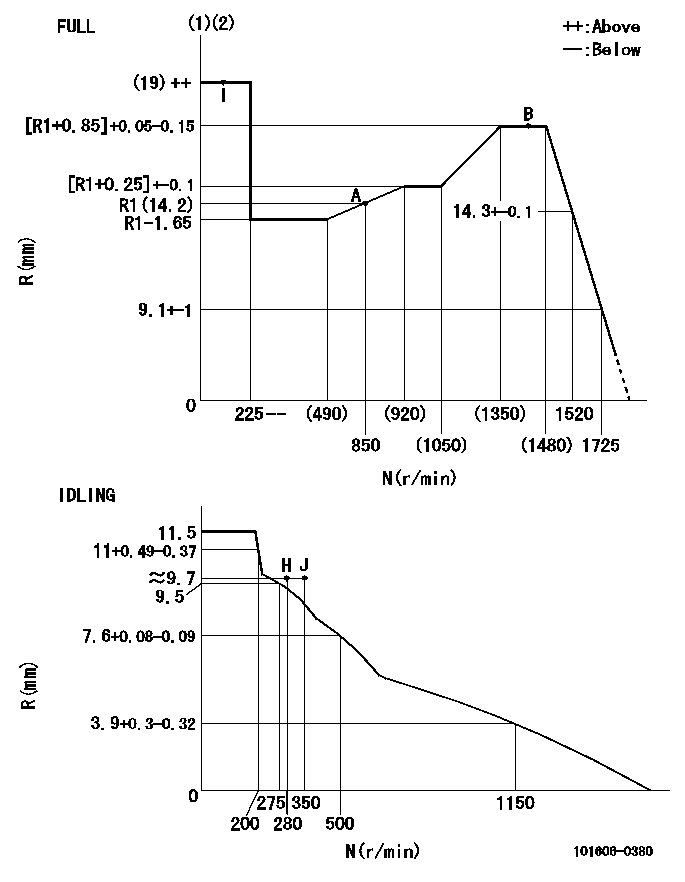
N:Pump speed
R:Rack position (mm)
(1)Torque cam stamping: T1
(2)Tolerance for racks not indicated: +-0.05mm.
----------
T1=P02
----------
----------
T1=P02
----------
Timer adjustment
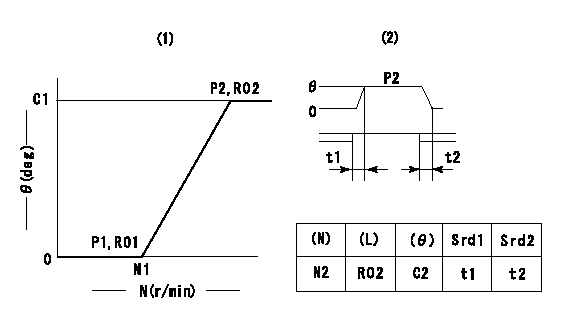
(1)Adjusting range
(2)Step response time
(N): Speed of the pump
(L): Load
(theta) Advance angle
(Srd1) Step response time 1
(Srd2) Step response time 2
1. Adjusting conditions for the variable timer
(1)Adjust the clearance between the pickup and the protrusion to L.
----------
L=1.5+-0.2mm N2=800r/min C2=(8)deg t1=2--sec. t2=2--sec.
----------
N1=1300++r/min P1=0kPa(0kgf/cm2) P2=392kPa(4kgf/cm2) C1=8+-0.3deg R01=0/4load R02=4/4load
----------
L=1.5+-0.2mm N2=800r/min C2=(8)deg t1=2--sec. t2=2--sec.
----------
N1=1300++r/min P1=0kPa(0kgf/cm2) P2=392kPa(4kgf/cm2) C1=8+-0.3deg R01=0/4load R02=4/4load
Speed control lever angle
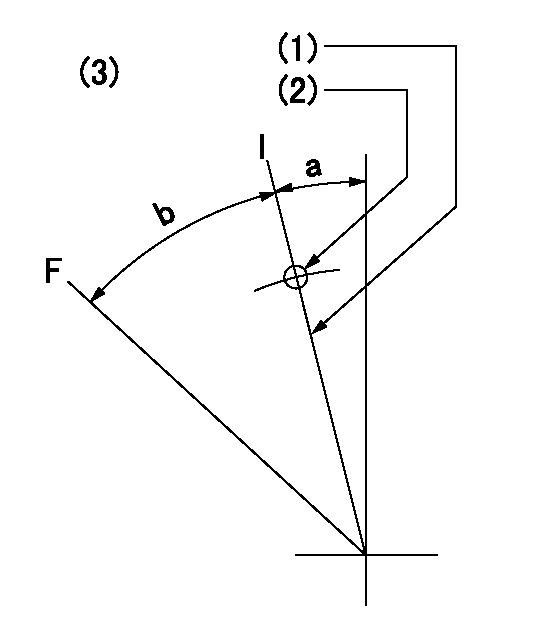
F:Full speed
I:Idle
(1)Stopper bolt setting
(2)Use the pin at R = aa
(3)Viewed from feed pump side.
----------
aa=35mm
----------
a=11deg+-5deg b=40deg+-3deg
----------
aa=35mm
----------
a=11deg+-5deg b=40deg+-3deg
Stop lever angle
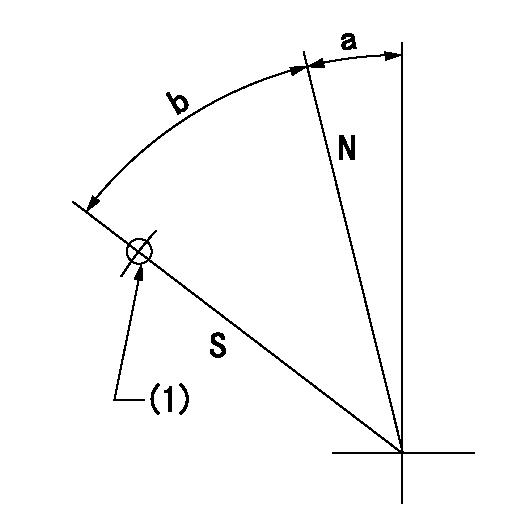
N:Pump normal
S:Stop the pump.
(1)Use the pin at R = aa
----------
aa=45mm
----------
a=12.5deg+-5deg b=40deg+-5deg
----------
aa=45mm
----------
a=12.5deg+-5deg b=40deg+-5deg
0000001501 RACK SENSOR
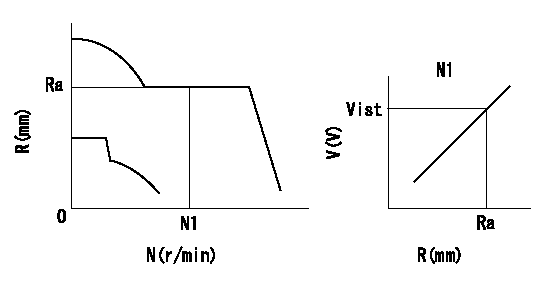
Rack sensor adjustment
1. Flange type rack sensor (rack sensor adjustment -5*20)
(1)These types of rack sensors do not need adjustment. Confirm the performance with the following procedures.
(2)Mount the rack sensor main body to the pump main body.
(3)Fix the pump lever at full.
(4)At supply voltage V1, pump speed N1 and rack position Ra, confirm that the amp's output voltage is Vist.
(5)Move the pump lever two or three times.
(6)Set again to full.
(7)Confirm that the amplifier output voltage is Vist.
(8)Fix the caution plate to the upper part of the rack sensor.
(For those without the caution plate instructions, make sure the nameplate of the rack sensor carries the "Don't hold here" caution.)
(9)Apply red paint to the rack sensor mounting bolts (2 places).
----------
V1=5+-0.01V N1=850r/min Ra=R1(14.2)mm Vist=3.49+-0.28V
----------
----------
V1=5+-0.01V N1=850r/min Ra=R1(14.2)mm Vist=3.49+-0.28V
----------
Timing setting
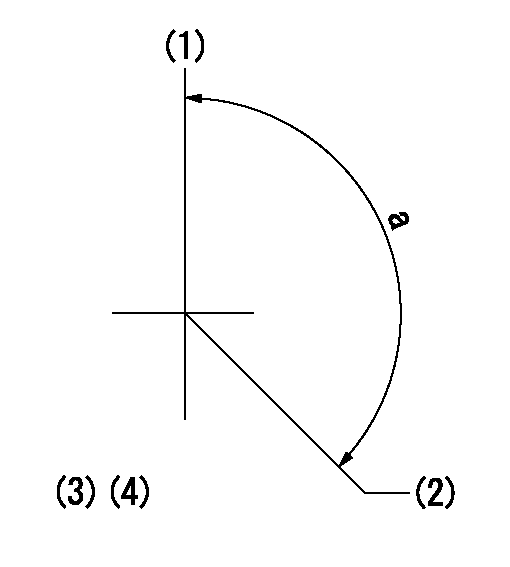
(1)Pump vertical direction
(2)Positions of coupling's threaded installation holes at No 1 cylinder's beginning of injection
(3)B.T.D.C.: aa
(4)-
----------
aa=6deg
----------
a=(160deg)
----------
aa=6deg
----------
a=(160deg)
Information:
Maintenance Recommendations
Caterpillar Inc. truck engines are certified by the United States Environmental Protection Agency (EPA) to comply with smoke and gaseous emission standards prescribed by Federal laws at the time of manufacture.Efficiency of emission control and engine performance depends on adherence to proper operation and maintenance recommendations AND use of recommended fuels and lubricating oils. It is recommended that major adjustments and repair be made by your authorized Caterpillar dealer.Various chemical fuel additives claiming to reduce visible smoke are available commercially. Although additives have been used by individuals to solve some isolated smoke problems in the field, they are not recommended for general use. Federal smoke regulations require that engines be certified without smoke depressants.The corrective steps taken immediately on discovery of worn parts, which may affect emission levels, will help assure proper operation of emission control systems. The use of genuine Caterpillar parts is recommended. Suppliers of non-Caterpillar parts must assure the owner that the use of such parts will not adversely affect emission levels.Regular maintenance intervals, along with special emphasis on the following items, are necessary to keep exhaust emissions within acceptable limits for the useful life of the engine. Refer to the Maintenance Section of this manual. If the engine is operating under severe conditions, adjust the maintenance schedule accordingly. See your authorized Caterpillar dealer to help analyze your specific application, operating environment and maintenance schedule adjustments.The following is an explanation of maintenance for emission-related components. See the Maintenance Schedule for the specific interval for the following items. FUEL INJECTION NOZZLES - Fuel nozzles are subject to tip wear as a result of fuel contamination. This damage can cause an increase in fuel consumption, the engine to emit black smoke, misfire or run rough. Inspect and replace if necessary. Fuel nozzles can be tested by an authorized Caterpillar truck engine dealer. TURBOCHARGER - Check for any unusual sound or vibration in the turbocharger. Inspect inlet and exhaust piping and connections. Check bearing condition and perform maintenance as described in the Maintenance Schedule. AIR/FUEL RATIO CONTROL - This component is a device to control the smoke emission of an engine during its operation when low inlet manifold pressure exists.Slow engine response and low power may indicate a need for adjustment or repair. Your Caterpillar dealer is equipped with the necessary tools, personnel and procedures to perform this service.Owner is encouraged to keep adequate maintenance records, but the absence of such, in and of itself, will not invalidate the warranty.The vehicle owner may perform routine maintenance, repairs and other non warranty work or have it done at any repair facility. Such non warranty work need not be performed at a designated warranty station in order for the warranty to remain in force.Customer Assistance-Emission Control Systems Warranty
Caterpillar Inc. aims to ensure that the Emission Control Systems warranty is properly administered. In the event that you do not receive the warranty service to which you believe you are entitled under the Emission Control Systems Warranty, call or write:Caterpillar Inc.
Manager,
Have questions with 101606-0380?
Group cross 101606-0380 ZEXEL
Isuzu
101606-0380
9 400 612 750
8976021410
INJECTION-PUMP ASSEMBLY
6HL1-N
6HL1-N