Information injection-pump assembly
BOSCH
9 400 613 178
9400613178
ZEXEL
101605-0310
1016050310
ISUZU
1156034900
1156034900

Rating:
Compare Prices: .
As an associate, we earn commssions on qualifying purchases through the links below
Car fuel pump assembly, Fuel Injection Pump 101605-0310 819W263034 116603-4900 1166034900
ZTUVUNVA The design of the oil outlet is exquisite and reasonable, which avoids carbon deposition at the oil outlet and effectively prolongs the service life. || Reduce fuel consumption, improve jitter and accelerate smoothly. || The oil meter is accurate, which can solve the problems of abnormal oil consumption, misfire and no power. || Solve problems such as abnormal fuel meter data. || Sufficient oil return flow ensures stable pressure and sufficient cooling of the fuel system.
ZTUVUNVA The design of the oil outlet is exquisite and reasonable, which avoids carbon deposition at the oil outlet and effectively prolongs the service life. || Reduce fuel consumption, improve jitter and accelerate smoothly. || The oil meter is accurate, which can solve the problems of abnormal oil consumption, misfire and no power. || Solve problems such as abnormal fuel meter data. || Sufficient oil return flow ensures stable pressure and sufficient cooling of the fuel system.
Fuel Injection Pump 101605-0310 819W263034 116603-4900 1166034900
VSQQGPSV Through high-precision pressure, fuel can be fully atomized, promoting complete combustion and improving fuel economy. || High precision manufacturing processes ensure the accuracy of fuel metering and injection. || Excellent design minimizes noise and vibration during operation, providing you with a quieter and more comfortable driving experience. || A good fuel injection pump is crucial for engine power, fuel efficiency, and fuel economy. || Fuel Injection Pump 101605-0310 819W263034 116603-4900 1166034900
VSQQGPSV Through high-precision pressure, fuel can be fully atomized, promoting complete combustion and improving fuel economy. || High precision manufacturing processes ensure the accuracy of fuel metering and injection. || Excellent design minimizes noise and vibration during operation, providing you with a quieter and more comfortable driving experience. || A good fuel injection pump is crucial for engine power, fuel efficiency, and fuel economy. || Fuel Injection Pump 101605-0310 819W263034 116603-4900 1166034900
Service parts 101605-0310 INJECTION-PUMP ASSEMBLY:
1.
_
5.
AUTOM. ADVANCE MECHANIS
6.
COUPLING PLATE
8.
_
9.
_
11.
Nozzle and Holder
1-15300-432-1
12.
Open Pre:MPa(Kqf/cm2)
16.7{170}/19.6{200}
14.
NOZZLE
Cross reference number
BOSCH
9 400 613 178
9400613178
ZEXEL
101605-0310
1016050310
ISUZU
1156034900
1156034900
Zexel num
Bosch num
Firm num
Name
101605-0310
9 400 613 178
1156034900 ISUZU
INJECTION-PUMP ASSEMBLY
6BG1-T K 14BF INJECTION PUMP ASSY PE6AD PE
6BG1-T K 14BF INJECTION PUMP ASSY PE6AD PE
Calibration Data:
Adjustment conditions
Test oil
1404 Test oil ISO4113 or {SAEJ967d}
1404 Test oil ISO4113 or {SAEJ967d}
Test oil temperature
degC
40
40
45
Nozzle and nozzle holder
105780-8140
Bosch type code
EF8511/9A
Nozzle
105780-0000
Bosch type code
DN12SD12T
Nozzle holder
105780-2080
Bosch type code
EF8511/9
Opening pressure
MPa
17.2
Opening pressure
kgf/cm2
175
Injection pipe
Outer diameter - inner diameter - length (mm) mm 6-2-600
Outer diameter - inner diameter - length (mm) mm 6-2-600
Overflow valve
134424-4120
Overflow valve opening pressure
kPa
255
221
289
Overflow valve opening pressure
kgf/cm2
2.6
2.25
2.95
Tester oil delivery pressure
kPa
255
255
255
Tester oil delivery pressure
kgf/cm2
2.6
2.6
2.6
Direction of rotation (viewed from drive side)
Right R
Right R
Injection timing adjustment
Direction of rotation (viewed from drive side)
Right R
Right R
Injection order
1-5-3-6-
2-4
Pre-stroke
mm
4.2
4.15
4.25
Beginning of injection position
Drive side NO.1
Drive side NO.1
Difference between angles 1
Cal 1-5 deg. 60 59.5 60.5
Cal 1-5 deg. 60 59.5 60.5
Difference between angles 2
Cal 1-3 deg. 120 119.5 120.5
Cal 1-3 deg. 120 119.5 120.5
Difference between angles 3
Cal 1-6 deg. 180 179.5 180.5
Cal 1-6 deg. 180 179.5 180.5
Difference between angles 4
Cyl.1-2 deg. 240 239.5 240.5
Cyl.1-2 deg. 240 239.5 240.5
Difference between angles 5
Cal 1-4 deg. 300 299.5 300.5
Cal 1-4 deg. 300 299.5 300.5
Injection quantity adjustment
Adjusting point
A
Rack position
10.4
Pump speed
r/min
1100
1100
1100
Average injection quantity
mm3/st.
91
89.5
92.5
Max. variation between cylinders
%
0
-2
2
Basic
*
Fixing the lever
*
Boost pressure
kPa
85.3
85.3
Boost pressure
mmHg
640
640
Injection quantity adjustment_02
Adjusting point
-
Rack position
7.8+-0.5
Pump speed
r/min
450
450
450
Average injection quantity
mm3/st.
12
10.7
13.3
Max. variation between cylinders
%
0
-14
14
Fixing the rack
*
Boost pressure
kPa
0
0
0
Boost pressure
mmHg
0
0
0
Remarks
Adjust only variation between cylinders; adjust governor according to governor specifications.
Adjust only variation between cylinders; adjust governor according to governor specifications.
Injection quantity adjustment_03
Adjusting point
E
Rack position
10.6++
Pump speed
r/min
100
100
100
Average injection quantity
mm3/st.
75
70
80
Fixing the lever
*
Boost pressure
kPa
0
0
0
Boost pressure
mmHg
0
0
0
Rack limit
*
Boost compensator adjustment
Pump speed
r/min
550
550
550
Rack position
R1-0.85
Boost pressure
kPa
28
24
32
Boost pressure
mmHg
210
180
240
Boost compensator adjustment_02
Pump speed
r/min
550
550
550
Rack position
R1(10.4)
Boost pressure
kPa
72
65.3
78.7
Boost pressure
mmHg
540
490
590
Test data Ex:
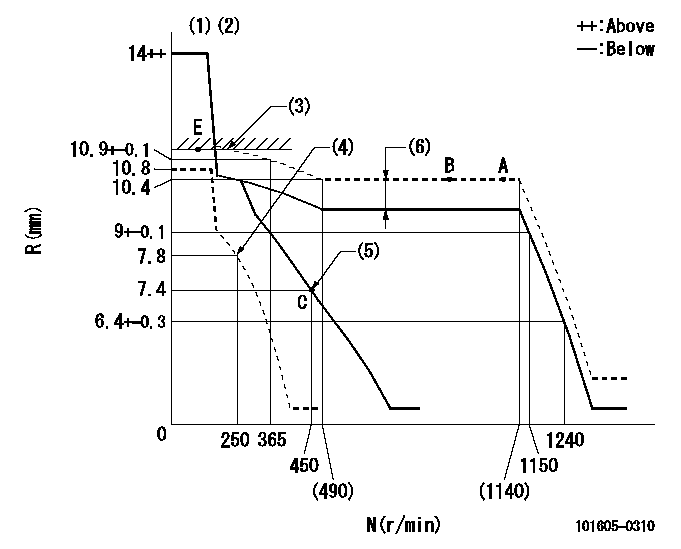
Governor adjustment

N:Pump speed
R:Rack position (mm)
(1)Target notch: K
(2)Tolerance for racks not indicated: +-0.05mm.
(3)RACK LIMIT
(4)Set idle sub-spring
(5)Main spring setting
(6)Boost compensator stroke: BCL
----------
K=13 BCL=0.85+-0.1mm
----------
----------
K=13 BCL=0.85+-0.1mm
----------
Speed control lever angle

F:Full speed
I:Idle
(1)Stopper bolt setting
----------
----------
a=9deg+-5deg b=21deg+-5deg
----------
----------
a=9deg+-5deg b=21deg+-5deg
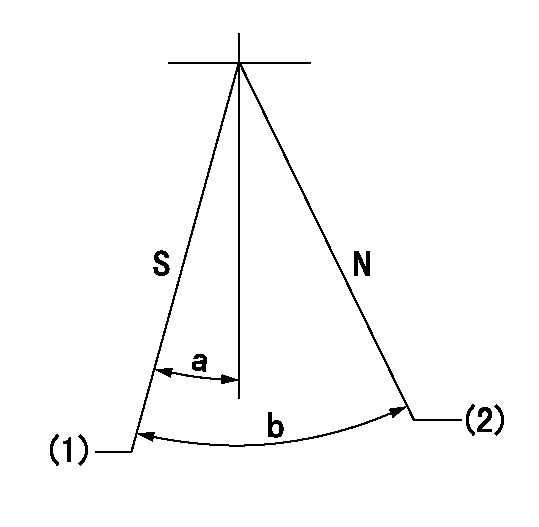
Stop lever angle

N:Pump normal
S:Stop the pump.
(1)Pump speed aa and rack position bb (to be sealed at delivery)
(2)Normal
----------
aa=0r/min bb=1-0.5mm
----------
a=32deg+-5deg b=(55deg)
----------
aa=0r/min bb=1-0.5mm
----------
a=32deg+-5deg b=(55deg)
0000001501 TAMPER PROOF

Tamperproofing-equipped boost compensator cover installation procedure
(A) After adjusting the boost compensator, tighten the bolts to remove the heads.
(1)Before adjusting the governor and the boost compensator, tighten the screw to the specified torque.
(Tightening torque T = T1 maximum)
(2)After adjusting the governor and the boost compensator, tighten to the specified torque to break off the bolt heads.
(Tightening torque T = T2)
----------
T1=2.5N-m(0.25kgf-m) T2=2.9~4.4N-m(0.3~0.45kgf-m)
----------
----------
T1=2.5N-m(0.25kgf-m) T2=2.9~4.4N-m(0.3~0.45kgf-m)
----------
Timing setting

(1)Pump vertical direction
(2)Position of gear mark 'CC' at No 1 cylinder's beginning of injection
(3)B.T.D.C.: aa
(4)-
----------
aa=9deg
----------
a=(100deg)
----------
aa=9deg
----------
a=(100deg)
Information:
1. Disconnect oil supply line (1) and oil drain tube (2). Remove the four mounting nuts and remove the turbocharger. Remove the gasket. The following steps are for the installation of the turbocharger.2. Apply 5P3931 Anti-Seize to turbocharger mounting studs. Position turbocharger gasket and turbocharger, then Install the four mounting nuts. Tighten the four mounting nuts to a torque of 54 5 N m (40 4 lb.ft.).3. Position gaskets and install drain tube (2) and supply line (1).Disassemble And Assemble Turbocharger
Start By:a. remove turbocharger 1. Remove bolts (1) and (2). Remove the compressor and turbine housings.2. Remove nut (3) and compressor wheel (4). Slide out turbine wheel (5) and shaft.3. Remove adapter plate snap ring (6).4. Use two screwdrivers and remove adapter plate (7).5. Remove bushings (8), spacers (9), and seals (10).6. Remove snap ring (11) and bushing (12).7. Remove snap ring (13) and bushing (14). The following steps are for the assembly of the turbocharger.8. Install bushing (12) and snap ring (11). Repeat for bushing (14) and snap ring (13).9. With th seals and shield (15) in place, install shaft and turbine wheel assembly (5).10. Install the spacers, bushings, plate, seals and adapter plate. Install the snap ring (not illustrated).
Do not allow any of the 7M7456 Locktite to get on the shaft. Damage to the turbocharger may occur.
11. Install compressor wheel (4) on the shaft. Put one drop of 7M7456 Locktite on the threads and install nut (3). Tighten nut (3) to a torque of 15.6 .7 N m (138 6 lb.in.).12. Position the turbine and compressor housings. Put 5P3931 Anti-Seize Compound on the bolts and install. Tighten bolts (1) for the compressor cover to a torque of 7.3 .6 N m (65 5 lb.in.). Tighten bolts (2), for the turbine housing to a torque of 15.8 .6 N m (140 5 lb.in.).End by:a. Install turbocharger
Have questions with 101605-0310?
Group cross 101605-0310 ZEXEL
Isuzu
101605-0310
9 400 613 178
1156034900
INJECTION-PUMP ASSEMBLY
6BG1-T
6BG1-T

