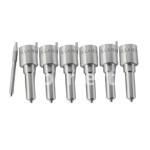
Information injection-pump assembly
ZEXEL
101603-7520
1016037520
ISUZU
8943969220
8943969220
Rating:
Service parts 101603-7520 INJECTION-PUMP ASSEMBLY:
1.
_
7.
COUPLING PLATE
8.
_
9.
_
11.
Nozzle and Holder
8-94397-483-2
12.
Open Pre:MPa(Kqf/cm2)
18.1{185}
15.
NOZZLE SET
Include in #1:
101603-7520
as INJECTION-PUMP ASSEMBLY
Include in #2:
104741-6730
as _
Cross reference number
ZEXEL
101603-7520
1016037520
ISUZU
8943969220
8943969220
Zexel num
Bosch num
Firm num
Name
Calibration Data:
Adjustment conditions
Test oil
1404 Test oil ISO4113 or {SAEJ967d}
1404 Test oil ISO4113 or {SAEJ967d}
Test oil temperature
degC
40
40
45
Nozzle and nozzle holder
105780-8210
Nozzle
105780-0070
Bosch type code
DN12SD12T-1
Nozzle holder
105780-2080
Bosch type code
EF8511/9
Opening pressure
MPa
17.2
Opening pressure
kgf/cm2
175
Injection pipe
Outer diameter - inner diameter - length (mm) mm 6-2-600
Outer diameter - inner diameter - length (mm) mm 6-2-600
Overflow valve
131424-4920
Overflow valve opening pressure
kPa
127
107
147
Overflow valve opening pressure
kgf/cm2
1.3
1.1
1.5
Tester oil delivery pressure
kPa
157
157
157
Tester oil delivery pressure
kgf/cm2
1.6
1.6
1.6
Direction of rotation (viewed from drive side)
Left L
Left L
Injection timing adjustment
Direction of rotation (viewed from drive side)
Left L
Left L
Injection order
1-5-3-6-
2-4
Pre-stroke
mm
4.2
4.15
4.25
Rack position
After adjusting injection quantity. R=A
After adjusting injection quantity. R=A
Beginning of injection position
Governor side NO.1
Governor side NO.1
Difference between angles 1
Cal 1-5 deg. 60 59.5 60.5
Cal 1-5 deg. 60 59.5 60.5
Difference between angles 2
Cal 1-3 deg. 120 119.5 120.5
Cal 1-3 deg. 120 119.5 120.5
Difference between angles 3
Cal 1-6 deg. 180 179.5 180.5
Cal 1-6 deg. 180 179.5 180.5
Difference between angles 4
Cyl.1-2 deg. 240 239.5 240.5
Cyl.1-2 deg. 240 239.5 240.5
Difference between angles 5
Cal 1-4 deg. 300 299.5 300.5
Cal 1-4 deg. 300 299.5 300.5
Injection quantity adjustment
Adjusting point
-
Rack position
11.2
Pump speed
r/min
900
900
900
Average injection quantity
mm3/st.
73.5
71.9
75.1
Max. variation between cylinders
%
0
-2.5
2.5
Basic
*
Fixing the rack
*
Standard for adjustment of the maximum variation between cylinders
*
Injection quantity adjustment_02
Adjusting point
H
Rack position
9.5+-0.5
Pump speed
r/min
260
260
260
Average injection quantity
mm3/st.
8.3
7
9.6
Max. variation between cylinders
%
0
-14
14
Fixing the rack
*
Standard for adjustment of the maximum variation between cylinders
*
Injection quantity adjustment_03
Adjusting point
A
Rack position
R1(11.2)
Pump speed
r/min
900
900
900
Average injection quantity
mm3/st.
73.5
72.5
74.5
Basic
*
Fixing the lever
*
Injection quantity adjustment_04
Adjusting point
B
Rack position
R1-0.1
Pump speed
r/min
1500
1500
1500
Average injection quantity
mm3/st.
84.6
80.6
88.6
Fixing the lever
*
Injection quantity adjustment_05
Adjusting point
C
Rack position
R1-0.3
Pump speed
r/min
600
600
600
Average injection quantity
mm3/st.
55.3
52.1
58.5
Fixing the lever
*
Injection quantity adjustment_06
Adjusting point
I
Rack position
-
Pump speed
r/min
150
150
150
Average injection quantity
mm3/st.
103
103
135
Fixing the lever
*
Timer adjustment
Pump speed
r/min
1270--
Advance angle
deg.
0
0
0
Remarks
Start
Start
Timer adjustment_02
Pump speed
r/min
1220
Advance angle
deg.
0.5
Timer adjustment_03
Pump speed
r/min
1500
Advance angle
deg.
5.5
5
6
Remarks
Finish
Finish
Test data Ex:
Governor adjustment
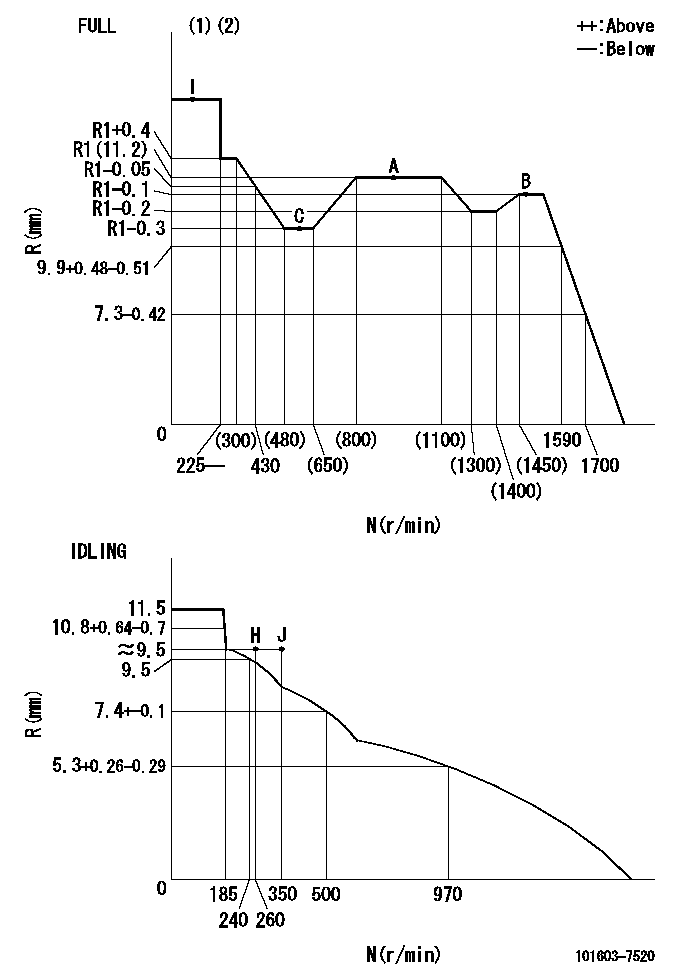
N:Pump speed
R:Rack position (mm)
(1)Torque cam stamping: T1
(2)Tolerance for racks not indicated: +-0.05mm.
----------
T1=F10
----------
----------
T1=F10
----------
Speed control lever angle

F:Full speed
I:Idle
(1)Use the pin at R = aa
(2)Stopper bolt set position 'H'
----------
aa=35mm
----------
a=11deg+-5deg b=(36.5deg)+-3deg
----------
aa=35mm
----------
a=11deg+-5deg b=(36.5deg)+-3deg
Stop lever angle
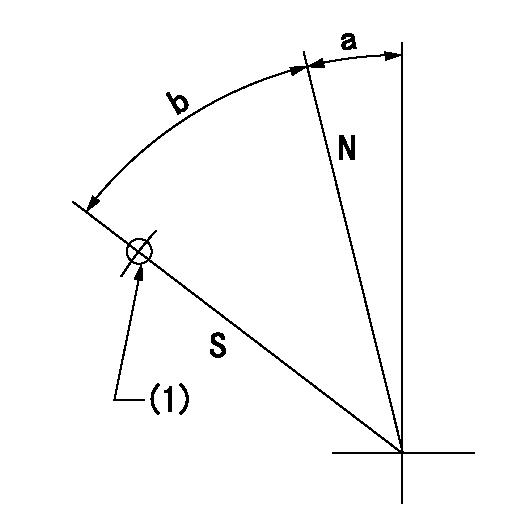
N:Pump normal
S:Stop the pump.
(1)Use the pin at R = aa
----------
aa=45mm
----------
a=12.5deg+-5deg b=40deg+-5deg
----------
aa=45mm
----------
a=12.5deg+-5deg b=40deg+-5deg
0000001501 I/P WITH LOAD PLUNGER ADJ
Plunger assembly number: PL (stamping: ST)
1. Adjustment procedures
(1)Insert the pre-stroke adjusting shims L1 for each cylinder.
(2)Adjust injection quantity.(max. var. bet. cyl. idling a1, full a2)
(3)At basic point A, adjust so that the pre-stroke is L2.
(4)Reconfirm the injection quantity.
----------
PL=131153-4520 ST=A724 L1=1mm L2=4.2+-0.05mm a1=+-14% a2=+-2.5%
----------
----------
PL=131153-4520 ST=A724 L1=1mm L2=4.2+-0.05mm a1=+-14% a2=+-2.5%
----------
Timing setting
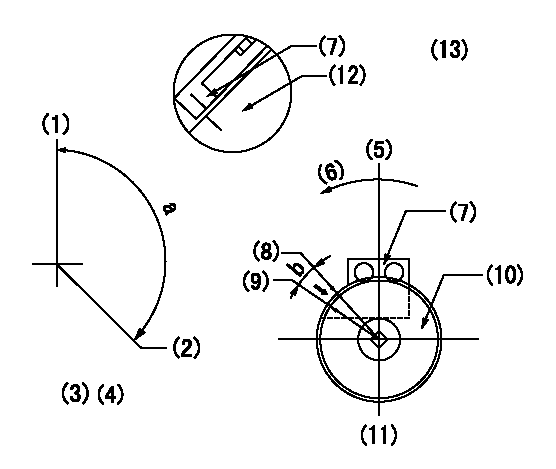
(1)Pump vertical direction
(2)Position of timer's threaded hole at No 1 cylinder's beginning of injection
(3)B.T.D.C.: aa
(4)-
(5)Pump vertical direction
(6)Direction of rotation
(7)Pointer
(8)Pointer stamping
(9)Timing device stamping
(10)Timing device
(11)Move b deg and stamp both at the same time as shown above.
(12)Outside circumference of timing device
(13)Secondary timing stamping position for the No. 1 cylinder's beginning of injection
----------
aa=11deg
----------
a=(150deg) b=1deg15min
----------
aa=11deg
----------
a=(150deg) b=1deg15min
Information:
Illustration 4 g01633558
(5) 326-7322 Bracket As (13) 250-3895 Spacer (14) 8T-4896 Hard Washer (15) 4L-6459 Bolt
Install the new 326-7322 Bracket As (5) by using four new 250-3895 Spacers (13), four new 4L-6459 Bolts (15), and four new 8T-4896 Hard Washers (14) in the same place where the muffler was previously installed. Refer to Illustration 4.
Illustration 5 g01633569
(4) 326-7321 Connector As (11) 249-3108 Isolation Mount (12) 7X-0618 Hard Washer (16) 8T-4244 Nut (17) 8T-7930 Bolt (19) 8T-4223 Hard Washer
Install the new 326-7321 Connector As (4) on bracket assembly (5) by using three new 249-3108 Isolation Mounts (11), three new 8T-7930 Bolts (17), six new 7X-0618 Hard Washers (12), three new 8T-4223 Hard Washers (19), and three new 8T-4244 Nuts (16). Refer to Illustration 5.
Illustration 6 g01633576
(2) 326-7333 Brace (7) 326-7334 Brace (11) 249-3108 Isolation Mount (12) 7X-0618 Hard Washer (16) 8T-4244 Nut (18) 8T-4176 Bolt (19) 8T-4223 Hard Washer
Install a new 326-7333 Brace (2) and a new 326-7334 Brace (7) to connector assembly (4) by using two new 249-3108 Isolation Mounts (11), two new 8T-4176 Bolts (18), four new 7X-0618 Hard Washers (12), two new 8T-4223 Hard Washers (19) and two new 8T-4244 Nuts (16). Refer to Illustration 6.
Illustration 7 g01633578
(1) 326-7315 Diesel Particulate Filter Gp
Install the new 326-7315 Diesel Particulate Filter Gp (1) onto connector assembly (4). The weight of the diesel particulate filter group is approximately 72.5 kg (160 lb). Refer to Illustration 7.
Illustration 8 g01633590
(9) 326-7320 Filter Clamp Assembly (16) 8T-4244 Nut (19) 8T-4223 Hard Washer (20) 8T-4910 Bolt
Install two new 326-7320 Filter Clamp As (9) by using eight new 8T-4223 Hard Washers (19), four new 8T-4910 Bolts (20) and four new 8T-4244 Nuts (16). Refer to Illustration 8.
Illustration 9 g01633633
(10) 195-3068 Ejector (22) 5P-0597 Hose Clamp (23) 273-3000 Hose (24) 233-7182 Tube
Install the new 195-3068 Ejector (10) to the diesel particulate filter. Refer to Illustration 9.
Install the new 273-3000 Hose (23), and the new 233-7182 Tube (24) to the ejector by using four new 5P-0597 Hose Clamps (22). Refer to Illustration 9.
Illustration 10 g01633714
(6) 326-7328 Tube As (8) 328-8875 Adaptor As (25) 141-1480 Clamp As (27) 202-1838 V-Band Clamp (28) 243-2973 Bellows
Install the new 326-7328 Tube As (6) to the inlet module tube of the diesel particulate filter by using a new 141-1480 Clamp As (25). Refer to Illustration 10.
Install the new 243-2973 Bellows (28) to tube assembly (6) by using a new 202-1838 V-Band
