Information injection-pump assembly
BOSCH
9 400 615 120
9400615120
ZEXEL
101603-6311
1016036311
MITSUBISHI
ME035599
me035599

Rating:
Service parts 101603-6311 INJECTION-PUMP ASSEMBLY:
1.
_
6.
COUPLING PLATE
7.
COUPLING PLATE
8.
_
9.
_
11.
Nozzle and Holder
ME035749
12.
Open Pre:MPa(Kqf/cm2)
21.6{220}
15.
NOZZLE SET
Cross reference number
BOSCH
9 400 615 120
9400615120
ZEXEL
101603-6311
1016036311
MITSUBISHI
ME035599
me035599
Zexel num
Bosch num
Firm num
Name
Calibration Data:
Adjustment conditions
Test oil
1404 Test oil ISO4113 or {SAEJ967d}
1404 Test oil ISO4113 or {SAEJ967d}
Test oil temperature
degC
40
40
45
Nozzle and nozzle holder
105780-8140
Bosch type code
EF8511/9A
Nozzle
105780-0000
Bosch type code
DN12SD12T
Nozzle holder
105780-2080
Bosch type code
EF8511/9
Opening pressure
MPa
17.2
Opening pressure
kgf/cm2
175
Injection pipe
Outer diameter - inner diameter - length (mm) mm 6-2-600
Outer diameter - inner diameter - length (mm) mm 6-2-600
Overflow valve
131424-5520
Overflow valve opening pressure
kPa
255
221
289
Overflow valve opening pressure
kgf/cm2
2.6
2.25
2.95
Tester oil delivery pressure
kPa
157
157
157
Tester oil delivery pressure
kgf/cm2
1.6
1.6
1.6
Direction of rotation (viewed from drive side)
Left L
Left L
Injection timing adjustment
Direction of rotation (viewed from drive side)
Left L
Left L
Injection order
1-5-3-6-
2-4
Pre-stroke
mm
3
2.95
3.05
Beginning of injection position
Governor side NO.1
Governor side NO.1
Difference between angles 1
Cal 1-5 deg. 60 59.5 60.5
Cal 1-5 deg. 60 59.5 60.5
Difference between angles 2
Cal 1-3 deg. 120 119.5 120.5
Cal 1-3 deg. 120 119.5 120.5
Difference between angles 3
Cal 1-6 deg. 180 179.5 180.5
Cal 1-6 deg. 180 179.5 180.5
Difference between angles 4
Cyl.1-2 deg. 240 239.5 240.5
Cyl.1-2 deg. 240 239.5 240.5
Difference between angles 5
Cal 1-4 deg. 300 299.5 300.5
Cal 1-4 deg. 300 299.5 300.5
Injection quantity adjustment
Adjusting point
-
Rack position
12.1
Pump speed
r/min
800
800
800
Each cylinder's injection qty
mm3/st.
88
85.4
90.6
Basic
*
Fixing the rack
*
Standard for adjustment of the maximum variation between cylinders
*
Injection quantity adjustment_02
Adjusting point
H
Rack position
9.5+-0.5
Pump speed
r/min
275
275
275
Each cylinder's injection qty
mm3/st.
10.5
9
12
Fixing the rack
*
Standard for adjustment of the maximum variation between cylinders
*
Injection quantity adjustment_03
Adjusting point
A
Rack position
R1(12.1)
Pump speed
r/min
800
800
800
Average injection quantity
mm3/st.
88
87
89
Basic
*
Fixing the lever
*
Boost pressure
kPa
49.3
49.3
Boost pressure
mmHg
370
370
Injection quantity adjustment_04
Adjusting point
C
Rack position
(R1-0.8)
Pump speed
r/min
600
600
600
Average injection quantity
mm3/st.
67
65
69
Fixing the lever
*
Boost pressure
kPa
18.7
18.7
18.7
Boost pressure
mmHg
140
140
140
Injection quantity adjustment_05
Adjusting point
I
Rack position
-
Pump speed
r/min
100
100
100
Average injection quantity
mm3/st.
110
90
130
Fixing the lever
*
Rack limit
*
Boost compensator adjustment
Pump speed
r/min
700
700
700
Rack position
R1-1.1
Boost pressure
kPa
13.3
13.3
13.3
Boost pressure
mmHg
100
100
100
Boost compensator adjustment_02
Pump speed
r/min
700
700
700
Rack position
(R1-0.8)
Boost pressure
kPa
18.7
17.4
20
Boost pressure
mmHg
140
130
150
Boost compensator adjustment_03
Pump speed
r/min
700
700
700
Rack position
R1(12.1)
Boost pressure
kPa
36
29.3
42.7
Boost pressure
mmHg
270
220
320
Test data Ex:
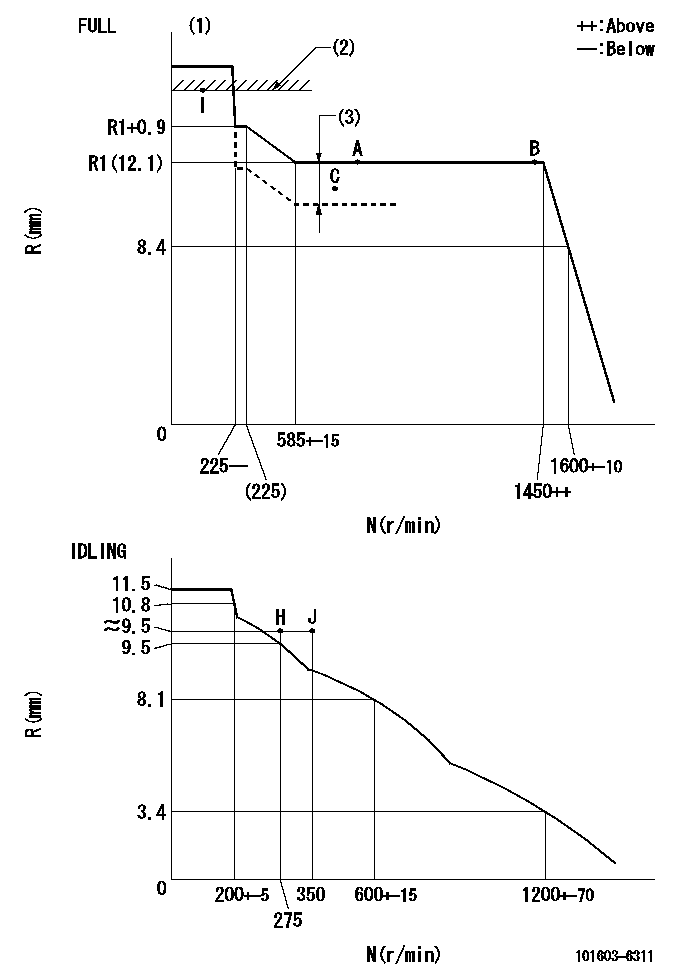
Governor adjustment

N:Pump speed
R:Rack position (mm)
(1)Torque cam stamping: T1
(2)RACK LIMIT
(3)Boost compensator stroke: BCL
----------
T1=B44 BCL=1.1+-0.1mm
----------
----------
T1=B44 BCL=1.1+-0.1mm
----------
Timer adjustment

(1)Adjusting range
(2)Step response time
(N): Speed of the pump
(L): Load
(theta) Advance angle
(Srd1) Step response time 1
(Srd2) Step response time 2
1. Adjusting conditions for the variable timer
(1)Adjust the clearance between the pickup and the protrusion to L.
----------
L=1.5+-0.2mm N2=800r/min C3=(8deg) t1=2--sec. t2=2--sec.
----------
N1=1400r/min P1=0kPa(0kgf/cm2) P2=392kPa(4kgf/cm2) C1=0.5--deg C2=8+-0.3deg R01=0/4load R02=4/4load
----------
L=1.5+-0.2mm N2=800r/min C3=(8deg) t1=2--sec. t2=2--sec.
----------
N1=1400r/min P1=0kPa(0kgf/cm2) P2=392kPa(4kgf/cm2) C1=0.5--deg C2=8+-0.3deg R01=0/4load R02=4/4load
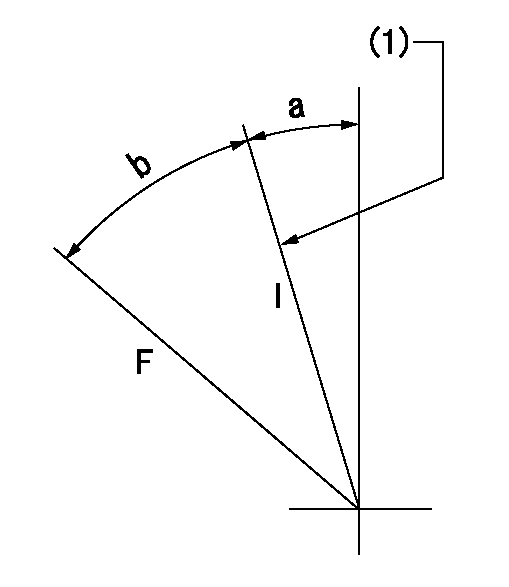
Speed control lever angle

F:Full speed
I:Idle
(1)Stopper bolt set position 'H'
----------
----------
a=18.5deg+-5deg b=(41deg)+-3deg
----------
----------
a=18.5deg+-5deg b=(41deg)+-3deg
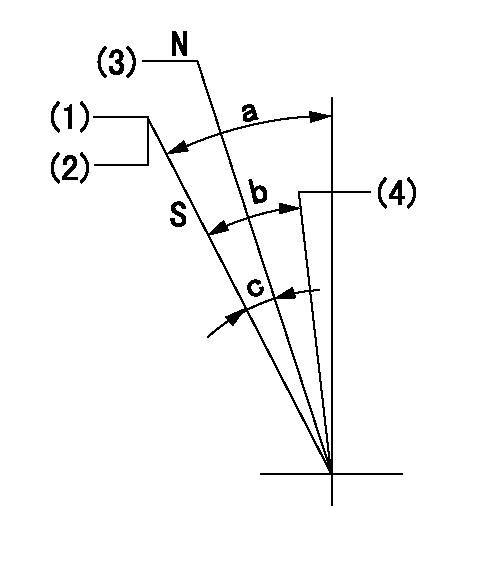
Stop lever angle

N:Engine manufacturer's normal use
S:Stop the pump.
(1)Set the stopper bolt at speed = rated point and rack position = aa (non-injection rack position). Confirm non-injection.
(2)After setting the stopper bolt , confirm non-injection at pump speed bb. Rack position = cc (non-injection rack position).
(3)Rack position = approximately dd
(4)Free (at shipping)
----------
aa=(7.5)mm bb=275r/min cc=(9)mm dd=17.4mm
----------
a=38.5deg+-5deg b=(27deg) c=17deg+-5deg
----------
aa=(7.5)mm bb=275r/min cc=(9)mm dd=17.4mm
----------
a=38.5deg+-5deg b=(27deg) c=17deg+-5deg
0000001501 MICRO SWITCH
Adjustment of the micro-switch
Adjust the bolt to obtain the following lever position when the micro-switch is ON.
(1)Speed N1
(2)Rack position Ra
----------
N1=400+-5r/min Ra=9.2mm
----------
----------
N1=400+-5r/min Ra=9.2mm
----------
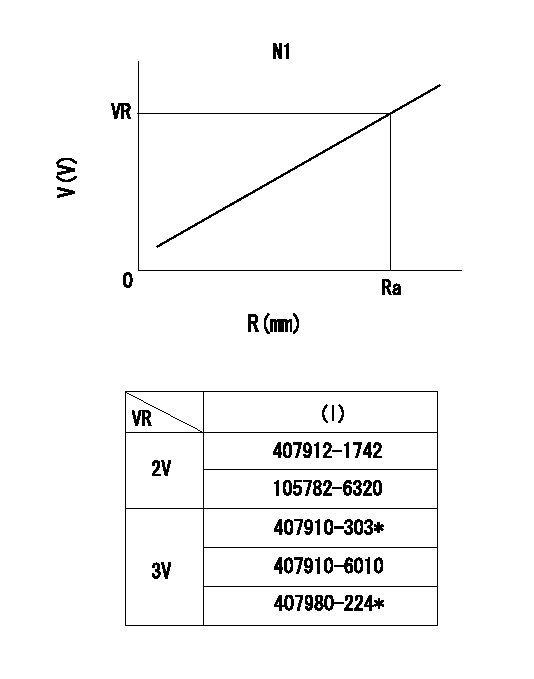
0000001601 RACK SENSOR

R:Rack position (mm)
V:Voltage (V)
After installing the rack sensor, confirm the output value (VR).
----------
N1=- Ra=R1(12.1)mm VR=1.99+-0.01V
----------
----------
N1=- Ra=R1(12.1)mm VR=1.99+-0.01V
----------
Timing setting

(1)Pump vertical direction
(2)Position of timer's tooth at No 1 cylinder's beginning of injection
(3)B.T.D.C.: aa
(4)-
----------
aa=14deg
----------
a=(0deg)
----------
aa=14deg
----------
a=(0deg)
Information:
Illustration 17 g03389921
Illustration 18 g03389931
Read the warning and select "Accept" to continue.
Illustration 19 g03389947
Once the reset is completed, a log of the reset is captured and visible as a new row of information in the Diesel Oxidation Catalyst Replacement screen. Selective Catalytic Reduction (SCR) Maintenance on Tier 4 Final Products
Note: Refer to Table 5 for the existing SCR catalyst part number being serviced along with the corresponding new service kit, and the clamp part number required for reassembly.
Table 5
SCR Part Number Service Kit Part Number Required Clamp Part Number
447-8145 N/A 346-0335
447-8143 N/A 346-0335
447-8141 N/A 346-0335
447-8149 N/A 346-0335
447-8147 N/A 346-0335
447-8163 N/A 346-0335
447-8151 N/A 346-0335
375-0989 N/A 346-0335
447-8165 N/A 346-0335
447-8153 N/A 346-0335
447-8161 N/A 346-0335
447-8159 N/A 346-0335
447-8157 N/A 346-0335
447-8169 N/A 346-0335
447-8173 N/A 346-0335
447-8171 N/A 346-0335
447-8167 N/A 346-0335
447-8175 N/A 346-0335 The Aftertreatment SCR Catalyst Replacement procedure must be performed when the SCR Catalyst has been replaced. This is necessary to ensure that the engine meets emissions requirements. Follow the procedure below to reset the SCR Catalyst model in the aftertreatment software.
Connect to Cat® ET.
Illustration 20 g03390636
Connect to "Engine #1 Aftertreatment Controller".
Illustration 21 g03740190
Select "Service" from the top menu and select "Service Procedures".
Illustration 22 g03740205
Select "Aftertreatment #1 SCR Catalyst Replacement" and select "Start".
Illustration 23 g03740210
Select "Reset".
Illustration 24 g03740216
You must read the warning and select "Accept" to continue.
Enter the factory passwords to continue.
Illustration 25 g03740230
Once the reset is completed, a log of the reset is captured and visible as a new row of information in the "Aftertreatment #1 SCR Catalyst Replacement" screen.