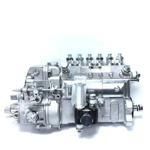
Information injection-pump assembly
ZEXEL
101602-7331
1016027331
ISUZU
1156026581
1156026581

Rating:
Service parts 101602-7331 INJECTION-PUMP ASSEMBLY:
1.
_
5.
AUTOM. ADVANCE MECHANIS
6.
COUPLING PLATE
8.
_
9.
_
11.
Nozzle and Holder
1-15300-250-2
12.
Open Pre:MPa(Kqf/cm2)
18.1{185}
15.
NOZZLE SET
Cross reference number
ZEXEL
101602-7331
1016027331
ISUZU
1156026581
1156026581
Zexel num
Bosch num
Firm num
Name
Calibration Data:
Adjustment conditions
Test oil
1404 Test oil ISO4113 or {SAEJ967d}
1404 Test oil ISO4113 or {SAEJ967d}
Test oil temperature
degC
40
40
45
Nozzle and nozzle holder
105780-8140
Bosch type code
EF8511/9A
Nozzle
105780-0000
Bosch type code
DN12SD12T
Nozzle holder
105780-2080
Bosch type code
EF8511/9
Opening pressure
MPa
17.2
Opening pressure
kgf/cm2
175
Injection pipe
Outer diameter - inner diameter - length (mm) mm 6-2-600
Outer diameter - inner diameter - length (mm) mm 6-2-600
Overflow valve
131424-4920
Overflow valve opening pressure
kPa
127
107
147
Overflow valve opening pressure
kgf/cm2
1.3
1.1
1.5
Tester oil delivery pressure
kPa
157
157
157
Tester oil delivery pressure
kgf/cm2
1.6
1.6
1.6
Direction of rotation (viewed from drive side)
Right R
Right R
Injection timing adjustment
Direction of rotation (viewed from drive side)
Right R
Right R
Injection order
1-5-3-6-
2-4
Pre-stroke
mm
3.4
3.35
3.45
Beginning of injection position
Drive side NO.1
Drive side NO.1
Difference between angles 1
Cal 1-5 deg. 60 59.5 60.5
Cal 1-5 deg. 60 59.5 60.5
Difference between angles 2
Cal 1-3 deg. 120 119.5 120.5
Cal 1-3 deg. 120 119.5 120.5
Difference between angles 3
Cal 1-6 deg. 180 179.5 180.5
Cal 1-6 deg. 180 179.5 180.5
Difference between angles 4
Cyl.1-2 deg. 240 239.5 240.5
Cyl.1-2 deg. 240 239.5 240.5
Difference between angles 5
Cal 1-4 deg. 300 299.5 300.5
Cal 1-4 deg. 300 299.5 300.5
Injection quantity adjustment
Adjusting point
A
Rack position
8.5
Pump speed
r/min
1025
1025
1025
Average injection quantity
mm3/st.
77.4
75.9
78.9
Max. variation between cylinders
%
0
-2.5
2.5
Basic
*
Fixing the lever
*
Injection quantity adjustment_02
Adjusting point
-
Rack position
5.4+-0.5
Pump speed
r/min
400
400
400
Average injection quantity
mm3/st.
9.4
8.1
10.7
Max. variation between cylinders
%
0
-14
14
Fixing the rack
*
Remarks
Adjust only variation between cylinders; adjust governor according to governor specifications.
Adjust only variation between cylinders; adjust governor according to governor specifications.
Test data Ex:
Governor adjustment
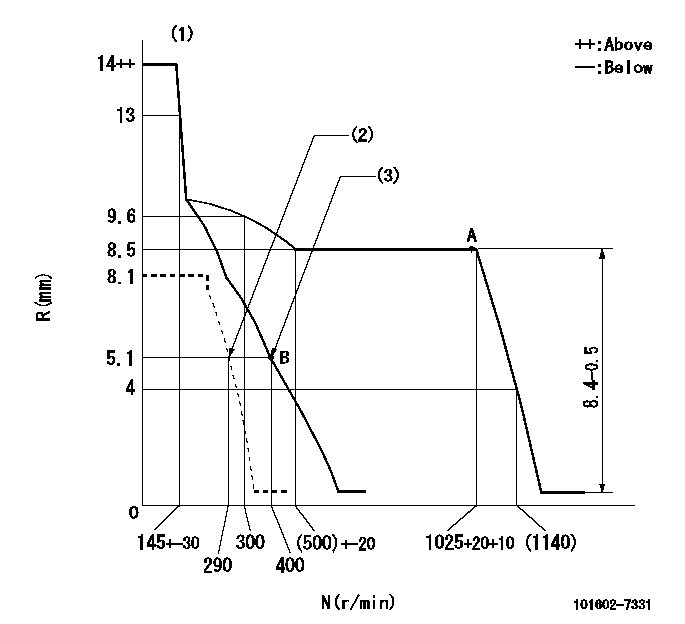
N:Pump speed
R:Rack position (mm)
(1)Notch fixed: K
(2)Set idle sub-spring
(3)Main spring setting
----------
K=10
----------
----------
K=10
----------
Speed control lever angle
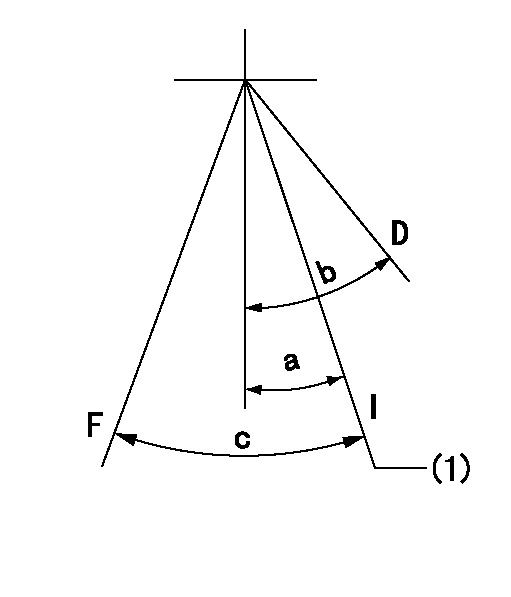
F:Full speed
I:Idle
D:Dead point
(1)Stopper bolt setting
----------
----------
a=18deg+-1deg b=20deg+-3deg c=(21deg)+-5deg
----------
----------
a=18deg+-1deg b=20deg+-3deg c=(21deg)+-5deg
Stop lever angle
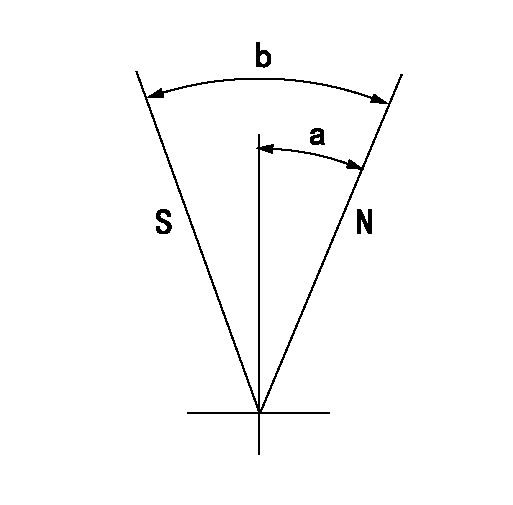
N:Pump normal
S:Stop the pump.
----------
----------
a=6deg+-5deg b=46deg+-5deg
----------
----------
a=6deg+-5deg b=46deg+-5deg
0000001501 LEVER
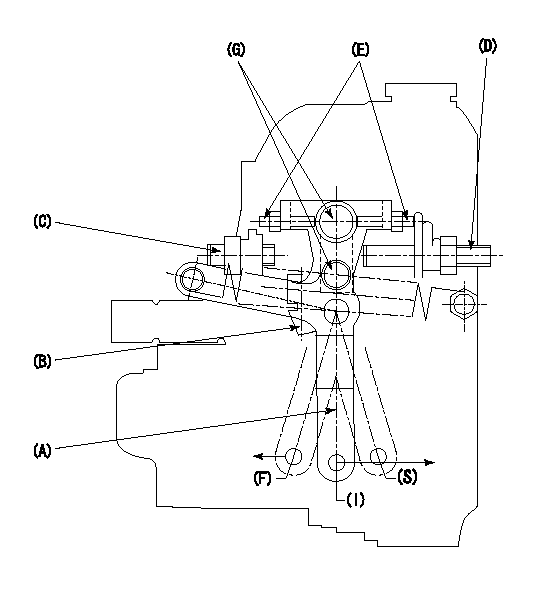
1. Variable lever adjustment
(1)Fix lever B in the idle position using the bolts C and D.
(2)Temporarily fix lever A in center of long hole.
(3)Set the dead point position temporarily and measure the lever angle.
(4)After idle adjustment, loosen the full side stopper bolt D.
(5)Move lever A in full speed direction.
(6)Fix the bolt D at the full speed position.
(7)Fix lever A using bolt E.
(8)(G) Lock using bolt.
(9)Finally, measure the lever angle and set the idle stopper bolt (C) stop position.
----------
----------
----------
----------
Timing setting

(1)Pump vertical direction
(2)Position of gear mark 'CC' at No 1 cylinder's beginning of injection
(3)B.T.D.C.: aa
(4)-
----------
aa=16deg
----------
a=(100deg)
----------
aa=16deg
----------
a=(100deg)
Information:
Fig. 4-Axial Bearing Movement CheckFasten dial indicator to turbine housing so that the indicator tip rests on the end of the shaft (Fig. 4).Move the shaft back and forth axially by hand. The total axial movement of the shaft should be 0.001 to 0.004 in. (0.03 to 0.10 mm). If not repair or replace unit.Repair
As each part is removed, place it in a clean protective container.Refer to Fig. 6 for part identification and relationship.
Fig. 5-Turbine Housing RemovalScribe a line on the mating surfaces of the turbine housing (1, Fig. 5) and center housing (2) to aid in alignment during reassembly.Remove the turbine housing-to-center housing cap screws (5, Fig. 5), lock plates (3), and clamps (4). Carefully remove turbine housing.
Fig. 6-Turbocharger Exploded View
Fig. 7-Removing Compressor (Impeller)Mount a suitable holding fixture (1, Fig. 7) (see Group 0499 Special Tools - Turbocharger) in a vise.Insert the turbine wheel into the fixture.Use a double universal socket to remove the compressor wheel retaining nut to avoid possible bending of the shaft.Remove the impeller (2, Fig. 7) from the shaft.
Fig. 8-Shaft and Wheel AssemblyRemove the turbine wheel and shaft assembly (3, Fig. 8) from the center housing keeping it centered until it is clear of the housing. Fig. 8 shows the turbine wheel assembly (1). The piston ring (2) can now be removed.Remove the back plate to center housing cap screw (16, Fig. 6) and lock plates (15).Carefully remove back plate by tapping with a soft mallet.
Fig. 9-Back Plate Assembly IMPORTANT: Back plate (2, Fig. 9) and the spring (1) are sold only as an assembly. The installed depth of the spring is a controlled dimension. Therefore, do not remove or replace the spring by itself. Cleaning can be done without removing the spring from the back plate.
Fig. 10-Removing Thrust Collar and Thrust WasherRemove the thrust collar (2, Fig. 10) and thrust washer (3) as shown in Fig. 10. Remove the O-ring (1) from housing and piston ring (4) from thrust collar.
Fig. 11-Retaining Ring and Bearing RemovalRemove retaining rings (2, Fig. 11) with a No. 501 Waldes Truarc Snap Ring Pliers, if snap rings are used, and bearings (1) from both sides of the center housing.Cleaning
Before cleaning, inspect parts for signs of burning, rubbing, or other damage which might not be evident after cleaning.Soak all parts in clean carbon solvent for approximately 25 minutes. After soaking use a stiff bristle brush to remove all dirt particles. Dry parts thoroughly. Normally, a light accumulation of carbon deposits will not affect turbine wheel operation.Inspection
Replace the following parts: O-ring (13, Fig. 6), lock plates (6, 15, and 21) piston rings (8 and 18), retaining rings (11), and all damaged nuts and bolts. If bearings and thrust washers show signs of nicks, scores, shellac deposits, or foreign material embedment, replace them.After cleaning, if any of the parts in the assembly show signs of rubbing, scoring, scratches, or seizure, replace them.Assembly
Be sure each part is clean before assembling. As parts are assembled, cover openings to prevent entry of dirt
