Information injection-pump assembly
BOSCH
9 400 610 246
9400610246
ZEXEL
101602-2283
1016022283
HINO
220202904A
220202904a
Rating:
Service parts 101602-2283 INJECTION-PUMP ASSEMBLY:
1.
_
5.
AUTOM. ADVANCE MECHANIS
7.
COUPLING PLATE
8.
_
9.
_
11.
Nozzle and Holder
23600-1830A
12.
Open Pre:MPa(Kqf/cm2)
19.6{200}
15.
NOZZLE SET
Cross reference number
BOSCH
9 400 610 246
9400610246
ZEXEL
101602-2283
1016022283
HINO
220202904A
220202904a
Zexel num
Bosch num
Firm num
Name
101602-2283
9 400 610 246
220202904A HINO
INJECTION-PUMP ASSEMBLY
H06CT K 14BF INJECTION PUMP ASSY PE6AD PE
H06CT K 14BF INJECTION PUMP ASSY PE6AD PE
Calibration Data:
Adjustment conditions
Test oil
1404 Test oil ISO4113 or {SAEJ967d}
1404 Test oil ISO4113 or {SAEJ967d}
Test oil temperature
degC
40
40
45
Nozzle and nozzle holder
105780-8140
Bosch type code
EF8511/9A
Nozzle
105780-0000
Bosch type code
DN12SD12T
Nozzle holder
105780-2080
Bosch type code
EF8511/9
Opening pressure
MPa
17.2
Opening pressure
kgf/cm2
175
Injection pipe
Outer diameter - inner diameter - length (mm) mm 6-2-600
Outer diameter - inner diameter - length (mm) mm 6-2-600
Overflow valve
134424-0920
Overflow valve opening pressure
kPa
162
147
177
Overflow valve opening pressure
kgf/cm2
1.65
1.5
1.8
Tester oil delivery pressure
kPa
157
157
157
Tester oil delivery pressure
kgf/cm2
1.6
1.6
1.6
Direction of rotation (viewed from drive side)
Right R
Right R
Injection timing adjustment
Direction of rotation (viewed from drive side)
Right R
Right R
Injection order
1-4-2-6-
3-5
Pre-stroke
mm
4
3.95
4.05
Beginning of injection position
Drive side NO.1
Drive side NO.1
Difference between angles 1
Cal 1-4 deg. 60 59.5 60.5
Cal 1-4 deg. 60 59.5 60.5
Difference between angles 2
Cyl.1-2 deg. 120 119.5 120.5
Cyl.1-2 deg. 120 119.5 120.5
Difference between angles 3
Cal 1-6 deg. 180 179.5 180.5
Cal 1-6 deg. 180 179.5 180.5
Difference between angles 4
Cal 1-3 deg. 240 239.5 240.5
Cal 1-3 deg. 240 239.5 240.5
Difference between angles 5
Cal 1-5 deg. 300 299.5 300.5
Cal 1-5 deg. 300 299.5 300.5
Injection quantity adjustment
Adjusting point
A
Rack position
9.3
Pump speed
r/min
1050
1050
1050
Average injection quantity
mm3/st.
87.1
86.1
88.1
Max. variation between cylinders
%
0
-3.5
3.5
Basic
*
Fixing the lever
*
Injection quantity adjustment_02
Adjusting point
-
Rack position
6+-0.5
Pump speed
r/min
410
410
410
Average injection quantity
mm3/st.
10
9
11
Max. variation between cylinders
%
0
-10
10
Fixing the rack
*
Remarks
Adjust only variation between cylinders; adjust governor according to governor specifications.
Adjust only variation between cylinders; adjust governor according to governor specifications.
Injection quantity adjustment_03
Adjusting point
C
Rack position
-
Pump speed
r/min
100
100
100
Average injection quantity
mm3/st.
130
130
140
Fixing the lever
*
Rack limit
*
Test data Ex:
Governor adjustment
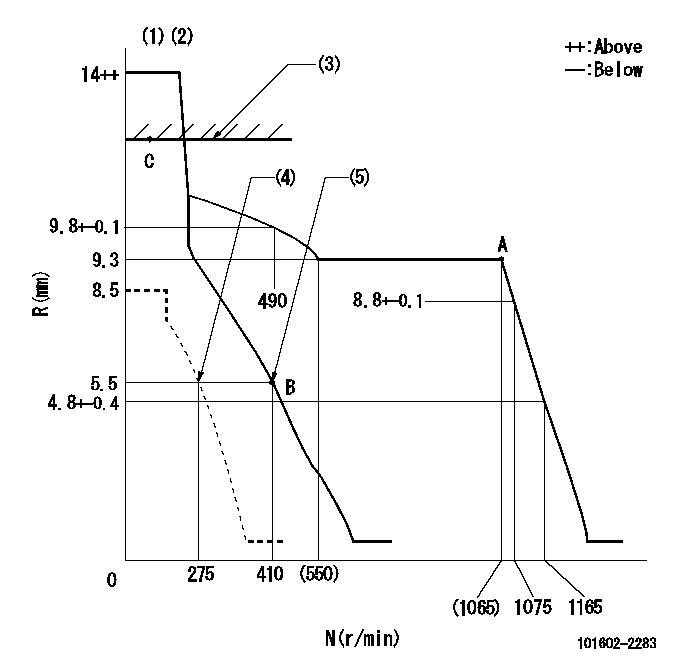
N:Pump speed
R:Rack position (mm)
(1)Target notch: K
(2)Tolerance for racks not indicated: +-0.05mm.
(3)RACK LIMIT
(4)Set idle sub-spring
(5)Main spring setting
----------
K=11
----------
----------
K=11
----------
Speed control lever angle
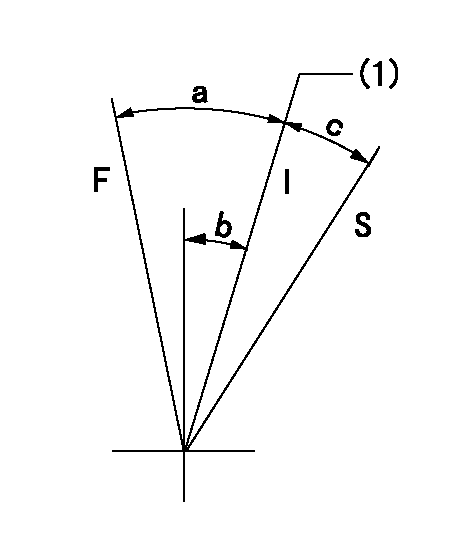
F:Full speed
I:Idle
S:Stop
(1)Set the stopper bolt at delivery
----------
----------
a=18deg+-5deg b=15deg+-5deg c=17deg+-5deg
----------
----------
a=18deg+-5deg b=15deg+-5deg c=17deg+-5deg
Stop lever angle
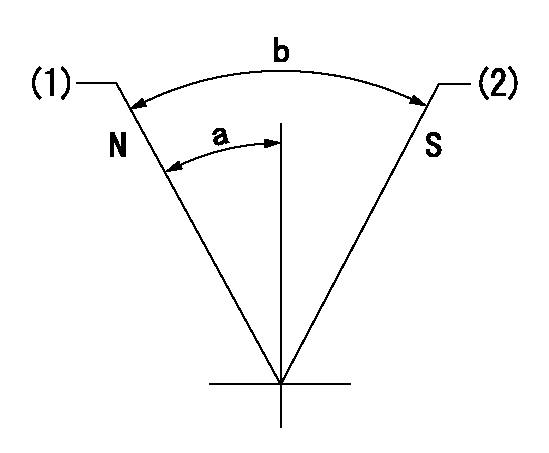
N:Pump normal
S:Stop the pump.
(1)Normal
(2)Rack position aa or less, pump speed bb
----------
aa=5mm bb=0r/min
----------
a=27deg+-5deg b=53deg+-5deg
----------
aa=5mm bb=0r/min
----------
a=27deg+-5deg b=53deg+-5deg
0000001501 LEVER
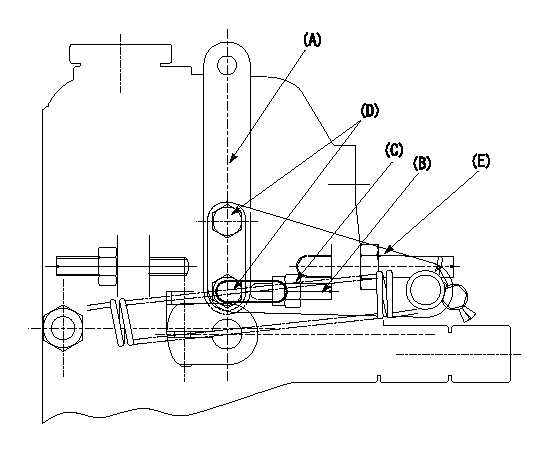
1. Adjust so that the control lever is as described below.
(1)Slightly loosen the bolt (D).
(2)Using bolt B, set so that the cancel spring's hook point is at the left hand side of the triangular lever's elongated hole.
(3)Fix the bolt (B) using the nut (C).
(4)Fix the lever (E) using the bolt (D).
2. (1) After setting the control lever cancel spring, set the speed to N1.
(2)Gradually move the control lever from the full position.
(3)At this time, it does not have to return to the stop position.
(4)Set idle at delivery.
----------
N1=0r/min
----------
----------
N1=0r/min
----------
Timing setting

(1)Pump vertical direction
(2)Coupling's key groove position at No 1 cylinder's beginning of injection
(3)-
(4)-
----------
----------
a=(60deg)
----------
----------
a=(60deg)
Information:
Introduction
The following procedure identifies the proper steps in identifying and recording a serial number of a DPF. There is also an inspection process that should be followed in order to help determine if an open Service Letter for the DPF applies to that particular unit.
Hot engine components can cause injury from burns. Before performing maintenance on the engine, allow the engine and the components to cool.
Wear goggles, gloves, protective clothing, and a National Institute for Occupational Safety and Health (NIOSH) approved P95 or N95 half-face respirator when handling a used Diesel Particulate Filter or Catalytic Converter Muffler. Failure to do so could result in personal injury.
Inspection Process that is Used in order to Obtain the Serial Number of the DPF
The serial number of the DPF contains 14 characters and the serial number is engraved onto the center section of the DPF.
Illustration 1 g01675205
Breakdown of the serial number of a DPF (1) Filter size number (256, 325, 519, 556, 653, 740, or 456) (2) Filter size letter (A or C) (3) Julian date (five numbers, first two will be 06, 07 or 08) (4) Assembly identification code (A or B) (5) Filter can number (four numbers)Note: Some older diesel particulate filters do not have the same sequence of characters and the filters may only contain 13 total characters. If 13 total characters are present the character for the size of the filter (fourth character from left) is missing.
The serial number of the DPF is located at the six o'clock position (pointing toward the ground on horizontally mounted diesel particulate filters) when the DPF is installed on the chassis of a vehicle. In the six o'clock position, the serial number of the DPF can be read. The following images show examples of an engraved serial number on the center section of the DPF.
Illustration 2 g01673033
(6) Location of the serial number on the center section of the DPF
Illustration 3 g01673054
(7) Location of the serial number on the center section of the DPFNote: Dual diesel particulate filters will have two different serial numbers. The serial numbers will be engraved on each center section.
Illustration 4 g01673094
Label from the factory on a DPF
Diesel particulate filters with low mileage may contain a label with information on the label. The label should be ignored. The label is only for the factory assembly, and the label will burn off in time.
Illustration 5 g01673200
(8) Enter the full serial number of the DPF in the section that is for comments.
Once the serial number of the DPF is found, write down the information. Connect to Caterpillar Electronic Technician (ET) and submit a warranty report. Type the serial number of the DPF in the section for comments. Refer to Illustration 5 for the location of the section for comments. Also, be sure to complete all the fields before submitting the download.
Illustration 6 g01678935
(9) Inputting the serial numbers for dual diesel particulate filters
If you are entering serial numbers for dual diesel particulate filters, add a semicolon between the serial numbers. Procedure for Inspecting the Sensor Assembly on Diesel
Have questions with 101602-2283?
Group cross 101602-2283 ZEXEL
Hino
Hino
101602-2283
9 400 610 246
220202904A
INJECTION-PUMP ASSEMBLY
H06CT
H06CT