Information injection-pump assembly
BOSCH
9 400 611 828
9400611828
ZEXEL
101600-3031
1016003031
KOMATSU
3863925
3863925
Rating:
Service parts 101600-3031 INJECTION-PUMP ASSEMBLY:
1.
_
4.
SUPPLY PUMP
5.
AUTOM. ADVANCE MECHANIS
6.
COUPLING PLATE
7.
COUPLING PLATE
8.
_
9.
_
10.
NOZZLE AND HOLDER ASSY
11.
Nozzle and Holder
12.
Open Pre:MPa(Kqf/cm2)
21.6{220}
13.
NOZZLE-HOLDER
14.
NOZZLE
15.
NOZZLE SET
Cross reference number
BOSCH
9 400 611 828
9400611828
ZEXEL
101600-3031
1016003031
KOMATSU
3863925
3863925
Zexel num
Bosch num
Firm num
Name
101600-3031
9 400 611 828
3863925 KOMATSU
INJECTION-PUMP ASSEMBLY
S6D102E K 14BE INJECTION PUMP ASSY PE6A PE
S6D102E K 14BE INJECTION PUMP ASSY PE6A PE
101600-3031
9 400 611 828
6735711480 KOMATSU
INJECTION-PUMP ASSEMBLY
S6D102E K 14BE INJECTION PUMP ASSY PE6A PE
S6D102E K 14BE INJECTION PUMP ASSY PE6A PE
Calibration Data:
Adjustment conditions
Test oil
1404 Test oil ISO4113 or {SAEJ967d}
1404 Test oil ISO4113 or {SAEJ967d}
Test oil temperature
degC
40
40
45
Nozzle and nozzle holder
105780-8140
Bosch type code
EF8511/9A
Nozzle
105780-0000
Bosch type code
DN12SD12T
Nozzle holder
105780-2080
Bosch type code
EF8511/9
Opening pressure
MPa
17.2
Opening pressure
kgf/cm2
175
Injection pipe
Outer diameter - inner diameter - length (mm) mm 6-2-600
Outer diameter - inner diameter - length (mm) mm 6-2-600
Overflow valve
131424-3420
Overflow valve opening pressure
kPa
255
221
289
Overflow valve opening pressure
kgf/cm2
2.6
2.25
2.95
Tester oil delivery pressure
kPa
157
157
157
Tester oil delivery pressure
kgf/cm2
1.6
1.6
1.6
Direction of rotation (viewed from drive side)
Right R
Right R
Injection timing adjustment
Direction of rotation (viewed from drive side)
Right R
Right R
Injection order
1-5-3-6-
2-4
Pre-stroke
mm
2.5
2.45
2.55
Beginning of injection position
Drive side NO.1
Drive side NO.1
Difference between angles 1
Cal 1-5 deg. 60 59.5 60.5
Cal 1-5 deg. 60 59.5 60.5
Difference between angles 2
Cal 1-3 deg. 120 119.5 120.5
Cal 1-3 deg. 120 119.5 120.5
Difference between angles 3
Cal 1-6 deg. 180 179.5 180.5
Cal 1-6 deg. 180 179.5 180.5
Difference between angles 4
Cyl.1-2 deg. 240 239.5 240.5
Cyl.1-2 deg. 240 239.5 240.5
Difference between angles 5
Cal 1-4 deg. 300 299.5 300.5
Cal 1-4 deg. 300 299.5 300.5
Injection quantity adjustment
Adjusting point
A
Rack position
9.7
Pump speed
r/min
1200
1200
1200
Average injection quantity
mm3/st.
73.5
72.5
74.5
Max. variation between cylinders
%
0
-2.5
2.5
Basic
*
Fixing the lever
*
Injection quantity adjustment_02
Adjusting point
C
Rack position
8+-0.5
Pump speed
r/min
435
435
435
Average injection quantity
mm3/st.
9.5
8.5
10.5
Max. variation between cylinders
%
0
-15
15
Fixing the rack
*
Injection quantity adjustment_03
Adjusting point
D
Rack position
10.2++
Pump speed
r/min
100
100
100
Average injection quantity
mm3/st.
70
70
80
Fixing the lever
*
Rack limit
*
Test data Ex:
Governor adjustment
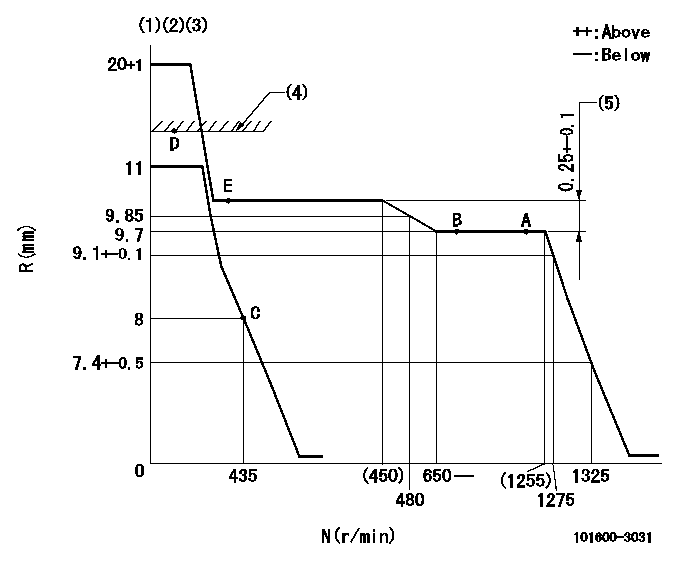
N:Pump speed
R:Rack position (mm)
(1)Target notch: K
(2)Tolerance for racks not indicated: +-0.05mm.
(3)Adjust the secondary timing before adjusting the governor.
(4)RACK LIMIT
(5)Rack difference between N = N1 and N = N2
----------
K=9 N1=1200r/min N2=400r/min
----------
----------
K=9 N1=1200r/min N2=400r/min
----------
Speed control lever angle
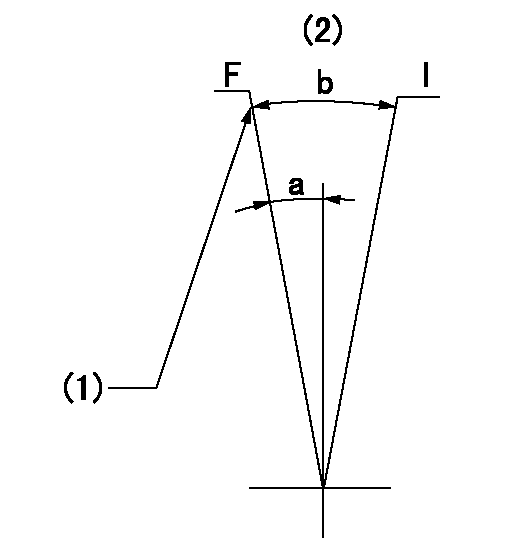
F:Full speed
I:Idle
(1)Stopper bolt setting
(2)Base lever only
----------
----------
a=16deg+-5deg b=26deg+-5deg
----------
----------
a=16deg+-5deg b=26deg+-5deg
Stop lever angle
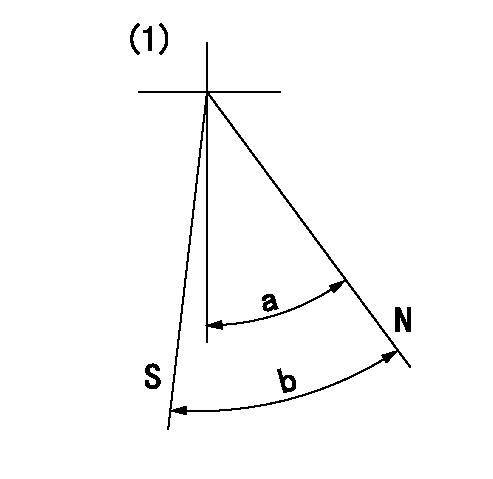
N:Pump normal
S:Stop the pump.
(1)No return spring
----------
----------
a=11.5deg+-5deg b=53deg+-5deg
----------
----------
a=11.5deg+-5deg b=53deg+-5deg
Timing setting
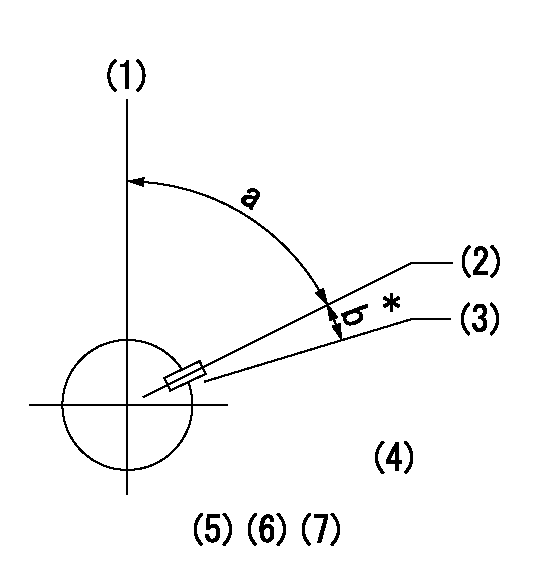
(1)Pump vertical direction
(2)Key groove position at No. 1 cylinder's beginning of injection position (at BTDC: aa).
(3)Position of the key groove of the No. 1 cylinder at B.T.D.C. bb (fix the governor flyweight at this position for delivery).
(4)B.T.D.C.: aa
(5)At second timing adjustment, set the camshaft at the * position and tighten the flyweight locknut.
(6)Align the flyweight's timing gear position with the lockpin groove and then fully tighten the flyweight to the camshaft.
(7)Remove the lock pin and adjust the governor. Reinstall the lock pin to fix the flyweight for delivery.
----------
aa=18deg bb=0deg
----------
a=54deg54min+-3deg b=9deg+-30min
----------
aa=18deg bb=0deg
----------
a=54deg54min+-3deg b=9deg+-30min
Information:
Illustration 4 g01787098
Right side view of machine (A) Hood and guard group (B) Lines group (Air) (C) Air cleaner
Illustration 5 g01787413
Front view of machineInstallation Procedure
Diesel Particulate Filter Installation
Illustration 6 g01787733
(2) 331-8935 Brackets (12) 5P-8245 Hard Washer (13) 6V-8149 Nut (14) 8F-6437 Washer (15) 8T-4956 Bolt
Place two new 331-8935 Brackets (2) parallel to each other on top of the hood. Secure the brackets to the hood using four new 8F-6437 Washers (14), four new 5P-8245 Hard Washers (12), four new 6V-8149 Nuts (13) and four new 8T-4956 Bolts (15). Refer to Illustration 6.
Illustration 7 g01787893
(5) 295-3044 Exhaust Support Gp (Lower half) (14) 8F-6437 Washer (15) 8T-4956 Bolt
Install the two lower halves of the new 295-3044 Exhaust Support Gp (5) onto two brackets (2) using four new 8F-6437 Washers (14) and four new 8T-4956 Bolts (15). Refer to Illustration 7.
Illustration 8 g01788694
(1) 331-8928 Diesel Particulate Filter Gp
Place the new 331-8928 Diesel Particulate Filter Gp (1) onto the two lower halves of exhaust support group (5). The approximate weight of the diesel particulate filter group is 43.6 kg (96.1 lb). Refer to Illustration 8.
Install the two upper halves of exhaust support group (5) onto the lower halves of exhaust support group (5). Secure the two halves of the exhaust support group by using four bolts (5a) and four hard washers (5b). Refer to Illustration 8.
Illustration 9 g01788695
(9) 174-5414 Clamp (11) 255-2899 Tail Pipe As
Connect 255-2899 Tail Pipe As (11) to the outlet module tube of the diesel particulate filter group by using 174-5414 Clamp (9). Refer to Illustration 9.
Illustration 10 g01788698
(3) 331-9162 Filter Tube As (7) 241-6170 Plug (8) 8T-6765 Pipe Plug (10) 209-4589 Clamp
Install the new 331-9162 Filter Tube As (3) to the inlet module tube of the diesel particulate filter group. Secure the connection using one new 209-4589 Clamp (10). Refer to Illustration 10.
Install the new 8T-6765 Pipe Plug (8) and 241-6170 Plug (7) into the respective bosses provided on the filter tube assembly. Refer to Illustration 10.
Illustration 11 g01788714
(6) 270-0112 Bellows
Install the new 270-0112 Bellows (6) to filter tube assembly (3). Secure the connection by using one new Clamp (10). Refer to Illustration 11.
Illustration 12 g01788715
Install the new 331-9161 Filter Tube (4) to bellows (6). Secure the connection by using one new clamp (10). Refer to Illustration 12.
Illustration 13 g01788716
Install the other end of filter tube (4) to the air lines group. Secure the connection by using one new clamp (10). Refer to Illustration 13.Exhaust Monitor Installation
Refer to Special Instruction, REHS5606, "Installation and Operation of the Caterpillar Diesel Particulate Filter (DPF) and the Diagnostic Module for Non-Road Machine Applications (Non-California Applications)" for information regarding the installation and the operation of the exhaust monitor.The exhaust monitor is a device designed to monitor the Caterpillar DPF system continuously. The exhaust monitor provides critical information to the vehicle
Have questions with 101600-3031?
Group cross 101600-3031 ZEXEL
Komatsu
Komatsu
Komatsu
101600-3031
9 400 611 828
3863925
INJECTION-PUMP ASSEMBLY
S6D102E
S6D102E
101600-3031
9 400 611 828
6735711480
INJECTION-PUMP ASSEMBLY
S6D102E
S6D102E