Information injection-pump assembly
BOSCH
9 400 612 201
9400612201
ZEXEL
101502-9090
1015029090
KUBOTA
1655451011
1655451011

Rating:
Service parts 101502-9090 INJECTION-PUMP ASSEMBLY:
1.
_
6.
COUPLING PLATE
7.
COUPLING PLATE
8.
_
9.
_
11.
Nozzle and Holder
16554-53001
12.
Open Pre:MPa(Kqf/cm2)
16.7{170}/22.1{225}
15.
NOZZLE SET
Cross reference number
BOSCH
9 400 612 201
9400612201
ZEXEL
101502-9090
1015029090
KUBOTA
1655451011
1655451011
Zexel num
Bosch num
Firm num
Name
9 400 612 201
1655451011 KUBOTA
INJECTION-PUMP ASSEMBLY
F5802-T * K 14BY PE5A PE
F5802-T * K 14BY PE5A PE
Calibration Data:
Adjustment conditions
Test oil
1404 Test oil ISO4113 or {SAEJ967d}
1404 Test oil ISO4113 or {SAEJ967d}
Test oil temperature
degC
40
40
45
Nozzle and nozzle holder
105780-8140
Bosch type code
EF8511/9A
Nozzle
105780-0000
Bosch type code
DN12SD12T
Nozzle holder
105780-2080
Bosch type code
EF8511/9
Opening pressure
MPa
17.2
Opening pressure
kgf/cm2
175
Injection pipe
Outer diameter - inner diameter - length (mm) mm 6-2-600
Outer diameter - inner diameter - length (mm) mm 6-2-600
Overflow valve
131425-2420
Overflow valve opening pressure
kPa
162
147
177
Overflow valve opening pressure
kgf/cm2
1.65
1.5
1.8
Tester oil delivery pressure
kPa
157
157
157
Tester oil delivery pressure
kgf/cm2
1.6
1.6
1.6
Direction of rotation (viewed from drive side)
Left L
Left L
Injection timing adjustment
Direction of rotation (viewed from drive side)
Left L
Left L
Injection order
1-3-5-4-
2
Pre-stroke
mm
3.2
3.15
3.25
Beginning of injection position
Drive side NO.1
Drive side NO.1
Difference between angles 1
Cal 1-3 deg. 72 71.5 72.5
Cal 1-3 deg. 72 71.5 72.5
Difference between angles 2
Cal 1-5 deg. 144 143.5 144.5
Cal 1-5 deg. 144 143.5 144.5
Difference between angles 3
Cal 1-4 deg. 216 215.5 216.5
Cal 1-4 deg. 216 215.5 216.5
Difference between angles 4
Cyl.1-2 deg. 288 287.5 288.5
Cyl.1-2 deg. 288 287.5 288.5
Injection quantity adjustment
Adjusting point
A
Rack position
10.8
Pump speed
r/min
1200
1200
1200
Average injection quantity
mm3/st.
83.5
82
85
Max. variation between cylinders
%
0
-2.5
2.5
Basic
*
Fixing the lever
*
Injection quantity adjustment_02
Adjusting point
C
Rack position
8.7+-0.5
Pump speed
r/min
325
325
325
Average injection quantity
mm3/st.
25.5
23.5
27.5
Max. variation between cylinders
%
0
-15
15
Fixing the rack
*
Timer adjustment
Pump speed
r/min
800--
Advance angle
deg.
0
0
0
Remarks
Start
Start
Timer adjustment_02
Pump speed
r/min
750
Advance angle
deg.
0.5
Timer adjustment_03
Pump speed
r/min
1160
Advance angle
deg.
3.5
3
4
Remarks
Finish
Finish
Test data Ex:
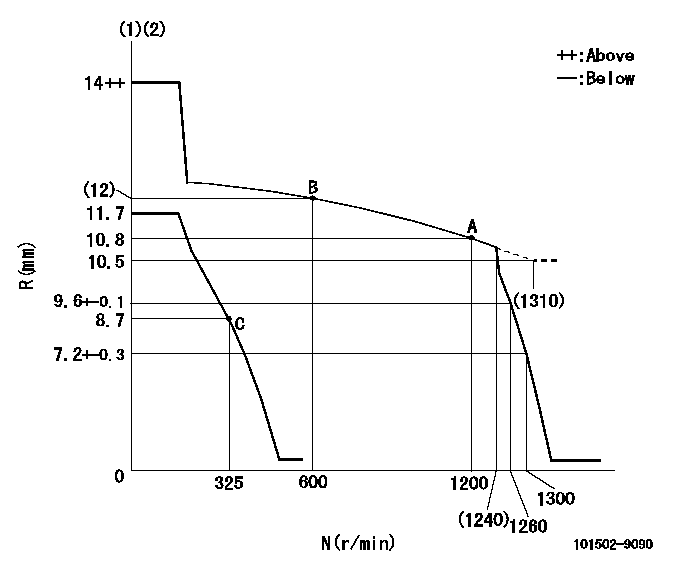
Governor adjustment

N:Pump speed
R:Rack position (mm)
(1)Target notch: K
(2)Tolerance for racks not indicated: +-0.05mm.
----------
K=14
----------
----------
K=14
----------
Speed control lever angle

F:Full speed
I:Idle
(1)Stopper bolt setting
----------
----------
a=36deg+-5deg b=19deg+-5deg
----------
----------
a=36deg+-5deg b=19deg+-5deg
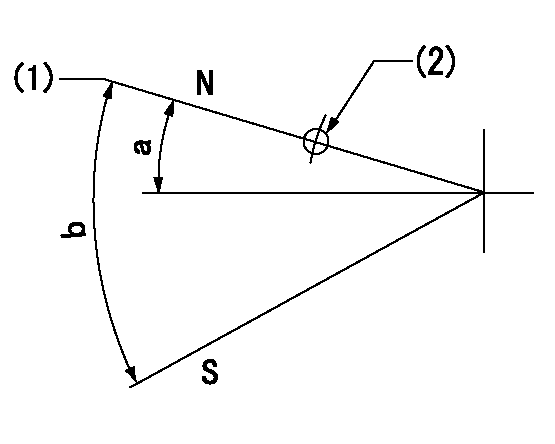
Stop lever angle

N:Pump normal
S:Stop the pump.
(1)Normal
(2)Use the hole at R = aa
----------
aa=60mm
----------
a=19deg+-5deg b=53deg+-5deg
----------
aa=60mm
----------
a=19deg+-5deg b=53deg+-5deg
Timing setting

(1)Pump vertical direction
(2)Position of camshaft's key groove at No 1 cylinder's beginning of injection
(3)-
(4)-
----------
----------
a=(120deg)
----------
----------
a=(120deg)
Information:
start by: a) remove oil pump1. Turn the crankshaft until the connecting rods are down for two pistons as shown. 2. Remove the nuts (1) and caps (4) from the connecting rods. 3. Remove the bearings (2) from the caps. Push up on connecting rods and remove the upper halves of bearings from the connecting rods.4. Clean the bearing contact surfaces in the caps and the rods. Install the upper halves of the bearings in connecting rods. Put clean oil on the bearings and pull the rod onto crankshaft. Put the lower halves of bearings in the caps.5. Put wire (A) across the lower halves of bearings and install the cap. Install and tighten both nuts on each cap to a torque of 30 3 lb.ft. (4.1 0.4 mkg). Put a mark across the nuts and bolts; and turn the nuts clockwise 90° from the marks as shown.6. Remove the caps, and take a measurement of the thickness of wire (A) to find bearing clearance. Clearance with new parts should be .003 to .006 in. (0.076 to 0.152 mm). Maximum permissible clearance is .010 in. (0.254 mm). 7. Put clean oil on the lower halves of bearings and on the threads of bolts (3). Install the caps on connecting rods. Install and tighten the nuts on each cap to 30 3 lb.ft. (4.1 0.4 mkg). Put a mark across the nuts and bolts; and turn the nuts clockwise 90° from the marks as shown.
Make sure the number mark on the side of connecting rod is the same number and on the same side as the number mark on the cap.
8. Do the above steps again for the remainder of the connecting rod bearings.end by: a) install oil pump
Make sure the number mark on the side of connecting rod is the same number and on the same side as the number mark on the cap.
8. Do the above steps again for the remainder of the connecting rod bearings.end by: a) install oil pump