Information injection-pump assembly
ZEXEL
101493-9230
1014939230

Rating:
Service parts 101493-9230 INJECTION-PUMP ASSEMBLY:
1.
_
6.
COUPLING PLATE
7.
COUPLING PLATE
8.
_
9.
_
11.
Nozzle and Holder
SL50 13 H50A
12.
Open Pre:MPa(Kqf/cm2)
16.7{170}
15.
NOZZLE SET
Include in #1:
101493-9230
as INJECTION-PUMP ASSEMBLY
Cross reference number
ZEXEL
101493-9230
1014939230
Zexel num
Bosch num
Firm num
Name
101493-9230
INJECTION-PUMP ASSEMBLY
Calibration Data:
Adjustment conditions
Test oil
1404 Test oil ISO4113 or {SAEJ967d}
1404 Test oil ISO4113 or {SAEJ967d}
Test oil temperature
degC
40
40
45
Nozzle and nozzle holder
105780-8140
Bosch type code
EF8511/9A
Nozzle
105780-0000
Bosch type code
DN12SD12T
Nozzle holder
105780-2080
Bosch type code
EF8511/9
Opening pressure
MPa
17.2
Opening pressure
kgf/cm2
175
Injection pipe
Outer diameter - inner diameter - length (mm) mm 6-2-600
Outer diameter - inner diameter - length (mm) mm 6-2-600
Overflow valve
131424-3420
Overflow valve opening pressure
kPa
255
221
289
Overflow valve opening pressure
kgf/cm2
2.6
2.25
2.95
Tester oil delivery pressure
kPa
157
157
157
Tester oil delivery pressure
kgf/cm2
1.6
1.6
1.6
Direction of rotation (viewed from drive side)
Right R
Right R
Injection timing adjustment
Direction of rotation (viewed from drive side)
Right R
Right R
Injection order
1-3-4-2
Pre-stroke
mm
3.2
3.15
3.25
Beginning of injection position
Drive side NO.1
Drive side NO.1
Difference between angles 1
Cal 1-3 deg. 90 89.5 90.5
Cal 1-3 deg. 90 89.5 90.5
Difference between angles 2
Cal 1-4 deg. 180 179.5 180.5
Cal 1-4 deg. 180 179.5 180.5
Difference between angles 3
Cyl.1-2 deg. 270 269.5 270.5
Cyl.1-2 deg. 270 269.5 270.5
Injection quantity adjustment
Adjusting point
-
Rack position
12.77+-0
.02
Pump speed
r/min
1000
1000
1000
Average injection quantity
mm3/st.
73.2
72.7
73.7
Max. variation between cylinders
%
0
-3.5
3.5
Basic
*
Fixing the rack
*
Standard for adjustment of the maximum variation between cylinders
*
Injection quantity adjustment_02
Adjusting point
-
Rack position
10.1+-0.
5
Pump speed
r/min
340
340
340
Average injection quantity
mm3/st.
10
8
12
Max. variation between cylinders
%
0
-10
10
Fixing the rack
*
Standard for adjustment of the maximum variation between cylinders
*
Remarks
Adjust only variation between cylinders; adjust governor according to governor specifications.
Adjust only variation between cylinders; adjust governor according to governor specifications.
Injection quantity adjustment_03
Adjusting point
A
Rack position
12.77+-0
.5
Pump speed
r/min
1000
1000
1000
Average injection quantity
mm3/st.
73.2
72.7
73.7
Basic
*
Fixing the lever
*
Boost pressure
kPa
21.3
21.3
Boost pressure
mmHg
160
160
Injection quantity adjustment_04
Adjusting point
B
Rack position
12.91+-0
.5
Pump speed
r/min
1600
1600
1600
Average injection quantity
mm3/st.
83.7
81.7
85.7
Fixing the lever
*
Boost pressure
kPa
21.3
21.3
Boost pressure
mmHg
160
160
Injection quantity adjustment_05
Adjusting point
C
Rack position
11.97+-0
.5
Pump speed
r/min
750
750
750
Average injection quantity
mm3/st.
49.3
47.3
51.3
Fixing the lever
*
Boost pressure
kPa
21.3
21.3
Boost pressure
mmHg
160
160
Injection quantity adjustment_06
Adjusting point
I
Rack position
-
Pump speed
r/min
100
100
100
Average injection quantity
mm3/st.
75
70
85
Fixing the lever
*
Boost pressure
kPa
0
0
0
Boost pressure
mmHg
0
0
0
Rack limit
*
Boost compensator adjustment
Pump speed
r/min
600
600
600
Rack position
10.49+-0
.05
Boost pressure
kPa
2
2
4.7
Boost pressure
mmHg
15
-5
35
Boost compensator adjustment_02
Pump speed
r/min
600
600
600
Rack position
11.69+-0
.02
Boost pressure
kPa
12
9.3
14.7
Boost pressure
mmHg
90
70
110
Timer adjustment
Pump speed
r/min
1500+-25
Advance angle
deg.
0
0
0
Remarks
Start
Start
Timer adjustment_02
Pump speed
r/min
1750
Advance angle
deg.
3
2.5
3.5
Remarks
Finish
Finish
Test data Ex:
Governor adjustment
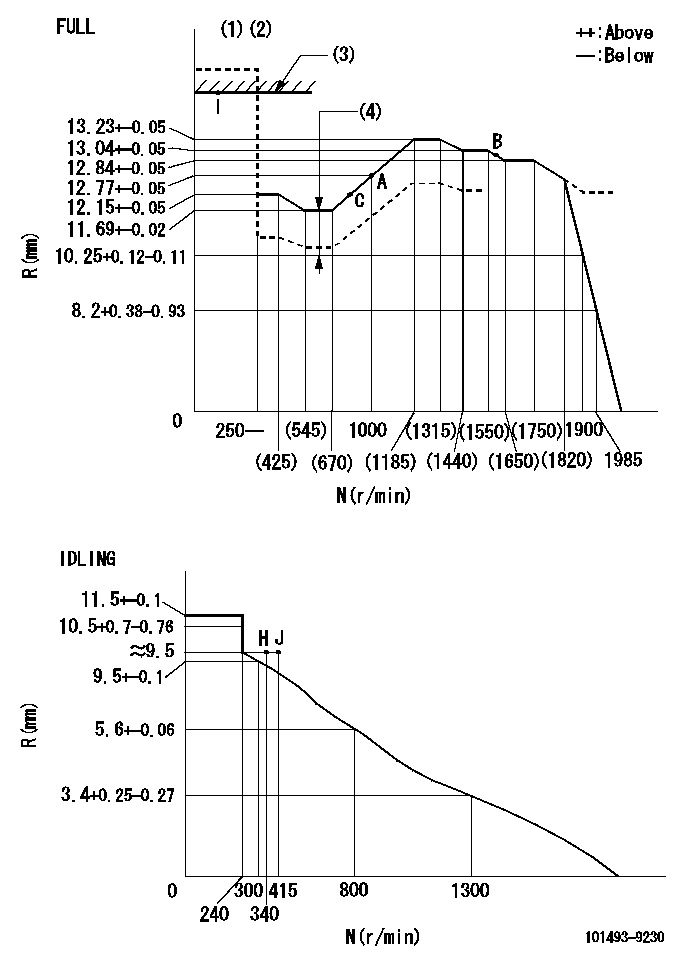
N:Pump speed
R:Rack position (mm)
(1)Torque cam stamping: T1
(2)Tolerance for racks not indicated: R1, speed N1
(3)RACK LIMIT
(4)Boost compensator stroke: BCL
----------
T1=M87 R1=+-0.02mm N1=+-3r/min BCL=1.2+-0.1mm
----------
----------
T1=M87 R1=+-0.02mm N1=+-3r/min BCL=1.2+-0.1mm
----------
Speed control lever angle

F:Full speed
I:Idle
(1)Use the hole at R = aa
(2)Stopper bolt setting
----------
aa=60mm
----------
a=20deg+-5deg b=43deg+-3deg
----------
aa=60mm
----------
a=20deg+-5deg b=43deg+-3deg
Stop lever angle
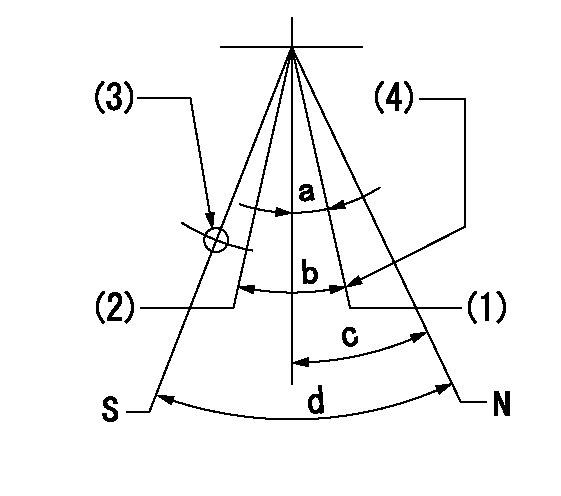
N:Pump normal
S:Stop the pump.
(1)Normal
(2)Stop
(3)Use the hole at R = aa
(4)Set the stop adjuster screw
----------
aa=39mm
----------
a=(15deg)+-5deg b=(13.5deg) c=23deg+-5deg d=40deg+-5deg
----------
aa=39mm
----------
a=(15deg)+-5deg b=(13.5deg) c=23deg+-5deg d=40deg+-5deg
0000001501 GOV RACK POSITION CONFIRM
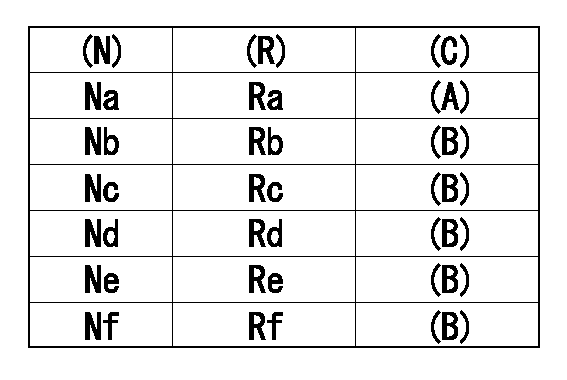
Confirm the governor adjustment rack position.
(N): Speed of the pump
(R) Rack position (mm)
Standard point A
(B) Confirmation
Remarks C
----------
----------
Na=1000r/min Nb=625r/min Nc=1700r/min Nd=1500r/min Ne=1250r/min Nf=400r/min Ra=12.77+-0.02mm Rb=11.69+-0.02mm Rc=12.84+-0.05mm Rd=13.04+-0.05mm Re=13.23+-0.05mm Rf=12.15+-0.05mm
----------
----------
Na=1000r/min Nb=625r/min Nc=1700r/min Nd=1500r/min Ne=1250r/min Nf=400r/min Ra=12.77+-0.02mm Rb=11.69+-0.02mm Rc=12.84+-0.05mm Rd=13.04+-0.05mm Re=13.23+-0.05mm Rf=12.15+-0.05mm
0000001601 LEVER
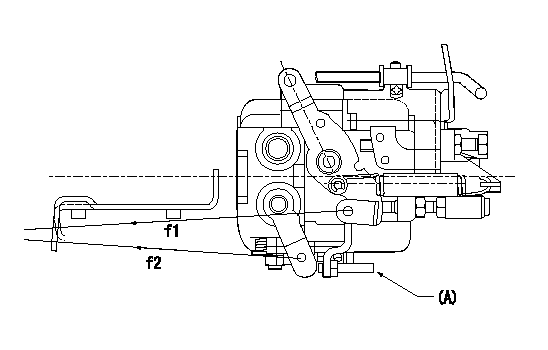
f1:Direction for pulling the speed lever
f2:Direction for pulling the stop lever
Stop lever's normal position setting method
1. (1) Push in the set bolt (A) until the rack starts to move.
(2)Return the bolt N1 turns from that position and set.
2. Rack with limiter
(1)Return the bolt N1 turns from the rack limit position and set.
----------
N1=1.5
----------
----------
N1=1.5
----------
Timing setting
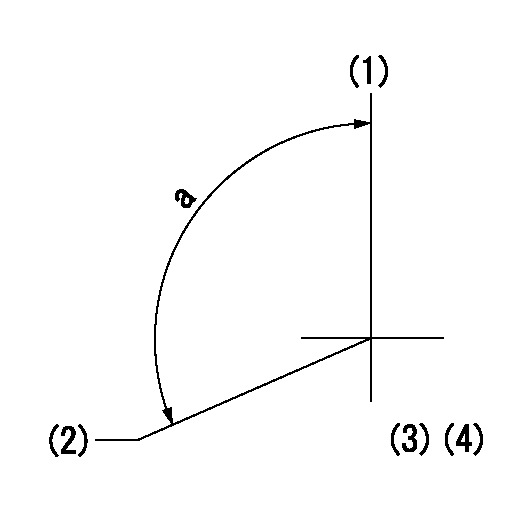
(1)Pump vertical direction
(2)Position of gear mark 'CC' at No 1 cylinder's beginning of injection
(3)-
(4)-
----------
----------
a=(130deg)
----------
----------
a=(130deg)
Information:
Problem 2
The engine does not crank.
Check the engine mounted start switch (EMSS).
Ensure that the emergency stop switch (ES) has been reset.
Place a switch across the terminals of the EMSS.
Close the switch momentarily, but do not start the engine.
Remove the switch when the test is completed. Result
The engine cranks.The EMSS is faulty or the circuit breaker (CB2) must be reset.
The engine does not crank.Go to Step 3.
Check the start/stop switch.
Ensure that the emergency stop switch (ES) has been reset.
Connect a switch with a 2 amp capacity between terminals (TS-21) and (TS-26) of the junction box.
Close the switch momentarily, but do not start the engine.
Disconnect the switch after the test is completed. Results
The engine cranks.The start/stop switch is faulty or the wiring to the switch is faulty. Replace the switch or repair the wiring. The circuit breaker (CB2) may need to be reset.
The engine does not crank.Go to Step 3.
Check the emergency stop switch (ES).
Ensure that the emergency stop switch (ES) has been reset.
Connect a switch with a 2 amp capacity between terminals (TS-26) and (TS-24) of the junction box.
Close the switch momentarily but do not start the engine.
Disconnect the switch after the test is completed. Result
The engine cranks.The emergency stop switch (ES) is faulty.
The engine does not crank.Reset the circuit breaker (CB5) and repeat Step 3. If the engine does not crank go to Step 4.
Check the components of the starting system.
Check the voltage at terminal (TS-24) of the junction box. Result
The voltage is low. Low voltage is between 1 volt and 20 volts.Charge the battery or repair the loose connections between the battery cable terminal and the battery. STOP.
The voltage is above 20 volts.The magnetic switch (MS), the pinion solenoid (PS), or the starting motor (SM) is faulty. The circuit breaker (CB2) may need to be reset. Reset the circuit breaker and repair the component that is faulty.
The voltage is zero (less than 1 volt).The circuit breaker (CB5) is being overloaded or the circuit breaker is faulty. Repair the short circuit or replace the circuit breaker. STOP.Problem 3
The engine starts and shutdown occurs immediately, or engine cranking terminates.
Check the protection switches.
Measure the voltage at terminal (SR2-30) while you crank the engine. Result
The voltage is above 10 volts while you crank the engine. The voltage then decreases to zero when the engine shuts down.The emergency stop switch (ES), the water temperature contactor switch (WTS), and the start/stop switch are opening. Check the start/stop switch first. The switch may be open across the common pair of contacts for the START/RUN switch when the switch is in the START position. The switch may also be open when the switch is released from the START position. Go to Step 7 of "Problem 1".
The voltage is above 10 volts at all times.The diode (D2) is faulty or there is a short across the diode circuit. The engine oil pressure switch (OPS1) may also have an intermittent short in the switch or in the connection. Refer
Have questions with 101493-9230?
Group cross 101493-9230 ZEXEL
Nissan
Nissan-Diesel
Nissan
Nissan-Diesel
Nissan
Nissan-Diesel
Nissan-Diesel
Nissan
Nissan-Diesel
101493-9230
INJECTION-PUMP ASSEMBLY