Information injection-pump assembly
BOSCH
9 400 610 517
9400610517
ZEXEL
101481-0250
1014810250
ISUZU
8971461230
8971461230

Rating:
Service parts 101481-0250 INJECTION-PUMP ASSEMBLY:
1.
_
6.
COUPLING PLATE
7.
COUPLING PLATE
8.
_
9.
_
11.
Nozzle and Holder
8-97042-322-1
12.
Open Pre:MPa(Kqf/cm2)
13.2{135}
15.
NOZZLE SET
Cross reference number
BOSCH
9 400 610 517
9400610517
ZEXEL
101481-0250
1014810250
ISUZU
8971461230
8971461230
Zexel num
Bosch num
Firm num
Name
101481-0250
9 400 610 517
8971461230 ISUZU
INJECTION-PUMP ASSEMBLY
4BD2 K 14BC INJECTION PUMP ASSY PE4A,5A, PE
4BD2 K 14BC INJECTION PUMP ASSY PE4A,5A, PE
Calibration Data:
Adjustment conditions
Test oil
1404 Test oil ISO4113 or {SAEJ967d}
1404 Test oil ISO4113 or {SAEJ967d}
Test oil temperature
degC
40
40
45
Nozzle and nozzle holder
105780-8140
Bosch type code
EF8511/9A
Nozzle
105780-0000
Bosch type code
DN12SD12T
Nozzle holder
105780-2080
Bosch type code
EF8511/9
Opening pressure
MPa
17.2
Opening pressure
kgf/cm2
175
Injection pipe
Outer diameter - inner diameter - length (mm) mm 6-2-600
Outer diameter - inner diameter - length (mm) mm 6-2-600
Overflow valve
131424-4920
Overflow valve opening pressure
kPa
127
107
147
Overflow valve opening pressure
kgf/cm2
1.3
1.1
1.5
Tester oil delivery pressure
kPa
157
157
157
Tester oil delivery pressure
kgf/cm2
1.6
1.6
1.6
Direction of rotation (viewed from drive side)
Right R
Right R
Injection timing adjustment
Direction of rotation (viewed from drive side)
Right R
Right R
Injection order
1-3-4-2
Pre-stroke
mm
2.8
2.75
2.85
Rack position
Point A R=A
Point A R=A
Beginning of injection position
Drive side NO.1
Drive side NO.1
Difference between angles 1
Cal 1-3 deg. 90 89.5 90.5
Cal 1-3 deg. 90 89.5 90.5
Difference between angles 2
Cal 1-4 deg. 180 179.5 180.5
Cal 1-4 deg. 180 179.5 180.5
Difference between angles 3
Cyl.1-2 deg. 270 269.5 270.5
Cyl.1-2 deg. 270 269.5 270.5
Injection quantity adjustment
Adjusting point
-
Rack position
11.9
Pump speed
r/min
950
950
950
Average injection quantity
mm3/st.
77
75.4
78.6
Max. variation between cylinders
%
0
-4
4
Basic
*
Fixing the rack
*
Standard for adjustment of the maximum variation between cylinders
*
Injection quantity adjustment_02
Adjusting point
H
Rack position
9.5+-0.5
Pump speed
r/min
400
400
400
Average injection quantity
mm3/st.
13
11.7
14.3
Max. variation between cylinders
%
0
-14
14
Fixing the rack
*
Standard for adjustment of the maximum variation between cylinders
*
Injection quantity adjustment_03
Adjusting point
A
Rack position
R1(11.9)
Pump speed
r/min
950
950
950
Average injection quantity
mm3/st.
77
76
78
Basic
*
Fixing the lever
*
Boost pressure
kPa
62.7
62.7
Boost pressure
mmHg
470
470
Injection quantity adjustment_04
Adjusting point
B
Rack position
R1-0.15
Pump speed
r/min
1375
1375
1375
Average injection quantity
mm3/st.
79
75
83
Fixing the lever
*
Boost pressure
kPa
62.7
62.7
Boost pressure
mmHg
470
470
Injection quantity adjustment_05
Adjusting point
C
Rack position
(R1-0.35
)
Pump speed
r/min
600
600
600
Average injection quantity
mm3/st.
63
59
67
Fixing the lever
*
Boost pressure
kPa
0
0
0
Boost pressure
mmHg
0
0
0
Injection quantity adjustment_06
Adjusting point
I
Rack position
-
Pump speed
r/min
150
150
150
Average injection quantity
mm3/st.
93
93
109
Fixing the lever
*
Boost pressure
kPa
0
0
0
Boost pressure
mmHg
0
0
0
Boost compensator adjustment
Pump speed
r/min
950
950
950
Rack position
R1-0.7
Boost pressure
kPa
8
6.7
9.3
Boost pressure
mmHg
60
50
70
Boost compensator adjustment_02
Pump speed
r/min
950
950
950
Rack position
R1(11.9)
Boost pressure
kPa
49.3
49.3
49.3
Boost pressure
mmHg
370
370
370
Timer adjustment
Pump speed
r/min
600--
Advance angle
deg.
0
0
0
Remarks
Start
Start
Timer adjustment_02
Pump speed
r/min
500
Advance angle
deg.
0.5
Timer adjustment_03
Pump speed
r/min
1500
Advance angle
deg.
2.5
2
3
Remarks
Finish
Finish
Test data Ex:
Governor adjustment
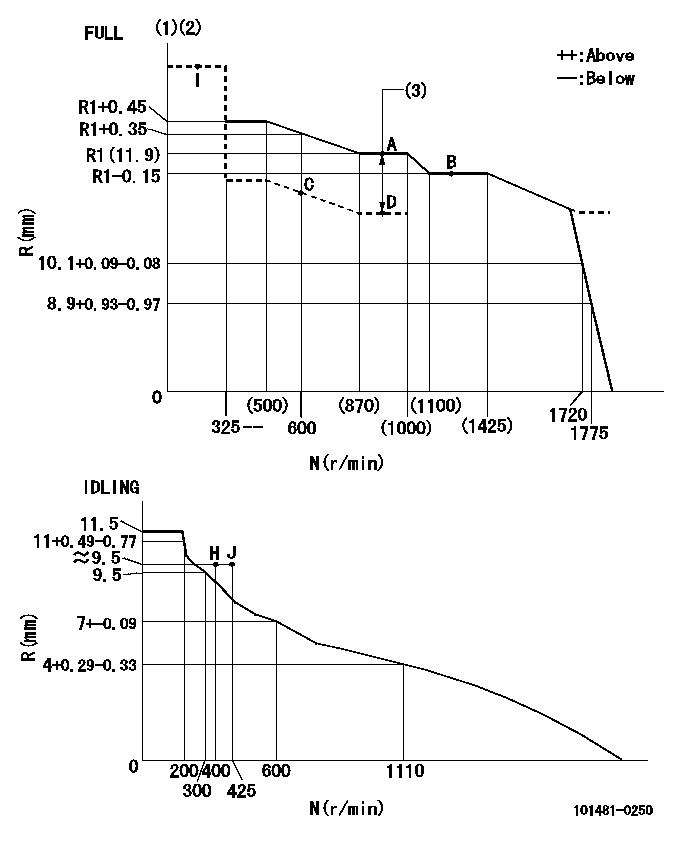
N:Pump speed
R:Rack position (mm)
(1)Torque cam stamping: T1
(2)Tolerance for racks not indicated: +-0.05mm.
(3)Boost compensator stroke: BCL
----------
T1=J45 BCL=0.7+-0.1mm
----------
----------
T1=J45 BCL=0.7+-0.1mm
----------
Speed control lever angle
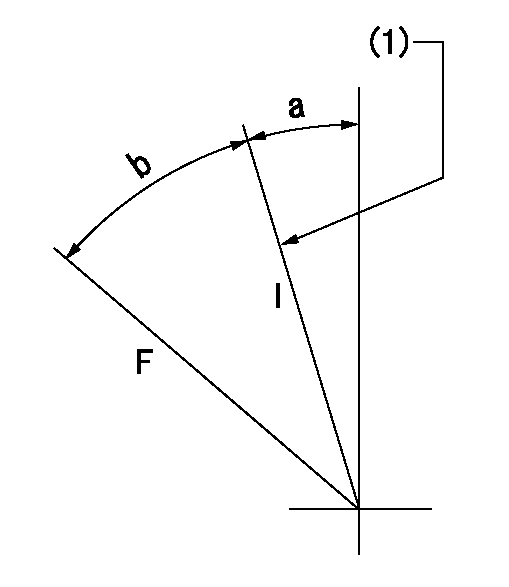
F:Full speed
I:Idle
(1)Stopper bolt set position 'H'
----------
----------
a=7.5deg+-5deg b=33deg+-3deg
----------
----------
a=7.5deg+-5deg b=33deg+-3deg
Stop lever angle
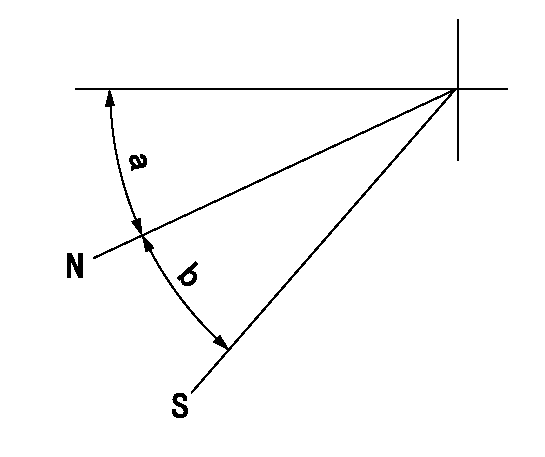
N:Pump normal
S:Stop the pump.
----------
----------
a=45deg+-5deg b=29deg+-5deg
----------
----------
a=45deg+-5deg b=29deg+-5deg
0000001501 ACS
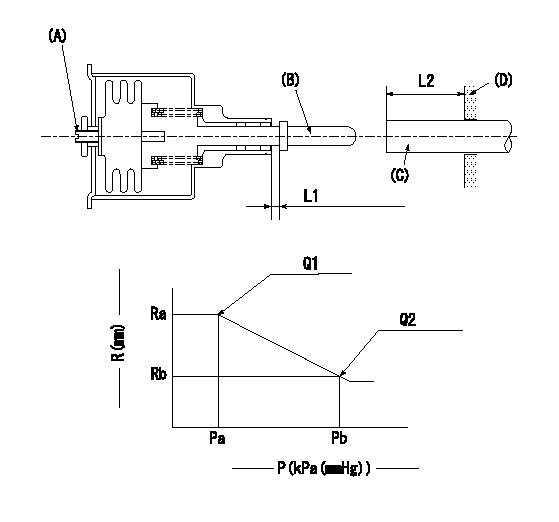
(A) Set screw
(B) Push rod 1
(C) Push rod 2
(D) Cover
1. Aneroid compensator unit adjustment
(1)Select the push rod 2 to obtain L2.
(2)Screw in (A) to obtain L1.
2. Adjustment when mounting the governor.
(1)Set the speed of the pump to N1 r/min and fix the control lever at the full set position.
(2)Screw in the aneroid compensator to obtain the performance shown in the graph above.
(3)As there is hysterisis, measure when the absolute pressure drops.
(4)Hysterisis must not exceed rack position = h1.
----------
N1=950r/min L1=(1.5)mm L2=24+-0.5mm h1=0.15mm
----------
Ra=R1(11.9)mm Rb=R1-0.25mm Pa=74.6+-2.7kPa(560+-20mmHg) Pb=61.6+-0.7kPa(462+-5mmHg) Q1=77+-1cm3/1000st Q2=(72)+-2cm3/1000st
----------
N1=950r/min L1=(1.5)mm L2=24+-0.5mm h1=0.15mm
----------
Ra=R1(11.9)mm Rb=R1-0.25mm Pa=74.6+-2.7kPa(560+-20mmHg) Pb=61.6+-0.7kPa(462+-5mmHg) Q1=77+-1cm3/1000st Q2=(72)+-2cm3/1000st
0000001601 ACS
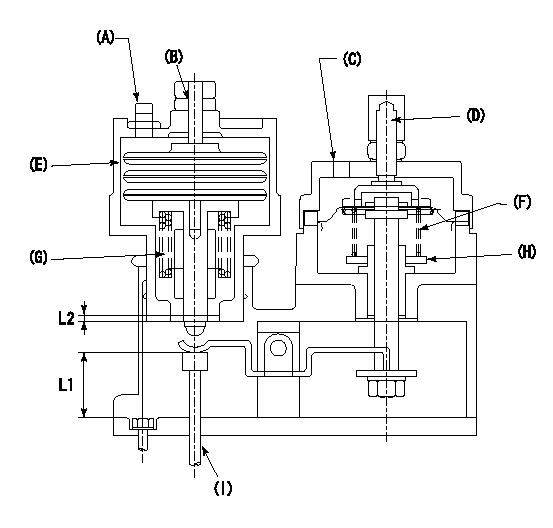
(A) Aneroid compensator
(B) Set screw
(C) Boost pressure inlet
(D) Rack positioning screw
(E): Aneroid compensator main body
(F) Boost compensator spring
(G): Aneroid compensator spring
(H): Adjusting notch
(I) Push rod
1. Instructions for adjusting the boost compensator with the aneroid compensator
(1)Select a pushrod to obtain L1 at full boost.
(2)Remove the aneroid compensator main body.
(3)Adjust the booster compensator stroke by turning the screw at (D.
(4)Adjust the beginning of boost compensator operation by turning the notch at (H).
(5)Install the aneroid compensator at full boost state.
(6)Turn (B)'s set screw so that the distance between the snapring and the body is L2.
(7)Screw in the aneroid compensator main body and adjust the point where it comes into play.
----------
L1=24+-0.5mm L2=1.5+-0.5mm
----------
----------
L1=24+-0.5mm L2=1.5+-0.5mm
----------
Timing setting

(1)Pump vertical direction
(2)Position of gear mark 'CC' at No 1 cylinder's beginning of injection
(3)B.T.D.C.: aa
(4)-
----------
aa=11deg
----------
a=(100deg)
----------
aa=11deg
----------
a=(100deg)
Information:
Illustration 3 g06519715
DOC brackets
Illustration 4 g06519717
DOC
Connect the welding ground cable directly to the DOC brackets or the DOC that will be welded. Place the ground cable as close as possible to the weld. This location will reduce the possibility of welding current damage bearings, hydraulic components, electrical components, and ground straps.Note: If electrical components are used as a ground for the welder, current flow from the welder could severely damage the component. Current flow from the welder could also severely damage electrical components that are located between the welder ground and the weld.
Illustration 5 g06519270
Weld blanket
Illustration 6 g06519272
Use a weld blanket draped over the engine to protect the engine from weld splatter. Likely need 2 or 3 blankets to cover between DOCs and the entire engine from splatter.
Illustration 7 g06519274
Illustration 8 g06519277
(1) 536-5400 Plate
Clean the top surface in the two locations where plates (1) will be welded in place with either a wire wheel or a flap disk.Note: Failure to clean the weld area could result in poor weld quality.
Illustration 9 g06519323
(D1) 6 2 mm (0.236 0.079 inch)
Illustration 10 g06519297
(D1) 6 2 mm (0.236 0.079 inch)
(D2) 43 3 mm (1.693 0.118 inch)
Illustration 11 g06519348
(D2) 43 3 mm (1.693 0.118 inch)
Set the plates on the top side of the housing and line up perpendicular to the front face. Position the plates to dimension (D1) from the front edge of the top plate.
Position the plates to dimension (D2) from the far edge of the rounded plate. There is a chamfer and fillet weld that will make measurements less precise. Use a tape measure to position.Note: Etching marks may also be present on the top of the unit and can be used for further positional guidance.
Illustration 12 g06519373
(W1) Tack weld
With the plates in place, add tack welds (W1) to the plates shown in Illustration 12. Use 308L weld wire.
Illustration 13 g06519408
(W2) 50 to 100 mm (1.969 to 3.937 inch)
Skip fillet weld (W2) down the side of each plate and then weld at the ends of each plates. Use 308L weld wire.
Illustration 14 g06519430
Finished product
Verify the weld quality and look for the following:
Cracks
Porosity
Inclusions
Convexity/Excess Weld Material
Concavity/Under Fill
Excess Penetration
Lack of Penetration
Fillet Weld - Undersize
Lack of Fusion
Undercut
Toe Radius
Overlap
Poor Restarts/Tie-ins
Cleaning/Grinding
Spatter/Arc Strike/Wire Stub
Illustration 15 g06519435
Mark the new plates with "THIS SIDE UP".Note: Make sure that the text is visible and stands out on the DOC.
Have questions with 101481-0250?
Group cross 101481-0250 ZEXEL
Isuzu
101481-0250
9 400 610 517
8971461230
INJECTION-PUMP ASSEMBLY
4BD2
4BD2