Information injection-pump assembly
ZEXEL
101402-7810
1014027810
ISUZU
8972541180
8972541180

Rating:
Cross reference number
ZEXEL
101402-7810
1014027810
ISUZU
8972541180
8972541180
Zexel num
Bosch num
Firm num
Name
Calibration Data:
Adjustment conditions
Test oil
1404 Test oil ISO4113 or {SAEJ967d}
1404 Test oil ISO4113 or {SAEJ967d}
Test oil temperature
degC
40
40
45
Nozzle and nozzle holder
105780-8140
Bosch type code
EF8511/9A
Nozzle
105780-0000
Bosch type code
DN12SD12T
Nozzle holder
105780-2080
Bosch type code
EF8511/9
Opening pressure
MPa
17.2
Opening pressure
kgf/cm2
175
Injection pipe
Outer diameter - inner diameter - length (mm) mm 6-2-600
Outer diameter - inner diameter - length (mm) mm 6-2-600
Overflow valve
134424-4120
Overflow valve opening pressure
kPa
255
221
289
Overflow valve opening pressure
kgf/cm2
2.6
2.25
2.95
Tester oil delivery pressure
kPa
255
255
255
Tester oil delivery pressure
kgf/cm2
2.6
2.6
2.6
Direction of rotation (viewed from drive side)
Right R
Right R
Injection timing adjustment
Direction of rotation (viewed from drive side)
Right R
Right R
Injection order
1-3-4-2
Pre-stroke
mm
4.2
4.15
4.25
Beginning of injection position
Drive side NO.1
Drive side NO.1
Difference between angles 1
Cal 1-3 deg. 90 89.5 90.5
Cal 1-3 deg. 90 89.5 90.5
Difference between angles 2
Cal 1-4 deg. 180 179.5 180.5
Cal 1-4 deg. 180 179.5 180.5
Difference between angles 3
Cyl.1-2 deg. 270 269.5 270.5
Cyl.1-2 deg. 270 269.5 270.5
Injection quantity adjustment
Adjusting point
A
Rack position
10
Pump speed
r/min
1100
1100
1100
Average injection quantity
mm3/st.
85.5
84.4
86.6
Max. variation between cylinders
%
0
-2
2
Basic
*
Fixing the lever
*
Boost pressure
kPa
93.3
93.3
Boost pressure
mmHg
700
700
Injection quantity adjustment_02
Adjusting point
-
Rack position
7.7+-0.5
Pump speed
r/min
475
475
475
Average injection quantity
mm3/st.
8.8
7.4
10.2
Max. variation between cylinders
%
0
-14
14
Fixing the rack
*
Boost pressure
kPa
0
0
0
Boost pressure
mmHg
0
0
0
Remarks
Adjust only variation between cylinders; adjust governor according to governor specifications.
Adjust only variation between cylinders; adjust governor according to governor specifications.
Injection quantity adjustment_03
Adjusting point
E
Rack position
10.2++
Pump speed
r/min
100
100
100
Average injection quantity
mm3/st.
120
115
125
Fixing the lever
*
Boost pressure
kPa
0
0
0
Boost pressure
mmHg
0
0
0
Rack limit
*
Boost compensator adjustment
Pump speed
r/min
650
650
650
Rack position
8.7
Boost pressure
kPa
40
36
44
Boost pressure
mmHg
300
270
330
Boost compensator adjustment_02
Pump speed
r/min
650
650
650
Rack position
9
Boost pressure
kPa
80
73.3
86.7
Boost pressure
mmHg
600
550
650
Test data Ex:
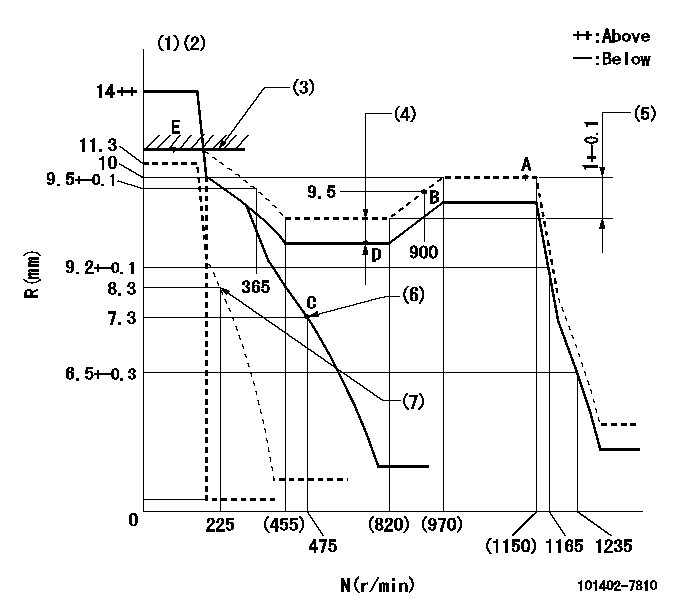
Governor adjustment

N:Pump speed
R:Rack position (mm)
(1)Target notch: K
(2)Tolerance for racks not indicated: +-0.05mm.
(3)RACK LIMIT
(4)Boost compensator stroke: BCL
(5)Rack difference between N = N1 and N = N2
(6)Main spring setting
(7)Set idle sub-spring
----------
K=9 BCL=0.3+-0.1mm N1=1100r/min N2=650r/min
----------
----------
K=9 BCL=0.3+-0.1mm N1=1100r/min N2=650r/min
----------
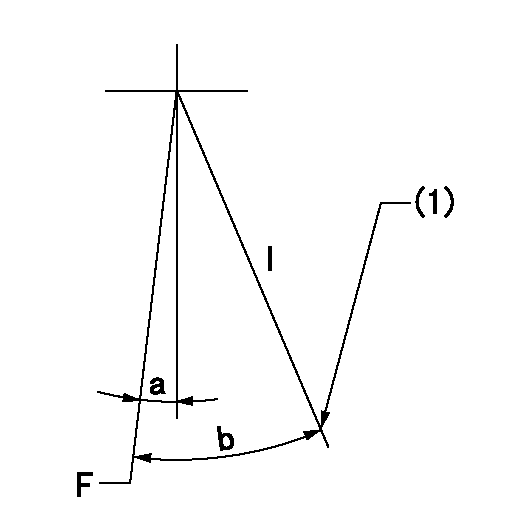
Speed control lever angle

F:Full speed
I:Idle
(1)Stopper bolt setting
----------
----------
a=5deg+-5deg b=20deg+-5deg
----------
----------
a=5deg+-5deg b=20deg+-5deg
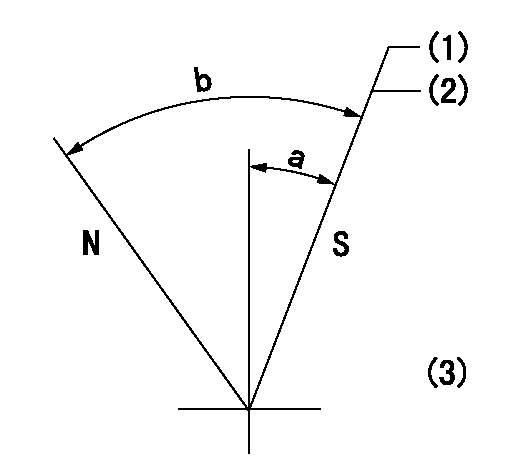
Stop lever angle

N:Pump normal
S:Stop the pump.
(1)Pump speed aa and rack position bb (to be sealed at delivery)
(2)Normal stop
(3)The stop lever does not have to return to the stop position (but set screw at rack position = cc).
----------
aa=0r/min bb=1-0.5mm cc=1-0.5mm
----------
a=10deg+-5deg b=(55deg)
----------
aa=0r/min bb=1-0.5mm cc=1-0.5mm
----------
a=10deg+-5deg b=(55deg)
0000001501 TAMPER PROOF

Tamperproofing-equipped boost compensator cover installation procedure
(A) After adjusting the boost compensator, tighten the bolts to remove the heads.
(1)Before adjusting the governor and the boost compensator, tighten the screw to the specified torque.
(Tightening torque T = T1 maximum)
(2)After adjusting the governor and the boost compensator, tighten to the specified torque to break off the bolt heads.
(Tightening torque T = T2)
----------
T1=2.5N-m(0.25kgf-m) T2=2.9~4.4N-m(0.3~0.45kgf-m)
----------
----------
T1=2.5N-m(0.25kgf-m) T2=2.9~4.4N-m(0.3~0.45kgf-m)
----------
Timing setting

(1)Pump vertical direction
(2)Position of gear mark 'CC' at No 1 cylinder's beginning of injection
(3)B.T.D.C.: aa
(4)-
----------
aa=7deg
----------
a=(100deg)
----------
aa=7deg
----------
a=(100deg)
Information:
Illustration 4 g01456650
Position 253-7967 Bracket (6) behind the turbocharger in the location that is shown in Illustration 4.
Illustration 5 g01879437
(6) 253-7967 Bracket (15) 8T-4121 Hard Washer (17) 8T-4195 Bolt
Install bracket (6) by using four 8T-4195 Bolts (17) and four 8T-4121 Hard Washers (15). Refer to Illustration 5.
Illustration 6 g01879493
(7) 253-7973 Bracket (15) 8T-4121 Hard Washer (16) 8T-4133 Nuts (18) 8T-4196 Bolt
Install 253-7973 Bracket (7) by using two 8T-4196 Bolts (18), four 8T-4121 Hard Washers (15), and two 8T-4133 Nuts (16). Refer to Illustration 6.Note: The left side of bracket (7) will be bolted to the engine block while the right side of the bracket will be free.
Illustration 7 g01879515
(3) 108-8625 Exhaust Coupling
Install one end of 108-8625 Exhaust Coupling (3) and 6N-0009 Metal Seal Ring (1) (not shown) into the end of the turbocharger. Refer to Illustration 7.
Illustration 8 g01879516
(2) 7E-3870 Muffler Clamp (3) 108-8625 Exhaust Coupling (8) 277-4717 Exhaust Elbow (15) 8T-4121 Hard Washer (17) 8T-4195 Bolt
Install 277-4717 Exhaust Elbow (8) by inserting the exhaust elbow into the other end of 108-8625 Exhaust Coupling (3). Tighten the exhaust elbow to the engine block by using four 8T-4195 Bolts (17) and four 8T-4121 Hard Washers (15). Tighten the four bolts to a torque of 7.5 N m (66 lb in). Refer to Illustration 8.
Apply 4C-5597 Anti-Seize Compound to the treads of 7E-3870 Muffler Clamp (2) and place the muffler clamp on exhaust coupling (3). Leave the muffler clamp positioned loosely. Refer to Illustration 8.
Illustration 9 g01879521
(5) 253-4495 Clamp As (6) 253-7967 Bracket (7) 253-7973 Bracket (15) 8T-4121 Hard Washer (16) 8T-4133 Nuts (18) 8T-4196 Bolt
Install one 253-4495 Clamp Assembly (5) to 253-7967 Bracket (6). Use two 8T-4196 Bolts (18), four 8T-4121 Hard Washers (15), and two 8T-4133 Nuts (16) to tighten clamp assembly (5) to bracket (6). Refer to Illustration 9.
Install the other 253-4495 Clamp Assembly (5) to 253-7973 Bracket (7). Use two 8T-4196 Bolts (18), four 8T-4121 Hard Washers (15), and two 8T-4133 Nuts (16) to tighten clamp assembly (5) to bracket (7). Refer to Illustration 9.
Illustration 10 g01879798
(4) 253-4346 Diesel Particulate Filter Gp (5) 253-4495 Clamp As (8) 277-4717 Exhaust Elbow
Install 253-4346 Diesel Particulate Filter Gp (4) by placing the diesel particulate filter group onto clamp assemblies (5) and inserting the inlet tube over the exposed end of exhaust elbow (8). The weight of the diesel particulate filter group is approximately 60 kg (132 lb). Refer to Illustration 10.
Illustration 11 g01879814
(5) 253-4495 Clamp As (9) 277-4718 Clamp As (10) 3B-4508 Lockwasher (12) 5P-8245 Hard Washer (13) 6V-8336 Bolt (14) 6V-8149 Nut
Position 277-4718 Clamp Assembly (9) over clamp assembly (5).